The Graph监听合约事件:从部署到查询
使用The Graph官方的Subgraph Studio在线平台来监控合约事件
1. 前言
The Graph 是一个去中心化的区块链数据索引协议,让你可以像查询数据库一样,用 GraphQL 查询区块链数据。
- 为什么需要?
区块链上的数据虽然公开,但查询效率低、结构复杂,想查某个合约的交互历史,要从成千上万个区块中找,太麻烦了。 而The Graph的作用就是提前监听区块链事件,把你关心的数据抓出来、处理好、存到数据库,然后开放查询接口。
- 使用场景
- Uniswap 查询用户交易记录
- Lens Protocol 查用户发布的帖子
- ENS 查某地址注册的域名
- NFT 市场查某个藏品的历史买卖记录
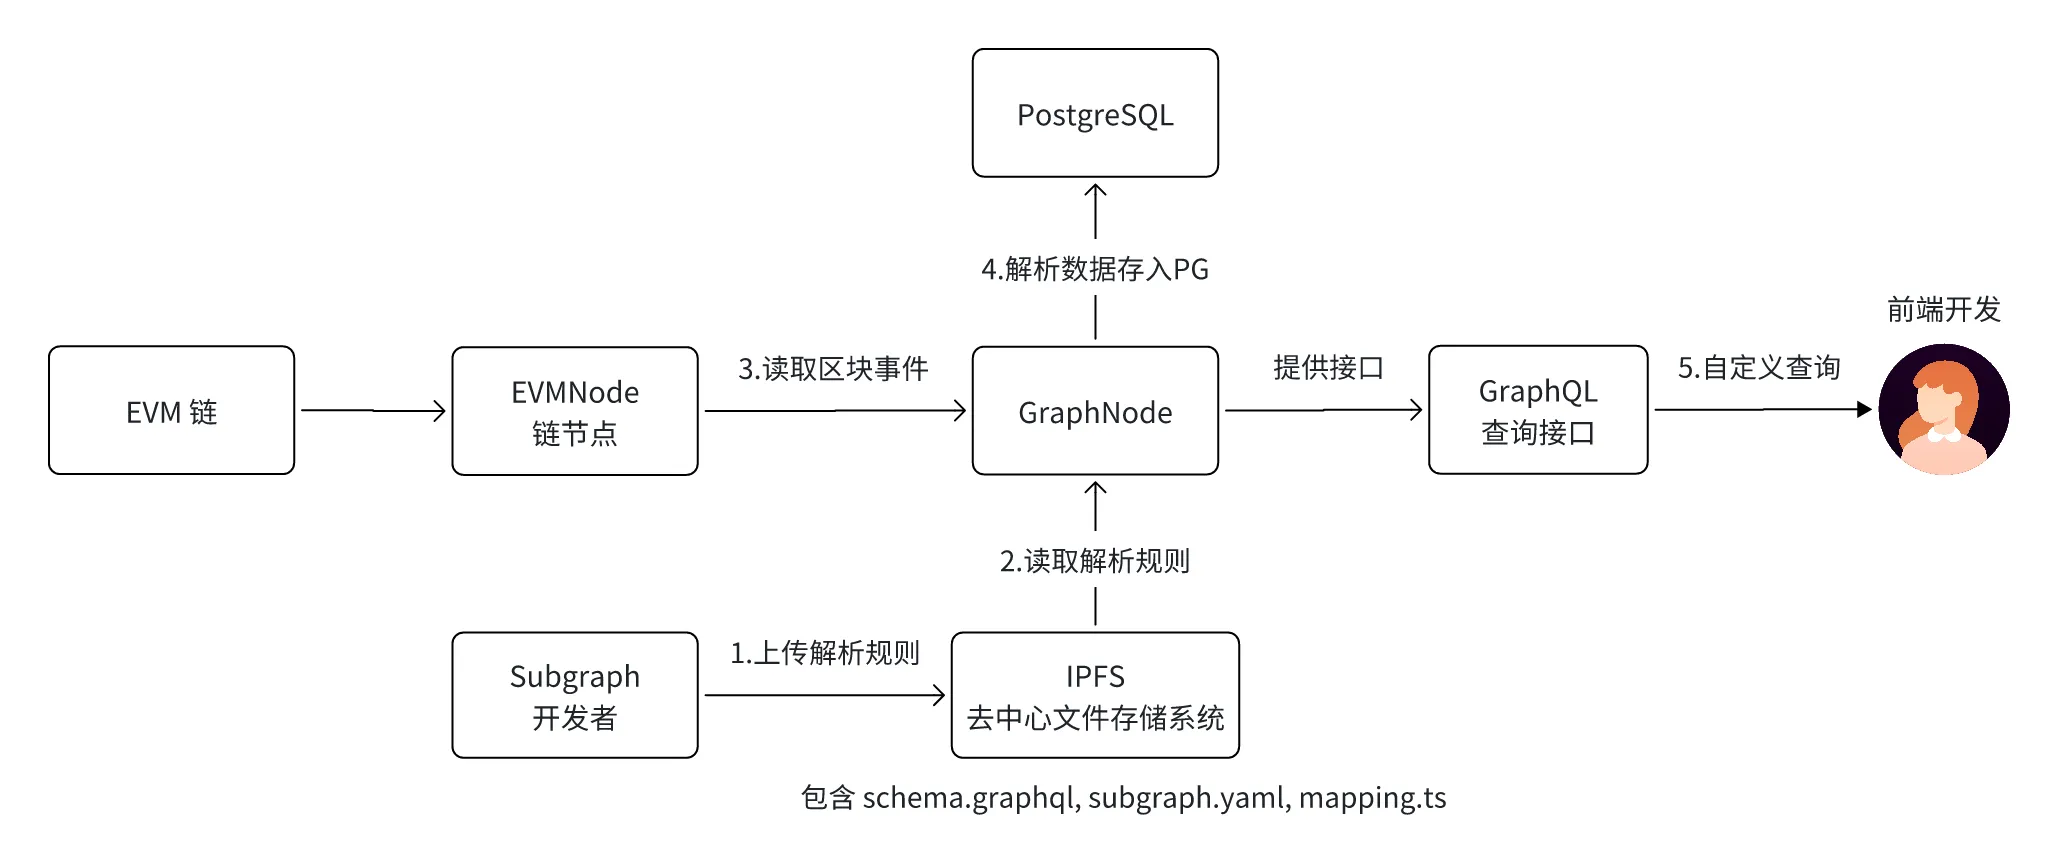
- 大概流程:
- 开发者设计Subgraph子图,即定义需要监听的合约和监听规则,比如监听哪些事件?怎么处理数据?存什么字段?怎么查询? 然后定义好的规则上传到IPFS;
- GraphNode 是一个区块链索引节点,它负责扫描区块,并读取IPFS中规则来解析区块数据,然后存储到 PostgreSQL数据库中;
- 用户通过GraphNode提供的GraphQL接口,来查询感兴趣的数据;
- 便于理解:
- 区块链数据 = 河水中的鱼
- SubGraph = 你设计捞网的形状,决定打捞大鱼还是小鱼;
- GraphNode = 打捞的工人,用捞网去小河中捞鱼,捞到的鱼放到箱子里;
- GraphQL查询 = 从箱子中找到你想要的鱼;
2. 在线部署
Subgraph Studio 是 The Graph 官方提供的图形化工具,用来创建、测试、部署和管理 Subgraph 的 Web 平台。
官方教程:https://thegraph.com/docs/zh/subgraphs/quick-start/
我们在此平台上来监听Counter合约的事件,监听事件包括:SetNumber和Increment,来监听number的变化;
准备条件
- 加密钱包:为了登录Web平台
- 已部署的合约地址:用于监控合约的事件,注意该合约存在事件;我已在Ethereum Sepolia网络上成功部署和验证的Counter合约;
- 安装Node.js:推荐安装v23.11.0。用于安装Graph 客户端或相关依赖包;安装工具支持npm,yarn和 pnpm
2.1 创建subgraph
- 使用metamask钱包登录网站:https://thegraph.com/studio/
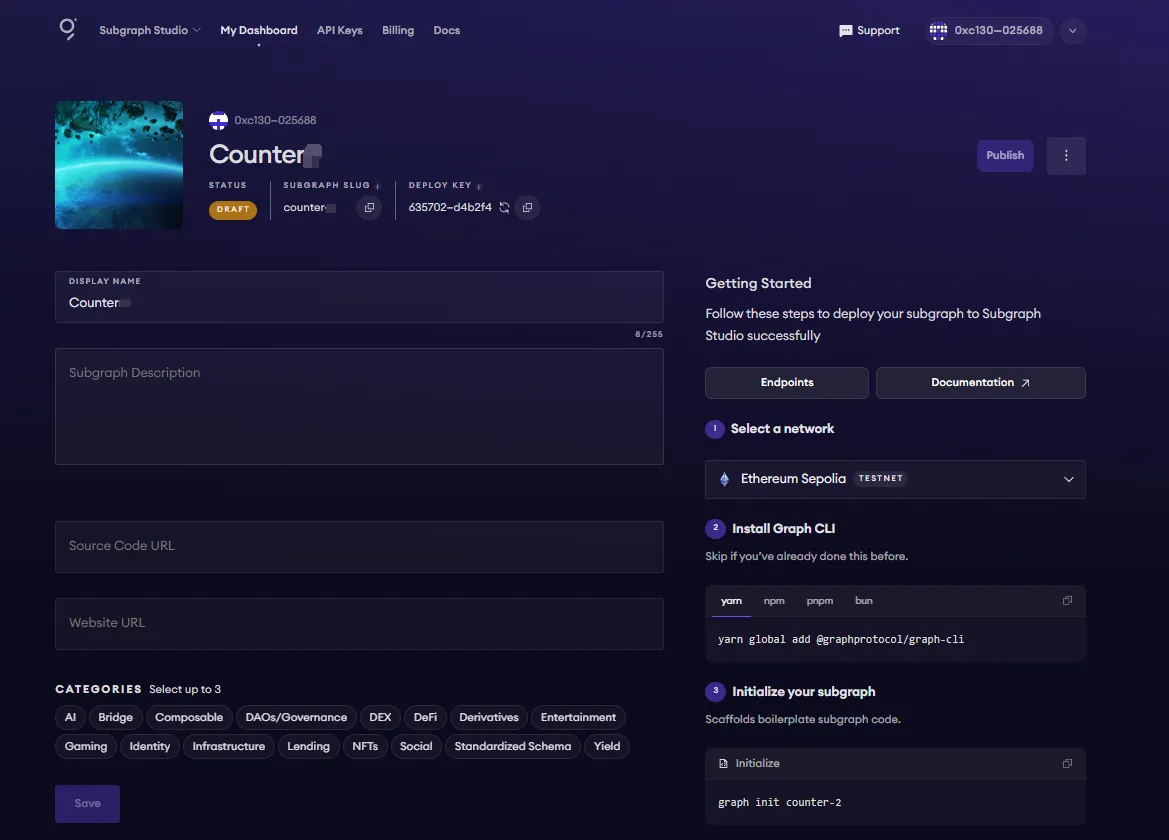
- 创建一个子图:Counter子图。创建成功后,在右栏提供了具体的创建步骤;
2.2 安装graph客户端
在本地电脑上安装graph客户端
# npm安装graph客户端
$ npm install -g @graphprotocol/graph-cli@latest
npm warn deprecated inflight@1.0.6: This module is not supported, and leaks memory. Do not use it. Check out lru-cache if you want a good and tested way to coalesce async requests by a key value, which is much more comprehensive and powerful.
npm warn deprecated rimraf@2.7.1: Rimraf versions prior to v4 are no longer supported
npm warn deprecated glob@7.2.3: Glob versions prior to v9 are no longer supported
added 422 packages in 22s
86 packages are looking for funding
  run `npm fund` for details

# 查看客户端版本
$ graph --version
@graphprotocol/graph-cli/0.97.0 win32-x64 node-v23.11.0
2.3 初始化subgraph
根据执行输入参数
- 选择sepolia网络,回车,回车,回车
- 输入合约地址:该合约需要验证通过,才能解析成功其中的ABI信息,否则要自行执行ABI的绝对路径。这是我验证通过的Counter合约地址
- 一路回车,使用默认参数;
$ graph init counter

√ Network · Ethereum Sepolia Testnet · sepolia · https://sepolia.etherscan.io  # 完整输入Ethereum Sepolia Testnet,选择sepolia网络
√ Source · Smart Contract · ethereum				# 回车
√ Subgraph slug · counter					# 回车
√ Directory to create the subgraph in · counter			# 回车
√ Contract address · 0xB78473a261797b9Fa4a18adff4Ad89B2b94B8856	# 输入验证通过的合约地址
√ Fetching ABI from Sourcify API...
√ Fetching ABI from Contract API...
√ Fetching start block from Contract API...
√ Fetching contract name from Contract API...
√ Start block · 8310332						# 回车,确认部署合约的区块号
? Contract name » counter					# 回车
√ Contract name · counter
√ Index contract events as entities (Y/n) · true		# 回车
  Generate subgraph
  Write subgraph to directory
√ Create subgraph scaffold
√ Initialize networks config
√ Initialize subgraph repository
√ Install dependencies with npm install
√ Generate ABI and schema types with npm run codegen
√ Add another contract? (y/N) · false				# 回车

Subgraph counter created in counter   # 通过counter项目创建counter子图的接下来的步骤提示
Next steps:
  1. Run `graph auth` to authenticate with your deploy key.
  2. Type `cd counter` to enter the subgraph.
  3. Run `npm run deploy` to deploy the subgraph.
Make sure to visit the documentation on https://thegraph.com/docs/ for further information.
2.4 授权
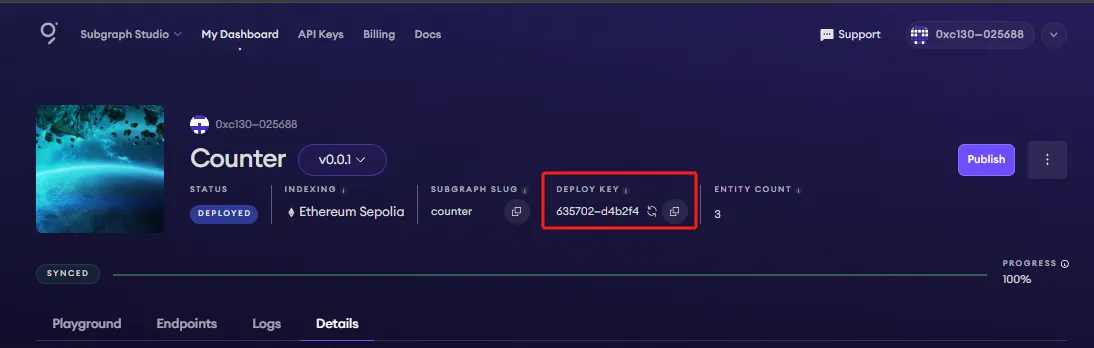
授权码在web端中查找 deploy key
$ graph auth 635702bb8e772ac010c612105bd4b2f4
Deploy key set for https://api.studio.thegraph.com/deploy/
2.5 生成和编译
三个核心文件:
- schema.graphql:定义解析数据的结构,即作为存储到PostgreSQL的实体结构,也是前端查询接口的传参——“鱼框的结构”
- subgraph.yaml:定义数据来源和处理规则;告诉GraphNode监听哪些合约,从哪个区块开始,匹配哪些事件,调用哪个处理函数等——“从哪条河的哪个河段开始打捞等说明”
- mapping.ts:定义事件的处理逻辑,将解析数据转换为实体存入PostgreSQL——“打捞到的鱼放进鱼框时,要不要再分类等处理”
# 进入初始化项目目录
$ cd counter/

# 生成和编译
$ graph codegen && graph build
  Skip migration: Bump mapping apiVersion from 0.0.1 to 0.0.2
  Skip migration: Bump mapping apiVersion from 0.0.2 to 0.0.3
  Skip migration: Bump mapping apiVersion from 0.0.3 to 0.0.4
  Skip migration: Bump mapping apiVersion from 0.0.4 to 0.0.5
  Skip migration: Bump mapping apiVersion from 0.0.5 to 0.0.6
  Skip migration: Bump manifest specVersion from 0.0.1 to 0.0.2
  Skip migration: Bump manifest specVersion from 0.0.2 to 0.0.4
√ Apply migrations
√ Load subgraph from subgraph.yaml						# 数据来源和处理规则
  Load contract ABI from abis\counter.json
√ Load contract ABIs
  Generate types for contract ABI: counter (abis\counter.json)
  Write types to generated\counter\counter.ts
√ Generate types for contract ABIs
√ Generate types for data source templates
√ Load data source template ABIs
√ Generate types for data source template ABIs
√ Load GraphQL schema from schema.graphql					# 解析数据的实体
  Write types to generated\schema.ts
√ Generate types for GraphQL schema

Types generated successfully							# 生成成功

  Skip migration: Bump mapping apiVersion from 0.0.1 to 0.0.2
  Skip migration: Bump mapping apiVersion from 0.0.2 to 0.0.3
  Skip migration: Bump mapping apiVersion from 0.0.3 to 0.0.4
  Skip migration: Bump mapping apiVersion from 0.0.4 to 0.0.5
  Skip migration: Bump mapping apiVersion from 0.0.5 to 0.0.6
  Skip migration: Bump manifest specVersion from 0.0.1 to 0.0.2
  Skip migration: Bump manifest specVersion from 0.0.2 to 0.0.4
√ Apply migrations
√ Load subgraph from subgraph.yaml
  Compile data source: counter => build\counter\counter.wasm
√ Compile subgraph
  Copy schema file build\schema.graphql
  Write subgraph file build\counter\counter.json
  Write subgraph manifest build\subgraph.yaml
√ Write compiled subgraph to build\

Build completed: build\subgraph.yaml						# 编译完成
2.5.1 schema.graphql文件
生成的schema.graphql文件内容
定义解析数据的结构,即作为存储到PostgreSQL的实体结构,也是前端查询接口的传参——“鱼框的结构”
type Increment @entity(immutable: true) {  	# @entity 表示这是需要被GraphNode存储到PostgreSQL的数据
  id: Bytes!					# 所有 Entity 都需要有一个 id 字段
  sender: Bytes! # address
  newValue: BigInt! # uint256
  blockNumber: BigInt!
  blockTimestamp: BigInt!
  transactionHash: Bytes!
}

type SetNumber @entity(immutable: true) {
  id: Bytes!
  sender: Bytes! # address
  newNumber: BigInt! # uint256
  blockNumber: BigInt!
  blockTimestamp: BigInt!
  transactionHash: Bytes!
}
2.5.2 subgraph.yaml文件
定义数据来源和处理规则;告诉GraphNode监听哪些合约,从哪个区块开始,匹配哪些事件,调用哪个处理函数等——“从哪条河的哪个河段开始打捞等说明”
specVersion: 1.3.0
indexerHints:
  prune: auto
schema:
  file: ./schema.graphql
dataSources:					# 要监听的链上合约及其事件
  - kind: ethereum
    name: counter
    network: sepolia
    source:
      address: "0xB78473a261797b9Fa4a18adff4Ad89B2b94B8856"
      abi: counter				# 对应事件的 ABI 文件,用于解析日志
      startBlock: 8310332			# 指定从哪个区块开始监听(提升效率)
    mapping:
      kind: ethereum/events
      apiVersion: 0.0.9
      language: wasm/assemblyscript
      entities:
        - Increment
        - SetNumber
      abis:
        - name: counter
          file: ./abis/counter.json
        eventHandlers:				# 指定事件和处理函数的映射关系
        - event: Increment(indexed address,uint256)
          handler: handleIncrement
        - event: SetNumber(indexed address,uint256)
          handler: handleSetNumber
      file: ./src/counter.ts	# 指定映射逻辑所在的 TypeScript 文件
2.5.3 mapping.ts
该案例的mapping.ts 对应为 counter/src/counter.ts;
定义事件的处理逻辑,将解析数据转换为实体存入PostgreSQL——“打捞到的鱼放进鱼框时,要不要再分类等处理”
import {
  Increment as IncrementEvent,
  SetNumber as SetNumberEvent
} from "../generated/counter/counter"
import { Increment, SetNumber } from "../generated/schema"

export function handleIncrement(event: IncrementEvent): void {
  let entity = new Increment(			// 监听到 IncrementEvent 后,创建一个entity实体。
    event.transaction.hash.concatI32(event.logIndex.toI32())
  )
  entity.sender = event.params.sender		// 利用事件参数填充字段
  entity.newValue = event.params.newValue

  entity.blockNumber = event.block.number
  entity.blockTimestamp = event.block.timestamp
  entity.transactionHash = event.transaction.hash

  entity.save()					// 然后 .save() 保存进数据库。
}

export function handleSetNumber(event: SetNumberEvent): void {
  let entity = new SetNumber(
    event.transaction.hash.concatI32(event.logIndex.toI32())
  )
  entity.sender = event.params.sender
  entity.newNumber = event.params.newNumber

  entity.blockNumber = event.block.number
  entity.blockTimestamp = event.block.timestamp
  entity.transactionHash = event.transaction.hash

  entity.save()
}
2.6 部署
将三个核心文件上传IPFS,并部署Graph node
$ graph deploy counter

# 正确结果
Which version label to use? (e.g. "v0.0.1") · v0.0.1		# 输入版本标签,用于标识本次部署的子图版本
  Skip migration: Bump mapping apiVersion from 0.0.1 to 0.0.2
  Skip migration: Bump mapping apiVersion from 0.0.2 to 0.0.3
  Skip migration: Bump mapping apiVersion from 0.0.3 to 0.0.4
  Skip migration: Bump mapping apiVersion from 0.0.4 to 0.0.5
  Skip migration: Bump mapping apiVersion from 0.0.5 to 0.0.6
  Skip migration: Bump manifest specVersion from 0.0.1 to 0.0.2
  Skip migration: Bump manifest specVersion from 0.0.2 to 0.0.4

  # 编译输出的关键文件(已准备部署)
  Write subgraph file build\counter\counter.json	# subgraph.yaml 编译后的 JSON 格式配置
  Write subgraph manifest build\subgraph.yaml		# 拷贝原始 manifest 文件用于 build 目录中的部署引用
√ Write compiled subgraph to build\			# 编译完成,所有核心文件写入 build 目录

  # 将核心文件上传到 IPFS(去中心化内容地址存储)
  Add file to IPFS build\schema.graphql			# GraphQL 实体结构定义(决定可查询字段)
                .. QmezFjzFxkKzgjYZzNgM67kEbwFWFqYSCjrGmXwLSsfas5# IPFS文件的唯一哈希值,保证唯一防篡改
  Add file to IPFS build\counter\counter.json		# 索引说明书(合约地址、处理事件、mapping 指向等)
                .. QmUp4K2wbtfL6BS6RkcPmqMrEgzDJFbiG8spBtVFY7cPCX
  Add file to IPFS build\counter\counter.wasm		# 编译后的 mapping.ts 文件(事件处理逻辑)
                .. QmU7rqqieWR3v8rcxwtEvDkWM12ymA4E5bK5eHtpf2zCUa
√ Upload subgraph to IPFS					# 上传成功!

Build completed: QmQ3iiVTZByx28jUuN1nXPAHr2JcwxgjfAVjDa9gYvZhyc	# 整个子图的 IPFS 根哈希(代表本次部署的唯一标识)

- Deploying to Graph node https://api.studio.thegraph.com/depl
\ Deploying to Graph node https://api.studio.thegraph.com/depl
| Deploying to Graph node https://api.studio.thegraph.com/depl
/ Deploying to Graph node https://api.studio.thegraph.com/depl
- Deploying to Graph node https://api.studio.thegraph.com/depl
\ Deploying to Graph node https://api.studio.thegraph.com/depl
| Deploying to Graph node https://api.studio.thegraph.com/depl
/ Deploying to Graph node https://api.studio.thegraph.com/depl
- Deploying to Graph node https://api.studio.thegraph.com/depl
\ Deploying to Graph node https://api.studio.thegraph.com/depl
| Deploying to Graph node https://api.studio.thegraph.com/depl
/ Deploying to Graph node https://api.studio.thegraph.com/depl
- Deploying to Graph node https://api.studio.thegraph.com/depl
\ Deploying to Graph node https://api.studio.thegraph.com/depl
| Deploying to Graph node https://api.studio.thegraph.com/depl
/ Deploying to Graph node https://api.studio.thegraph.com/depl
- Deploying to Graph node https://api.studio.thegraph.com/depl 	  # 部署到graph node节点
Deployed to https://thegraph.com/studio/subgraph/counter	  # 部署到studio中
2.7 验证
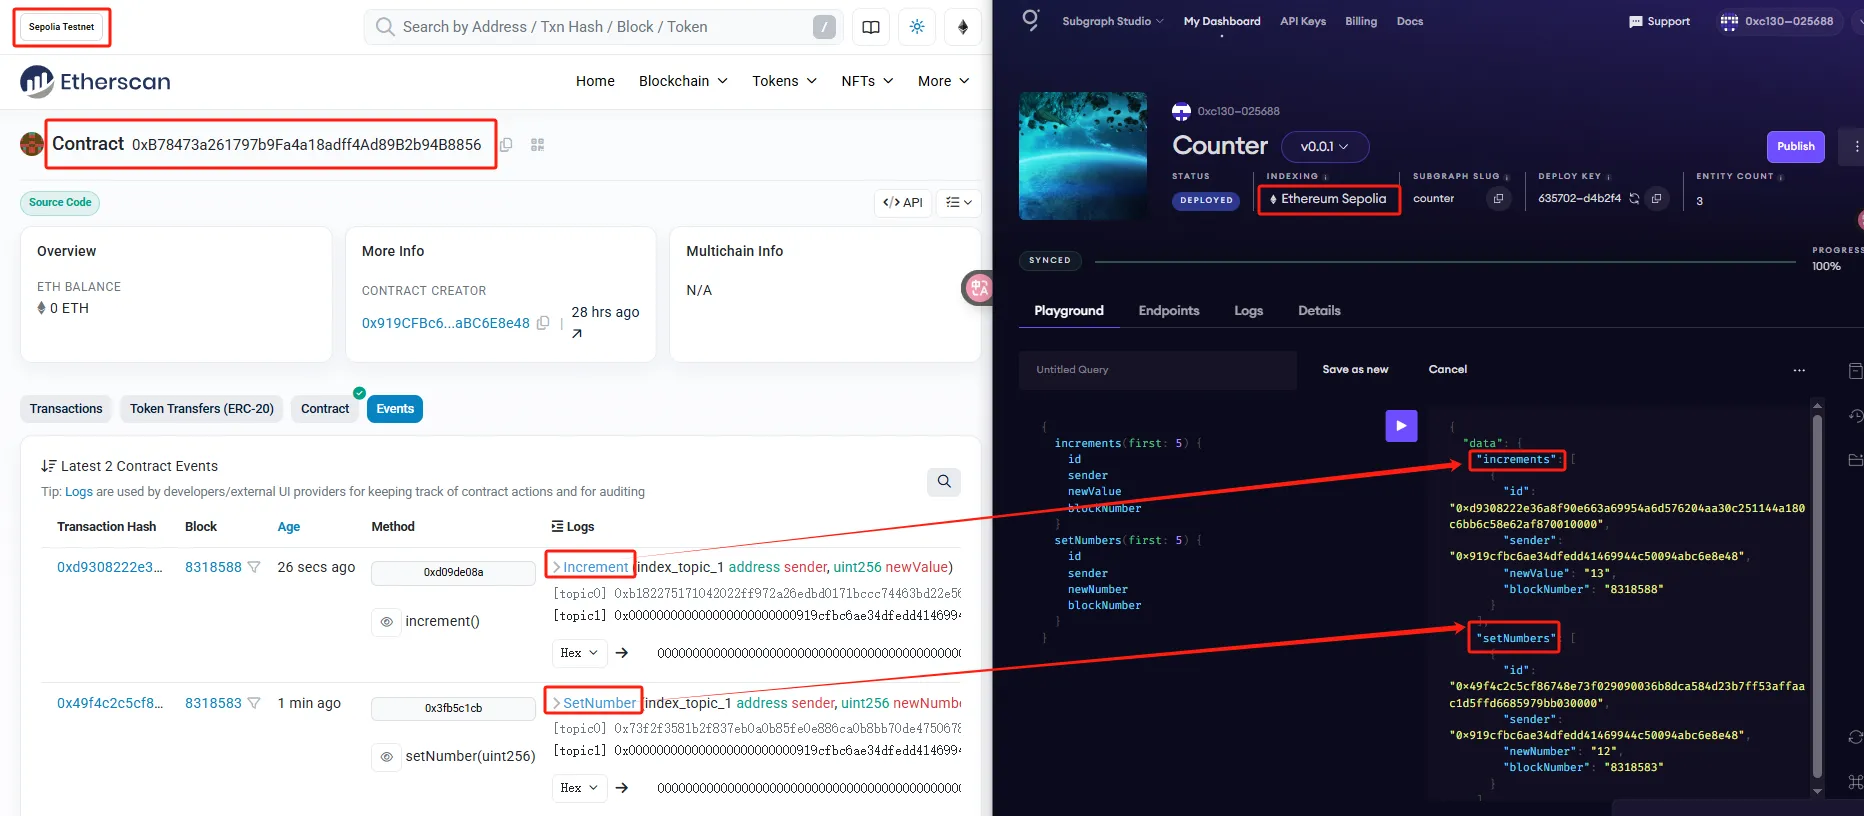
部署完成后,在回到web端就会发生变化
当我调用Counter合约的两个函数时,etherscan 和 subgraph studio上都能看到发生的事件;
合约事件:https://sepolia.etherscan.io/address/0xB78473a261797b9Fa4a18adff4Ad89B2b94B8856#events
Subgraph查询:https://thegraph.com/studio/subgraph/counter/playground
 GitHub 登录
 Web3 钱包登录

很不错