使用 React Native、Expo 和 MWA 构建 Solana Android 应用程序
本文介绍了如何使用 React Native、Expo、Solana Kit 和 Mobile Wallet Adapter (MWA) 构建一个轻量级的 Solana Android 应用程序,以便连接 Mock Wallet、请求空投和转移 SOL。文章详细介绍了环境搭建、代码结构以及关键服务的实现,为开发者提供了一个构建 Solana 移动应用的坚实基础。
概述
Solana 移动应用正在快速增长,这得益于 Seeker 手机和 Solana dApp 商店,它们让开发者可以直接接触到原生加密货币用户群体。 立即学习构建和连接 Solana 移动应用,你可以更快地发布应用,并在 Solana 移动生态系统扩展时尽早获取用户。
在本指南中,你将使用 React Native、Expo、Solana Kit 和移动钱包适配器 (MWA) 构建一个轻量级的 Solana Android 应用,以连接 Mock Wallet,请求空投并转移 SOL。
你将获得 Solana 移动开发方面的坚实基础,以后可以将其扩展为完整的、可用于生产环境的应用。
你将做什么
- 设置 Android Studio 和模拟器
- 使用 Expo 搭建 React Native 应用
- 在原生 Android 层添加移动钱包适配器 (MWA)
- 安装并运行 Mock Wallet 以进行授权和签名
- 构建钱包流程:连接 → 余额 → 空投 → 发送 SOL
- 在模拟器上进行端到端测试
你需要什么
本指南假设你熟悉 Solana 编程、React 和 TypeScript,并且对以下内容有大致了解:
- Solana 基础知识
- Solana 移动堆栈
- 如何为 Android 开发
- 使用 React Native 构建应用
- 使用 Expo CLI
| 依赖项 | 版本 |
|---|---|
| Android Studio | Narwhal 4 2025.1.4 |
| AVD (模拟器) | Android 16, API 36.1 |
| Node | 24.8.0 |
| Expo | 54.0.13 |
| @solana/kit | 3.0.3 |
| Java JDK | 17 |
安装 Android Studio
MWA 使用 Android 的原生 SDK,因此你将使用 Android Studio 进行构建,并在模拟器上运行。 如果你还没有安装,请安装 Android Studio 并启动它。
React Native/Expo 的 Android Gradle 插件需要 JDK 17:
- 在 Android Studio 中,打开 Settings/Preferences → Build, Execution, Deployment → Build Tools → Gradle
- 在 Gradle JDK 选项中,选择 JDK 17 安装。 如果未列出 JDK 17,请安装它,然后将 Android Studio 指向该路径。
- 设置你的 shell 以匹配 Studio:
JAVA_HOME→ JDK 17 安装(可选,但推荐) - 在设备管理器中创建 Android 虚拟机 (AVD)。
- 让 Android Studio 安装任何所需的 SDK/构建工具并完成同步。
将 PIN 添加到模拟器
要使用 Mock Wallet,请设置屏幕 PIN,以便设备安全并可以批准会话和签名。
- 启动模拟器: 从 Android Studio 启动你的 Android 16 (API 36) AVD(中型手机配置文件)。
- 设置屏幕锁(必需): 打开设置 → 安全和隐私 → 设备解锁 -> 屏幕锁 → 设置 PIN。
安装 Mock Wallet
Mock Wallet 允许你在 Android 上进行授权和签名,而无需生产钱包。
仅用于开发
Mock Wallet 不是一个安全的最终用户钱包,不应在生产环境中使用或与真实资金一起使用。
克隆存储库:
git clone https://github.com/solana-mobile/mock-mwa-wallet.git
在 Android Studio 中,打开 mock-mwa-wallet/build.gradle 文件,让 Gradle 同步,然后在模拟器上运行它。
在模拟器上打开 Mock MWA Wallet。 当钱包内提示时,点击 Authenticate 以启用开发会话的签名。
Solana Android 应用概述
我们将使用 Expo 构建一个集成了 MWA 的 React Native Android 应用,用于核心 Solana 流程:
- 连接/断开钱包
- 显示 SOL 余额
- 请求 devnet 空投
- 将 SOL 发送到接收者
MWA 允许 Android 应用连接到设备上任何符合 MWA 标准的钱包,从而无需单独集成每个钱包。 为了集成 MWA,我们将使用 React Native 的 bare workflow。 Expo CLI 将仅用于脚手架、构建/配置助手和资产处理。
我们将包含 @solana/web3.js 以满足 MWA 的预期类型,但使用 @solana/kit 来实现空投和发送逻辑。
应用结构
我们按职责(UI → hooks → services)拆分代码,以使其保持简单、可测试和可扩展,因此原生钱包/intent 保持隔离,从而使添加和重用功能更容易。
src/
├─ index.tsx
├─ components/
│  ├─ BalanceDisplay.tsx
│  ├─ ConnectScreen.tsx
│  ├─ DisconnectModal.tsx
│  ├─ ErrorModal.tsx
│  ├─ Header.tsx
│  └─ SendSolForm.tsx
├─ constants/
│  └─ index.ts
├─ hooks/
│  ├─ useAirdrop.ts
│  └─ useSolBalance.ts
├─ services/
│  ├─ airdropService.ts
│  ├─ solanaService.ts
│  ├─ transferService.ts
│  └─ walletService.ts
├─ styles/
│  └─ index.ts
└─ utils/
   └─ addressUtils.ts
首先,克隆示例应用存储库并打开 Solana 移动应用文件夹:
git clone https://github.com/quiknode-labs/qn-guide-examples.git
cd qn-guide-examples/solana/solana-mobile-app
让我们探索应用背后的核心服务文件以及它们涵盖的职责。
Solana 服务
solanaService.ts 处理基本的 Solana RPC 操作(余额获取)。 它通过调用 getBalance 来获取 lamports,并转换为 SOL 以进行显示。
src/services/solanaService.ts
import { address } from '@solana/kit';
import type { RpcClient } from './rpcClient';

export const fetchSolBalance = async (
  addressString: string,
  rpc: RpcClient
): Promise<number> => {
  try {
    console.log('Fetching balance for address:', addressString);

    // Convert string address to address type
    const solanaAddress = address(addressString);

    // Get balance using the proper @solana/kit API
    const { value: balanceLamports } = await rpc.getBalance(solanaAddress).send();

    console.log('Balance in lamports:', balanceLamports);

    return Number(balanceLamports);
  } catch (error) {
    // ...
  }
};
钱包服务
walletService.ts 通过使用 MWA 进行授权、保存返回的 auth_token 并返回钱包地址来处理与移动钱包的连接。
src/services/walletService.ts
import { transact, Web3MobileWallet } from '@solana-mobile/mobile-wallet-adapter-protocol-web3js';
import { APP_IDENTITY } from '../constants';
import AsyncStorage from '@react-native-async-storage/async-storage';

// Store auth token for reuse
const AUTH_TOKEN_KEY = 'solana_auth_token';

export const connectWallet = async (): Promise<string> => {
  return new Promise(async (resolve, reject) => {
    try {
      const authorizationResult = await transact(async (wallet: Web3MobileWallet) => {
        const authorizationResult = await wallet.authorize({
          identity: APP_IDENTITY,
        });
        return authorizationResult;
      });

      // Store the auth token for future use
      if (authorizationResult.auth_token) {
        await AsyncStorage.setItem(AUTH_TOKEN_KEY, authorizationResult.auth_token);
      }

      // Use display_address directly (fallback to address if display_address not available)
      const account = authorizationResult.accounts[0];
      const address = (account as any).display_address || account.address;
      resolve(address);
    } catch (error) {
      // ...
    }
  });
};

export const disconnectWallet = async (): Promise<void> => {
  try {
    // Clear stored auth token
    await AsyncStorage.removeItem(AUTH_TOKEN_KEY);
  } catch (error) {
    console.error('Error clearing auth token:', error);
  }
};

export const getStoredAuthToken = async (): Promise<string | null> => {
  try {
    return await AsyncStorage.getItem(AUTH_TOKEN_KEY);
  } catch (error) {
    console.error('Error getting stored auth token:', error);
    return null;
  }
};
空投服务
airdropService.ts 处理调用和确认 requestAirdrop 以获得一个以 lamports 为单位的 SOL。
src/services/airdropService.ts
import { address, lamports } from '@solana/kit';
import { LAMPORTS_PER_SOL } from '../constants';
import type { RpcClient } from './rpcClient';
import { sleep } from '../utils/sleep';

export const requestAirdrop = async (
  recipientAddress: string,
  rpc: RpcClient
): Promise<string> => {
  try {
    console.log('Requesting airdrop for address:', recipientAddress);

    // Convert address to @solana/kit address type
    const solanaAddress = address(recipientAddress);

    // Request airdrop using direct RPC call
    const signature = await rpc.requestAirdrop(solanaAddress, lamports(BigInt(LAMPORTS_PER_SOL))).send();

    console.log('Airdrop successful, signature:', signature);

    // Wait for the transaction to be confirmed before returning
    console.log('Waiting for transaction confirmation...');

    // Poll for confirmation
    let confirmed = false;
    let attempts = 0;
    const maxAttempts = 30; // 30 seconds max wait time

    while (!confirmed && attempts < maxAttempts) {
      await sleep(1000);
      const { value: statuses } = await rpc.getSignatureStatuses([signature]).send();

      if (statuses?.[0]?.confirmationStatus) {
        confirmed = true;
        console.log('Transaction confirmed!');
      } else {
        attempts++;
        console.log(`Waiting for confirmation... attempt ${attempts}/${maxAttempts}`);
      }
    }

    if (!confirmed) {
      console.warn('Transaction confirmation timeout, but airdrop may still succeed');
    }

    return signature;
  } catch (error) {
    // ...
  }
};
转移服务
transferService.ts 处理将 SOL 从一个地址发送到另一个地址。 它通过启动 MWA 流程、使用 @solana/web3.js 构建转移交易并使用 Kit 的 sendTransaction 发送它来实现。
src/services/transferService.ts
import { transact, Web3MobileWallet } from '@solana-mobile/mobile-wallet-adapter-protocol-web3js';
import { PublicKey, Transaction, SystemProgram, LAMPORTS_PER_SOL } from '@solana/web3.js';
import { fromByteArray } from 'base64-js';
import { APP_IDENTITY } from '../constants';
import { getStoredAuthToken } from './walletService';
import type { RpcClient } from './rpcClient';
import { sleep } from '../utils/sleep';

export const transferSol = async (
  fromAddress: string,
  toAddress: string,
  amountSol: number,
  rpc: RpcClient
): Promise<string> => {
  try {

    // Convert SOL amount to lamports
    const amountLamports = Math.floor(amountSol * LAMPORTS_PER_SOL);

    // Use mobile wallet adapter to sign and send the transaction
    const signature = await transact(async (wallet: Web3MobileWallet) => {
      // Add a small delay to ensure the UI is ready
      await sleep(100);

      // Try to reuse existing session with stored auth token
      const storedAuthToken = await getStoredAuthToken();

      if (storedAuthToken) {
        try {
          // Try silent reauthorization with stored token
          await wallet.reauthorize({
            auth_token: storedAuthToken,
            identity: APP_IDENTITY,
          });
        } catch (reauthError) {
          console.log('Silent reauth failed, falling back to full authorization');
          // If silent reauth fails, fall back to full authorization
          await wallet.authorize({
            identity: APP_IDENTITY,
          });
        }
      } else {
        // No stored token, do full authorization
        await wallet.authorize({
          identity: APP_IDENTITY,
        });
      }

      // Convert addresses to web3.js PublicKey for transaction building
      const fromPubkey = new PublicKey(fromAddress);
      const toPubkey = new PublicKey(toAddress);

      // Create the transfer transaction using web3.js (required for mobile wallet adapter compatibility)
      const transaction = new Transaction().add(
        SystemProgram.transfer({
          fromPubkey,
          toPubkey,
          lamports: amountLamports,
        })
      );

      // Get recent blockhash using @solana/kit
      const { value: blockhashResult } = await rpc.getLatestBlockhash().send();
      transaction.recentBlockhash = blockhashResult.blockhash;
      transaction.feePayer = fromPubkey;

      // Sign the transaction using mobile wallet adapter
      const signedTransactions = await wallet.signTransactions({
        transactions: [transaction],
      });

      // Serialize the signed transaction to base64
      const serializedTransaction = signedTransactions[0].serialize();
      // Convert to Uint8Array (handles both Buffer and Uint8Array)
      const txBytes = new Uint8Array(serializedTransaction);
      const base64Transaction = fromByteArray(txBytes) as any;

      // Send the signed transaction using @solana/kit
      const txSignature = await rpc.sendTransaction(base64Transaction, { encoding: 'base64' }).send();

      console.log('Transaction sent, signature:', txSignature);

      return txSignature;
    });

    // Wait for the transaction to be confirmed before returning
    console.log('Waiting for transaction confirmation...');

    // Poll for confirmation (same pattern as airdrop)
    // Note: signature from sendTransaction should already be compatible
    let confirmed = false;
    let attempts = 0;
    const maxAttempts = 30; // 30 seconds max wait time

    while (!confirmed && attempts < maxAttempts) {
      await sleep(1000);
      const { value: statuses } = await rpc.getSignatureStatuses([signature as any]).send();

      if (statuses?.[0]?.confirmationStatus) {
        confirmed = true;
        console.log('Transaction confirmed!');
      } else {
        attempts++;
        console.log(`Waiting for confirmation... attempt ${attempts}/${maxAttempts}`);
      }
    }

    if (!confirmed) {
      console.warn('Transaction confirmation timeout, but transfer may still succeed');
    }

    return String(signature);

  } catch (error) {
    // ...
  }
};
运行应用
确保 Android Studio 已打开并且你的模拟器正在运行(首次构建可能需要几分钟才能完成)。
npm run android
你应该会看到带有“Connect Wallet”按钮的主屏幕。

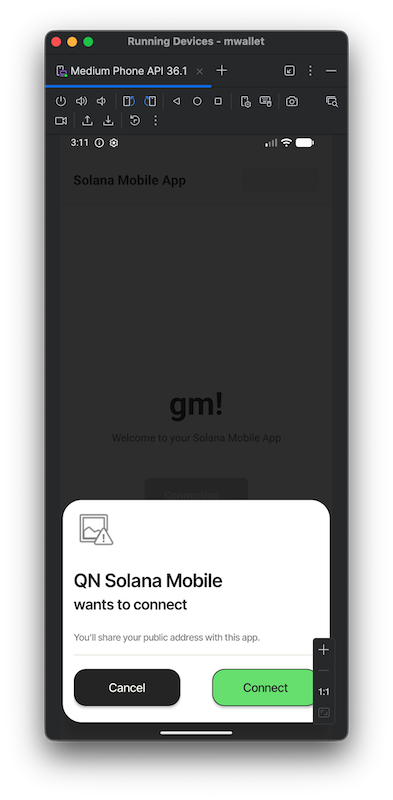
连接钱包
首先,我们需要连接到 Mock Wallet 并输入你的 PIN 以进行授权。
连接后,主屏幕会显示 Airdrop 和 Send SOL。
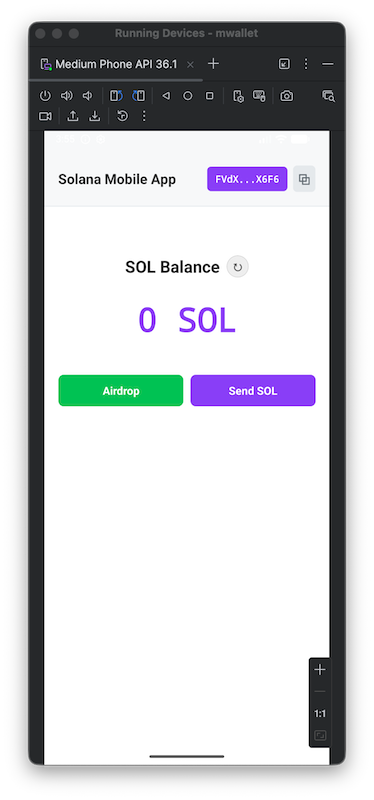
请求空投
点击 Airdrop 以资助你的钱包,以便测试余额读取和转移。
Devnet 水龙头受到速率限制。 如果受到限制,请使用备用水龙头。 查看Solana 上空投 SOL 测试币完整指南,了解获取 devnet SOL 的其他方法。
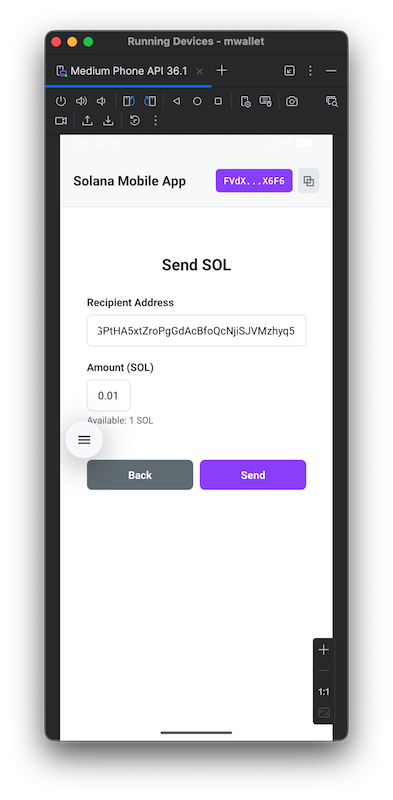
发送 SOL
点击 Send SOL,输入接收者和金额,点击 Send,然后在 Mock Wallet 中批准转账。
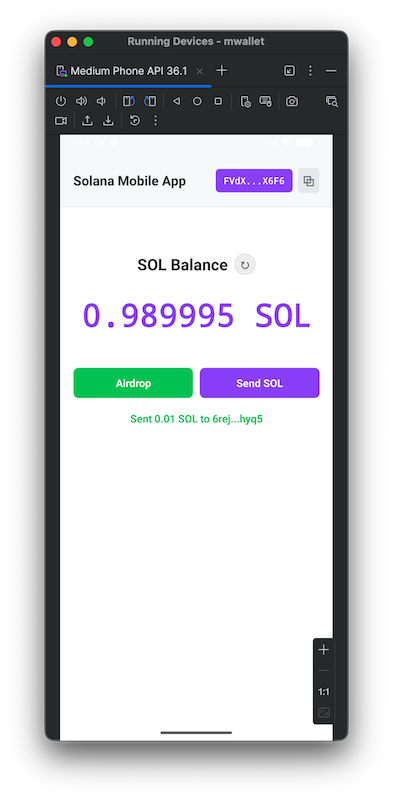
使用 Mock Wallet 批准转账。 成功后,你将看到确认消息和主屏幕上更新的余额。
总结
恭喜! 你现在拥有构建 Solana 移动应用程序的核心基础。 你设置了你的 Android 和 React Native 环境,集成了 MWA,并构建了一个可工作的入门应用程序,你可以继续扩展它。
现在你了解了基础知识,你可以扩展此应用以添加更多移动原生功能,并发布到 Solana dApp 商店。
资源
- Solana 移动应用示例 GitHub
- Android Studio 下载页面
- React Native 文档
- Expo 文档
- Mock MWA Wallet Github
- Solana 移动开发者中心
我们 ❤️ 反馈!
如果你对新主题有任何反馈或要求,请告诉我们。 我们很乐意倾听你的意见。
- 原文链接: quicknode.com/guides/sol...
- 登链社区 AI 助手,为大家转译优秀英文文章,如有翻译不通的地方,还请包涵~
 GitHub 登录
 Web3 钱包登录
