Rust 实战:构建高性能 TTS 语音合成服务
前言在人工智能应用蓬勃发展的今天,文本转语音(Text-to-Speech,TTS)技术已经渗透到我们生活的方方面面。从智能助手、有声读物到无障碍服务,TTS正在重塑人机交互的方式。作为一门以高性能和安全性著称的编程语言,Rust在构建TTS服务方面展现出独特的优势。本文将深入探
前言
在人工智能应用蓬勃发展的今天,文本转语音(Text-to-Speech,TTS)技术已经渗透到我们生活的方方面面。
从智能助手、有声读物到无障碍服务,TTS 正在重塑人机交互的方式。
作为一门以高性能和安全性著称的编程语言,Rust 在构建 TTS 服务方面展现出独特的优势。
本文将深入探讨如何使用 Rust 构建一个高效、稳定的 TTS 语音合成服务。
TTS 技术概述与 Rust 的优势
1.1 为什么选择 Rust 构建 TTS 服务
TTS 服务通常需要处理高并发的实时请求,同时还要保证语音合成的低延迟。
在传统的技术栈中,开发者往往需要在 Python 的易用性和 Go/C++ 的性能之间做出权衡。
Rust 的出现改变了这一局面:
- 零成本抽象:Rust 的高级特性在编译时会被优化为底层机器码,不会引入额外的运行时开销。
- 内存安全:所有权系统和借用检查器在编译阶段就能消除大多数内存安全问题,避免了 C++ 中常见的悬垂指针和内存泄漏问题。
- 并发性能:Rust 的 async/await 语法配合 tokio 运行时,能够轻松处理数万个并发连接,且不会产生线程安全问题。
- 优秀的生态:crates.io 上有大量成熟的 Web 框架、JSON 处理库和 HTTP 客户端,可以快速构建生产级别的服务。
1.2 业界主流开源 TTS 方案
在开源社区中,有几个 TTS 项目值得关注:
- Coqui TTS:一个功能全面的 TTS 工具包,支持多种模型架构,包括 Tacotron、FastSpeech 等。
- VITS:端到端的端到端 TTS 模型,能够生成高质量的自然语音。
- Bark:由 Suno AI 开发的生成式语音模型,支持多语言和情感控制。
- OpenAI TTS:虽然闭源,但其 API 设计思路值得借鉴,OpenAI 兼容的接口已成为行业事实标准。
技术架构设计
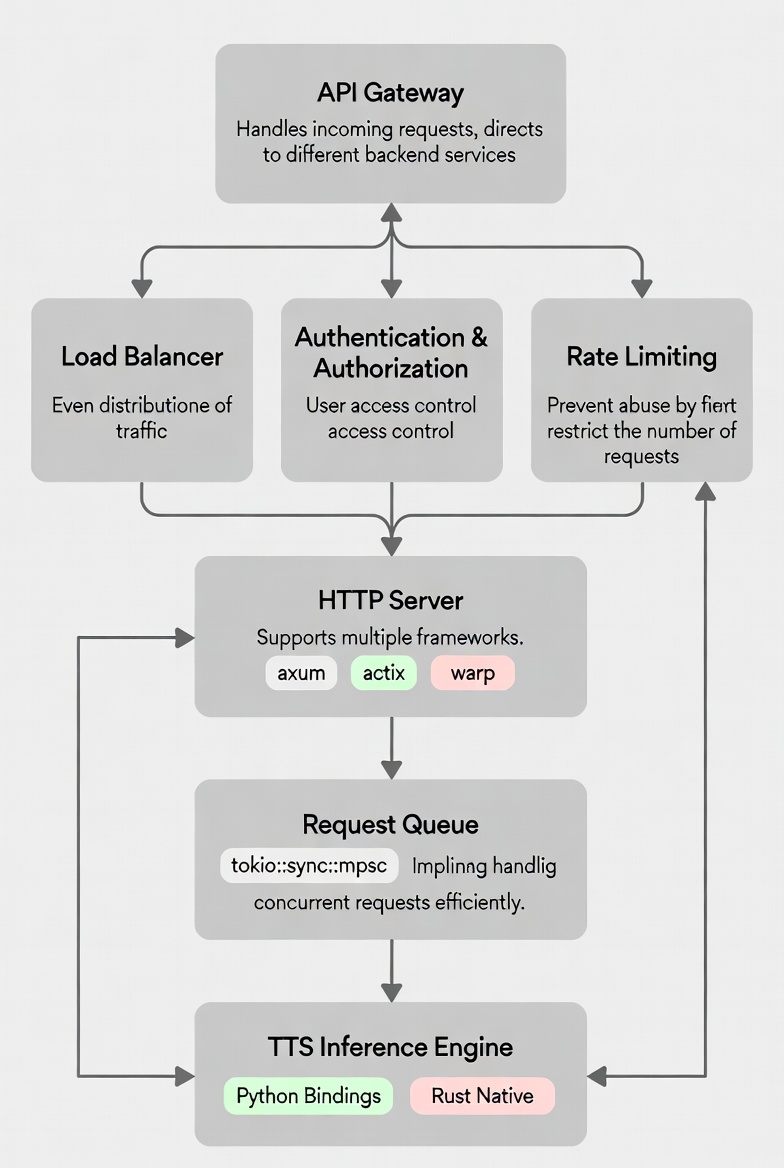
2.1 服务整体架构
一个典型的 TTS 服务通常包含以下组件:
2.2 接口设计:拥抱 OpenAI 兼容性
为了降低集成成本,建议采用 OpenAI TTS API 的接口设计。这种设计已经被业界广泛接受,新服务可以无缝替换现有方案:
POST /v1/audio/speech
Content-Type: application/json

{
    "model": "tts-model-name",
    "input": "你好,世界!",
    "voice": "zh-CN-Xiaoxiao",
    "speed": 1.0,
    "response_format": "mp3"
}
这种接口设计的优势在于:
- 开发者无需修改现有代码即可迁移
- 丰富的客户端库支持
- 文档和教程资源丰富
代码实现详解
3.1 项目初始化与依赖配置
首先,创建一个新的 Rust 项目并配置 Cargo.toml:
[package]
name = "rust-tts-server"
version = "0.1.0"
edition = "2024"

[dependencies]
axum = "0.7"
tokio = { version = "1", features = ["full"] }
serde = { version = "1.0", features = ["derive"] }
serde_json = "1.0"
clap = { version = "4.4", features = ["derive"] }
tracing = "0.1"
tracing-subscriber = "0.3"
base64 = "0.22"
uuid = { version = "1.6", features = ["v4"] }
3.2 数据模型定义
定义请求和响应的数据结构是构建 API 的第一步:
use serde::{Deserialize, Serialize};

#[derive(Deserialize, Debug)]
#[serde(default)]
pub struct SpeechRequest {
    pub model: Option<String>,
    pub input: String,
    pub voice: Option<String>,
    pub speed: Option<f32>,
    pub response_format: Option<String>,
    pub steps: Option<u32>,
    pub method: Option<String>,
    pub cfg_strength: Option<f32>,
}

impl Default for SpeechRequest {
    fn default() -> Self {
        Self {
            model: None,
            input: String::new(),
            voice: None,
            speed: Some(1.0),
            response_format: Some("wav".to_string()),
            steps: Some(8),
            method: Some("rk4".to_string()),
            cfg_strength: Some(2.0),
        }
    }
}

#[derive(Serialize)]
pub struct SpeechResponse {
    pub object: String,
    pub model: String,
    pub audio_base64: String,
    pub duration: f64,
    pub timing: Timing,
}

#[derive(Serialize)]
pub struct Timing {
    pub generation: f64,
}
3.3 核心推理逻辑
TTS 推理是整个服务的核心模块。由于许多优秀的 TTS 模型都是用 Python 编写的,我们需要考虑两种集成方案:
方案一:调用外部 CLI 命令
对于已经安装 TTS CLI 的场景,可以通过 tokio::process::Command 调用:
use std::fs;
use std::path::PathBuf;
use tokio::process::Command;
use uuid::Uuid;

const SAMPLE_RATE: f64 = 24000.0;
const BYTES_PER_SAMPLE: f64 = 4.0;

pub struct AppState {
    pub model_name: String,
    pub quantization: Option<i32>,
}

fn generate_output_path() -> PathBuf {
    let temp_dir = std::env::temp_dir();
    temp_dir.join(format!("tts_output_{}.wav", Uuid::new_v4()))
}

fn build_command_args(output_file: &Path, state: &AppState, request: &SpeechRequest) -> Vec<String> {
    let mut args = vec![
        "--text".to_string(),
        request.input.clone(),
        "--output".to_string(),
        output_file.display().to_string(),
        "--steps".to_string(),
        request.steps.unwrap_or(8).to_string(),
    ];

    if state.model_name != "default" {
        args.push("--model".to_string());
        args.push(state.model_name.clone());
    }

    if let Some(q) = state.quantization {
        args.push("--q".to_string());
        args.push(q.to_string());
    }

    args
}

pub async fn run_tts_inference(
    state: &AppState,
    request: &SpeechRequest,
) -> Result<(Vec<u8>, f64, f64), String> {
    let output_file = generate_output_path();
    let start_time = std::time::Instant::now();

    let cmd_args = build_command_args(&output_file, state, request);

    let output = Command::new("tts-cli")
        .args(&cmd_args)
        .output()
        .await
        .map_err(|e| format!("Failed to execute TTS command: {}", e))?;

    if !output.status.success() {
        let stderr = String::from_utf8_lossy(&output.stderr);
        return Err(format!("TTS command failed: {}", stderr));
    }

    let audio_data = fs::read(&output_file)
        .map_err(|e| format!("Failed to read output file: {}", e))?;

    let _ = fs::remove_file(&output_file);

    let duration = audio_data.len() as f64 / (SAMPLE_RATE * BYTES_PER_SAMPLE);
    let gen_time = start_time.elapsed().as_secs_f64();

    Ok((audio_data, duration, gen_time))
}
方案二:使用 PyO3 绑定 Python 库
对于需要深度定制的场景,可以使用 PyO3 直接调用 Python TTS 库:
use pyo3::prelude::*;

#[pyfunction]
fn synthesize_speech(text: &str, voice: &str) -> PyResult<Vec<u8>> {
    Python::with_gil(|py| {
        let tts_module = PyModule::import(py, "tts")?;
        let result = tts_module
            .call1("synthesize", (text, voice))?
            .extract()?;
        Ok(result)
    })
}
3.4 HTTP 路由与处理器
使用 axum 框架构建 RESTful API:
use axum::{
    Router,
    extract::{Json, State},
    http::header,
    response::IntoResponse,
    routing::{get, post},
};
use base64::Engine;
use serde_json::json;

pub fn create_router(state: AppState) -> Router {
    Router::new()
        .route("/", get(|| async { Json(json!({ "name": "TTS API", "version": "1.0.0" })) }))
        .route("/v1/audio/speech", post(create_speech))
        .with_state(state)
}

async fn create_speech(
    State(state): State<AppState>,
    Json(request): Json<SpeechRequest>,
) -> Result<impl IntoResponse, String> {
    match run_tts_inference(&state, &request).await {
        Ok((audio_data, duration, gen_time)) => {
            let format = request.response_format.unwrap_or_else(|| "wav".to_string());
            let media_type = format!("audio/{}", format);

            let mut response = axum::http::Response::new(audio_data);
            response.headers_mut().insert(header::CONTENT_TYPE, media_type.parse().unwrap());
            response.headers_mut().insert("x-audio-duration", format!("{:.2}", duration).parse().unwrap());
            response.headers_mut().insert("x-generation-time", format!("{:.2}", gen_time).parse().unwrap());

            Ok(response)
        }
        Err(e) => Err(e),
    }
}
3.5 程序入口与配置解析
使用 clap 库解析命令行参数:
use clap::Parser;
use std::net::SocketAddr;
use tracing::info;

#[derive(Parser, Debug)]
#[command(name = "rust-tts-server")]
struct Args {
    /// Server port
    #[arg(short, long, default_value = "8000")]
    port: u16,

    /// Host to bind
    #[arg(short, long, default_value = "0.0.0.0")]
    host: String,

    /// TTS model name
    #[arg(long, default_value = "default")]
    model: String,

    /// Quantization bits (4 or 8)
    #[arg(short, long)]
    quantization: Option<i32>,
}

#[tokio::main]
async fn main() {
    tracing_subscriber::fmt::init();

    let args = Args::parse();

    let state = AppState::new(args.model, args.quantization);

    let app = create_router(state);

    let addr: SocketAddr = format!("{}:{}", args.host, args.port)
        .parse()
        .expect("Invalid address");

    info!("TTS Server starting on http://{}", addr);
    info!("Endpoints:");
    info!("  POST /v1/audio/speech        - Generate speech (binary audio)");
    info!("  POST /v1/audio/speech/base64 - Generate speech (JSON response)");
    info!("  GET  /v1/models              - List models");
    info!("  GET  /health                 - Health check");

    let listener = tokio::net::TcpListener::bind(&addr).await.unwrap();
    axum::serve(listener, app).await.unwrap();
}
性能优化实践
4.1 并发模型选择
Rust 的 async 运行时提供了两种主要的并发模型:
// 方案一:单线程处理所有请求(适合 I/O 密集型任务)
#[tokio::main]
async fn main() {
    let app = create_router(AppState::new());
    axum::serve(TcpListener::bind("0.0.0.0:8000").await.unwrap(), app).await.unwrap();
}

// 方案二:多线程工作池(适合 CPU 密集型任务)
#[tokio::main]
async fn main() {
    let (tx, mut rx) = tokio::sync::mpsc::channel::<Request>(100);

    // 启动多个工作线程处理 TTS 推理
    for _ in 0..num_cpus::get() {
        tokio::spawn(async move {
            while let Some(req) = rx.recv().await {
                let _ = process_tts_request(req).await;
            }
        });
    }

    // HTTP 服务器仅负责接收请求
    let app = Router::new()
        .route("/v1/audio/speech", post(move |req| handle_request(req, tx.clone())))
        .with_state(());
}
4.2 内存优化
- 对象池:使用 object_pool 重用 TTS 模型实例,避免频繁加载模型。
- 流式响应:对于大文件,采用流式传输减少内存占用。
- 零拷贝解析:使用 bytes crate 进行高效的字节处理。
use bytes::Bytes;
use tokio::fs::File;
use tokio::io::{AsyncReadExt, BufReader};

async fn stream_audio_response(file_path: &str) -> impl IntoResponse {
    let file = File::open(file_path).await.unwrap();
    let mut buf = BufReader::new(file);
    let mut chunk = Vec::new();

    let stream = async_stream::stream! {
        while let Ok(_) = buf.read_to_end(&mut chunk).await {
            if chunk.is_empty() {
                break;
            }
            yield Bytes::from(chunk.clone());
            chunk.clear();
        }
    };

    axum::response::StreamResponse::new(stream)
        .header(header::CONTENT_TYPE, "audio/wav")
}
4.3 请求队列与限流
use std::time::Duration;
use tokio::sync::Semaphore;

pub struct RateLimiter {
    semaphore: Semaphore,
    timeout: Duration,
}

impl RateLimiter {
    pub fn new(max_concurrent: usize, timeout_secs: u64) -> Self {
        Self {
            semaphore: Semaphore::new(max_concurrent),
            timeout: Duration::from_secs(timeout_secs),
        }
    }

    pub async fn acquire(&self) -> Result<OwnedPermit, String> {
        self.semaphore
            .try_acquire_owned(|| {})
            .map_err(|_| "Rate limit exceeded")?;

        Ok(OwnedPermit(self.semaphore.clone()))
    }
}

struct OwnedPermit(Semaphore);

impl Drop for OwnedPermit {
    fn drop(&mut self) {
        // SemaphorePermit 会自动释放,无需手动处理
    }
}
生产环境部署建议
5.1 Docker 容器化
FROM rust:1.93.0-slim AS builder

WORKDIR /app
COPY Cargo.toml Cargo.lock ./
COPY src ./src
RUN cargo build --release

FROM debian:bookworm-slim

COPY --from=builder /app/target/release/rust-tts-server /usr/local/bin/

EXPOSE 8000
CMD ["rust-tts-server", "--port", "8000"]
5.2 系统服务配置
使用 systemd 管理服务:
[Unit]
Description=Rust TTS Server
After=network.target

[Service]
Type=simple
User=www-data
WorkingDirectory=/opt/tts
ExecStart=/usr/local/bin/rust-tts-server --port 8000 --host 0.0.0.0
Restart=always
RestartSec=5
Environment="RUST_LOG=info"

[Install]
WantedBy=multi-user.target
5.3 监控与日志
集成 Prometheus 指标:
use prometheus::{IntCounter, IntGauge, Registry, TextEncoder};

lazy_static::lazy_static! {
    static ref REQUESTS_TOTAL: IntCounter =
        IntCounter::new("tts_requests_total", "Total number of TTS requests").unwrap();
    static ref REQUEST_DURATION: HistogramVec =
        HistogramVec::new(HistogramOpts::new("tts_request_duration_seconds", "Request duration"), &["status"]).unwrap();
    static ref ACTIVE_REQUESTS: IntGauge =
        IntGauge::new("tts_active_requests", "Number of active requests").unwrap();
}

async fn metrics() -> impl IntoResponse {
    let encoder = TextEncoder::new();
    let metric_families = prometheus::gather();
    let mut buffer = Vec::new();
    encoder.encode(&metric_families, &mut buffer).unwrap();
    String::from_utf8(buffer).unwrap()
}
总结
使用 Rust 构建 TTS 服务是一项既有挑战性又充满成就感的工作。
通过本文的介绍,我们了解了:
- 技术选型:Rust 的高性能特性使其非常适合构建 TTS 服务。
- 架构设计:采用 OpenAI 兼容的 API 设计可以降低集成成本。
- 核心实现:通过 tokio::process 调用外部 CLI 或 PyO3 绑定 Python 库实现 TTS 推理。
- 性能优化:合理的并发模型、内存管理和请求限流是保证服务稳定性的关键。
- 生产部署:容器化和系统服务配置确保服务的可靠运行。
随着 Rust 生态的不断成熟,我们有理由相信会有越来越多的 AI 服务选择 Rust 作为后端开发语言。
希望本文能够为你在 Rust 语音服务开发之路上提供一些有价值的参考。
 GitHub 登录
 Web3 钱包登录
