用以太坊实现Web2身份认证
本教程详细介绍了如何将Ethereum签名与SAML集成,使Ethereum钱包用户能够登录传统Web2服务。
SAML 是 web2 中使用的一种标准,它允许身份提供商(IdP)向服务提供商(SP)提供用户信息。
在本教程中,你将学习如何将以太坊签名与 SAML 集成,使用户能够使用自己的以太坊钱包在尚未原生支持以太坊的 web2 服务上进行身份验证。
请注意,本教程面向两类不同的受众:
- 理解以太坊并需要学习 SAML 的以太坊用户
- 理解 SAML 和 web2 身份验证并需要学习以太坊的 web2 用户
因此,文中会包含一些你可能已经知道的入门材料。可以跳过你认为熟悉的部分。
面向以太坊用户的 SAML 介绍
SAML 是一种中心化协议。服务提供商(SP)只接受来自身份提供商(IdP)的断言(例如“这是我的用户 John,他应该拥有执行 A、B、C 操作的权限”),前提是 SP 与 IdP 之间存在预先建立的信任关系,或者与该 IdP 证书的证书颁发机构存在信任关系。
例如,SP 可以是一家为其他公司提供旅行服务的旅行社,而 IdP 可以是某公司的内部网站。当员工需要预订商务旅行时,旅行社会在允许他们实际预订旅行之前,将他们重定向到公司进行身份验证。

这是浏览器、SP 和 IdP 这三个实体协商访问权限的方式。SP 无需事先了解使用浏览器的用户,只需信任 IdP 即可。
面向 SAML 用户的以太坊介绍
以太坊是一个去中心化系统。
用户拥有一个私钥(通常保存在浏览器扩展中)。从私钥可以推导出公钥,再进一步得到 20 字节的地址。当用户需要登录系统时,系统会要求他们使用随机数(一次性使用值)对消息进行签名。服务器可以验证该签名是由该地址创建的。
签名只验证了以太坊地址。要获取其他用户属性,通常需要使用证明。一个证明通常包含以下字段:
- 证明者(Attestor):做出证明的地址
- 接收者(Recipient):证明应用的目标地址
- 数据(Data):被证明的数据,例如姓名、权限等。
- 模式(Schema):用于解释数据的模式 ID。
由于以太坊的去中心化特性,任何用户都可以做出证明。证明者的身份对于确定哪些证明是可靠的至关重要。
初始设置
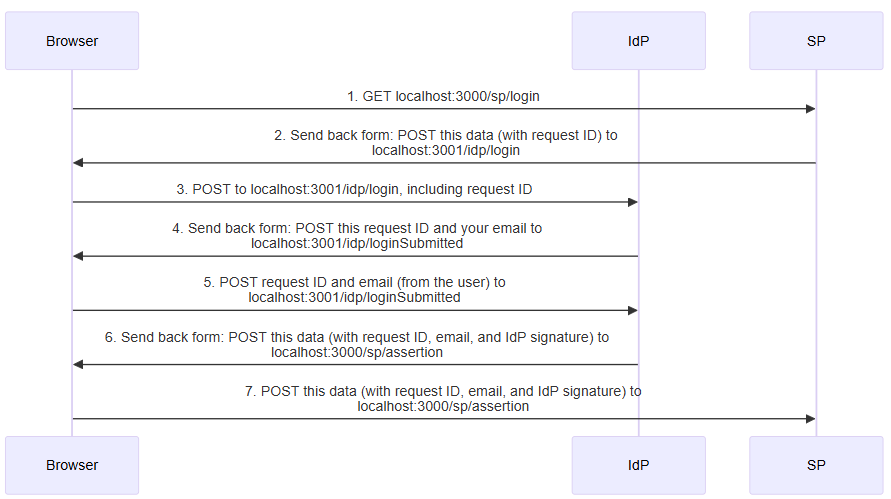
第一步是让一个 SAML SP 和一个 SAML IdP 能够相互通信。
- 下载软件。本文的示例代码存放在 GitHub 上。不同阶段存储在不同的分支中,对于当前阶段,你需要
saml-only分支。
git clone https://github.com/qbzzt/250420-saml-ethereum -b saml-only
cd 250420-saml-ethereum
pnpm install
- 创建带有自签名证书的密钥。这意味着该密钥本身就是自己的证书颁发机构,需要手动导入到服务提供商中。更多信息请参阅 OpenSSL 文档。
mkdir keys
cd keys
openssl req -new -x509 -days 365 -nodes -sha256 -out saml-sp.crt -keyout saml-sp.pem -subj /CN=sp/
openssl req -new -x509 -days 365 -nodes -sha256 -out saml-idp.crt -keyout saml-idp.pem -subj /CN=idp/
cd ..
- 启动服务器(SP 和 IdP)。
pnpm start
-
在浏览器中访问 SP 的 URL http://localhost:3000/,点击按钮,你会被重定向到 IdP(端口3001)。
-
向 IdP 提供你的电子邮件地址,然后点击登录到服务提供商。你会看到自己被重定向回服务提供商(端口3000),并且它已经知道你的电子邮件地址。
详细解释
以下是逐步发生的过程:
src/config.mts
该文件包含身份提供商和服务提供商的配置。通常这两个实体是分开的,但这里为了简化,我们共享代码。
const fs = await import("fs")

const protocol="http"
目前只是在测试,所以使用 HTTP 没问题。
export const spCert = fs.readFileSync("keys/saml-sp.crt").toString()
export const idpCert = fs.readFileSync("keys/saml-idp.crt").toString()
读取公钥,这些公钥通常对两个组件都可用(要么直接受信任,要么由受信任的证书颁发机构签名)。
export const spPort = 3000
export const spHostname = "localhost"
export const spDir = "sp"

export const idpPort = 3001
export const idpHostname = "localhost"
export const idpDir = "idp"

export const spUrl = `${protocol}://${spHostname}:${spPort}/${spDir}`
export const idpUrl = `${protocol}://${idpHostname}:${idpPort}/${idpDir}`
两个组件的 URL。
export const spPublicData = {
服务提供商的公开数据。
entityID: `${spUrl}/metadata`,
按照 SAML 惯例,entityID 是实体元数据所在的 URL。这里的元数据对应于公开数据,只不过以 XML 形式呈现。
    wantAssertionsSigned: true,
    authnRequestsSigned: false,
    signingCert: spCert,
    allowCreate: true,
    assertionConsumerService: [{\
        Binding: 'urn:oasis:names:tc:SAML:2.0:bindings:HTTP-POST',\
        Location: `${spUrl}/assertion`,\
    }]
  }
对于我们来说,最重要的定义是 assertionConsumerService。它意味着要断言某件事(例如“发送此信息的用户是 somebody@example.com”)给服务提供商,我们需要使用 HTTP POST 发送到 URL http://localhost:3000/sp/assertion。
export const idpPublicData = {
    entityID: `${idpUrl}/metadata`,
    signingCert: idpCert,
    wantAuthnRequestsSigned: false,
    singleSignOnService: [{\
      Binding: "urn:oasis:names:tc:SAML:2.0:bindings:HTTP-POST",\
      Location: `${idpUrl}/login`\
    }],
    singleLogoutService: [{\
      Binding: "urn:oasis:names:tc:SAML:2.0:bindings:HTTP-POST",\
      Location: `${idpUrl}/logout`\
    }],
  }
身份提供商的公开数据类似。它指定了要使用户登录,向 http://localhost:3001/idp/login 发送 POST 请求;要使登出,向 http://localhost:3001/idp/logout 发送 POST 请求。
src/sp.mts
这是实现服务提供商的代码。
import * as config from "./config.mts"
const fs = await import("fs")
const saml = await import("samlify")
我们使用 samlify 库来实现 SAML。
import * as validator from "@authenio/samlify-node-xmllint"
saml.setSchemaValidator(validator)
samlify 库期望有一个包来验证 XML 是否正确、是否用预期公钥签名等。我们使用 @authenio/samlify-node-xmllint 来实现此目的。
const express = (await import("express")).default
const spRouter = express.Router()
const app = express()
express 的 Router 是一个可以挂载在网站内部的“迷你网站”。在这里,我们用它来将所有服务提供商的定义分组在一起。
const spPrivateKey = fs.readFileSync("keys/saml-sp.pem").toString()

const sp = saml.ServiceProvider({
  privateKey: spPrivateKey,
  ...config.spPublicData
})
服务提供商对自身的表示包含所有公开数据,以及用于签名信息的私钥。
const idp = saml.IdentityProvider(config.idpPublicData);
公开数据包含了服务提供商需要了解的所有关于身份提供商的信息。
spRouter.get(`/metadata`,
  (req, res) => res.header("Content-Type", "text/xml").send(sp.getMetadata())
)
为了实现与其他 SAML 组件的互操作性,服务和身份提供商应将其公开数据(称为元数据)以 XML 格式放在 /metadata 路径下。
spRouter.post(`/assertion`,
这是浏览器用于标识自己的页面。断言包括用户标识符(这里我们使用电子邮件地址),并且可以包含其他属性。这是上面时序图中第 7 步的处理程序。
  async (req, res) => {
    // console.log(`SAML response:\n${Buffer.from(req.body.SAMLResponse, 'base64').toString('utf-8')}`)
你可以使用注释掉的命令来查看断言中提供的 XML 数据。它是 base64 编码 的。
    try {
      const loginResponse = await sp.parseLoginResponse(idp, 'post', req);
解析来自身份服务器的登录请求。
      res.send(`
        <html>
          <body>
            <h2>Hello ${loginResponse.extract.nameID}</h2>
          </body>
        </html>
      `)
      res.send();
发送一个 HTML 响应,只是为了向用户展示我们成功登录了。
    } catch (err) {
      console.error('Error processing SAML response:', err);
      res.status(400).send('SAML authentication failed');
    }
  }
)
在失败时通知用户。
spRouter.get('/login',
当浏览器试图访问此页面时,创建一个登录请求。这是上面时序图中第 1 步的处理程序。
  async (req, res) => {
    const loginRequest = await sp.createLoginRequest(idp, "post")
获取提交登录请求所需的信息。
    res.send(`
      <html>
        <body>
          <script>
            window.onload = function () { document.forms[0].submit(); }
          </script>
此页面会自动提交下面的表单。这样用户无需进行任何操作即可被重定向。这是上面时序图中的第 2 步。
<form method="post" action="${loginRequest.entityEndpoint}">
提交到 loginRequest.entityEndpoint(身份提供商端点的 URL)。
<input type="hidden" name="${loginRequest.type}" value="${loginRequest.context}" />
输入名称为 loginRequest.type(即 SAMLRequest)。该字段的内容是 loginRequest.context,同样是 base64 编码的 XML。
          </form>
        </body>
      </html>
    `)
  }
)

app.use(express.urlencoded({extended: true}))
这个中间件 读取 HTTP 请求 的请求体。默认情况下 express 会忽略它,因为大多数请求不需要,但我们 POST 请求确实需要正文。
app.use(`/${config.spDir}`, spRouter)
将路由器挂载到服务提供商目录(/sp)。
app.get("/", (req, res) => {
  res.send(`
    <html>
      <body>
        <button onClick="document.location.href='${config.spUrl}/login'">
           Click here to log on
        </button>
      </body>
    </html>
  `)
})
如果浏览器尝试访问根目录,提供一个跳转到登录页面的链接。
app.listen(config.spPort, () => {
  console.log(`service provider is running on http://${config.spHostname}:${config.spPort}`)
})
使用此 express 应用监听 spPort 端口。
src/idp.mts
这是身份提供商。它与服务提供商非常相似,下面的解释针对不同的部分。
const xmlParser = new (await import("fast-xml-parser")).XMLParser(
  {
    ignoreAttributes: false, // Preserve attributes
    attributeNamePrefix: "@_", // Prefix for attributes
  }
)
我们需要读取并理解从服务提供商接收到的 XML 请求。
const getLoginPage = requestId => `
此函数创建包含自动提交表单的页面,该表单在以上时序图的第 4 步中返回。
<html>
  <head>
    <title>Login page</title>
  </head>
  <body>
    <h2>Login page</h2>
    <form method="post" action="./loginSubmitted">
      <input type="hidden" name="requestId" value="${requestId}" />
      Email address: <input name="email" />
      <br />
      <button type="Submit">
        Login to the service provider
      </button>
我们向服务提供商发送两个字段:
- 响应的
requestId。 - 用户标识符(目前我们使用用户提供的电子邮件地址)。
    </form>
  </body>
</html>

const idpRouter = express.Router()

idpRouter.post("/loginSubmitted", async (req, res) => {
  const loginResponse = await idp.createLoginResponse(
这是上面时序图中第 5 步的处理程序。idp.createLoginResponse 创建登录响应。
    sp,
    {
      authnContextClassRef: 'urn:oasis:names:tc:SAML:2.0:ac:classes:PasswordProtectedTransport',
      audience: sp.entityID,
受众(audience)是服务提供商。
      extract: {
        request: {
          id: req.body.requestId
        }
      },
从请求中提取的信息。我们关心的请求参数是 requestId,它允许服务提供商匹配请求和响应。
signingKey: { privateKey: idpPrivateKey, publicKey: config.idpCert } // Ensure signing
我们需要 signingKey 来签名响应数据。服务提供商不信任未签名的请求。
    },
    "post",
    {
      email: req.body.email
这是包含用户信息的字段,我们将它发送回服务提供商。
    }
  );

  res.send(`
    <html>
      <body>
        <script>
          window.onload = function () { document.forms[0].submit(); }
        </script>

        <form method="post" action="${loginResponse.entityEndpoint}">
          <input type="hidden" name="${loginResponse.type}" value="${loginResponse.context}" />
        </form>
      </body>
    </html>
  `)
})
再次使用自动提交表单。这是上面时序图中的第 6 步。
// IdP endpoint for login requests
idpRouter.post(`/login`,
这是接收来自服务提供商登录请求的端点。这是上面时序图中第 3 步的处理程序。
  async (req, res) => {
    try {
      // Workaround because I couldn't get parseLoginRequest to work.
      // const loginRequest = await idp.parseLoginRequest(sp, 'post', req)
      const samlRequest = xmlParser.parse(Buffer.from(req.body.SAMLRequest, 'base64').toString('utf-8'))
      res.send(getLoginPage(samlRequest["samlp:AuthnRequest"]["@_ID"]))
我们本应使用 idp.parseLoginRequest 来读取身份验证请求的 ID。然而,我无法让它工作,并且不值得花大量时间在这方面,所以我直接使用一个通用 XML 解析器。我们需要的信息是 <samlp:AuthnRequest> 标签内的 ID 属性,该标签位于 XML 的顶层。
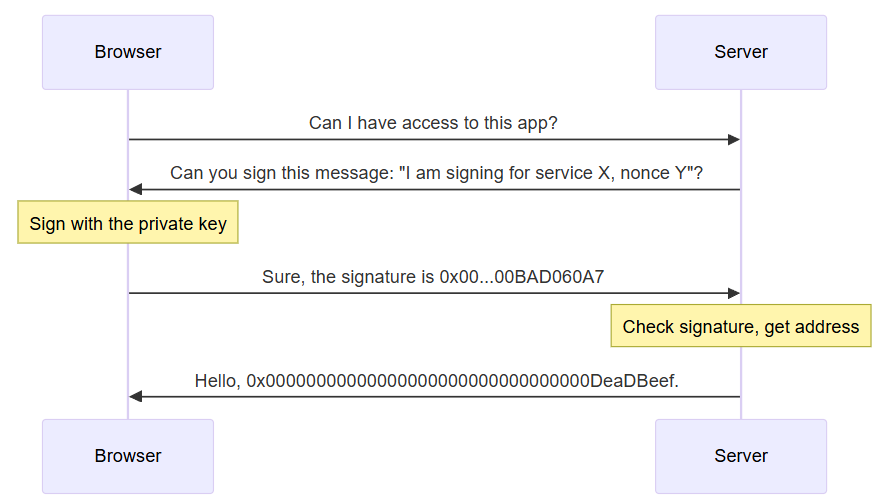
使用以太坊签名
现在我们已经能够向服务提供商发送用户身份,下一步是以可信的方式获取用户身份。Viem 允许我们直接向钱包请求用户地址,但这意味着我们要从浏览器获取信息。我们无法控制浏览器,所以不能自动信任从浏览器获得的响应。
因此,IdP 会向浏览器发送一个需要签名的字符串。如果浏览器中的钱包签署了这个字符串,则意味着它确实是该地址(即它知道与该地址对应的私钥)。
要查看实际效果,请停止现有的 IdP 和 SP,并运行以下命令:
git checkout eth-signatures
pnpm install
pnpm start
然后浏览到 SP,并按照指示操作。
请注意,目前我们无法从以太坊地址获取电子邮件地址,因此我们向 SP 报告 <以太坊地址>@bad.email.address。
详细解释
更改发生在前一个图的步骤 4-5 中。

我们只更改了 idp.mts 文件。以下是更改的部分。
import { v4 as uuidv4 } from 'uuid'
import { verifyMessage } from 'viem'
我们需要这两个额外的库。我们使用 uuid 来创建随机数值。值本身不重要,只要它只使用一次即可。
viem 库让我们能够使用以太坊的定义。这里我们需要它来验证签名是否有效。
const loginPrompt = "To access the service provider, sign this nonce: "
钱包要求用户允许签名消息。如果消息只是随机数,可能会让用户感到困惑,所以我们包含了这个提示。
// Keep requestIDs here
let nonces = {}
我们需要请求信息才能响应它。我们可以将其与请求一起发送(步骤 4),并在步骤 5 中接收回来。但是,我们不能信任从浏览器获取的信息,因为浏览器可能被恶意用户控制。因此,更好的做法是将其存储在这里,以随机数为键。
注意,为了简单起见,我们在此使用变量。但这有几个缺点:
- 容易受到拒绝服务攻击。恶意用户可以多次尝试登录,填满我们的内存。
- 如果 IdP 进程需要重启,我们会丢失现有的值。
- 无法在多个进程间进行负载均衡,因为每个进程都有自己的变量。
在生产系统中,我们应该使用数据库并实现某种过期机制。
const getSignaturePage = requestId => {
  const nonce = uuidv4()
  nonces[nonce] = requestId
创建一个随机数,并将 requestId 存储起来供将来使用。
  return `
<html>
  <head>
    <script type="module">
当页面加载时,此 JavaScript 会自动执行。
import { createWalletClient, custom, getAddress } from 'https://esm.sh/viem'
我们需要从 viem 中导入几个函数。
      if (!window.ethereum) {
          alert("Please install MetaMask or a compatible wallet and then reload")
      }
只有当浏览器中存在钱包时,我们才能工作。
const [account] = await window.ethereum.request({method: 'eth_requestAccounts'})
从钱包(window.ethereum)请求账户列表。假设至少有一个账户,并且只存储第一个。
      const walletClient = createWalletClient({
          account,
          transport: custom(window.ethereum)
      })
创建一个钱包客户端来与浏览器钱包交互。
      window.goodSignature = () => {
        walletClient.signMessage({
            message: "${loginPrompt}${nonce}"
要求用户签署一条消息。因为整个 HTML 都在一个模板字符串中,我们可以使用在 idp 进程中定义的变量。这是时序图中的步骤 4.5。
        }).then(signature => {
            const path= "/${config.idpDir}/signature/${nonce}/" + account + "/" + signature
            window.location.href = path
        })
      }
重定向到 /idp/signature/<nonce>/<address>/<signature>。这是时序图中的步骤 5。
      window.badSignature = () => {
        const path= "/${config.idpDir}/signature/${nonce}/" +
          getAddress("0x" + "BAD060A7".padEnd(40, "0")) +
          "/0x" + "BAD0516".padStart(130, "0")
        window.location.href = path
      }
签名是由浏览器发送回来的,而浏览器是潜在恶意的(没有什么能阻止你直接在浏览器中打开 http://localhost:3001/idp/signature/bad-nonce/bad-address/bad-signature)。因此,验证 IdP 进程正确处理错误签名非常重要。
    </script>
  </head>
  <body>
    <h2>Please sign</h2>
    <button onClick="window.goodSignature()">
      Submit a good (valid) signature
    </button>
    <br/>
    <button onClick="window.badSignature()">
      Submit a bad (invalid) signature
    </button>
  </body>
</html>
`
}
剩下的只是标准的 HTML。
idpRouter.get("/signature/:nonce/:account/:signature", async (req, res) => {
这是时序图中步骤 5 的处理程序。
  const requestId = nonces[req.params.nonce]
  if (requestId === undefined) {
    res.send("Bad nonce")
    return ;
  }

  nonces[req.params.nonce] = undefined
获取请求 ID,并从 nonces 中删除该随机数,以确保它不会被重复使用。
try {
因为签名可能无效的方式有很多种,我们将此包裹在 try ... catch 块中,以捕获任何抛出的错误。
    const validSignature = await verifyMessage({
      address: req.params.account,
      message: `${loginPrompt}${req.params.nonce}`,
      signature: req.params.signature
    })
使用 verifyMessage 实现时序图中的步骤 5.5。
    if (!validSignature)
      throw("Bad signature")
  } catch (err) {
    res.send("Error:" + err)
    return ;
  }
处理程序的其余部分与之前我们在 /loginSubmitted 处理程序中所做的相同,只有一个小的变化。
  const loginResponse = await idp.createLoginResponse(
      .
      .
      .
    {
      email: req.params.account + "@bad.email.address"
    }
  );
我们没有实际的电子邮件地址(将在下一节中获取),所以现在只返回以太坊地址,并明确标记它不是电子邮件地址。
// IdP endpoint for login requests
idpRouter.post(`/login`,
  async (req, res) => {
    try {
      // Workaround because I couldn't get parseLoginRequest to work.
      // const loginRequest = await idp.parseLoginRequest(sp, 'post', req)
      const samlRequest = xmlParser.parse(Buffer.from(req.body.SAMLRequest, 'base64').toString('utf-8'))
      res.send(getSignaturePage(samlRequest["samlp:AuthnRequest"]["@_ID"]))
    } catch (err) {
      console.error('Error processing SAML response:', err);
      res.status(400).send('SAML authentication failed');
    }
  }
)
在第 3 步处理程序中,现在使用 getSignaturePage 而不是 getLoginPage。
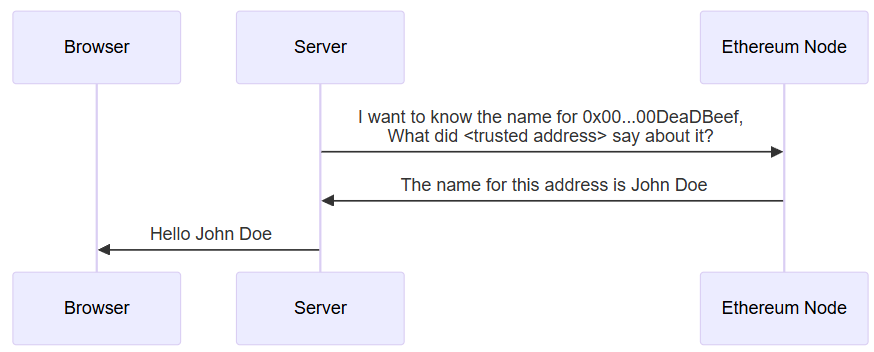
获取电子邮件地址
下一步是获取服务提供商所需的标识符——电子邮件地址。为此,我们使用以太坊证明服务(EAS)。
获取证明的最简单方法是使用 GraphQL API。我们使用以下查询:
query GetAttestationsByRecipient {
  attestations(
    where: {
      recipient: { equals: "${getAddress(ethAddr)}" }
      schemaId: { equals: "0xfa2eff59a916e3cc3246f9aec5e0ca00874ae9d09e4678e5016006f07622f977" }
    }
    take: 1
  ) {
    data
    id
    attester
  }
}
这个 schemaId 只包含一个电子邮件地址。此查询请求该模式的证明。证明的主题被称为 recipient。它始终是一个以太坊地址。
警告:我们在此获取证明的方式存在两个安全问题。
- 我们访问 API 端点
https://optimism.easscan.org/graphql,这是一个中心化组件。我们可以获取id属性,然后在链上查询以验证证明是否真实,但 API 端点仍然可以通过不告诉我们某些证明来对其进行审查。
这个问题并非无法解决,我们可以运行自己的 GraphQL 端点并从链日志中获取证明,但这对于我们的目的来说过于复杂。
- 我们不检查证明者的身份。任何人都可以向我们提供虚假信息。在实际实现中,我们应拥有一组受信任的证明者,并且只查看他们的证明。
要查看实际效果,请停止现有的 IdP 和 SP,并运行以下命令:
git checkout email-address
pnpm install
pnpm start
然后提供你的电子邮件地址。有两种方法:
- 使用私钥导入钱包,并使用测试私钥
0xac0974bec39a17e36ba4a6b4d238ff944bacb478cbed5efcae784d7bf4f2ff80。 - 为你自己的电子邮件地址添加证明:
- 浏览到证明浏览器中的模式。
- 点击使用模式证明。
- 输入你的以太坊地址作为接收者,你的电子邮件地址作为电子邮件地址,并选择链上。然后点击做出证明。
- 在钱包中批准交易。你需要在 Optimism 区块链上拥有一些 ETH 来支付 Gas 费用。
无论采用哪种方式,之后浏览到 http://localhost:3000 并按照指示操作。如果你导入了测试私钥,你收到的电子邮件地址是 test_addr_0@example.com。如果你使用了自己的地址,应该会是你证明的那个地址。
详细解释
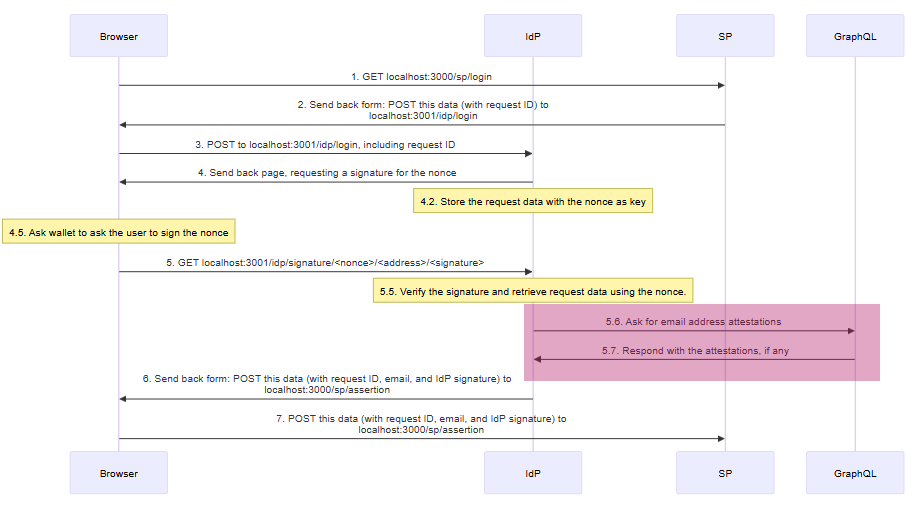
新增的步骤是 GraphQL 通信,即步骤 5.6 和 5.7。
同样,以下是 idp.mts 中更改的部分。
import { GraphQLClient } from 'graphql-request'
import { SchemaEncoder } from '@ethereum-attestation-service/eas-sdk'
导入我们需要的库。
const graphqlEndpointUrl = "https://optimism.easscan.org/graphql"
const graphqlClient = new GraphQLClient(graphqlEndpointUrl, { fetch })
创建一个新的 GraphQLClient 客户端,用于查询端点。
const graphqlSchema = 'string emailAddress'
const graphqlEncoder = new SchemaEncoder(graphqlSchema)
GraphQL 只给我们一个不透明的字节数据对象。要理解它,我们需要知道模式。
const ethereumAddressToEmail = async ethAddr => {
一个从以太坊地址获取电子邮件地址的函数。
  const query = `
    query GetAttestationsByRecipient {
这是一个 GraphQL 查询。
attestations(
我们在查找证明。
        where: {
          recipient: { equals: "${getAddress(ethAddr)}" }
          schemaId: { equals: "0xfa2eff59a916e3cc3246f9aec5e0ca00874ae9d09e4678e5016006f07622f977" }
        }
我们想要的证明是采用我们的模式,并且接收者为 getAddress(ethAddr) 的证明。getAddress 函数确保我们的地址具有正确的校验和。这对于 GraphQL 的大小写敏感性是必要的。"0xBAD060A7"、"0xBad060A7" 和 "0xbad060a7" 是不同的值。
take: 1
无论我们找到多少条证明,我们只想要第一条。
      ) {
        data
        id
        attester
      }
    }`
我们想要接收的字段。
attester:提交证明的地址。通常用于决定是否信任该证明。id:证明 ID。你可以使用此值在链上读取证明,以验证来自 GraphQL 查询的信息是否正确。data:模式数据(在本例中即电子邮件地址)。
  const queryResult = await graphqlClient.request(query)

  if (queryResult.attestations.length == 0)
    return "no_address@available.is"
如果没有证明,返回一个明显错误但对服务提供商来说似乎有效的值。
  const attestationDataFields = graphqlEncoder.decodeData(queryResult.attestations[0].data)
  return attestationDataFields[0].value.value
}
如果有值,使用 decodeData 解码数据。我们不需要它提供的元数据,只需要值本身。
  const loginResponse = await idp.createLoginResponse(
    sp,
    {
      .
      .
      .
    },
    "post",
    {
      email: await ethereumAddressToEmail(req.params.account)
    }
  );
使用新函数来获取电子邮件地址。
那么去中心化呢?
在这种配置下,只要我们依赖可信的证明者来进行以太坊到电子邮件地址的映射,用户就不能冒充他人。然而,我们的身份提供商仍然是一个中心化组件。拥有身份提供商私钥的人可以向服务提供商发送虚假信息。
或许可以使用多方计算(MPC)来解决这个问题。我希望在未来的教程中介绍它。
结论
采用一种登录标准(例如以太坊签名)面临着先有鸡还是先有蛋的问题。服务提供商希望吸引尽可能广泛的市场。用户希望能够访问服务,而不必担心是否支持他们的登录标准。 创建适配器(例如以太坊 IdP)可以帮助我们克服这一障碍。
+1
本教程对你有帮助吗?
- 原文链接: ethereum.org/developers/...
- 登链社区 AI 助手,为大家转译优秀英文文章,如有翻译不通的地方,还请包涵~
 GitHub 登录
 Web3 钱包登录
