狠人!用Python从零敲出一个EVM-1
让我们尝试从头开始去构建一个以太坊虚拟机(EVM)!只参考以太坊黄皮书(yellowpaper)
?介绍
阅读完Cupid的 Playdate with the EVM 这篇文章后,我非常享受,但想要更多地去实践操作。 因此让我们尝试从头开始去构建一个以太坊虚拟机(EVM)!只参考以太坊黄皮书(yellow paper )
在第一部分,我们将去构建:
- 一个基本的堆栈(stack)
- 一个基本的临时存储器(memory)
- 代码缓冲区
- 一些指令
- 一个指令编译器
- 一个基础的提取解码循环
?堆栈和存储器
Most of the things we need to get started can be found in Section 9, The Execution Model.
在以太坊黄皮书的第九部分提到了 <mark>执行模型</mark>
 首先,我们得有一个256位字并且最大容量为1024的堆栈,就像这样:
stack.py
# 栈类的深度限制为1024个元素
from .constants import MAX_STACK_DEPTH, MAX_UINT256


class Stack:
    def __init__(self, max_depth=MAX_STACK_DEPTH) -> None:
        self.stack = []
        self.max_depth = max_depth

    def push(self, item: int) -> None:
        if item < 0 or item > MAX_UINT256:
            raise InvalidStackItem({"item": item})

        if (len(self.stack) + 1) > self.max_depth:
            raise StackOverflow()

        self.stack.append(item)

    def pop(self) -> int:
        if len(self.stack) == 0:
            raise StackUnderflow()

        return self.stack.pop()

    def __str__(self) -> str:
        return str(self.stack)

    def __repr__(self) -> str:
        return str(self)


class StackUnderflow(Exception):
    ...


class StackOverflow(Exception):
    ...


class InvalidStackItem(Exception):
    ...
其中constants.py
MAX_UINT256 = 2 ** 256 - 1
MAX_UINT8 = 2 ** 8 - 1
MAX_STACK_DEPTH = 1024
接着我们得有一个临时存储器(memory)
这是现在我所能想到的最简单的例子:memory.py
from .constants import MAX_UINT256, MAX_UINT8

class Memory:
    def __init__(self) -> None:
        # TODO: use https://docs.python.org/3/library/functions.html#func-bytearray
        self.memory = []

    def store(self, offset: int, value: int) -> None:
        if offset < 0 or offset > MAX_UINT256:
            raise InvalidMemoryAccess({"offset": offset, "value": value})

        if value < 0 or value > MAX_UINT8:
            raise InvalidMemoryValue({"offset": offset, "value": value})

        # 在必要时将会拓展 memory存储数组长度
        if offset >= len(self.memory):
            self.memory.extend([0] * (offset - len(self.memory) + 1))

        self.memory[offset] = value

    def load(self, offset: int) -> int:
        if offset < 0:
            raise InvalidMemoryAccess({"offset": offset})

        if offset >= len(self.memory):
            return 0

        return self.memory[offset]


class InvalidMemoryAccess(Exception):
    ...


class InvalidMemoryValue(Exception):
    ...
让我们先暂时忽略storage存储,先开始第二部分。
?定义指令
 以太坊虚拟机的合约代码不是于数据一起驻留在内存中的,而是另辟一个单独的空间存储。我们将其定义为一个简单的字节对象,可以得到如下
ExecutionContext结构:
context.py
from .memory import Memory
from .stack import Stack
"""
EVM中的合约代码不是与数据一起驻留在内存中,而是驻留在一个单独的区域中。
如果我们将其定义为一个简单的字节对象,我们将得到以下ExecutionContext结构
"""

class ExecutionContext:
    def __init__(self, code=bytes(), pc=0, stack=Stack(), memory=Memory()) -> None:
        self.code = code
        self.stack = stack
        self.memory = memory
        self.pc = pc
        self.stopped = False
        self.returndata = bytes()


    def stop(self) -> None:
        self.stopped = True

    def read_code(self, num_bytes) -> int:
        """
        :param num_bytes:
        :return:Returns the next num_bytes from the code buffer (at index pc) as an integer and advances pc by num_bytes.
        """
        value = int.from_bytes(
            self.code[self.pc:self.pc + num_bytes], byteorder="big"
        )
        self.pc += num_bytes
        return value
有了代码临时存放的地方,开始定义指令类
opcodes.py/Instruction
class Instruction:
    def __init__(self, opcode: int, name: str, arg_length=0):
        self.opcode = opcode
        self.name = name
        self.arg_length = arg_length

    def execute(self, context: ExecutionContext) -> None:
        raise NotImplementedError
以及它的辅助函数:
INSTRUCTIONS = []
INSTRUCTIONS_BY_OPCODE = {}


def register_instruction(opcode: int, name: str, execute_func: callable):
    instruction = Instruction(opcode, name)
    instruction.execute = execute_func
    INSTRUCTIONS.append(instruction)

    assert opcode not in INSTRUCTIONS_BY_OPCODE
    INSTRUCTIONS_BY_OPCODE[opcode] = instruction

    return instruction
现在我们可以定义一些简单的指令就像下面给出的那样:
ExecutionContext存放
# 定义命令
STOP = register_instruction(0x00, "STOP", (lambda ctx: ctx.stop()))
# 放入堆栈指令
PUSH1 = register_instruction(
    0x60,
    "PUSH1",
    (lambda ctx: ctx.stack.push(ctx.read_code(1)))
)
# 加法指令
ADD = register_instruction(
    0x01,
    "ADD",
    (lambda ctx: ctx.stack.push((ctx.stack.pop() + ctx.stack.pop()) % 2 ** 256)),
)
# 乘法指令
MUL = register_instruction(
    0x02,
    "MUL",
    (lambda ctx: ctx.stack.push((ctx.stack.pop() * ctx.stack.pop()) % 2 ** 256)),
)
?运行代码
现在,为了运行代码,我们只需要知道如何解码代码中的指令
def decode_opcode(context: ExecutionContext) -> Instruction:
    if context.pc < 0 or context.pc >= len(context.code):
        raise InvalidCodeOffset({"code": context.code, "pc": context.pc})

    opcode = context.read_code(1)
    instruction = INSTRUCTIONS_BY_OPCODE.get(opcode)
    if instruction is None:
        raise UnknownOpcode({"opcode": opcode})

    return instruction
并且现在如果我们忽略gas费的消耗,将能够得到最终运行脚本:
runner.py
from .context import ExecutionContext
from .opcodes import decode_opcode

def run(code: bytes)-> None:
    """
    :param code:
    :return:
    """
    context = ExecutionContext(code = code)

    while not context.stopped:
        pc_before = context.pc
        instruction = decode_opcode(context)
        instruction.execute(context)

        print(f"{instruction} @ pc={pc_before}")
        print(context)
        print()

    print(f"Output: 0x{context.returndata.hex()}")
现在我们用这个例子来演示:
PUSH 0x6
PUSH 0x7
MUL
STOP
即让EVM编译 600660070200 这串字节码,我们可以得到最基本的运行脚本
# 虚拟机的字大小为256位,即一次性处理256位长度的数据

from soul_evm.runner import run
import sys


def main():
    if len(sys.argv) != 2:
        print("Usage: {} <hexdata>".format(sys.argv[0]))
        sys.exit(1)

    data = sys.argv[1]
    run(bytes.fromhex(data))


if __name__ == "__main__":
    main()
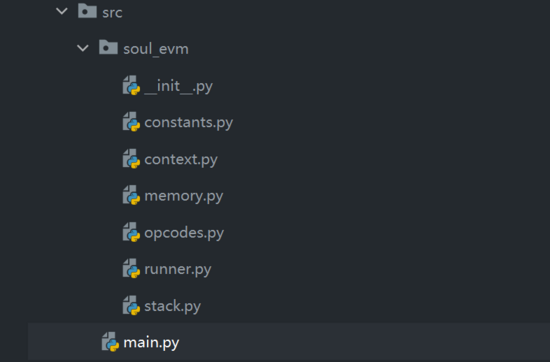
这是我项目的路径:
现在让我们运行它,并得到如下输出:
PS E:evmproject\src> python main.py 600660070200
PUSH1 @ pc=0
stack: [6]
memory:[]

PUSH1 @ pc=2
stack: [6, 7]
memory:[]

MUL @ pc=4
stack: [42]
memory:[]

STOP @ pc=5
stack: [42]
memory:[]

Output: 0x
假如我们将00STOP指令去掉,编译6006600702这串字节码,看看会得到什么:
PS E:evmproject\src> python main.py 6006600702
PUSH1 @ pc=0
stack: [6]
memory:[]

PUSH1 @ pc=2
stack: [6, 7]
memory:[]

MUL @ pc=4
stack: [42]
memory:[]

Traceback (most recent call last):
soul_evm.opcodes.InvalidCodeOffset: {'code': b'`\x06`\x07\x02', 'pc': 5}
将会报InvalidCodeOffset的错误。
当我试图在字节指令的末尾处获取下一条指令时,遇到了一个错误。
让我们来看看关于这个场景下,黄皮书说了什么?
大致概括一下:如果程序计数器在代码字节数组之外,那么将会干净利落地停止,而不是抛出异常,所以我们需要改变解码器中的条件:
opcodes.py/decode_opcode
def decode_opcode(context: ExecutionContext) -> Instruction:
    if context.pc < 0:
        raise InvalidCodeOffset({"code": context.code.hex(), "pc": context.pc})

    if context.pc >= len(context.code):
        return STOP

    #通过bytes获取指令
    opcode = context.read_code(1)
    instruction = INSTRUCTIONS_BY_OPCODE.get(opcode)
    if instruction is None:
        raise UnknownOpcode({"opcode": opcode})

    return instruction
如此一来,便不会报错了!
PS E:evmproject\src> python main.py 6006600702
PUSH1 @ pc=0
stack: [6]
memory:[]

PUSH1 @ pc=2
stack: [6, 7]
memory:[]

MUL @ pc=4
stack: [42]
memory:[]

STOP @ pc=5
stack: [42]
memory:[]

Output: 0x
?返回数据
到目前为止,我们一直在监视跟踪运行中的堆栈,但在实际应用中,以太坊虚拟机必须返回值才算有用。
根据黄皮书,返回值意味着什么?

返回从堆栈中弹出的两个元素,offset和length以及返回的memory[offset:offset+length-1]
所以为了返回数据,我们需要实现内存存储指令和RETURN。让我们从MSTORE8开始,它能够从堆栈中弹出一个偏移量和一个字,并将该字的最低字节存储在内存中:

MSTORE8 = register_instruction(
    0x53,
    "MSTORE8",
    (lambda ctx: ctx.memory.store(ctx.stack.pop(), ctx.stack.pop() % 256)),
)
为了RETURN,我们添加一个load_range(offset,length) 来操作临时存储:
def load_range(self, offset: int, length: int) -> bytes:
        if offset < 0:
            raise InvalidMemoryAccess({"offset": offset, "length": length})

        # we could use a slice here, but this lets us gets 0 bytes if we read past the end of concrete memory
        return bytes(self.load(x) for x in range(offset, offset + length))
note:添加在Memory类中
然后我们就可以给我们的ExcutionContext加上获取返回数据的属性函数:
class ExecutionContext:
    def __init__(self, code=bytes(), pc=0, stack=Stack(), memory=Memory()) -> None:
        ...
        self.returndata = bytes()

    def set_return_data(self, offset: int, length: int) -> None:
        self.stopped = True
        self.returndata = self.memory.load_range(offset, length)
现在给出RETURN的指令:
RETURN = register_instruction(
    0xf3,
    "RETURN",
    (lambda ctx: ctx.set_return_data(ctx.stack.pop(), ctx.stack.pop())),
)
现在我们就可以返回并且输出运行之后的结果啦!
PS E:evmproject\src> python main.py 600660070260005360016000f3
PUSH1 @ pc=0
stack: [6]
memory:[]

PUSH1 @ pc=2
stack: [6, 7]
memory:[]

MUL @ pc=4
stack: [42]
memory:[]
PUSH1 @ pc=8
stack: [1]
memory:[42]

PUSH1 @ pc=10
stack: [1, 0]
memory:[42]

RETURN @ pc=12
stack: []
memory:[42]

Output: 0x2a
翻译不易,码字不简~
有条件的同学可以点赞收藏加关注~这是对博主最大的肯定!
?个人博客(合约安全审计方向)
77Brother (nangbowan.github.io)
原文链接
Building an EVM from scratch part 1 - the execution context (notion.so)
 GitHub 登录
 Web3 钱包登录