区块链基础教程 2 # ETH & BTC 节点API
- skysys.eth
- 发布于 2023-12-18 11:19
- 阅读 4045
说明:本机环境Mac12.2.1,不同环境可能略有差异学习节点API需要使用一个RPC网关,本文以Infura为例,进行举例说明1ETH节点API交互首先需要注册infura账号,然后申请一个APIKEY,选择ETHmainnet。这里获取数据有两种方式,一
- 说明:本机环境 Mac 12.2.1,不同环境可能略有差异
- 学习节点 API 需要使用一个 RPC 网关,本文以 Infura 为例,进行举例说明
1 ETH 节点API交互
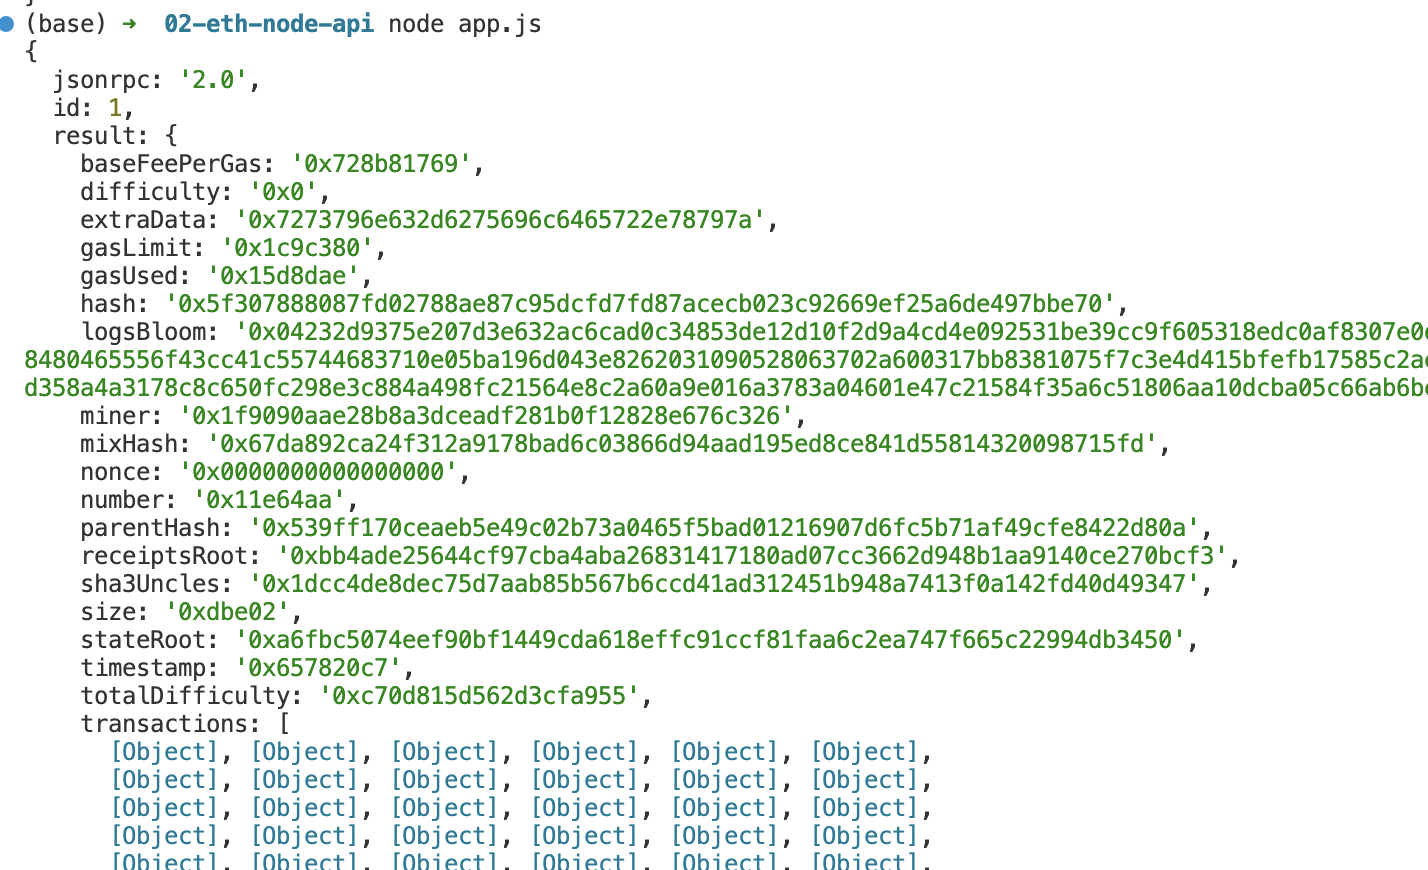
首先需要注册 infura 账号,然后申请一个 API KEY,选择 ETH mainnet。这里获取数据有两种方式,一种是 RESTful API 一种是 WebSocket 请求。
yarn add dotenv
yarn add request
yarn add ws
然后新建 app.js,其中的 proxy 是由于众所周知的网络原因单独配置的,这个跟不同网络环境相关。
const dotenv = require('dotenv').config();
var request = require('request');

var headers = {
    'Content-Type': 'application/json'
};

var dataString = '{"jsonrpc":"2.0","method":"eth_getBlockByNumber","params":["latest",true], "id":1}';

var options = {
    url: `https://mainnet.infura.io/v3/${process.env.PROJECT_ID}`,
    method: 'POST',
    headers: headers,
    body: dataString,
    proxy: {
        host: '127.0.0.1',
        port: 7890,
     }
};

function callback(error, response, body) {
    if (!error && response.statusCode == 200) {
        json = response.body;
        var obj = JSON.parse(json);
        console.log(obj)
    } else {
        console.log(error)
    }
}

request(options, callback);

WebSocket 示例:
const dotenv = require('dotenv').config();
const WebSocket = require('ws');

const ws = new WebSocket(`wss://mainnet.infura.io/v3/${process.env.PROJECT_ID}`);
ws.on('open', function open() {
    ws.send('{"jsonrpc":"2.0","method":"eth_subscribe","params":["newHeads"], "id":1}');
});

ws.on('message', function incoming(data) {
    var obj = JSON.parse(data);
    console.log(obj);
    ws.close()
});
2 BTC节点API交互
比特币钱包有多种地址形式:
- 以
1开头的P2PKH(Pay-to-Public-Key-Hash)地址,顾名思义是基于公钥哈希进行交易的地址,它是基于公钥私钥的地址形式 - 以
3开头的P2SH(Pay-to-Script-Hash)地址,与P2PKH不同的是它是通过赎回脚本进行交易的,注意:这种地址可能是Segwit(隔离见证)也可能不是 - 以
bj开头的Segwit(隔离见证)地址,后面会详细介绍 - 以
m、n、2开头的地址,一般是测试网络上的地址
比特币社区推荐大家尽可能使用以3开头的地址,因为它比1开头的地址具备更多扩展性。
BTC 需要用到 blockcypher API。BlockCypher除了可以使用比特币区块链的测试环境外,还可以使用其自身提供的一个测试环境,只需要将 Api 的 url 前缀写成api.blockcypher.com/v1/bcy/test就可以了。
对于比特币中的隔离见证地址,基于 blockcypher 的方式就不能用了,另外一种创建比特币交易的方式——通过bitcoinjs-lib来创建交易(本文示例代码基于bitcoinjs-lib v3.3.2)。
2.1 生成账号
创建 P2PKH 钱包
const bitcoin = require('bitcoinjs-lib');
// 创建钱包
const keyPair = bitcoin.ECPair.makeRandom();
// 钱包地址:19AAjaTUbRjQCMuVczepkoPswiZRhjtg31
console.log(keyPair.getAddress());
// 钱包私钥:Kxr9tQED9H44gCmp6HAdmemAzU3n84H3dGkuWTKvE23JgHMW8gct
console.log(keyPair.toWIF());
私钥导入 P2PKH 钱包
const bitcoin = require('bitcoinjs-lib');

// 导入钱包
const keyPair = bitcoin.ECPair.fromWIF('Kxr9tQED9H44gCmp6HAdmemAzU3n84H3dGkuWTKvE23JgHMW8gct')
// 钱包地址:19AAjaTUbRjQCMuVczepkoPswiZRhjtg31
console.log(keyPair.getAddress());
通过 P2SH 创建 SegWit 钱包
const bitcoin = require('bitcoinjs-lib');

// 导入 P2PKH 钱包
const keyPair = bitcoin.ECPair.fromWIF('Kxr9tQED9H44gCmp6HAdmemAzU3n84H3dGkuWTKvE23JgHMW8gct')
const pubKey = keyPair.getPublicKeyBuffer()

const redeemScript = bitcoin.script.witnessPubKeyHash.output.encode(bitcoin.crypto.hash160(pubKey))
const scriptPubKey = bitcoin.script.scriptHash.output.encode(bitcoin.crypto.hash160(redeemScript))
const address = bitcoin.address.fromOutputScript(scriptPubKey)

// 钱包地址:34AgLJhwXrvmkZS1o5TrcdeevMt22Nar53
// 它既是 P2SH 也是 SegWit 钱包
console.log(address);
创建测试网络钱包
const bitcoin = require('bitcoinjs-lib');

// 测试网络
const testnet = bitcoin.networks.testnet;
// 测试钱包
const keyPair = bitcoin.ECPair.makeRandom({ network: testnet });
// 钱包地址:n1HiJCt8YKujJKqBVdBde95ZYw9WLfVQVz
console.log(keyPair.getAddress());
// 钱包私钥:cQ18zisWxiXFPuKfHcqKBeKHSukVDj7F9xLPxU2pMz8bCanxF8zD
console.log(keyPair.toWIF());
2.2 创建交易
普通地址的交易
const bitcoin = require('bitcoinjs-lib');

// 创建钱包
const alice = bitcoin.ECPair.fromWIF('L1uyy5qTuGrVXrmrsvHWHgVzW9kKdrp27wBC7Vs6nZDTF2BRUVwy');
// 构建交易 builder
const txb = new bitcoin.TransactionBuilder();

// 添加交易中的 Inputs,假设这个 UTXO 有 15000 satoshi
txb.addInput('61d520ccb74288c96bc1a2b20ea1c0d5a704776dd0164a396efec3ea7040349d', 0);
// 添加交易中的 Outputs,矿工费用 = 15000 - 12000 = 3000 satoshi
// addOutput 方法的参数分别为收款地址和转账金额
txb.addOutput('1cMh228HTCiwS8ZsaakH8A8wze1JR5ZsP', 12000);

// 交易签名
txb.sign(0, alice);
// 打印签名后的交易 hash
console.log(txb.build().toHex());
隔离见证地址的交易
const keyPair = bitcoin.ECPair.fromWIF('cMahea7zqjxrtgAbB7LSGbcQUr1uX1ojuat9jZodMN87JcbXMTcA', testnet);
const pubKey = keyPair.getPublicKeyBuffer();
const pubKeyHash = bitcoin.crypto.hash160(pubKey);
// 得到隔离见证地址的回执脚本
const redeemScript = bitcoin.script.witnessPubKeyHash.output.encode(pubKeyHash);

// 构建交易 builder
const txb = new bitcoin.TransactionBuilder();

// 添加交易中的 Inputs,假设这个 UTXO 有 15000 satoshi
txb.addInput('61d520ccb74288c96bc1a2b20ea1c0d5a704776dd0164a396efec3ea7040349d', 0);
// 添加交易中的 Outputs,矿工费用 = 15000 - 12000 = 3000 satoshi
// addOutput 方法的参数分别为收款地址和转账金额
txb.addOutput('1cMh228HTCiwS8ZsaakH8A8wze1JR5ZsP', 12000);

// 交易签名
txb.sign(0, keyPair, redeemScript, null, 15000);
// 打印签名后的交易 hash
console.log(txb.build().toHex());
2.2 查询账户余额
BTC 采用的不是余额模型,所以这个地方实际查询的是UTXO。Inputs 需要获取转出地址的 UTXO,那有什么简便的方式来获取地址的 UTXO 呢?所幸BlockChain提供了一个 Api 可以来获取地址的 UTXO,Api信息如下:
- 网址:<https://blockchain.info/unspent?active=$address>
- 方法:GET
- 参数
- active: 要查询 UTXO 的地址,多个地址可以用
|号分隔 - limit: 返回的记录数限制,默认是 250,最大是 1000
- confirmations: 查询的 UTXO 必须是大于多少个确认,比如 confirmations=6
- active: 要查询 UTXO 的地址,多个地址可以用
{
    "unspent_outputs":[
        {
            "tx_age":"1322659106",
            "tx_hash":"e6452a2cb71aa864aaa959e647e7a4726a22e640560f199f79b56b5502114c37",
            "tx_index":"12790219",
            "tx_output_n":"0",
            "script":"76a914641ad5051edd97029a003fe9efb29359fcee409d88ac", (Hex encoded)
            "value":"5000661330"
        }
    ]
}
在返回的结果中有我们需要的交易 hash 和索引值,以及用来计算需要多少个 input 的 value 值,这样就可以算出交易需要哪些 Inputs 了。
在比特币的交易中,如果矿工费用设置过高或者过低,交易都不能成功生成,所以我们还需要计算交易中的矿工费用,这里有一个公式可以大致预估出交易所需的 size,然后将 size 再乘以每比特的价格就可以得到矿工费用了。
size = inputsNum * 180 + outputsNum * 34 + 10 (+/-) 40
- inputNum 指交易中的 Input 个数
- outputNum 指交易中的 Output 个数
- 最后一部分是加减 40
2.3 获取块高
const fetch = require('node-fetch');

async function getBtcBlockHeight() {
  const response = await fetch('https://api.blockcypher.com/v1/btc/main');
  const data = await response.json();

  return data.height;
}

getBtcBlockHeight().then(height => {
  console.log('Current BTC block height:', height);
});
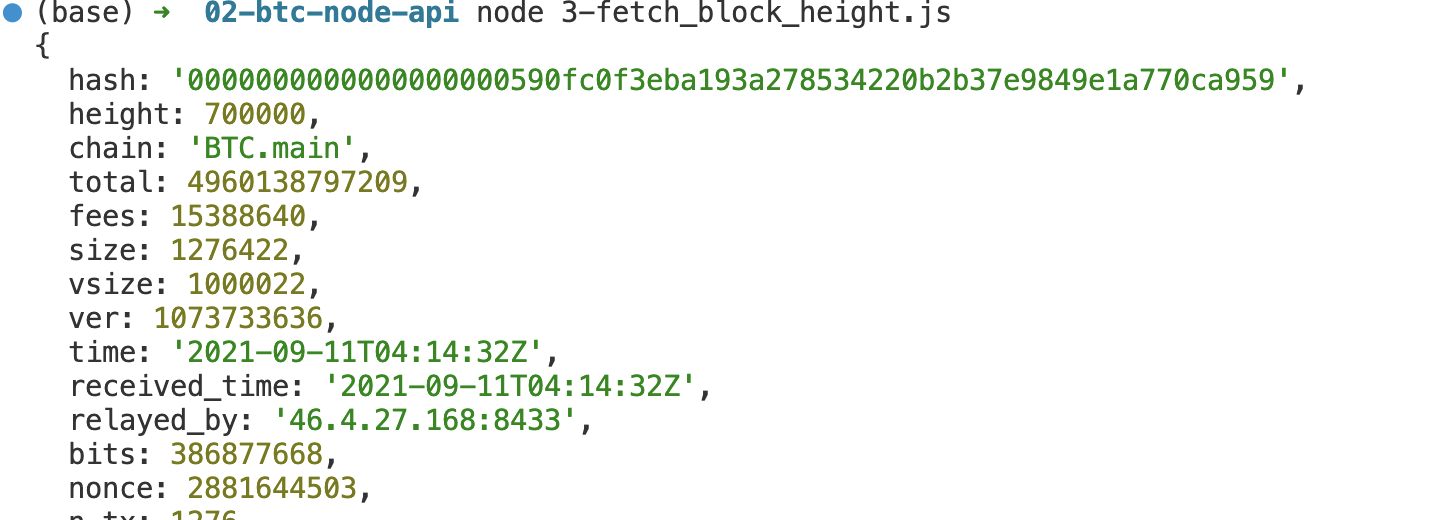
2.4 获取块详情
const fetch = require('node-fetch');

async function getBlockDetails(blockHeight) {
    const url = `https://api.blockcypher.com/v1/btc/main/blocks/${blockHeight}`;
    const response = await fetch(url);
    const data = await response.json();
    return data;
}

getBlockDetails(700000).then(block => {
    console.log(block)
});
2.5 获取交易详情
const fetch = require('node-fetch');

async function getTransactionDetails(txid) {
  const url = `https://api.blockcypher.com/v1/btc/main/txs/${txid}`;
  const response = await fetch(url);
  const data = await response.json();
  return data;
}

const txid = '0e3e2357e806b6cdb1f70b54c3a3a17b6714ee1f0e68bebb44a74b1efd512098';

getTransactionDetails(txid).then(txn => {
  console.log('Transaction Hash:', txn.hash);
  console.log('Confirmations:', txn.confirmations);
  console.log('Value:', txn.total);
  console.log('Coinbase:', txn.coinbase);
});
2.6 交易回执
严格上比特币没有交易回执,比特币因为使用UTXO模型,技术上没有交易回执的概念。与账户模型的以太坊不同,比特币的交易只是从输入到输出的代币转移,没有执行代码生成回执的过程。代码示例试图模拟交易回执的结构,返回交易确认信息。
const fetch = require('node-fetch');

async function getTransactionReceipt(txid) {

  const url = `https://api.blockcypher.com/v1/btc/main/txs/${txid}`;
  const response = await fetch(url);
  const tx = await response.json();

  if(!tx.received) {
    throw new Error('Transaction not yet confirmed');
  }

  const height = tx.received;
  const confirmations = tx.confirmations;
  const url2 = `https://api.blockcypher.com/v1/btc/main/blocks/${height}`;
  const response2 = await fetch(url2);
  const block = await response2.json();
  const timestamp = block.time;

  const receipt = {
    confirmations,
    timestamp
  };

  return receipt;
}

const txid = '0e3e2357e806b6cdb1f70b54c3a3a17b6714ee1f0e68bebb44a74b1efd512098';

getTransactionReceipt(txid).then(receipt => {
  console.log(receipt);
});
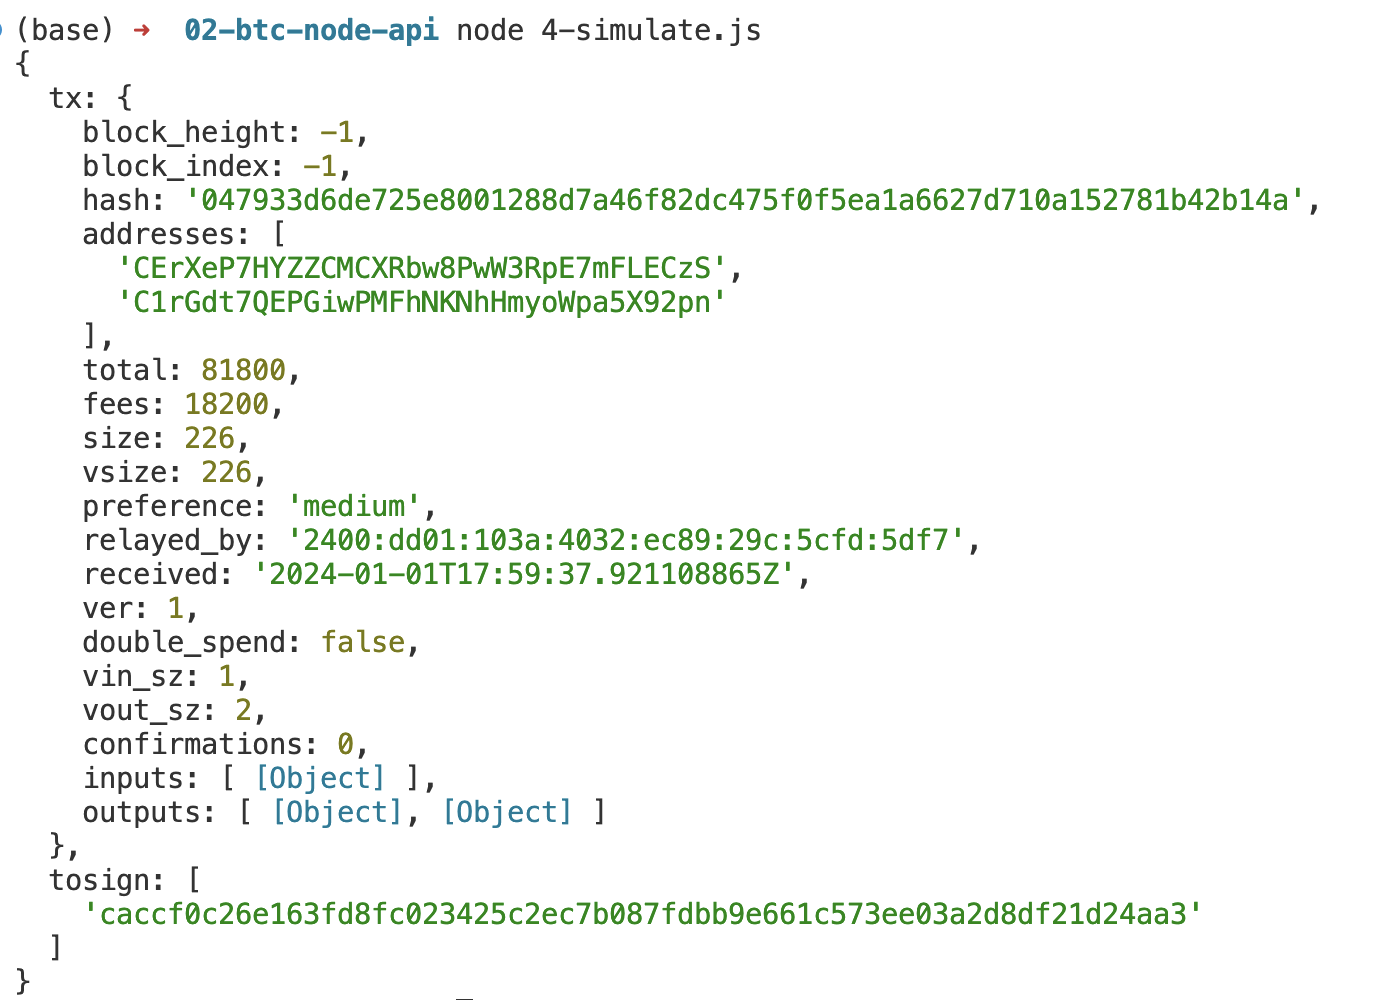
2.7 转账 & 广播交易
// 领取测试币
var data = {"address": "CErXeP7HYZZCMCXRbw8PwW3RpE7mFLECzS", "amount": 100000}
axios.post('https://api.blockcypher.com/v1/bcy/test/faucet?token=a122e0fd87a640e5b411b01f09b5ce3e', JSON.stringify(data))
    .then(function(resp) {console.log(resp.data)});   //水龙头领取测试币
var newtx = {
  inputs: [{addresses: ['CErXeP7HYZZCMCXRbw8PwW3RpE7mFLECzS']}],
  outputs: [{addresses: ['C1rGdt7QEPGiwPMFhNKNhHmyoWpa5X92pn'], value: 1000}]
};

// 创造交易
axios.post('https://api.blockcypher.com/v1/bcy/test/txs/new', JSON.stringify(newtx))
  .then(function(resp) {
    data = resp.data;
    console.log(data)
}); 
var bitcoin = require("bitcoinjs-lib");
var secp = require('tiny-secp256k1');
var ecfacory = require('ecpair');

var ECPair = ecfacory.ECPairFactory(secp);

const keyBuffer = Buffer.from(my_hex_private_key, 'hex')
var keys = ECPair.fromPrivateKey(keyBuffer)

var newtx = {
  inputs: [{ addresses: ['CEztKBAYNoUEEaPYbkyFeXC5v8Jz9RoZH9'] }],
  outputs: [{ addresses: ['C1rGdt7QEPGiwPMFhNKNhHmyoWpa5X92pn'], value: 100000 }]
};

// calling the new endpoint, same as above
axios.post('https://api.blockcypher.com/v1/bcy/test/txs/new', JSON.stringify(newtx))
  .then(function (tmptx) {
    // signing each of the hex-encoded string required to finalize the transaction
    tmptx.pubkeys = [];
    tmptx.signatures = tmptx.tosign.map(function (tosign, n) {
      tmptx.pubkeys.push(keys.publicKey.toString('hex'));
      return bitcoin.script.signature.encode(
        keys.sign(Buffer.from(tosign, "hex")),
        0x01,
      ).toString("hex").slice(0, -2);
    });
    // sending back the transaction with all the signatures to broadcast
    axios.post('https://api.blockcypher.com/v1/bcy/test/txs/send', JSON.stringify(tmptx))
      .done(function (finaltx) {
        console.log(finaltx);
      })
      .fail(function (xhr) {
        console.log(xhr.responseText);
      });
  });
Reference
[1] Infura 以太坊 API 入门教程 [2] Using dotenv package to create environment variables [3] 比特币交易开发实战(一) [4] blockcypher api document
- 原创
- 学分: 0
- 分类: 公链
- 标签:

