十分钟开发零知识证明之混币-实操篇
- 吴寿鹤
- 发布于 2019-12-18 10:55
- 阅读 8101
上一篇我们梳理了一下混币的基本原理,在这一篇中我们开始动手实现一个混币。
上一篇我们梳理了一下混币的基本原理,在这一篇中我们开始动手实现一个混币。
Merkle Tree
混币中最主要的数据结构就是Merkle tree,现在还是借助功德箱来分析如何利用Merkle tree来实现混币功能的。
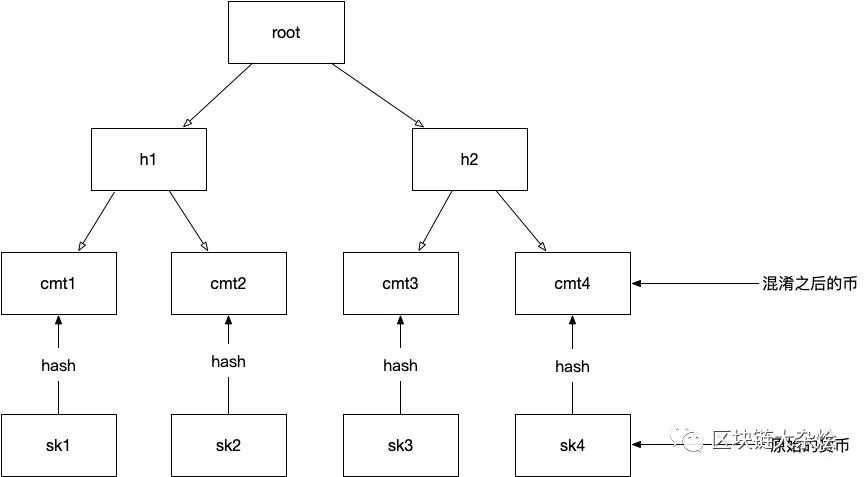
首先回顾一下功德箱的第一个特点:“所有游客向功德箱中放入都是同一年份的一元硬币”,这个特性保证了在功德箱中的硬币都是一模一样的,并且无法区分,这一特性是如何在Merkle tree中体现的?先看一下下面这张图,这张图中展示了所有与混币相关的操作,首先看一下如何让游客投入的硬币全部变成一模一样无法区分的硬币,这里用到的是hash算法,hash算法是不可逆的,也就是任何人都无法通过hash后的值推算出原始值是什么。利用hash函数的这一特点就可以将不同的硬币变成无法无法分辨的同质硬币了。具体操作看下面的图,图中最后一行是原始货币(游客要捐的香火钱),接下来原始货币会被hash函数进行处理变成commitment(混淆之后的货币),commitment会被添加到Merkle tree的叶子节点中,至此利用Merkle tree已经完成了功德箱的第一个特点。
接下来是功德箱的第二个特性:“使用零知识证明解决在不暴露相关信息的情况下,证明加密货币所有权的问题”。先看第一个问题如何证明加密货币所有权的问题,由于功德箱是通过Merkle tree实现,所以证明是否有某个货币所有权的问题就转化成是否可以证明你拥有Merkle tree上某个叶子节点的preimage(原始货币)同时能给出从这个叶子节点到Merkle tree根之间的路径也就是Merkle path。为了便于理解,接下来通过一个例子来说明,请看下图:
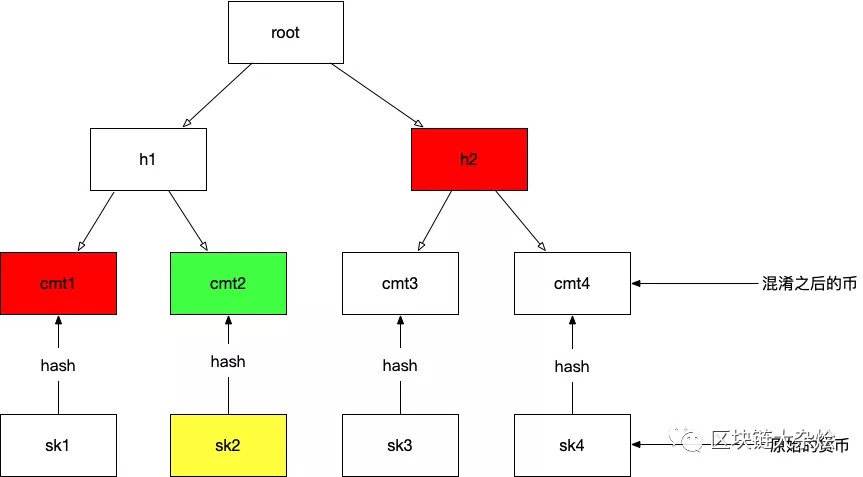
当小沙弥来到功德箱前,并想取走图中绿色方块(cmt2)中的钱,那么他首先需要提供cmt2的preimage也就是图中的黄色小方块(sk2),同时要提供一个从cmt2到root之间的Merkle path也就是图中标红的小方块(cmt1,h2),还有一个Merkle path索引(1,0)索引是(cmt1,h2)在Merkle tree中的位置,索引看用于计算nullifier以及从merkle path计算merkle root。
接下来需要解决的是如何在不暴露隐私的情况下能向他人证明我们拥有cmt2的preimage(sk2),要解决这个问题就需要零知识证明。请看下面这张图,这张图的作用在上一篇中已经介绍过,这张图演示了零知识证明生成以及校验的过程,在生成零知识证明的时候需要有输入即:Private input,Public Input,然后经过电路运算后会产生一个proof,接下来将proof交给verify校验即可。

有关电路如何编写将在下个章节中介绍,这里先明确哪些是可以作为public input参数可以公开的,哪些是可以作为private input需要隐藏的。
首先sk2是不能公开的,一旦公开其他人也可以利用sk2进行hash运算生成cmt2并且构造出一个merkle path,然后进行提款。第二个不能公开的是merkle path,因为一旦公开了merkle path,其他人就知道你在merkle tree上的某个叶子节点(cmt2)上取了钱,在结合之前的充钱记录,就可以将发送方与接收方联系起来了,因为向功德箱中放入钱是可以知道谁向Merkle tree上添加了哪个叶子节点的。
所以取款方的Private input为:
- sk
- Merkle path
- Merkle path index
小沙弥利用
Private input结合zk-snark生成的proof可以向公德箱提款了,这里有个问题由于公德箱并没有记录提款记录,那么同一个proof就可以多次提款,为了防止重复提币,还需要nullifier,nullifier是通过sk与Merkle path index进行hash运算产生的,nullifier=hash(sk,merkle_path_index)。另外Merkle tree的root需要公开,不然功德箱没办法校验小沙弥用的Merkle path是不是确实存在于功德箱里的Merkle tree上,小沙弥用一个假的Merkle path也能校验通过。
提款方的public input为:
- nullifier
- root 到目前为止,我们利用Merkle tree实现了功德箱的两个特性,接下来就是电路的设计,电路设计使用的Circom。
Circom
Circom是一种用于编写零知识证明的算术电路的语言,Circom简化了创建zk-snark电路的复杂度。Circom有个template关键字,template类似于java面向对象语言中的class,与class一样定义好的模板可以在不同的电路或其他的项目中重用。
下面就是一个模板的example:
template NAND() {
    signal private input a; // Private input 隐私输入
    signal input b; // public input  公开输入
    signal output out;

    // 约束
    out <== 1 - a*b;
    a*(a-1) === 0;
    b*(b-1) === 0;
}

component main = NAND();circom的语法类似于javascript,所以学习的门槛并不是很高,同时circom提供5个额外的操作符用于定义约束。
<==,==>操作符用于给signal赋值,同时会生成一个等于约束。
<--,-->操作为赋值符号,用于给signal赋值,但不生成任何约束。通常为了强制约束,可以与操作符===一起使用。
===操作符定义了等于约束,约束必须简化为a*b+c=0的形式,其中a、b和c是signal的线性组合。
如上面例子中a*(a-1) === 0,b(b-1) === 0强制所有的input必须是0或1。
电路设计
功德箱的电路就一个目的:“证明你知道merkle tree上某个叶子节点的preimage”。
首先实现一个公用电路GetMerkleRoot,GetMerkleRoot有三个输入参数:
- sk
- Merkle path
- Merkle path index
GetMerkleRoot的目的是对输入的参数进行计算,得出merkle path所在的merkle tree的root
GetMerkleRoot里使用的hash算法不是sha256而是mimc7,原因是mimc7对电路友好。
以下是GetMerkleRoot的源码:
include "../circomlib/circuits/mimc.circom"; //引入 mimc hash算法

template GetMerkleRoot(k){
    // k 是Merkle tree 的深度

    signal input leaf; // 叶子节点 preimage
    signal input paths2_root[k]; // Merkle path
    signal input paths2_root_pos[k]; // Merkle 路径索引

    signal output out;

    // 对Merkle path中前两个元素进行hash运算
    component merkle_root[k];
    merkle_root[0] = MiMC7(91);
    merkle_root[0].x_in <== paths2_root[0] - paths2_root_pos[0]* (paths2_root[0] - leaf);
    merkle_root[0].k <== leaf - paths2_root_pos[0]* (leaf - paths2_root[0]);

    // 对Merkle path中剩下的元素进行hash运算
    for (var v = 1; v < k; v++){
        merkle_root[v] = MiMC7(91);
        merkle_root[v].x_in <== paths2_root[v] - paths2_root_pos[v]* (paths2_root[v] - merkle_root[v-1].out);
        merkle_root[v].k<== merkle_root[v-1].out - paths2_root_pos[v]* (merkle_root[v-1].out - paths2_root[v]);

    }

    // 输出计算完成的Merkle tree root
    out <== merkle_root[k-1].out;

}接下来是Withdraw电路,withdraw的输入参数分两个部分:
-
public input
-
root
-
nullifierHash
-
-
private input
-
sk
-
Merkle path
-
Merkle path index
-
withdraw主要实现以下几个功能:
校验sk,merkle path与merkle path index计算出的root与public input中的root是否相等。
校验sk与merkle path index计算出的nullifierHash与public input中的nullifierHash是否相等
为什么withdraw电路计算的值需要与public input的参数相等?因为在链上校验proof的时候,合约会将链上的数据(root,nullifierHash),所以链下的计算会受到链上的约束。
下面是Withdraw电路的源码:
include "./get_merkle_root.circom"; // 导入 getMerkleRoot 电路
include "../circomlib/circuits/mimc.circom"; //引入 mimc hash算法
include "../circomlib/circuits/bitify.circom";

template Withdraw(k){
  // public input
  signal input root; // Merkle root
  signal input nullifierHash;  // nullifier

  // private input
  signal private input secret; // 叶子节点 preimage

  signal private input paths2_root[k]; // merkle path
    signal private input paths2_root_pos[k]; // merkle path index

  // root constrain
  component leaf = MiMC7(91);
  leaf.x_in <== secret;
  leaf.k <== 0;

    component computed_root = GetMerkleRoot(k);
    computed_root.leaf <== leaf.out;

    for (var w = 0; w < k; w++){
        computed_root.paths2_root[w] <== paths2_root[w];
        computed_root.paths2_root_pos[w] <== paths2_root_pos[w];
    }
    root === computed_root.out;

  // nullifier constrain
  component cmt_index = Bits2Num(k);
  for (var i =0 ;i < k ; i++){
    cmt_index.in[i] <== paths2_root_pos[i];
  }

  component nullifier = MiMC7(91);
  nullifier.x_in <== cmt_index.out;
  nullifier.k <== secret;

  nullifierHash === nullifier.out;

}

component main = Withdraw(8);
电路处理
现在所有电路已经全部编写完成了,接下来利用circom做以下几件事:
- 编译电路
- 计算witness
- trusted setup
- 生成proof
- 校验proof
首先安装Circom与snarkjs
npm install -g circom
npm install -g snarkjs
编译电路
执行以下命令编译电路,编译好的电路会放入circuit.json文件中。
circom withdraw.circom -o circuit.json现在电路已经编译完成了,我们可以使用snarkjs printconstraints查看电路约束。
snarkjs printconstraints -c circuit.json或着使用snarkjs info查看电路的统计信息
snarkjs info -c circuit.json

# Wires: 3674
# Constraints: 3656
# Private Inputs: 17
# Public Inputs: 2
# Outputs: 0
trusted setup
使用编译好的电路执行trusted setup,执行完成后会生成两个文件:proving_key.json与verification_key.json。生成证明时需要用到proving key,校验证明时需要用到verification key。
snarkjs setup -c circuit.json --protocol groth计算witness
在生成proof之前,需要生成符合电路约束的witness,零知识证明可以证明你知道一个witness,这个witness可以满足电路中所有的约束,但除了public input以及output不会向外泄露任何信息
在生成witness之间需要先将用到的public input以及private input放入到input.json文件中:
input.json内容:
{
    "root": "21150603275199036235447464146889900632582816435445773009431960038115036290869",
    "nullifierHash": "8112587267332776847096965636706065951984180935722389598817594570457611916925",
    "secret": "0",
    "paths2_root": [
        "0",
        "11730251359286723731141466095709901450170369094578288842486979042586033922425",
        "9246143820134657901174176070515121907817622693387763521229610032056676659170",
        "3919701857960328675810908960351443394156342162925591865624975500788003961839",
        "11868459870544964516983456008242250460119356993157504951373700810334626455267",
        "17452340833314273101389791943519612073692685328163719737408744891984034913325",
        "5253775198292439148470029927208469781432760606734473405438165226265735347735",
        "9586203148669237657308746417333646936338855598595657703565568663564319347700"
    ],
    "paths2_root_pos": [
        1,
        1,
        1,
        1,
        1,
        1,
        1,
        1
    ]
}接下来使用snarkjs calculatewitness来生成witness,命令执行完成后会将结果输出到witness.json文件中。
snarkjs calculatewitness -c circuit.json -i input.json生成证明
有了witness.json后就可以使用snarkjs proof生成证明
snarkjs proof -w witness.json --pk proving_key.json这个命令会使用proving_key.json和witness.json生成proof.json与public.json两个文件,proof.json包含证明相关信息。public.json包含public input以及电路运行后的outputs。
校验证明(链下校验)
运行snarkjs verify来验证proof是否正确,如果验证通过会输出OK,否则输出INVALID。
snarkjs verify --vk verification_key.json -p proof.json --pub public.json验证proof时会用到verification_key.json,proof.json以及public.json。
校验证明(链上校验)
为了能够在链上校验proof,需要生成一个链上合约。snarkjs generateverifier会用verification_key.json生成solidity代码并将solidity代码保存到verifier.sol文件中。
snarkjs generateverifier --vk verification_key.jsonverifier.sol中包含两个合约:
- Pairings
- Verifier
当部署合约时只需要部署Verifier合约即可。Verifier合约部署完成后,可以调用verifyProof方法校验proof,如果校验通过则返回true,否则返回false。
function verifyProof(
            uint[2] memory a,
            uint[2][2] memory b,
            uint[2] memory c,
            uint[2] memory input
) public view returns (bool r) {
        Proof memory proof;
        proof.A = Pairing.G1Point(a[0], a[1]);
        proof.B = Pairing.G2Point([b[0][0], b[0][1]], [b[1][0], b[1][1]]);
        proof.C = Pairing.G1Point(c[0], c[1]);
        uint[] memory inputValues = new uint[](input.length);
        for(uint i = 0; i < input.length; i++){
            inputValues[i] = input[i];
        }
        if (verify(inputValues, proof) == 0) {
            return true;
        } else {
            return false;
        }
}调用合约方法的参数可以通过snarkjs generatecall生成,snarkjs generatecall会用proof.json与public.json两个文件生成调用Verifier合约所需要的参数。
snarkjs generatecall -p proof.json --pub public.json

["0x2e282056742fb4fe24b65531a7e17e66fd2416d293d13a0b4ecc3a4b13be36c5", "0x22b245ca3c770f9ce2e946ccdd4052b9e13f5292009ea1f212a12b260043aa90"],[["0x2e2dbd1677ff7712cbc551c63e205d7e5469d52d07f2e4c700fac535378e6d3c", "0x05f4c0367542bb1281556ff8e773993ed56352dd8cbaa136662d42f959e0ae91"],["0x2088f897fa5e307f41864ce196e3cb94ed6f574fe594af0b7f3633b695cfb38e", "0x21f183a915e59a74744a48883c3d03350115897dc3c621c1ab491706350647e1"]],["0x2166c2e9c9b62f2188a07ea30a9234e6509eaed81a621a93ca7fe000c32fad76", "0x14eee56356071d21438029846397aefc94fc86d4f3fc521dfb2fbae034c9e049"],["0x2ec2d13597576e6e9a28d337af768c614a0b892a38aece30dd4df4b1138edf35","0x11ef8fc9e658c40fa4a8ae1d40e81084befc8a507f560bb0f2c33bb14cca567d"]
链上合约设计
电路生成好后接下来就到了最后一个环节链上合约设计,链上合约一共有两个:
- Merkle Tree
- Mixer
merkle tree合约主要负责:
- 维护
merkle tree数据结构 - 生成
merkle proof
Merkle tree合约源码:
pragma solidity ^0.5.0;

contract IMimc { // Mimc hash函数
  function MiMCpe7(uint256 in_x,uint256 in_k) public returns(uint256 out_x);
}

contract MerkelTree {
    mapping (uint256 => bool) public roots; // 记录Merkle tree上的root
    uint public tree_depth = 8; // Merkle tree 深度
    uint public no_leaves = 256; // Merkle tree 叶子节点个数
    struct Mtree {
        uint256 cur;
        uint256[256][9] leaves2; // tree depth + 1
    }

    Mtree public MT;

    IMimc mimc;

    event LeafAdded(uint256 index);

    event TestMimc(uint256);

    event MerkleProof(uint256[8] , uint256[8] );

    constructor(address _mimc) public{
        mimc = IMimc(_mimc);
    }

    //Merkletree.append(com)
    // 插入 commitment叶子节点
    function insert(uint256 com) public returns (uint256 ) {
        require (MT.cur != no_leaves );
        MT.leaves2[0][MT.cur] = com;
        updateTree();
        emit LeafAdded(MT.cur);
        MT.cur++;

        return MT.cur-1;
    }

    // 返回Merkle path,Merkle path index
    function getMerkelProof(uint256 index) public returns (uint256[8] memory, uint256[8] memory) {

        uint256[8] memory address_bits;
        uint256[8] memory merkelProof;

        for (uint256 i=0 ; i < tree_depth; i++) {
            // address_bits[i] = index%2;
            if (index%2 == 0) {
                address_bits[i]=1;
                merkelProof[i] = getUniqueLeaf(MT.leaves2[i][index + 1],i);
            }
            else {
                address_bits[i]=0;
                merkelProof[i] = getUniqueLeaf(MT.leaves2[i][index - 1],i);
            }
            index = uint256(index/2);
        }
        emit MerkleProof(merkelProof, address_bits);
        return(merkelProof, address_bits);
    }

    function getMimc(uint256 input, uint256 sk) public returns ( uint256) {
        emit TestMimc(mimc.MiMCpe7(input , sk));
        return mimc.MiMCpe7(input , sk);
    }

    function getUniqueLeaf(uint256 leaf, uint256 depth) public returns (uint256) {
        if (leaf == 0) {
            for (uint256 i=0;i<depth;i++) {
                leaf = mimc.MiMCpe7(leaf, leaf);
            }
        }
        return (leaf);
    }

    // 更新Merkle  tree
    function updateTree() public returns(uint256 root) {
        uint256 CurrentIndex = MT.cur;
        uint256 leaf1;
        uint256 leaf2;
        for (uint256 i=0 ; i < tree_depth; i++) {
            uint256 NextIndex = CurrentIndex/2;
            if (CurrentIndex%2 == 0) {
                leaf1 =  MT.leaves2[i][CurrentIndex];
                leaf2 = getUniqueLeaf(MT.leaves2[i][CurrentIndex + 1], i);
            } else {
                leaf1 = getUniqueLeaf(MT.leaves2[i][CurrentIndex - 1], i);
                leaf2 =  MT.leaves2[i][CurrentIndex];
            }
            MT.leaves2[i+1][NextIndex] = mimc.MiMCpe7( leaf1, leaf2);
            CurrentIndex = NextIndex;
        }
        return MT.leaves2[tree_depth][0];
    }

    function getLeaf(uint256 j,uint256 k) public view returns (uint256 root) {
        root = MT.leaves2[j][k];
    }

    // 返回Merkle tree root
    function getRoot() public view returns(uint256 root) {
        root = MT.leaves2[tree_depth][0];
    }

}Mixer合约主要负责:
- 记录所有合法
Merkle tree root,防止链下造假 - 记录已使用的
nullifierHash,防止双花 - 记录
commitment,确保同一个commitment不会多次被添加到Merkle tree上 deposit方法,用户调用deposit时,向Mixer中存储0.01以太币,同时会将commitment添加到merkle tree上withdraw方法,用户调用withdraw时,Mixer校验proof是否合法,如果合法则给用户转0.01以太币forward方法,用户调用forward时,Mixer校验proof是否合法,如何合法则在merkle tree中插入一个新的commitment
当merkle tree是空时,所有的commitment都是初始化状态"0x0",Alice向merkle tree中添加了一个commitment后,Bob从合约中用secret将这个commitment所表示的币给提走了,那么第三方很容易将Alice与Bob联系起来,从这里也可以看出当越多的人使用mixer时,mixer的隐私性越好,反之则越差。
那么在使用人数较少的时候如何保证隐私?当Bob接受到Alice的转账,Bob向将币转给Carl那么Bob可以调用forward方法,具体流程如下:
Bob向Mixer提供proof证明他可以消费某一个币,同时提交一个新的commitment这个commitment是Carl可以消费的forward校验Bob的proof是否正确,如何正确则向merkle tree中插入新的commitmentforawrd在合约中作废Bob已经消费的nulliferHash
Mixer合约源码:
pragma solidity ^0.5.0;

import "./MerkleTree.sol";
import "./verifier.sol";

contract Mixer is MerkelTree ,Verifier {
    mapping(uint256 => bool) public roots; // 记录所有合法的Merkle tree root
    mapping(uint256 => bool) public nullifierHashes; // 记录已使用的nullifier,防止双花
    mapping(uint256 => bool) public commitments; // 记录commitment,同一个commitment不允许放入两次

    // 每次只能向mixer中投入0.01个以太币
    uint256 constant public AMOUNT = 0.01 ether;

    event Deposit(uint256 indexed commitment, uint256 leafIndex, uint256 timestamp);
    event Withdraw(address to, uint256 nullifierHash);
    event Forward(uint256 indexed commitment, uint256 leafIndex, uint256 timestamp);

    // Constructor
    constructor  (address _mimc) MerkelTree(_mimc) public {

    }

    // 向mixer中存入0.01个以太坊,同时将_commitment插入到Merkle tree中
    function deposit (uint256 _commitment) payable public{
        require(!commitments[_commitment], "The commitment has been submitted");

        require(msg.value == AMOUNT);
        uint256 insertedIndex = insert(_commitment);
        commitments[_commitment] = true;
        roots[getRoot()] = true;
        emit Deposit(_commitment,insertedIndex,block.timestamp);
    }

    // 向mixer提交proof,校验通过后可以提走0.01个以太币
    function withdraw(uint[2] memory a,
            uint[2][2] memory b,
            uint[2] memory c,
            uint[2] memory input) public payable {

        uint256 _nullifierHash = uint256(input[1]);
        uint256 _root = uint256(input[0]);

        require(!nullifierHashes[_nullifierHash], "The note has been already spent");
        require(isKnownRoot(_root), "Cannot find your merkle root");
        require(verifyProof(a,b,c,input), "Invalid withdraw proof");

        nullifierHashes[_nullifierHash] = true;
        msg.sender.transfer(AMOUNT); // 处理转账
        emit Withdraw(msg.sender, _nullifierHash);
    }

    // forward 允许用户直接在合约中进行转账操作
    function forward (
            uint[2] memory a,
            uint[2][2] memory b,
            uint[2] memory c,
            uint[2] memory input,
            uint256 _commitment
) public returns (address) {

        uint256 _nullifierHash = uint256(input[1]);
        uint256 _root = uint256(input[0]);

        require(!commitments[_commitment], "The commitment has been submitted");
        require(!nullifierHashes[_nullifierHash], "The note has been already spent");
        require(isKnownRoot(_root), "Cannot find your merkle root"); // Make sure to use a recent one
        require(verifyProof(a,b,c,input), "Invalid withdraw proof");

        uint insertedIndex = insert(_commitment);
        roots[getRoot()] = true;

        nullifierHashes[_nullifierHash] = true;
        emit Forward(_commitment,insertedIndex,block.timestamp);
    }

    function isKnownRoot(uint256 _root) public returns(bool){
        return roots[_root];
    }

}到这里已经将实现混币的所有步骤都分享完了,下面演示一下怎么使用Mixer。
实例演示
我在ropsten上部署已经部署好一个Mxier合约
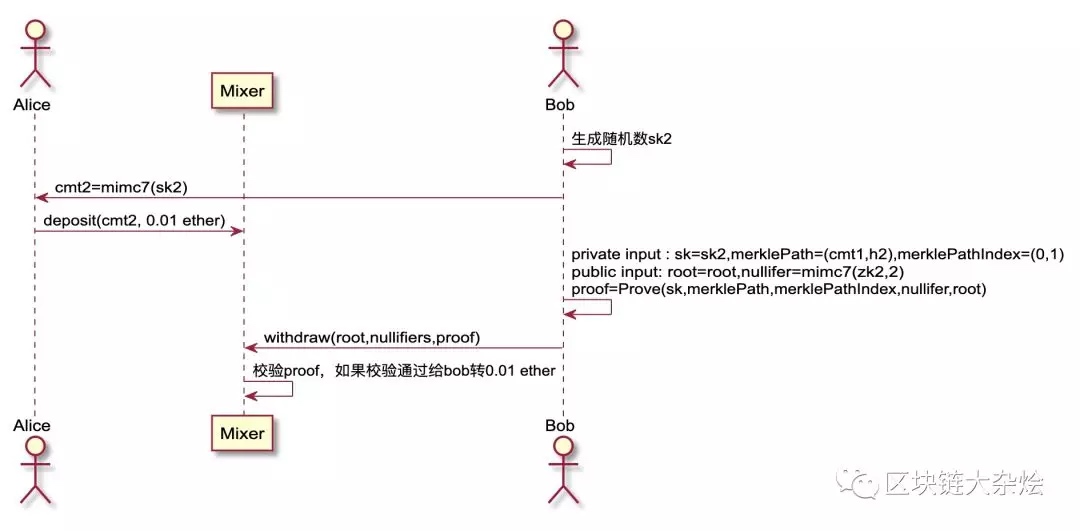
下图演示了使用Mixer的流程,例如:Alice要给Bob转0.01ether,那么会涉及到以下几个步骤:
Bob在本地产生一个随机数sk2,然后将sk2用mimc7进行hash运算得到cmt2,然后将cmt2发送给AliceAlice调用Mixer合约deposit方法,并传入cmt2参数Bob接收到Alice转账时,可以在本地生成proof,调用Mixer的withdraw方法取回0.01 ether。Mixer校验proof通过后,向Bob转0.01 ether
下图是我在ropsten上先存储0.01 ether,然后在取回0.01 ether

下图是在ropsten上调用Mixer合约deposit方法的交易记录:
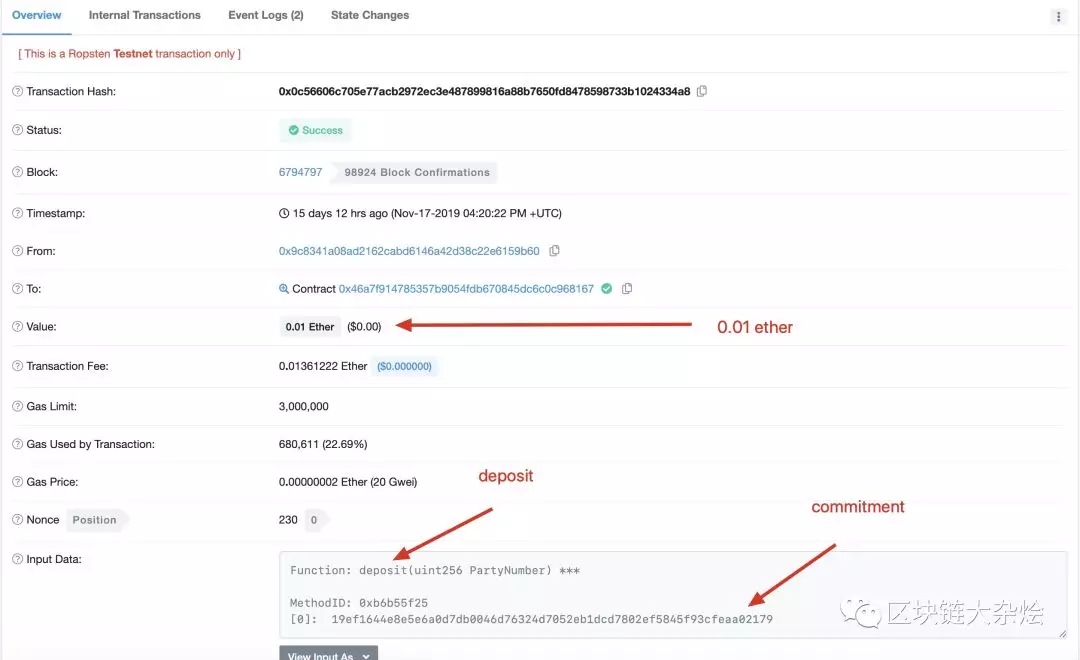 下图是在
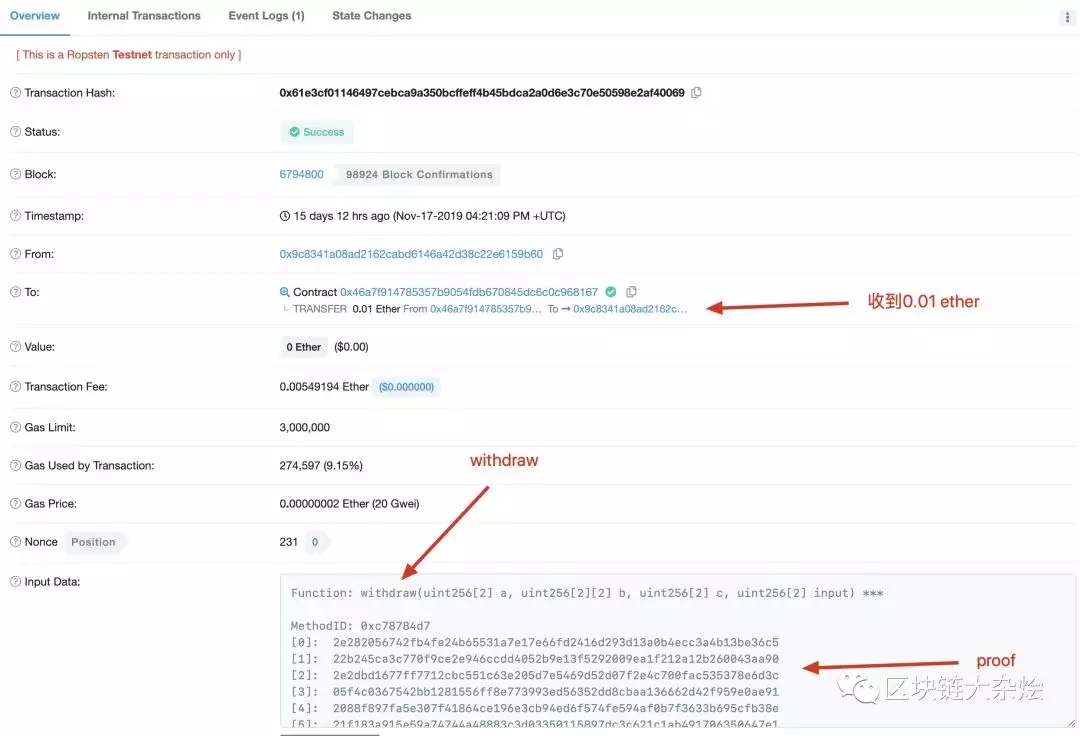
下图是在ropsten上调用Mixer合约withdraw方法的交易记录:
- 第四卷:CoinJoin匿名性的交叉攻击 785 浏览
- 揭秘隐私:加密货币中的混币和 CoinJoin 2622 浏览
- 比特币 - 运行 Tumbler 1179 浏览
- 运行 Joinmarket-Qt 进行 coinjoin 的操作步骤(单次或 Tumbler) 1122 浏览
- SNICKER:一种非交互式比特币混币方案 1035 浏览
- 比特币 - Knapsack 混币 1403 浏览
- CoinJoin 完全指南 1339 浏览
- 比特币与密码朋克的延续 1269 浏览

