Solana 开发学习笔记(一)——从 Hello World 出发
- anray
- 发布于 2021-11-01 12:30
- 阅读 40868
本章对 Solana 区块链的基本概念进行了简要介绍,并介绍了开发 Solana 链上程序必须安装和配置的编程环境。通过对 Hello World 这个官方演示项目源码的解读,了解如何使用 Rust 开发链上程序,并使用 Solana CLI 来构建与部署,以及使用 Solana JavaScript SDK 与链上程序进行交互。
笔者注:因近期笔者工作需要,开始接触 Solana 链上程序开发。本系列文章是笔者的学习笔记,既是为了备忘,也是希望得到 Solana 开发者的指点与交流。本系列文章将默认读者已经掌握 Rust 的基础语法,故不涉及对 Rust 语法细节的解释。如果读者对 Rust 基础语法还不熟练的话,可参阅相关资料或购买本文下方推荐的 Rust 入门书籍《Rust 编程入门、实战与进阶》学习。
1.1 Solana 简介
Solana 是一个高性能、无许可的底层公链,专注于在不牺牲去中心化或安全性的前提下提供可扩展性。Solana 主网于 2020 年一季度上线,目前主网的全球节点超过 800 个,TPS 最高可达 6.5 万,出块时间约 400 毫秒。
Solana 的共识算法采用 PoH(历史证明),其核心是一个去中心化时钟,该时钟旨在解决缺乏单个可信赖时间源在分布式网络中的时间问题。PoH 免除了在节点网络中广播时间戳的需求,从而提高整个网络的效率。
1.1.1 链上程序
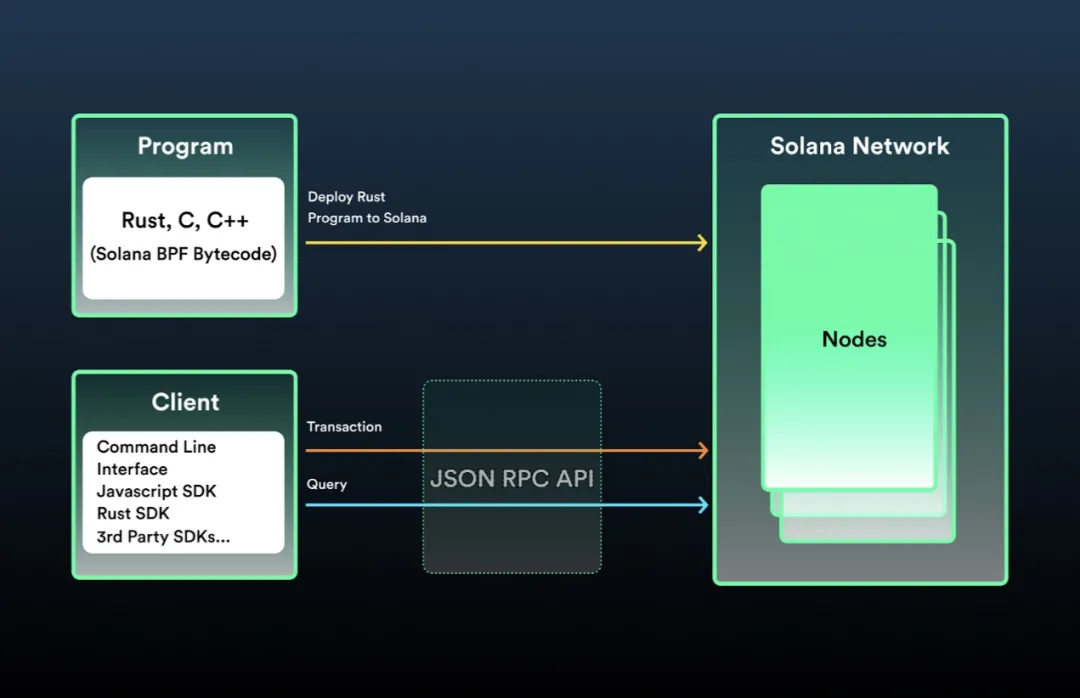
Solana 的智能合约叫做链上程序(On-chain Program),Solana 官方提供了 Rust 和 C 的 SDK 来支持开发链上程序。链上程序的开发工作流如图 1-1 所示,开发者可以使用工具将程序编译成 Berkley Packet Filter (BPF) 字节码(文件以 .so 为扩展名),再部署到 Solana 链上,通过 Sealevel 并行智能合约运行时去执行智能合约的逻辑。此外,基于 Solana JSON RPC API,官方提供了诸多 SDK 用于客户端与 Solana 链上数据交互。
图 1-1 链上程序开发工作流

1.1.2 账户模型
与以太坊类似,Solana 也是基于账户模型的区块链。通过将任意状态存储于链上账户并同步复制给集群中的所有节点,可以创建复杂而强大的去中心化应用程序。
Solana 提供了一套不同于以太坊的账户模型,账户定义的字段如表 1-1 所示。Solana 的账户可以分为可执行账户和不可执行账户。
- 可执行账户:存储不可变的数据,主要用于存储程序的 BPF 字节码。
- 不可执行账户:存储可变的数据,主要用于存储程序的状态。
表 1-1 账户定义字段
| 字段 | 描述 |
|---|---|
| lamports | 账户余额 |
| owner | 账户所有者 |
| executable | 是否为可执行账户 |
| data | 账户存储的数据 |
| rent_epoch | Solana链上程序的部署是按其账户大小进行定期收费的,如果账户无法支付租金,系统将清除该账号 |
我们知道以太坊上每个智能合约的代码和状态都存储在同一个账户中,而 Solana 链上程序是只读或无状态的,即程序的账户(可执行账户)只存储 BPF 字节码,不存储任何状态,程序会把状态存储在其他独立的账户(不可执行账户)中。为了区分某个账户是用作哪个程序的状态存储,每个账户都指定了一个程序作为其所有者。程序可以读取其不作为所有者的账户中的状态,但只有作为所有者的程序才能修改账户中的状态,任何其他程序所做的修改都会被还原并导致交易失败。
更多关于账户模型的资料可以参见官方文档:https://solana.wiki/zh-cn/docs/account-model/
1.2 搭建编程环境
在开始 Solana 链上程序开发之前,需要先安装和配置相关的编程环境。首先请正确安装 Node、NPM 和 Rust 的最新稳定版本,下面来安装 Solana CLI 并配置相关环境。
1.2.1 安装 Solana CLI
Solana CLI 是与 Solana 集群进行交互的命令行管理工具,包含节点程序 solana-validator、密钥对生成工具 solana-keygen,以及合约开发工具 cargo-build-bpf、cargo-test-bpf 等。
在终端运行以下命令,可完成 Solana CLI 最新稳定版的下载与安装。
sh -c "$(curl -sSfL https://release.solana.com/stable/install)"如果安装成功,会出现以下内容。
downloading stable installer
  ✨ stable commit e9bef425 initialized
Adding export PATH="~/.local/share/solana/install/active_release/bin:$PATH" to ~/.profile
Adding export PATH="~/.local/share/solana/install/active_release/bin:$PATH" to ~/.bash_profile

Close and reopen your terminal to apply the PATH changes or run the following in your existing shell:
  export PATH="~/.local/share/solana/install/active_release/bin:$PATH"
Solana CLI 的所有命令行工具都安装在 ~/.local/share/solana/install/active_release/bin 中,并会自动将该路径加入 ~/.profile 和 ~/.bash_profile 文件的 PATH 环境变量。
运行以下命令,检查 PATH 环境变量是否已正确设置。
solana --version

// solana-cli 1.7.18 (src:e9bef425; feat:140464022)
如果能显示 solana-cli 的版本号、版本哈希等信息,代表环境变量设置成功。如果未看到这些信息,请检查相关文件中 PATH 环境变量设置的路径是否正确。
如果已安装过 Solana CLI,想升级到最新版本,可在终端运行以下命令。
solana-install update
1.2.2 配置 Solana CLI
1. 连接到集群
Solana 的集群有本地集群(localhost)和公开集群。根据不同的用途,公开集群又分为开发者网络(devnet)、测试网(testnet)和主网(mainnet-beta)。
- devnet 是适用于开发者的集群,开发者可获得 SOL token 的空投,但这个 SOL token 不具有真实价值,仅限测试使用。devnet 的 RPC 链接是 https://api.devnet.solana.com 。
- testnet 是用于测试最新功能的集群,如网络性能、稳定性和验证程序行为等。同样可获得 SOL token 的空投,但也仅限测试使用。testnet 的 RPC 链接是 https://api.testnet.solana.com 。
- mainnet-beta 是主网集群,在 Mainnet Beta 上发行的 SOL token 具有真实价值。mainnet-beta 的 RPC 链接是 https://api.mainnet-beta.solana.com 。
运行以下命令,根据实际需要来选择集群。
// 选择localhost集群
solana config set --url localhost

// 选择devnet集群
solana config set --url devnet
2. 创建账户
如果是第一次使用 Solana CLI,需要先创建一个账户。运行以下命令,根据操作提示可以设置一个 BIP39 规范的密码,此密码用来增强助记词的安全性,当然也可以为空。生成新的账户后,密钥对会被自动写入 ~/.config/solana/id.json 文件中。需要注意的是,这种存储密钥对的方式是不安全的,仅限开发测试使用。
solana-keygen new要查看当前这个账户的公钥,运行以下命令。
solana-keygen pubkey当前如果是在 devnet 集群,该账户的余额为 0 SOL,可以运行以下命令查询余额。
solana balance在 devnet 上申请 SOL 空投,运行以下命令后再次查询当前账户的余额,会发现余额为 2 SOL。
solana airdrop 21.3 第一个 Solana 项目——Hello World
Hello World 是一个官方演示项目,展示了如何使用 Rust 和 C 开发链上程序,并使用 Solana CLI 来构建与部署,以及使用 Solana JavaScript SDK 与链上程序进行交互。
1.3.1 Hello World 源码解读
example-helloworld 项目的目录结构如下所示,其中 program-rust 目录下是 Rust 开发的程序源代码,client 目录下是客户端的源代码。
example-helloworld
|
+-- src
|  |
|  +-- client
|  |  |
|  |  +-- hello_world.ts
|  |  |
|  |  +-- main.ts
|  |  |
|  |  +-- utils.ts
|  |
|  +-- program-rust
|  |  |
|  |  +-- src
|  |  |  |
|  |  |  +-- lib.rs
|  |  |
|  |  +-- tests
|  |  |  |
|  |  |  +-- lib.rs
|  |  |
|  |  +-- Cargo.toml
|  |  |
|  |  +-- Xargo.toml
|
+-- .gitignore
|
+-- package.json
|
+-- tsconfig.json
1. 链上程序源码解读
program-rust/src/lib.rs 是链上程序的核心代码,如代码清单 1-1 所示,实现了将程序被调用次数存储在链上账户中。
第 1 行代码将 borsh::BorshDeserialize 和 borsh::BorshSerialize 引入本地作用域,用于序列化和反序列化数据。第 2~9 行代码将 Solana Rust SDK 的模块引入本地作用域,使用 Rust 编写程序都需要这个 SDK。
第 13~16 行代码定义了 GreetingAccount 结构体作为存储在账户中的状态类型,里面有一个 u32 类型的字段 counter,用于记录程序被有效调用的次数。
第 19 行代码 entrypoint 声明了 process_instruction 函数是程序入口,每个程序都有一个唯一的入口。第 22~26 行代码是 process_instruction 函数签名,它要接收 3 个参数:
- program_id:链上程序的部署地址,在这里也就是 helloworld 程序账户的公钥。
- accounts:与程序交互的账户列表,当前程序会使用账户列表中的账户来存储状态或修改账户中的数据。如果当前程序不是某个账户的所有者,那就无法使用该账户存储状态或修改数据,当前交易会执行失败。
- instruction_data:指令数据,比如要转账的代币数量、转账地址等。
process_instruction 函数的返回值类型是 ProgramResult,ProgramResult 类型的定义如下所示。
pub type ProgramResult = Result<(), ProgramError>;当程序的逻辑执行成功时返回 Ok(()),否则将 ProgramError 错误返回。ProgramError 是自定义错误的枚举类型,其中包含程序可能失败的各种原因。
第 27 行代码使用 msg! 宏将字符串输出到日志中,方便观察业务的执行逻辑和调试信息。第 30 行代码通过 iter 方法将账户列表转换为迭代器,以安全的方式获取账户地址。第 33 行代码使用了 ? 操作符,如果迭代器中有账户地址,会将账户地址与变量 account 绑定。如果迭代器中没有账户地址,? 操作符会让程序执行失败。
第 36~39 行代码判断存储状态的账户所有者是否是当前程序。只有账户所有者才能修改数据,否则输出日志并返回。
第 42~44 行代码先对账户中的数据进行反序列化操作,再将 counter 加一,最后将其序列化后存储到账户中。
代码清单 1-1 helloworld 链上程序
use borsh::{BorshDeserialize, BorshSerialize};
use solana_program::{
    account_info::{next_account_info, AccountInfo},
    entrypoint,
    entrypoint::ProgramResult,
    msg,
    program_error::ProgramError,
    pubkey::Pubkey,
};

/// Define the type of state stored in accounts
#[derive(BorshSerialize, BorshDeserialize, Debug)]
pub struct GreetingAccount {
    /// number of greetings
    pub counter: u32,
}

// Declare and export the program's entrypoint
entrypoint!(process_instruction);

// Program entrypoint's implementation
pub fn process_instruction(
    program_id: &Pubkey, // Public key of the account the hello world program was loaded into
    accounts: &[AccountInfo], // The account to say hello to
    _instruction_data: &[u8], // Ignored, all helloworld instructions are hellos
) -> ProgramResult {
    msg!("Hello World Rust program entrypoint");

    // Iterating accounts is safer then indexing
    let accounts_iter = &mut accounts.iter();

    // Get the account to say hello to
    let account = next_account_info(accounts_iter)?;

    // The account must be owned by the program in order to modify its data
    if account.owner != program_id {
        msg!("Greeted account does not have the correct program id");
        return Err(ProgramError::IncorrectProgramId);
    }

    // Increment and store the number of times the account has been greeted
    let mut greeting_account = GreetingAccount::try_from_slice(&account.data.borrow())?;
    greeting_account.counter += 1;
    greeting_account.serialize(&mut &mut account.data.borrow_mut()[..])?;

    msg!("Greeted {} time(s)!", greeting_account.counter);

    Ok(())
}
2. 客户端程序源码解读
要想测试链上程序,我们必须通过 Solana JSON RPC API 去和链上程序进行交互。example-helloworld 项目提供的客户端用 Typescript 编写,使用了 web3.js 库这个 Solana JavaScript SDK。
在 client 目录下,客户端执行的入口是 main.ts 文件,它按特定的顺序执行任务,每个任务的业务逻辑代码在 hello_world.ts 文件。
首先,客户端调用 establishConnection 函数与集群建立连接。
export async function establishConnection(): Promise<void> {
  const rpcUrl = await getRpcUrl();
  connection = new Connection(rpcUrl, 'confirmed');
  const version = await connection.getVersion();
  console.log('Connection to cluster established:', rpcUrl, version);
}
接着,客户端调用 establishPayer 函数来确保有一个有支付能力的账户。
export async function establishPayer(): Promise<void> {
  let fees = 0;
  if (!payer) {
    const {feeCalculator} = await connection.getRecentBlockhash();

    // Calculate the cost to fund the greeter account
    fees += await connection.getMinimumBalanceForRentExemption(GREETING_SIZE);

    // Calculate the cost of sending transactions
    fees += feeCalculator.lamportsPerSignature * 100; // wag

    try {
      // Get payer from cli config
      payer = await getPayer();
    } catch (err) {
      // Fund a new payer via airdrop
      payer = await newAccountWithLamports(connection, fees);
    }
  }

  const lamports = await connection.getBalance(payer.publicKey);
  if (lamports < fees) {
    // This should only happen when using cli config keypair
    const sig = await connection.requestAirdrop(
      payer.publicKey,
      fees - lamports,
    );
    await connection.confirmTransaction(sig);
  }

  console.log(
    'Using account',
    payer.publicKey.toBase58(),
    'containing',
    lamports / LAMPORTS_PER_SOL,
    'SOL to pay for fees',
  );
}
然后,客户端调用 checkProgram 函数从 src/program-rust/target/deploy/helloworld-keypair.json 中加载已部署程序的密钥对(此操作前需先构建链上程序,详见 1.3.2 节),并使用密钥对的公钥来获取程序账户。如果程序不存在,客户端会报错并停止执行。如果程序存在,将创建一个新账户来存储状态,并以该程序作为新账户所有者。这里新账户存储的状态,就是程序被调用的次数。
export async function checkProgram(): Promise<void> {
  // Read program id from keypair file
  try {
    const programKeypair = await createKeypairFromFile(PROGRAM_KEYPAIR_PATH);
    programId = programKeypair.publicKey;
  } catch (err) {
    const errMsg = (err as Error).message;
    throw new Error(
      `Failed to read program keypair at '${PROGRAM_KEYPAIR_PATH}' due to error: ${errMsg}.`,
    );
  }

  // Check if the program has been deployed
  const programInfo = await connection.getAccountInfo(programId);
  if (programInfo === null) {
    if (fs.existsSync(PROGRAM_SO_PATH)) {
      throw new Error(
        'Program needs to be deployed with `solana program deploy dist/program/helloworld.so`',
      );
    } else {
      throw new Error('Program needs to be built and deployed');
    }
  } else if (!programInfo.executable) {
    throw new Error(`Program is not executable`);
  }
  console.log(`Using program ${programId.toBase58()}`);

  // Derive the address (public key) of a greeting account from the program so that it's easy to find later.
  const GREETING_SEED = 'hello';
  greetedPubkey = await PublicKey.createWithSeed(
    payer.publicKey,
    GREETING_SEED,
    programId,
  );

  // Check if the greeting account has already been created
  const greetedAccount = await connection.getAccountInfo(greetedPubkey);
  if (greetedAccount === null) {
    console.log(
      'Creating account',
      greetedPubkey.toBase58(),
      'to say hello to',
    );
    const lamports = await connection.getMinimumBalanceForRentExemption(
      GREETING_SIZE,
    );

    const transaction = new Transaction().add(
      SystemProgram.createAccountWithSeed({
        fromPubkey: payer.publicKey,
        basePubkey: payer.publicKey,
        seed: GREETING_SEED,
        newAccountPubkey: greetedPubkey,
        lamports,
        space: GREETING_SIZE,
        programId,
      }),
    );
    await sendAndConfirmTransaction(connection, transaction, [payer]);
  }
}
客户端再调用 sayHello 函数向链上程序发送交易。一个交易可以包含一个或多个不同的指令,当前该交易包含了一个指令,指令中带有要调用链上程序的 Program Id 以及客户端要交互的账户地址。需要注意的是,如果交易中包含多个不同的指令,其中有一个指令执行失败,那么所有指令所做的操作都会被还原。
export async function sayHello(): Promise<void> {
  console.log('Saying hello to', greetedPubkey.toBase58());
  const instruction = new TransactionInstruction({
    keys: [{pubkey: greetedPubkey, isSigner: false, isWritable: true}],
    programId,
    data: Buffer.alloc(0), // All instructions are hellos
  });
  await sendAndConfirmTransaction(
    connection,
    new Transaction().add(instruction),
    [payer],
  );
}
最后,客户端调用 reportGreetings 函数访问账户数据,查询链上程序被有效调用的次数。
export async function reportGreetings(): Promise<void> {
  const accountInfo = await connection.getAccountInfo(greetedPubkey);
  if (accountInfo === null) {
    throw 'Error: cannot find the greeted account';
  }
  const greeting = borsh.deserialize(
    GreetingSchema,
    GreetingAccount,
    accountInfo.data,
  );
  console.log(
    greetedPubkey.toBase58(),
    'has been greeted',
    greeting.counter,
    'time(s)',
  );
}
1.3.2 Hello World 构建与部署
1. 创建项目
使用 git clone 命令下载 example-helloworld 项目。
git clone https://github.com/solana-labs/example-helloworld.git
cd example-helloworld
2. 构建链上程序
运行以下命令,在 program-rust 目录下构建链上程序。
cd src/program-rust/
cargo build-bpf
构建完成后,src/program-rust/target/deploy 目录下的 helloworld.so 就是可在 Solana 集群部署的链上程序的 BPF 字节码文件。
3. 启动本地集群
当前项目在本地集群部署运行,因此首先选择 localhost 集群,运行以下命令。
solana config set --url localhost本地集群设置成功,会出现以下内容。
Config File: ~/.config/solana/cli/config.yml
RPC URL: http://localhost:8899
WebSocket URL: ws://localhost:8900/ (computed)
Keypair Path: ~/.config/solana/id.json
Commitment: confirmed
再运行以下命令,启动 localhost 集群。
solana-test-validator看到以下内容,代表本地集群已成功启动。
Ledger location: test-ledger
Log: test-ledger/validator.log
Identity: A4HuRgmABNCe94epY2mU7q6WqEHCo2B9iBFE5Yphiw5u
Genesis Hash: 96TF9n1uuyFv4rAKECffA61jLrgYjMjNRZ3hJpP6HSr7
Version: 1.7.18
Shred Version: 13390
Gossip Address: 127.0.0.1:1024
TPU Address: 127.0.0.1:1027
JSON RPC URL: http://127.0.0.1:8899
⠉ 00:00:42 | Processed Slot: 45430 | Confirmed Slot: 45430 | Finalized Slot: 45398 | Snapshot Slot: 45300 | Transactions: 45452 | ◎499.772930000
4. 部署链上程序
运行以下命令,在 localhost 集群部署链上程序。
solana program deploy target/deploy/helloworld.so

// Program Id: 6AArMEBpFhhtU2mBnEMEPeEH7xkhfUwPseUeG4fhLYto
链上程序部署成功会返回 Program Id,它类似于以太坊智能合约的地址。
5. 调用链上程序
helloworld 已成功部署,可以与它进行交互了!example-helloworld 项目提供了一个简单的客户端,在运行客户端之前先安装依赖软件包。
npm install由于我们调整了链上程序的构建方式,没有使用该项目默认的 npm run build:program-rust 命令,因此需要修改 client 目录下的 hello_world.ts 文件,将第 48 行代码定义的变量 PROGRAM_PATH 的路径由“../../dist/program”改为“../program-rust/target/deploy”。 再运行以下命令,启动客户端去调用链上程序。
npm run start客户端成功调用链上程序,输出内容如下所示。如果再次运行客户端,第 10 行所显示的次数会加一。至此,我们已经成功在 Solana 集群部署链上程序并与之交互了。
> helloworld@0.0.1 start
> ts-node src/client/main.ts

Let's say hello to a Solana account...
Connection to cluster established: http://localhost:8899 { 'feature-set': 3179062686, 'solana-core': '1.6.23' }
Using account 4xRm2FYmRB8WdxJk6nXicVMgsPnsxChEnpQwFDGwdcSS containing 499999999.93435186 SOL to pay for fees
Using program 6AArMEBpFhhtU2mBnEMEPeEH7xkhfUwPseUeG4fhLYto
Creating account Eq7bcsg5p6AaYiPnfiia99ESsuq4B4jYpVbWZhQ94Zvy to say hello to
Saying hello to Eq7bcsg5p6AaYiPnfiia99ESsuq4B4jYpVbWZhQ94Zvy
Eq7bcsg5p6AaYiPnfiia99ESsuq4B4jYpVbWZhQ94Zvy has been greeted 1 time(s)
Success
如果没有输出期望值,请首先确认是否已正确启动了本地集群,构建并部署好了链上程序。此外,可以运行以下命令查看程序日志,日志包括程序日志消息以及程序失败信息。
solana logs包含程序失败信息的日志如下所示,检查日志找出程序失败的原因。
Transaction executed in slot 5621:
Signature: 4pya5iyvNfAZj9sVWHzByrxdKB84uA5sCxLceBwr9UyuETX2QwnKg56MgBKWSM4breVRzHmpb1EZQXFPPmJnEtsJ
Status: Error processing Instruction 0: Program failed to complete
Log Messages:
  Program G5bbS1ipWzqQhekkiCLn6u7Y1jJdnGK85ceSYLx2kKbA invoke [1]
  Program log: Hello World Rust program entrypoint
  Program G5bbS1ipWzqQhekkiCLn6u7Y1jJdnGK85ceSYLx2kKbA consumed 200000 of 200000 compute units
  Program failed to complete: exceeded maximum number of instructions allowed (200000) at instruction #334
  Program G5bbS1ipWzqQhekkiCLn6u7Y1jJdnGK85ceSYLx2kKbA failed: Program failed to complete
1.4 本章小节
本章对 Solana 区块链的基本概念进行了简要介绍,Solana 的智能合约叫做链上程序。在开始 Solana 链上程序开发之前,需要先安装和配置相关的编程环境,我们着重介绍了 Solana CLI 的安装和配置。
Hello World 是一个官方演示项目,通过对这个项目源码的解读,我们了解了如何使用 Rust 开发链上程序,并使用 Solana CLI 来构建与部署,以及使用 Solana JavaScript SDK 与链上程序进行交互。
推荐 Rust 入门学习书籍《Rust 编程入门、实战与进阶》,该书详细讲解 Rust 核心语法,注重编码能力训练,将数据结构、算法与 Rust 编程结合,精选 39 道 LeetCode 高频算法面试真题。需要购买书籍的朋友,可以访问当当网或扫描下方二维码。

扫码关注公众号

- Agave 3.1 更新:你需要知道的一切 221 浏览
- lambdaworks 2026 年更新路线图和优先级 242 浏览
- 为了理解,你必须创造,或我们为什么构建一个开源的 Solana 聚合器 301 浏览
- 手把手教你用 Rust 打造复古太空射击游戏 263 浏览
- Bankrun是什么以及如何使用它来增强Solana本地开发? 280 浏览
- 什么是Amman,以及如何使用它来增强Solana本地开发? 314 浏览

