Sui Move初体验(2) -- 创建 NFT 剑
- MoveMoon
- 发布于 2022-10-08 16:22
- 阅读 4061
Sui Move初体验(2) -- 创建 NFT 剑

Sui Move 初体验系列文章包含:
- 介绍和铸造一个简单的NFT
- 建立一个简单的剑的例子。
- 构建一个带有前端的简单井字游戏实例
示例 -- 铸造一把剑
让我们简单的想像一个游戏示例来进行研究。请确保你的工作电脑有Sui binaries,克隆相应的代码库,因为本教程假设你是在Sui版本库上工作。
    $ git clone <https://github.com/MystenLabs/sui.git> --branch devnet
$ which sui-move // make sure the path to Sui binaries (~/.cargo/bin)现在的目录结构应该是下面的样子。你可以参考这里或官方文档中的代码示例。在当前目录下创建一些文件,该目录与 Sui 代码库 平级。
    $ mkdir -p my_move_package/sources
    touch my_move_package/sources/m1.move
    touch my_move_package/Move.toml
    current_directory
    ├── sui
    ├── my_move_package
        ├── Move.toml
        ├── sources
            ├── m1.move
对于初学者来说,应该先声明模块。我们希望一把剑是一个可升级的对象,可能被几个用户使用。
module my_first_package::m1 {
  // Please note that we need to import the ID package from Sui framework
  // to gain access to the VersionedID struct type defined in this package.
  use sui::id::VersionedID;
  use sui::tx_context::TxContext;

  struct Sword has key, store {
    id: VersionedID,
    magic: u64,
    strength: u64,
  }
}如果开发者希望从不同的包中访问剑的特性,该结构体必须在其模块中包括public访问器函数。该资产还具有magic和strength字段,描述其各种属性字段的值,此外还有必要的id字段以及key和store能力。
public fun magic(self: & Sword): u64 {
  self.magic
}
public fun strength(self: & Sword): u64 {
  self.strength
}让我们先写一些测试方法。为了给我们的剑构建一个唯一的标识符,我们必须首先创建一个TxContext结构的模拟。接下来,我们创建实体剑。最后,我们使用它的访问器方法,以确保它们提供预期的结果。
注意,剑本身是作为一个只读的引用参数提供给函数的访问器方法的,而假(dummy)上下文是作为一个可变的引用参数&mut传递给tx_context::new_id函数。
#[test]
public fun test_sword_create() {
  use sui::tx_context;
  use sui::transfer;
  // create a dummy instance of TXContext so that to create sword object
  let ctx = tx_context::dummy();
  // create a sword
  let sword = Sword {
    // dummy context is passed to `tx_context::new_id`
    id: tx_context::new_id( &mut ctx),
    magic: 42,
    strength: 7
  };
  // check if accessor function returns correct values
  assert!(magic( & sword) == 42 && strength( & sword) == 7, 1);
  // create a dummy address and transfer the sword
  let dummy_address = @0xCAFE;
  transfer::transfer(sword, dummy_address);
}
现在让我们进入新测试函数的具体内容。首先是生成几个地址,代表测试环境中的用户。我们有一个管理员用户和两个参加游戏的普通用户。第一种情况是通过代表管理员发起第一笔交易来创建,这也会生成一把剑并将所有权转移给所有者。
#[test]
fun test_sword_transactions() {
    use sui::test_scenario;
    let admin = @0xABBA;
    let initial_owner = @0xCAFE;
    let final_owner = @0xFACE;
    // first transaction executed by admin
    let scenario = &mut test_scenario::begin( &admin);
    {
      // create the sword and transfer it to the initial owner
      sword_create(42, 7, initial_owner, test_scenario::ctx(scenario));
    };
(...)第二笔交易是由第一个所有者进行的。注意,初始所有者是作为参数提供给test_scenario::next_tx函数的。他们将剑的所有权转移给最终的所有者。
这里使用了test_scenario模块,它的take_owned方法使Sword的一个对象被一个在当前交易内执行的地址所拥有。在此案例中,从存储器中检索的对象被移到一个不同的地址。
#[test]
fun test_sword_transactions() {
  (...)
  // second transaction executed by the initial sword owner
  test_scenario::next_tx(scenario, & initial_owner);
  {
    // extract the sword owned by the initial owner
    let sword = test_scenario::take_owned < Sword > (scenario);
    // transfer the sword to the final owner
    sword_transfer(sword, final_owner, test_scenario::ctx(scenario));
  };
  (...)
}最后一笔交易是由最后的所有者进行的,他从存储中获得Sword对象,并验证它是否具有相应的特性。值得注意的是,一旦一个对象通过创建或从模拟存储中获取而变得可用,它就不能简单地消失。
test_scenario包提供了一个简单的方法,类似于在Sui的上下文中执行Move时的情况--只是使用test_scenario::return_owned函数将剑返回到对象池中。
#[test]
fun test_sword_transactions() {
  (...)
  // third transaction executed by the final sword owner
  test_scenario::next_tx(scenario, & final_owner); {
    // extract the sword owned by the final owner
    let sword = test_scenario::take_owned < Sword > (scenario);
    // verify that the sword has expected properties
    assert!(magic( & sword) == 42 && strength( & sword) == 7, 1);
    // return the sword to the object pool (it cannot be simply "dropped")
    test_scenario::return_owned(scenario, sword)
  }
}Move.toml文件必须包含某些元数据,以便创建包含这个直接模块的包,包括包的名称、版本、本地依赖路径(用于查找Sui框架代码),以及包的数字ID,对于用户定义的模块必须是0x0,以便于包发布。
Move.toml文件的MoveStdlib依赖的本地文件路径必须被改变,以使其指向正确的Move标准库。为了做到这一点,我使用git克隆了sui 库代码,这使我能够在本地安装正确的MoveStdlib。然后我对Move.toml做了如下修改。
    [package]
    name = "MyFirstPackage"
    version = "0.0.1"
    [dependencies]
    Sui = { local = "../sui/crates/sui-framework" }
    MoveStdlib = { local = "/path/to/git-repo/move/deps/sui/crates/sui-framework/deps/move-stdlib/",
    addr_subst = { "std" = "0x1" } }
    [addresses]
    my_first_package = "0x0"
确保软件包在正确目录中,然后用以下命令构建:
$ sui move build结果应该是下面的样子:
    Build Successful
Artifacts path: "./build"这里只有一个Move单元测试,一个带有#[test]注解的公共函数,没有参数或返回值。运行下面的命令进行测试,测试应该在my_move_package目录下执行,测试框架将执行上述的功能。
$ sui move test结果应该类似于下面。而且,不出所料,单元测试将失败了,因为我们还没有编写任何实现逻辑。
    error[E03005]: unbound unscoped name
        ┌─ ./sources/m1.move:145:17
        │
    145 │                 sword_create(
        │                 ^^^^^^^^^^^^ Unbound function 'sword_create' in current scope
测试驱动开发,这听起来很简单啊?为了通过测试,需要在上面的结构上编写sword_create方法。这个新方法是不言而喻的,它利用了与前面部分相同的Sui内部模块,TxContext和Transfer。
use sui::tx_context::TxContext;继续我们的想像这个游戏。这里将引入一个将参与铸剑过程的Forge对象。比方说,Forge对象需要跟踪已经铸造了多少把剑。将Forge结构定义为如下。然后,该模块有一个getter,返回铸剑的数量。
struct Forge has key, store {
  id: VersionedID,
  swords_created: u64,
}
public fun sword_created(self: & Forge): u64 {
  self.swords_created
}为了使TxContext结构可用于函数声明,我们必须在模块级别添加一个额外的导入行,以使代码可以构建。
public entry fun sword_create(forge: &mut Forge, magic: u64, strength: u64,  recipient: address, ctx: &mut TxContext) {
  use sui::transfer;
  // <https://github.com/MystenLabs/sui/blob/main/crates/sui-framework/sources/tx_context.move>
  use sui::tx_context;
  // create a sword
  let sword = Sword {
    id: tx_context::new_id(ctx),
    magic,
    strength,
  };
  // In order to use the forge, we need to modify the sword_create function to take the forge as a parameter
  // and to update the number of created swords at the end of the function:
  forge.swords_created = forge.swords_created + 1;
  // transfer the sword
  transfer::transfer(sword, recipient);
}

public entry fun sword_transfer(sword: Sword, recipient: address, _ctx: &mut TxContext) {
  use sui::transfer;
  // transfer the sword
  transfer::transfer(sword, recipient);
}
现在我们可以再次运行测试命令,看到我们的模块现在有两个成功的测试。
    BUILDING MoveStdlib
    BUILDING Sui
    BUILDING MyFirstPackage
    Running Move unit tests
    [ PASS    ] 0x0::M1::test_sword_create
    [ PASS    ] 0x0::M1::test_sword_transactions
    Test result: OK. Total tests: 2; passed: 2; failed: 0
Move 作为一种面向对象的编程语言,而我们现在还没有创建一个构造器方法(用于初始化)。一个包中的每个模块都可以有一个自定义的初始化函数,当包被发布时将会被调用。现在你可以写一个方法来测试模块的初始化。
正如你在测试方法中看到的,我们在第一个交易中明确地调用初始化函数,然后在下一个交易中验证Forge对象是否已经被创建并正确初始化。
#[test]
public fun test_module_init() {
  use sui::test_scenario;
  // create test address representing game admin
  let admin = @0xABBA;
  // first transaction to emulate module initialization
  let scenario = &mut test_scenario::begin( &admin);
  {
    init(test_scenario::ctx(scenario));
  };

  // second transaction to check if the forge has been created
  // and has initial value of zero swords created
  test_scenario::next_tx(scenario, &admin);
  {
    // extract the Forge object
    let forge = test_scenario::take_owned < Forge > (scenario);
    // verify number of created swords
    assert!(swords_created( & forge) == 0, 1);
    // return the Forge object to the object pool
    test_scenario::return_owned(scenario, forge)
  }
}当你运行这个测试时,肯定会抛出一个错误,说没有实现init模块:
    error[E03005]: unbound unscoped name
        ┌─ ./sources/m1.move:135:17
        │
    135 │                 init(test_scenario::ctx(scenario1));
        │                 ^^^^ Unbound function 'init' in current scope
为了在发布(或部署)模块时执行,请将模块的初始化方法写成以下样子:
// module initializer to be executed when this module is published
fun init(ctx: &mut TxContext) {
  use sui::transfer;
  use sui::tx_context;
  let admin = Forge {
    id: tx_context::new_id(ctx),
    swords_created: 0,
  };
  // transfer the forge object to the module/package publisher
  // (presumably the game admin)
  transfer::transfer(admin, tx_context::sender(ctx));
}
运行你指定的单元测试,它们应该被通过。
    INCLUDING DEPENDENCY MoveStdlib
    INCLUDING DEPENDENCY Sui
    BUILDING MyFirstPackage
    Running Move unit tests
    [ PASS    ] 0x0::m1::test_module_init
    [ PASS    ] 0x0::m1::test_sword_create
    [ PASS    ] 0x0::m1::test_sword_transactions
    Test result: OK. Total tests: 3; passed: 3; failed: 0
让我们开始游戏吧。在发布模块之前,让我们用命令看一下我们在CLI客户端拥有的账户地址。因为这些地址是随机产生的,所以它们会和你看到的不同。
    $ sui client addresses
    Showing 5 results.
    0x76705799eaef88a5378bf616fab44c96e0b8dc05
    0x9f67952f0fe64b790c169d6bc3e97f0275f9876d
    0x86e29705c42a304a85c16b095892e5c877768113
    0xc6fce00f0ec0b8bb66c6e03bbeb0f9c2c6c7a555
    0xa57bf4d15156534533f20576bea6961e1e0696ad
因为我们将在整个发布过程中反复利用地址和Gas对象,让我们声明它们是环境变量,这样我们就不必每次都把它们放进去。
    export ADMIN=0x76705799eaef88a5378bf616fab44c96e0b8dc05 // YOUR ANY ARBITRARY ADDRESS SHOWN ABOVE
    export RECIPIENT=0x9f67952f0fe64b790c169d6bc3e97f0275f9876d
对于上面的地址,让我们发现Gas对象。如果你没有Gas对象,在Discord的#devnet-faucet上申请测试SUI代币。
    $ sui client gas --address $ADMIN
     Object ID                                  |  Version   |  Gas Value
    ----------------------------------------------------------------------
     0x152045509c335d7c0ee9c093513282f375cbe4cd |     13     |    39063
     0x17f40dc99e5e0097fa4693e5dfd1d493d1803aa2 |     2      |    50000
     0x1abf044fa3243c33454d9d01400c0f7ea0182b4d |     2      |    50000
     0x7ce36b6a4f0ac1037877408c75cbecebfeddeaf8 |     2      |    50000
     0xd6af71588d85618a3b83941a8d2183c062c40c81 |     2      |    50000
选择第一个有Gas的账号 。我已经事先发布了大量的模块,这样初始Gas 值就会减少到39063。让把他们也记录到环境变量中。
export ADMIN_GAS=0x152045509c335d7c0ee9c093513282f375cbe4cd // YOUR ANY ARBITRARY GAS OBJECT SHOWN ABOVE
现在发布模块! 运行下面的命令。确保你在--path标志后输入正确的模块路径。模块的根目录是Move.toml所在的目录。在我这里,我直接在模块的根目录下运行该命令:
    $ sui client publish --path . --gas $ADMIN_GAS --gas-budget 30000
    ----- Certificate ----
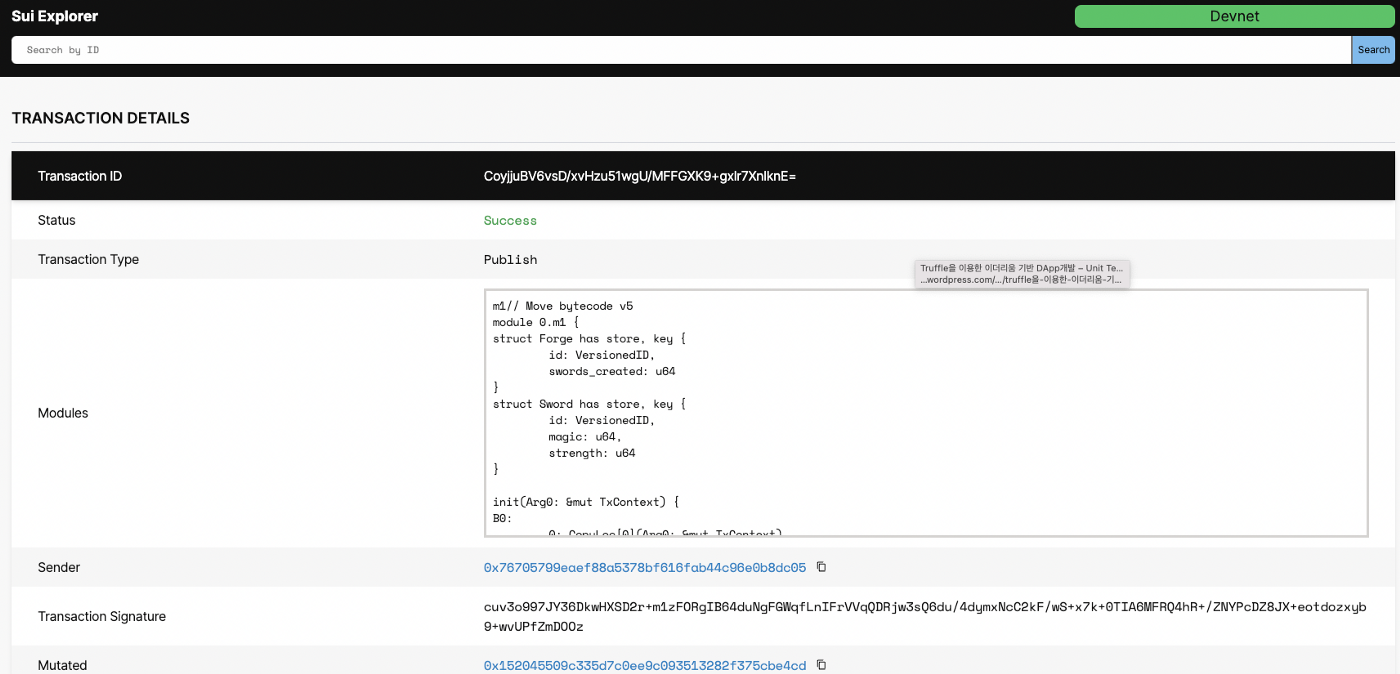
    Transaction Hash: CoyjjuBV6vsD/xvHzu51wgU/MFFGXK9+gxlr7XnlknE=
    Transaction Signature: cuv3o997JY36DkwHXSD2r+m1zFORgIB64duNgFGWqfLnIFrVVqQDRjw3sQ6du/4dymxNcC2kF/wS+x7k+0TIAw==@owVFDiFH79k1g9wNnwlf56i12jPHJv37C9Q99mYM47M=
    Signed Authorities : [k#e97638a9e10b9cc46d85b81191a60a6a6fcae63dacd811c07502db9c5cfc55b5, k#1584ef2b677d6f5e96b57dac2744e9278aa24e117c7bfd6ac00bf43c1129c7fd, k#839e99f8b03f0f5563d6cd9cc39e10a8cf483ad2775aecbb927031370925ef4e]
    Transaction Kind : Publish
    ----- Publish Results ----
    The newly published package object ID: 0x529830305d84d2335c5394c7f786e01f241c8372
    List of objects created by running module initializers:
    ----- Move Object (0x954fa256f139900d995d807392a56ddc4442caa9[1]) -----
    Owner: Account Address ( 0x76705799eaef88a5378bf616fab44c96e0b8dc05 )
    Version: 1
    Storage Rebate: 12
    Previous Transaction: CoyjjuBV6vsD/xvHzu51wgU/MFFGXK9+gxlr7XnlknE=
    ----- Data -----
    type: 0x529830305d84d2335c5394c7f786e01f241c8372::m1::Forge
    id: 0x954fa256f139900d995d807392a56ddc4442caa9[1]
    swords_created: 0
    Updated Gas : Coin { id: 0x152045509c335d7c0ee9c093513282f375cbe4cd, value: 48687 }
我的交易哈希值是AdSdjYdaCgfnljF0bk50ZWVdk+/cgafSYB1eA/d+Ca8=。Sui Explorer上的交易哈希可能包括Sui的区块链状态上发布的字节码。该软件包已成功发布。一些Gas被收取,导致初始Gas值发生变化。在发布过程中,init函数被调用,因此模块初始化函数已经运行。sword_created值被初始化为零。

上面的软件包现在在资源管理器上找不到了,由于 devnet 经常清空重启。
新发布的软件包的ID是0x5f35e44748ddc37ab57f7d97435b3b984d13d8e6,这与你那边不同。我们将该软件包添加到另一个环境变量中。
$ export PACKAGE=0x5f35e44748ddc37ab57f7d97435b3b984d13d8e6
你会得到PACKAGE的ID和新创建的Forge对象ID。使用 sui client call功能,在--function标志后调用指定的函数。你也可以在--args标志后传递参数。在这个例子中,第一个参数是 Forge 对象,因此传递已发布的 Forge Id 将是准确的。
    // m1.move
public entry fun sword_create(forge: &mut Forge, magic: u64, strength: u64, recipient: address, ctx: &mut TxContext)第二个和第三个参数是传递一个无符号整数来指定魔法和强度。第三个参数是收件人的地址,我们将使用上面声明的$RECIPIENT环境变量作为参数。最后一个参数是 TxContext,它将有 Sui CLI 自动注入。
    $ sui client call --package $PACKAGE --module m1 --function sword_create --args 0x954fa256f139900d995d807392a56ddc4442caa9 30 7 $RECIPIENT --gas-budget 3000
    ----- Certificate ----
    Transaction Hash: t9Q5C9tHuxLs9lDgjRn+vRaIWO+gnSiGIeZ+b7EjGEo=
    Transaction Signature: XQTRhTodzSbgUu8q+9YH6BcXwTgdHqz5stEv4OoMBVOg0lC8m3paEADBR13887DQj2u8UICXZIxVujjwBp8OCA==@owVFDiFH79k1g9wNnwlf56i12jPHJv37C9Q99mYM47M=
    Signed Authorities : [k#1584ef2b677d6f5e96b57dac2744e9278aa24e117c7bfd6ac00bf43c1129c7fd, k#e97638a9e10b9cc46d85b81191a60a6a6fcae63dacd811c07502db9c5cfc55b5, k#839e99f8b03f0f5563d6cd9cc39e10a8cf483ad2775aecbb927031370925ef4e]
    Transaction Kind : Call
    Package ID : 0x529830305d84d2335c5394c7f786e01f241c8372
    Module : m1
    Function : sword_create
    Arguments : ["0x954fa256f139900d995d807392a56ddc4442caa9", 30, "\\u0000\\u0000\\u0000\\u0000\\u0000\\u0000\\u0000", "0x76705799eaef88a5378bf616fab44c96e0b8dc05"]
    Type Arguments : []
    ----- Transaction Effects ----
    Status : Success
    Created Objects:
      - ID: 0x1f403b24ae0fea26c27b16d9b57fd7e88398610d , Owner: Account Address ( 0x76705799eaef88a5378bf616fab44c96e0b8dc05 )
    Mutated Objects:
      - ID: 0x152045509c335d7c0ee9c093513282f375cbe4cd , Owner: Account Address ( 0x76705799eaef88a5378bf616fab44c96e0b8dc05 )
      - ID: 0x954fa256f139900d995d807392a56ddc4442caa9 , Owner: Account Address ( 0x76705799eaef88a5378bf616fab44c96e0b8dc05 )
    ``
你的Forge对象有一个递增的sword_created值,因为我们在m1.move文件的sword_create函数中声明,在创建一个新剑后,swords_created值递增1。看一下Sui Explorer上的示例交易,你可以找到新创建的objectId。它肯定是新的Sword对象。
这就是了! 你已经成功地为Sui编写了合约模块,发布了它,并调用了该函数。在第三章中,我们将研究另一个简单的井字游戏的例子,以进一步了解Move语言及其生态系统。
原文: https://medium.com/dsrv/my-first-impression-of-sui-move-2-building-a-sword-example-a8af707d3bed
- ERC8004 从 v0.4 到 v1.0 规范:通往主网之路 718 浏览
- Sudoswap 正在升级 ♨️ 249 浏览
- Trust Wallet:通往 Web3、DeFi 和多链未来的主权门户 800 浏览
- $CARDS 看涨案例 749 浏览
- 14. 一些有前景的应用 778 浏览
- ERC721 NFT标准 1225 浏览
- 区块链应用场景 2264 浏览
- 以太坊:可编程的区块链 2382 浏览
- Web3 实操入门 2467 浏览
- 5. 代币 833 浏览
- Uniswap v3:集中流动性、JIT攻击与集成指南 1227 浏览
- 13. Web3 将继续存在……因为太多人已经投资,不愿承认自己错了 819 浏览

