Fabric2.0 更新通道配置
- 张小雨
- 发布于 2020-02-26 22:46
- 阅读 6554
Fabric2.0 更新通道配置 , 修改最大交易数量。
本文实践将基于已部署好的first-network。
1. 通道配置说明
我们再前面创建通道的时候,通过configtx.yaml定义通道的基础配置包括:
-
策略: 通道的读写权限策略等;
-
Capabilities:确保网络和通道以相同的方式处理交易,使用版本号进行定义。
-
Channel/Application:
控制应用程序通道的配置参数(添加/删除组织):修改这一部分配置需要大部分组织管理管理员的签名。 将组织添加到通道:要实现添加到通道必须将组织的MSP等配置参数添加到组织配置,下一章将详细讲。 组织相关参数:可以更改组织特定的任何参数(例如,标识锚点对等体或组织管理员的证书)。请注意,默认情况下,更改这些值将不需要大多数应用程序组织管理员,而仅需要组织本身的管理员。
-
Channel/Orderer:
控制排序节点相关参数
-
Batch size
- Batch size:这些参数决定了一个区块中交易的数量和大小。
- Batch timeout: 在第一个交易到达其他交易之后,在切割区块之前要等待的时间。减小该值将改善等待时间,但是减小该值可能会由于不允许块填满其最大容量而降低吞吐量。
- Block validation: 该策略指定了被视为有效的块的签名要求。默认情况下,它需要订购组织的某些成员的签名。
-
Channel:
控制peer跟orderer都需要同意的参数,需要大部分应用程序管理者同意:
- orderer地址:客户端可以在其中调用orderer的Broadcast和Deliver功能的地址列表。peer在这些地址中随机选择,并在它们之间进行拉取块。
- Hashing structure :块数据是字节数组的数组。块数据的哈希计算为默克尔树。此值指定该Merkle树的宽度。目前,该值固定为4294967295。
- 散列算法:用于计算编码到区块链块中的哈希值的算法。特别是,这会影响数据散列以及该块的先前的块散列字段。请注意,此字段当前只有一个有效值(SHA256),不应更改。
- Consensus type 共识类型: 为了能够将基于Kafka的orderer服务迁移到基于Raft的orderer服务,可以更改渠道的共识类型。
2. 更新通道
2.1 提取并解析通道配置
更新通道配置的第一步是获取最新的配置块。这是一个三步过程。首先,我们将以protobuf格式提取通道配置,创建一个名为的文件config_block.pb。
控制台数据docker exec -it cli bash进入cli
peer channel fetch config config_block.pb -o $ORDERER_CONTAINER -c mychannel --tls --cafile $TLS_ROOT_CA控制台输入获取通道区块数码,并生成config_block.pb文件

.pb是protobuf格式,我们将他转成json版本
继续再当前目录输入以下命令:
configtxlator proto_decode --input config_block.pb --type common.Block --output config_block.json参数说明: --input : .pb文件路径 --output :转json格式后输出文件路径
生成config_block.json文件

看一下输出的config_block.json文件,数据很多
最后,我们将从配置中排除所有不必要的元数据,使其更易于阅读。您可以随意调用该文件,但是在本示例中,我们将其称为config.json。
执行以下命令:
jq .data.data[0].payload.data.config config_block.json > config.json为了待会比较,我们先复制一份:
cp config.json modified_config.json2.2 修改配置
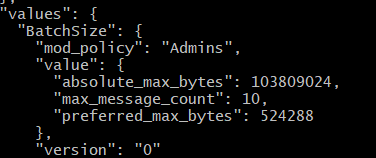
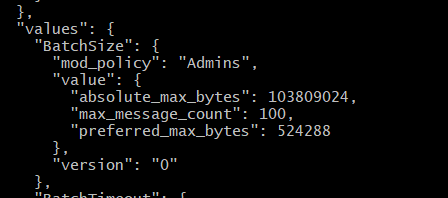
修改Batch size,将区块最大交易数量提高,原本max_message_count是10,我们修改为100。
原本配置截图:

vi modified_config.json修改后截图:

2.2 重新编码跟提交配置
首先,我们将config.json文件恢复为protobuf格式,创建一个名为的文件config.pb。然后,我们将对我们的modified_config.json文件执行相同的操作。之后,我们将计算两个文件之间的差,创建一个名为的文件config_update.pb。
configtxlator proto_encode --input config.json --type common.Config --output config.pb
configtxlator proto_encode --input modified_config.json --type common.Config --output modified_config.pb
configtxlator compute_update --channel_id mychannel --original config.pb --updated modified_config.pb --output config_update.pb
现在我们已经计算出旧配置和新配置之间的差异config_update.pb,我们可以将更改应用于配置。
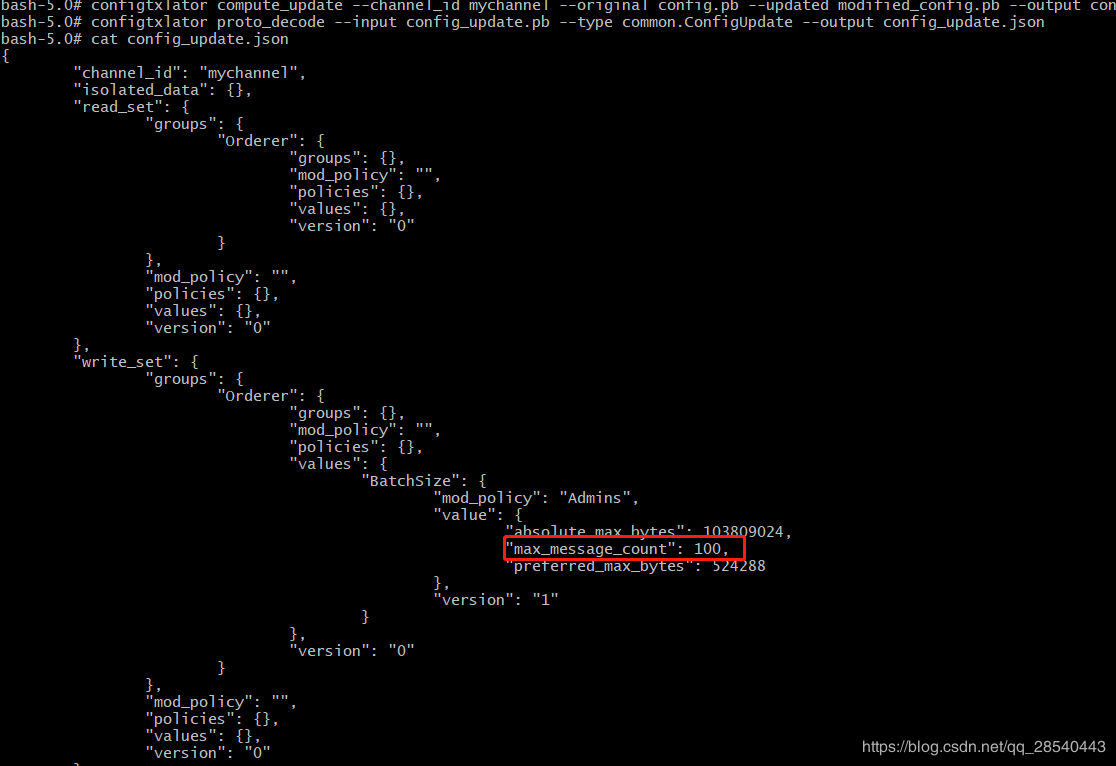
configtxlator proto_decode --input config_update.pb --type common.ConfigUpdate --output config_update.json
查看差异配置
 将差异配置重新编码:
echo '{"payload":{"header":{"channel_header":{"channel_id":"mychannel", "type":2}},"data":{"config_update":'$(cat config_update.json)'}}}' | jq . > config_update_in_envelope.json
configtxlator proto_encode --input config_update_in_envelope.json --type common.Envelope --output config_update_in_envelope.pb
提交配置:
peer channel update -f config_update_in_envelope.pb -c mychannel -o $ORDERER_CONTAINER --tls true --cafile $TLS_ROOT_CA
控制台输出:

提示错误:
implicit policy evaluation failed - 0 sub-policies were satisfied, but this policy requires 1 of the 'Admins' sub-policies to be satisfied
上面的错误应该是很熟悉了,就是修改这个配置不够权限,提示需要Admin,由于batchSize属于排序节点的配置,所以这里的Admin是OrdererMSP.admin
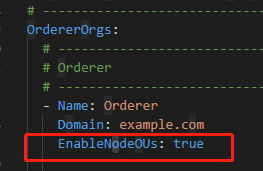
这里要注意一点的是 first-network的排序节点是没有区份admin、client这些需要再crypto-config.yaml打开配置如下:

切换OrdererMSP.admin环境变量如下:
CORE_PEER_LOCALMSPID=OrdererMSP
CORE_PEER_MSPCONFIGPATH=/opt/gopath/src/github.com/hyperledger/fabric/peer/crypto/ordererOrganizations/example.com/users/Admin@example.com/msp/
原本应该调用peer channel signconfigtx 进行签名的,但是peer channel update 的时候会自动带客户端签名,这里我们直接update就行了,因为他需要1个Admin而已.
控制台输入:
peer channel update -f config_update_in_envelope.pb -c mychannel -o $ORDERER_CONTAINER --tls true --cafile $TLS_ROOT_CA输出结果如下:
 通道配置更新成功
3. 总结
更新通道配置步骤主要是获取现有配置,修改配置,提交配置,看起来比较简单,但是有一点要留意的是权限问题,想刚刚上面就提示没有收集够签名,这时候我们应该关注日志输出内容,回顾我们原本configtx.yaml的配置,找到需要的签名,满足策略。
- 闪电网络中的流动性广告 1174 浏览
- Fabric - Fabric 加速Based Rollup 的基础设施与连接 - Layer 2 1116 浏览
- 流动性的艺术:我们需要什么样的比特币链下扩容网络 2749 浏览
- 私有利他主义瞭望塔 786 浏览
- 以太坊Layer2扩容方案之State Channel 2797 浏览
- 闪电网络:技术与用户体验(一):用户体验的基本元素 1239 浏览
- L2链推导规范 597 浏览
- 闪电网络的未来:LSP 规范与互通性 989 浏览
- 闪电通道 “拼接” 的原理 3812 浏览
- 何为 “双向注资的闪电通道”? 1198 浏览
- Hyperledger Fabric 安装部署及测试网络汇总 4548 浏览
- 闪电网络服务商的崛起 1063 浏览

