如何在UBUNTU虚拟机上编译EOS完成环境搭建?
如何在UBUNTU虚拟机上编译EOS完成环境搭建?
1,摘要
【本文目标】 通过本文实践,能在WINDOWS操作系统搭建UBUNTU 18.04 LTS环境,并在此环境编译成功EOS v1.0.5正式发布版本。 【前置条件】 有学习EOS环境搭建意向,不怕折腾。 【技术收获】 1)搭建UBUNTU 18.04 LTS环境 2)在硬件要求不满足官方要求的环境下EOS环境编译成功 3) EOS编译过程中的踩坑排查能力
2,编译血泪史
EOS主网上线没有几天,从各种渠道得知EOS环境搭建比较麻烦,辉哥刚开始想绕过编译环节或者直接使用可直接使用的环境。于是,辉哥首先从赵志明老师那儿拉个一个V1.0.5的已编译成功的版本,拉到笔记本的Ubuntu虚拟机环境根本没法跑起来。 然后,辉哥想用欧阳哥哥花了好长时间搭建成功的虚拟机环境来测试操作,结果发现EOS节点运行起来后,他主机的CPU占用率为90%,他就没法工作了。 又为了省钱,不愿意购买阿里云ECS环境。最终,辉哥还是在古千峰老师和欧阳哥哥的鼓励下,下定决心把EOS环境编译成功。因为目前大部分研发人员用的是WINDOWS操作系统,那在此基础上搭建Ubuntu虚拟机成功对大部分EOS学习者来说非常有帮助。而坊间搭建EOS环境编译的步骤介绍中都非常简单,基本都不写编译失败或者踩过的坑,好像编译都是很顺利似的。作为一个热心的技术布道者,辉哥就下定决心把环境编译好,并把踩的坑和方法都贡献出来,供大家学习交流。 如果还有其他人能够在其他环境,例如Centos 7, MacOs上编译成功的,希望也可以把自己编译过程制作文档,在本文留言,让更多的人少踩坑。
辉哥把编译成功的修改脚本,下载附件放在知识星球了,需要者加入自取,加入知识星球后也可以加入VIP微信群,提供技术对接。

3,环境配置
1)WINDOWS主机及操作系统 关键信息:Windows 10 64位操作系统,8G内存,4核CPU。
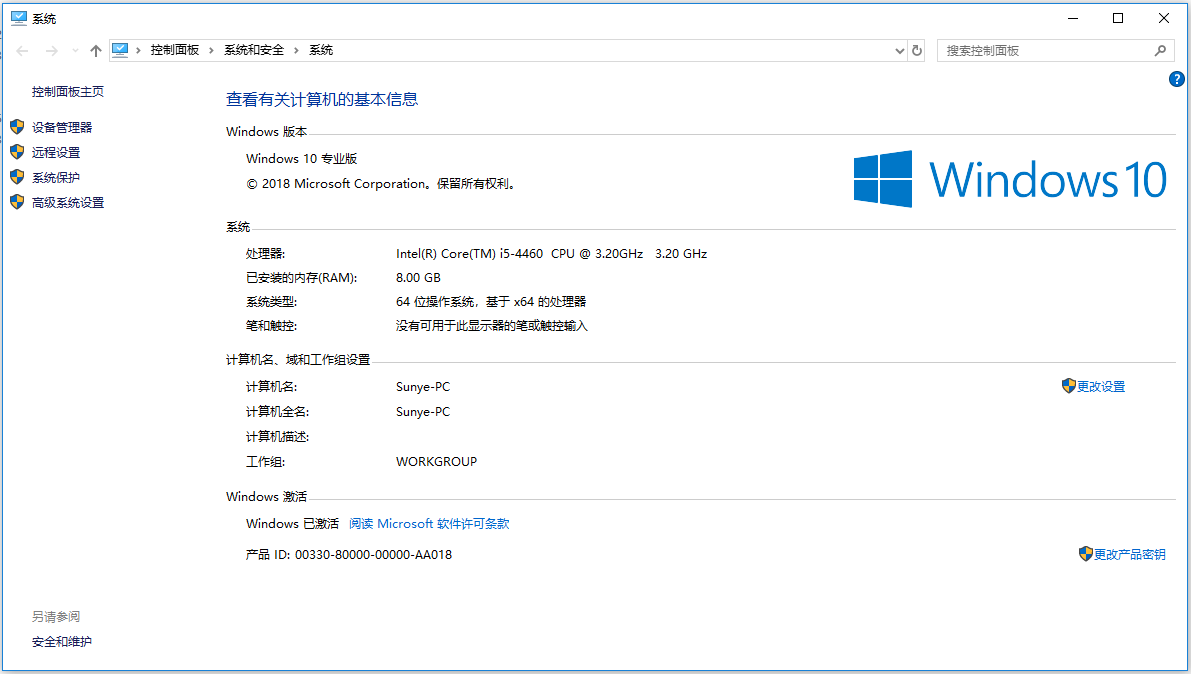
Windows 10系统环境.jpg
分析: 从RAM要求看是不满足7GB RAM空闲资源要求,但有方法绕过去。
2)VmWare虚拟机 辉哥用的是VMware 10版本,可从官网下载或者参考 《第一课 如何在WINDOWS环境下搭建以太坊开发环境》 的“1,安装VMware虚拟机”章节完成虚拟机的安装。
3)Ubuntu资源配置 按照EOS的要求,辉哥选择UBUNTU 18.04 LTS版本。下载官网地址为 https://www.ubuntu.com/download/server/thank-you?country=CN&version=18.04&architecture=amd64 ,AMD架构的经安装验证没有问题的。安装和配置方法参考 《第一课 如何在WINDOWS环境下搭建以太坊开发环境》 的“2,安装Ubuntu操作系统”章节完成虚拟机的安装,建议硬盘和内存选择要尽可能大一些。
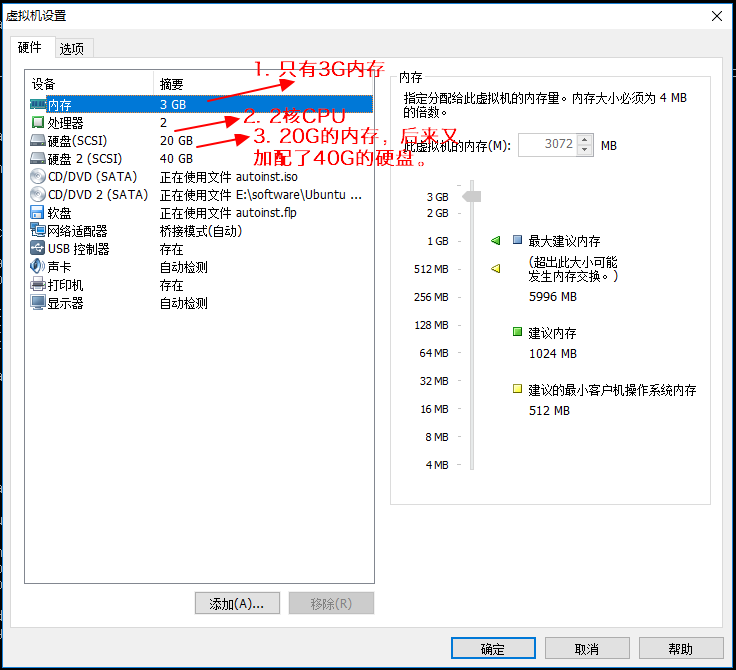
Ubuntu资源.png
EOSIO的安装最低配置:
- 7GB RAM free required
- 20GB Disk free required 辉哥的环境的RAM是不满足要求的,后面编译的时候注释代码绕过去,不影响编译成功。
4,编译历程和踩坑记录
4.1 【错误1】直接下载版本不可行
辉哥从EOSIO官网上 下载V1.0.5的版本 ,然后上传到Ubuntu虚拟机环境,运行'./eosio_build.sh'提示必须用github下载。只所以用v1.0.5版本,只是一个个人临时决定而已。
【信息交互提示1】
duncanwang@duncanwang:~/work/eos-1.0.5$ ./eosio_ build.sh
输出:
> -bash: ./eosio_build.sh: Permission denied
解决方案:
duncanwang@duncanwang:~/work/eos-1.0.5$ chmod 755 ./eosio_ build.sh
【信息交互提示2】
duncanwang@duncanwang:~/work/eos-1.0.5$ ./eosio_ build.sh
输出:
> This build script only works with sources cloned from git
    Please clone a new eos directory with 'git clone https://github.com/EOSIO/eos --recursive'
    See the wiki for instructions: https://github.com/EOSIO/eos/wiki
4.2 【错误2】Github下载提示连不上github
【信息交互提示】
duncanwang@duncanwang:~/work$ git clone -b v1.0.5 https://github.com/EOSIO/eos --recursive
输出:
Cloning into 'eos'...
fatal: unable to access 'https://github.com/EOSIO/eos/': Could not resolve host: github.com
解决方案: 提示表明链接不上github网站,增加了香港服务器解决。
- 加入香港线路
sudo vim /etc/hosts
加入以下配置后保存
192.30.253.113 github.com
- 命令行增加配置
git config --global http.sslversion tlsv1
4.3 【错误3】Github下载提示端口错误
【信息交互提示】
duncanwang@duncanwang:~/work$ git clone https://github.com/EOSIO/eos --recursive
Cloning into 'eos'...
fatal: unable to access 'https://github.com/EOSIO/eos/': Failed to connect to github.com port 443: No route to host
duncanwang@duncanwang:~/work$ ping github.com
PING github.com (192.30.253.113) 56(84) bytes of data.
From 192.168.1.100 icmp_seq=1 Destination Host Unreachable
From 192.168.1.100 icmp_seq=2 Destination Host Unreachable
From 192.168.1.100 icmp_seq=3 Destination Host Unreachable
From 192.168.1.100 icmp_seq=4 Destination Host Unreachable
From 192.168.1.100 icmp_seq=5 Destination Host Unreachable
解决方案: 参考网上方法,运行以下命令,但是结果还是不行。
sudo iptables -I INPUT -p tcp --dport 443 -j ACCEPT
古哥的建议是先解决linux翻墙的问题,有点小难度。辉哥就重启了一下Ubuntu虚拟机,然后重新下载,发现下载成功了。
4.4 【成功】版本下载成功
duncanwang@duncanwang:~$ git clone -b v1.0.5 https://github.com/EOSIO/eos --recursive
Cloning into 'eos'...
remote: Counting objects: 107783, done.
remote: Compressing objects: 100% (66/66), done.
remote: Total 107783 (delta 25), reused 34 (delta 13), pack-reused 107700
Receiving objects: 100% (107783/107783), 105.34 MiB | 2.61 MiB/s, done.
Resolving deltas: 100% (85696/85696), done.
Note: checking out 'c9b7a2472dc3c138e64d07ec388e64340577bb34'.

You are in 'detached HEAD' state. You can look around, make experimental
changes and commit them, and you can discard any commits you make in this
state without impacting any branches by performing another checkout.
4.5 【错误4】编译提示RAM空间不足
输入:
duncanwang@duncanwang:~/eos$ ./eosio_ build.sh
错误提示:
    Beginning build version: 1.2
    Wed Jun 27 10:24:48 UTC 2018
    User: duncanwang
cat: .git/refs/heads/master: No such file or directory
    git head id:
    Current branch: HEAD

    ARCHITECTURE: Linux

    OS name: Ubuntu
    OS Version: 18.04
    CPU speed: 3192.622Mhz
    CPU cores: 2
    Physical Memory: 974 Mgb
    Disk install: /dev/sda2
    Disk space total: 19G
    Disk space available: 13G
    Your system must have 7 or more Gigabytes of physical memory installed.
    Exiting now.
解决方法: 进到eos/scripts/路径,修改对应的sh文件,找到“Your system must have 7 or more Gigabytes of physical memory installed”字样,或者You must have at least %sGB of available storage to install EOSIO,将后面的exit 1命令去掉即可。
 if [ "${MEM_MEG}" -lt 7000 ]; then
        printf "\\tYour system must have 7 or more Gigabytes of physical memory installed.\\n"
        printf "\\tExiting now.\\n"
  ##     exit 1
    fi
顺道把硬盘不足的提示也注释掉,测试发现13G的空闲硬盘是可以编译成功的。
>   if [ "${DISK_AVAIL%.*}" -lt "${DISK_MIN}" ]; then
        printf "\\tYou must have at least %sGB of available storage to install EOSIO.\\n" "${DISK_MIN}"
        printf "\\tExiting now.\\n"
##       exit 1
    fi
4.6 【错误5】mongoDB无法下载
编译过程中错误提示:
    Boost successfully installed @ /home/duncanwang/opt/boost.

    Checking MongoDB installation.

    Installing MongoDB 3.6.3.
  % Total    % Received % Xferd  Average Speed   Time    Time     Time  Current
                                 Dload  Upload   Total   Spent    Left  Speed
  0     0    0     0    0     0      0      0 --:--:--  0:00:30 --:--:--     0
curl: (28) Operation timed out after 30002 milliseconds with 0 out of 0 bytes received
    Unable to download MongoDB at this time.
    Exiting now.
分析: eosio_build_ubuntu.sh 查找 “Unable to download MongoDB at this time.”关键字 可知这个语句执行失败。
--STATUS=$(curl -LO -w '%{http_code}' --connect-timeout 30 https://fastdl.mongodb.org/linux/mongodb-linux-x86_64-3.6.3.tgz )
解决办法:
1)本地下载2个文件“mongodb-linux-x86_64-3.6.3.tgz”和“mongo-c-driver-1.9.3.tar.gz”,上传到虚拟机的软件存放目录“/home/duncanwang/work/software”,
2)修改脚本,重新运行 ./eosio_build.sh 即可解决。这2个下载文件可在辉哥的知识星球找到,也可以上官网下载。
        #STATUS=$(curl -LO -w '%{http_code}' --connect-timeout 30 https://fastdl.mongodb.org/linux/mongodb-linux-x86_64-3.6.3.tgz)
        #if [ "${STATUS}" -ne 200 ]; then
        ##   printf "\\tUnable to download MongoDB at this time.\\n"
        ##   printf "\\n\\tExiting now.\\n\\n"
        ##   exit 1;
        #fi
        cp /home/duncanwang/work/software/mongodb-linux-x86_64-3.6.3.tgz "${HOME}/opt/"

##       STATUS=$(curl -LO -w '%{http_code}' --connect-timeout 30 https://github.com/mongodb/mongo-c-driver/releases/download/1.9.3/mongo-c-driver-1.9.3.tar.gz)
##       if [ "${STATUS}" -ne 200 ]; then
##           if ! rm -f "${TEMP_DIR}/mongo-c-driver-1.9.3.tar.gz"
##           then
##               printf "\\n\\tUnable to remove file %s/mongo-c-driver-1.9.3.tar.gz.\\n" "${TEMP_DIR}"
##           fi
##           printf "\\tUnable to download MongoDB C driver at this time.\\n"
##           printf "\\tExiting now.\\n\\n"
##           exit 1;
##       fi
   cp /home/duncanwang/work/software/mongo-c-driver-1.9.3.tar.gz "${TEMP_DIR}/"
4.7 【错误6】RPC错误 编译过程中错误提示:
error: RPC failed; curl 56 GnuTLS recv error (-54): Error in the pull function.
fatal: The remote end hung up unexpectedly
fatal: early EOF
fatal: index-pack failed
    Unable to clone clang repo @ https://github.com/llvm-mirror/clang.git.

    Exiting now.

Cloning into 'llvm'...
remote: Counting objects: 24803, done.
remote: Compressing objects: 100% (23960/23960), done.
error: RPC failed; curl 56 GnuTLS recv error (-54): Error in the pull function.
fatal: The remote end hung up unexpectedly
fatal: early EOF
fatal: index-pack failed
解决方法
提示RPC错误,古千峰反馈说,主网RPC服务不稳定。
1) 辉哥想到的方法是把需要的 git clone --depth 1 --single-branch --branch release_40 https://github.com/llvm-mirror/llvm.git , git clone --depth 1 --single-branch --branch release_40 https://github.com/llvm-mirror/clang.git 单独执行或者从windows下载转放到Ubuntu对应目录。
编译的提示如下,还是搞不定。有大侠认为是因为我们下载的 llvm.git , clang.git 用的是最新版本的原因,没有用 release_40的版本,没有做重新尝试。
CMake Error at tools/clang/tools/diagtool/CMakeLists.txt:14 (target_link_libraries):
  The keyword signature for target_link_libraries has already been used with
  the target "diagtool".  All uses of target_link_libraries with a target
  must be either all-keyword or all-plain.

  The uses of the keyword signature are here:

   * cmake/modules/LLVM-Config.cmake:105 (target_link_libraries)
   * cmake/modules/AddLLVM.cmake:785 (target_link_libraries)
2)辉哥第二天早晨过来,把 /tmp/llvm-compiler 文件夹删除,重新编译一下,结果什么都成了。
4.8【成功】编译成功
完成4.7的删除文件夹重编译后,编译就成功了。
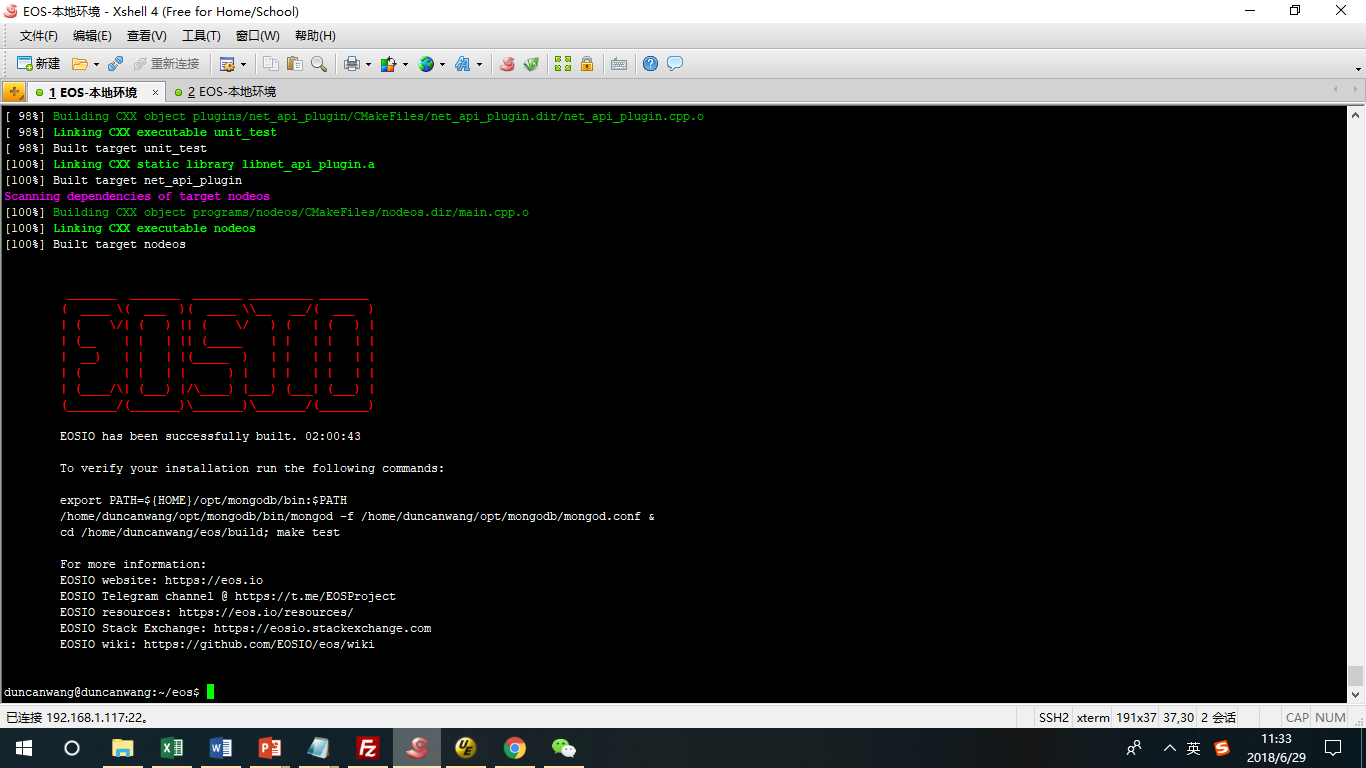
1.EOS编译成功.png
4.9【成功】安装包
sudo make install
执行结果为成功,如下:
-- Installing: /usr/local/bin/nodeos
-- Installing: /usr/local/var/log/eosio
-- Installing: /usr/local/var/lib/eosio
-- Installing: /usr/local/bin/cleos
-- Installing: /usr/local/bin/keosd
-- Installing: /usr/local/bin/eosio-launcher
-- Installing: /usr/local/bin/eosio-abigen
-- Installing: /usr/local/bin/eosiocpp
duncanwang@duncanwang:~/eos/build$ make test
4.10【部分失败】验证安装是否成功
1) 运行mongod,在Ubuntu系统中,运行:
~/opt/mongodb/bin/mongod -f ~/opt/mongodb/mongod.conf & 输出内容:
[1] 24769
2)检验eosio是否安装成功命令
duncanwang@duncanwang:~/eos/build$ make test
26/36 Test #26: unit_test_binaryen ...................   Passed  130.46 sec
      Start 27: unit_test_wavm
27/36 Test #27: unit_test_wavm .......................***Exception: SegFault433.62 sec
      Start 28: validate_deferred_test_abi
28/36 Test #28: validate_deferred_test_abi ...........   Passed    0.04 sec
      Start 29: plugin_test
29/36 Test #29: plugin_test ..........................   Passed    0.10 sec
      Start 30: nodeos_run_test
30/36 Test #30: nodeos_run_test ......................   Passed   61.58 sec
      Start 31: p2p_dawn515_test
31/36 Test #31: p2p_dawn515_test .....................   Passed    8.18 sec
      Start 32: distributed-transactions-test
32/36 Test #32: distributed-transactions-test ........   Passed   74.44 sec
      Start 33: restart-scenarios-test-resync
33/36 Test #33: restart-scenarios-test-resync ........   Passed  126.77 sec
      Start 34: restart-scenarios-test-hard_replay
34/36 Test #34: restart-scenarios-test-hard_replay ...   Passed  123.08 sec
      Start 35: restart-scenarios-test-none
35/36 Test #35: restart-scenarios-test-none ..........   Passed  130.01 sec
      Start 36: validate_dirty_db_test
36/36 Test #36: validate_dirty_db_test ...............   Passed    2.41 sec

97% tests passed, 1 tests failed out of 36

Total Test time (real) = 1091.60 sec

The following tests FAILED:
     27 - unit_test_wavm (SEGFAULT)
Errors while running CTest
Makefile:119: recipe for target 'test' failed
make: *** [test] Error 8
5. 编译总结
EOS成功的编译总是相同的,不成功的编译各个各的不幸。这儿总结下成功的步骤,一般是及其简单的。 1)、下载最新代码 git clone https://github.com/EOSIO/eos.git --recursive 3)、内存限制修改 ubuntu:eosio_build_ubuntu.sh 25行7000改成3000 4)、编译 ./eosio_build.sh 5)、安装命令:cd build 然后maker install
6. 【成功】私有节点运行
辉哥解决不了哪个安装测试错误的问题,就当做没有发生了。 直接输入命令启动私有节点。
cd ~/eos/build/programs/nodeos
./nodeos -e -p eosio --plugin eosio::chain_api_plugin --plugin eosio::history_api_plugin
输出结果如下:
1672402ms thread-0   chain_plugin.cpp:208          plugin_initialize    ] initializing chain plugin
1672402ms thread-0   chain_plugin.cpp:391          plugin_initialize    ] Starting up fresh blockchain with default genesis state.
CHAINBASE:   Failed to pin chainbase shared memory (of size 1024 MB) in RAM. Performance degradation is possible.
CHAINBASE:   Failed to pin chainbase shared memory (of size 340 MB) in RAM. Performance degradation is possible.
1672457ms thread-0   http_plugin.cpp:290           plugin_initialize    ] configured http to listen on 127.0.0.1:8888
1672458ms thread-0   net_plugin.cpp:2947           plugin_initialize    ] Initialize net plugin
1672458ms thread-0   net_plugin.cpp:2971           plugin_initialize    ] host: 0.0.0.0 port: 9876
1672458ms thread-0   net_plugin.cpp:3043           plugin_initialize    ] my node_id is dd1b4640288cfefc56f90bc02f92b7ddd5f8e2e6f1d46d0422f7a5f43dafce8e
1672459ms thread-0   main.cpp:104                  main                 ] nodeos version c9b7a247
1672459ms thread-0   main.cpp:105                  main                 ] eosio root is /home/duncanwang/.local/share
1672459ms thread-0   controller.cpp:1190           startup              ] No head block in fork db, perhaps we need to replay
1672459ms thread-0   controller.cpp:304            initialize_fork_db   ]  Initializing new blockchain with genesis state
1672496ms thread-0   chain_plugin.cpp:446          plugin_startup       ] starting chain in read/write mode
1672496ms thread-0   chain_plugin.cpp:451          plugin_startup       ] Blockchain started; head block is #1, genesis timestamp is 2018-06-01T12:00:00.000
1672496ms thread-0   http_plugin.cpp:331           plugin_startup       ] start listening for http requests
1672496ms thread-0   chain_api_plugin.cpp:75       plugin_startup       ] starting chain_api_plugin
1672496ms thread-0   http_plugin.cpp:377           add_handler          ] add api url: /v1/chain/abi_bin_to_json
1672496ms thread-0   http_plugin.cpp:377           add_handler          ] add api url: /v1/chain/abi_json_to_bin
1672497ms thread-0   http_plugin.cpp:377           add_handler          ] add api url: /v1/chain/get_abi
1672497ms thread-0   http_plugin.cpp:377           add_handler          ] add api url: /v1/chain/get_account
1672497ms thread-0   http_plugin.cpp:377           add_handler          ] add api url: /v1/chain/get_block
1672497ms thread-0   http_plugin.cpp:377           add_handler          ] add api url: /v1/chain/get_block_header_state
1672497ms thread-0   http_plugin.cpp:377           add_handler          ] add api url: /v1/chain/get_code
1672497ms thread-0   http_plugin.cpp:377           add_handler          ] add api url: /v1/chain/get_currency_balance
1672497ms thread-0   http_plugin.cpp:377           add_handler          ] add api url: /v1/chain/get_currency_stats
1672497ms thread-0   http_plugin.cpp:377           add_handler          ] add api url: /v1/chain/get_info
1672497ms thread-0   http_plugin.cpp:377           add_handler          ] add api url: /v1/chain/get_producers
1672497ms thread-0   http_plugin.cpp:377           add_handler          ] add api url: /v1/chain/get_required_keys
1672497ms thread-0   http_plugin.cpp:377           add_handler          ] add api url: /v1/chain/get_table_rows
1672497ms thread-0   http_plugin.cpp:377           add_handler          ] add api url: /v1/chain/push_block
1672497ms thread-0   http_plugin.cpp:377           add_handler          ] add api url: /v1/chain/push_transaction
1672497ms thread-0   http_plugin.cpp:377           add_handler          ] add api url: /v1/chain/push_transactions
1672497ms thread-0   history_api_plugin.cpp:38     plugin_startup       ] starting history_api_plugin
1672497ms thread-0   http_plugin.cpp:377           add_handler          ] add api url: /v1/history/get_actions
1672497ms thread-0   http_plugin.cpp:377           add_handler          ] add api url: /v1/history/get_controlled_accounts
1672498ms thread-0   http_plugin.cpp:377           add_handler          ] add api url: /v1/history/get_key_accounts
1672498ms thread-0   http_plugin.cpp:377           add_handler          ] add api url: /v1/history/get_transaction
1672498ms thread-0   net_plugin.cpp:3055           plugin_startup       ] starting listener, max clients is 25
1672498ms thread-0   producer_plugin.cpp:577       plugin_startup       ] producer plugin:  plugin_startup() begin
1672498ms thread-0   producer_plugin.cpp:592       plugin_startup       ] Launching block production for 1 producers at 2018-06-29T09:27:52.498.
1672499ms thread-0   producer_plugin.cpp:604       plugin_startup       ] producer plugin:  plugin_startup() end
1673001ms thread-0   producer_plugin.cpp:1073      produce_block        ] Produced block 000000024e3c9579... #2 @ 2018-06-29T09:27:53.000 signed by eosio [trxs: 0, lib: 0, confirmed: 0]
1673502ms thread-0   producer_plugin.cpp:1073      produce_block        ] Produced block 00000003176eba27... #3 @ 2018-06-29T09:27:53.500 signed by eosio [trxs: 0, lib: 2, confirmed: 0]
1674001ms thread-0   producer_plugin.cpp:1073      produce_block        ] Produced block 00000004726778be... #4 @ 2018-06-29T09:27:54.000 signed by eosio [trxs: 0, lib: 3, confirmed: 0]
1674502ms thread-0   producer_plugin.cpp:1073      produce_block        ] Produced block 0000000546ea9c4a... #5 @ 2018-06-29T09:27:54.500 signed by eosio [trxs: 0, lib: 4, confirmed: 0]
【问题】 系统异常重启后加载nodeos节点失败。 【linux-ubuntu解决方法】 清理旧的数据即可重新启动。
cd ~/.local/share/eosio/nodeos rm -rf data
7. 参考
1) Windows10下 opencv2.4.9+dlib19.7+Visual Studio 2017 配置教程 2) EOS智能合约开发(一):EOS环境搭建和启动节点[P叔] 3) 官网本地环境搭建 4) EOSIO编译安装[古千峰@BTCMedia] 5) EOS测试环境快速搭建
编译过程中得到古千峰大侠和欧阳哥哥的帮助,深表感谢。技术圈要多做分享,不怕被学习,自身更容易获得成长!
 GitHub 登录
 Web3 钱包登录
