以太坊安卓钱包开发系列5 - 发送转账交易
- Tiny熊
- 发布于 2019-04-04 14:34
- 阅读 20262
这是如何开发以太坊安卓钱包系列第5篇,利用钱包对交易进行本地签名,然后发送到以太坊网络。
这是如何开发以太坊安卓钱包系列第5篇,利用钱包对交易进行本地签名,然后发送到以太坊网络。
预备知识
发送一个交易, 逻辑上会包含三个步骤:
- 构造交易对象;
- 对交易进行签名;
- 把签名后的交易序列化后发送到网络节点。
第 2 3步,web3j 提供的API 几句代码就可以解决,关键第 1 步构造交易对象,我们来逐步分解。
一个交易长什么样
一个交易的结构如下:
 public class RawTransaction {
    private String to;
    private BigInteger value;

    private BigInteger gasLimit;
    private BigInteger gasPrice;

    private BigInteger nonce;

    private String data;
}发起交易的时候,就是需要填充每一个字段,构建这样一个交易结构,每个字段含义如下:
to: 用户要转账的目标地址;value: 转账的金额;gasLimit: 表示用户愿意为交易准备的(计算和存储空间)工作量;gasPrice: 交易发起者愿意支付的单位工作量费用,矿工在选择交易的时候,是按照gasPrice进行排序,先服务高出价者,因此如果出价过低会导致交易迟迟不能打包确认,出价过高则费用较大;
Gas是以太坊的工作计费机制,是交易者给矿工打包的一笔预算,预算= gasLimit gasPrice, 可以类比为请货车的运费:公里数 每公里单价。
-
nonce: 交易序列号, 它可以用来防止重放攻击,如果没有nonce的活,同一笔交易就可以多次广播。同样的道理,如果遇到一个交易很久没有打包,可以使用相同的交易nonce序列号, 用更高的gasPrice 重发这笔交易; -
data: 交易的附加的消息,对于代币Token转账,则data就是调用函数的ABI编码数据,参考:如何理解以太坊ABI
这个结构中没有
from地址 ,是因为在对交易用私钥签名后,可以推倒出用户地址。
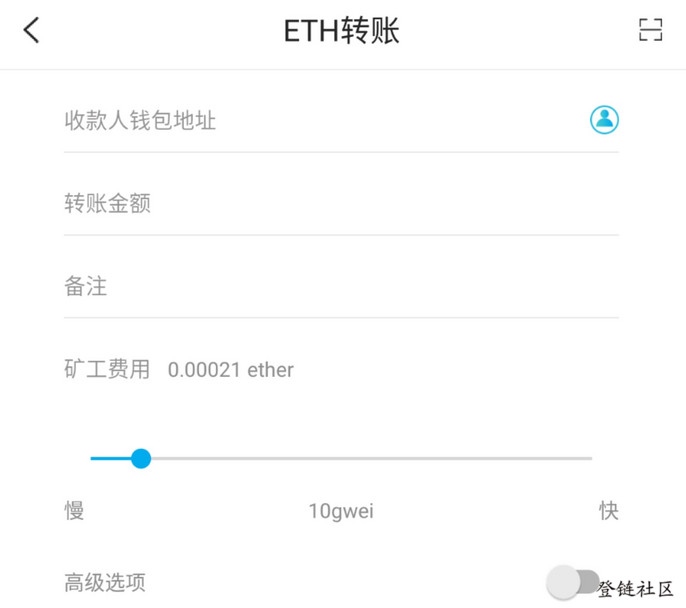
交易界面
用户在App界面通过以下界面来发起一个交易:

这个界面对应的代码是SendActivity.java,构造交易目标地址和金额可以直接从界面获得。
设置 Gas
如果 Gas 设置丢给用户,从体验上说有点说不过去,因此我们给用户一些推荐值。
Gas Price
先说说gas price, gas price 是一个竞争值, 一个矿工能做的工作量基本是固定的,因此他总是会挑给价最高的,如果一个时间段内,提交的交易数量很多,价格也会随之水涨船高,如果交易少,价格就会下降。
那么设置一个合理的价格就显得很重要,怎么恰到好处设置一个不至于浪费又不用等待长时间的gas price呢?
幸运的是web3 提供了一个接口获取最近区块的gas price,因此可以这个作为推荐值。
也有一些第三方提供的预测gas price的接口,如:gasPriceOracle 、 ethgasAPI、 etherscan gastracker,大家可自行选择。
获取Gas设置,代码中提供了一个专门的类FetchGasSettingsInteract
public class FetchGasSettingsInteract {
    private final MutableLiveData<BigInteger> gasPrice = new MutableLiveData<>();
    private BigInteger cachedGasPrice;

    public FetchGasSettingsInteract(
        gasSettingsDisposable = Observable.interval(0, 60, TimeUnit.SECONDS)
                .doOnNext(l ->fetchGasPriceByWeb3()
                ).subscribe();
    }

    private void fetchGasPriceByWeb3() {
        final Web3j web3j = Web3j.build(rpcServerUrl));
        try {
            EthGasPrice price = web3j.ethGasPrice().send();
            if (price.getGasPrice().compareTo(BalanceUtils.gweiToWei(BigDecimal.ONE)) >= 0)
            {
                cachedGasPrice = price.getGasPrice();
                gasPrice.postValue(cachedGasPrice);
            }
        } catch (Exception ex) {
            // silently
        }
    }

    public MutableLiveData<BigInteger> gasPriceUpdate()
    {
        return gasPrice;
    }
}
FetchGasSettingsInteract 类中gasPrice是一个可以订阅的LiveData数据,fetchGasPriceByWeb3函数用于获取价格,在构造函数中使用了Observable.interval来开启一个间隔一分钟的循环任务,即每分钟去取一下最新的价格。
Gas Limit
Gas Limit用来确定工作量,不像Gas Price 谁时间的变化而浮动,工作量任务确定后,这个值就是固定的,如一个转账到普通的交易,工作量中是21000。
对于智能合约交易,gasLimit则根据执行的任务而变化,如果设定的不够,会发生out-of-gas 错误,交易就不会打包上链,如果设定的过高,多余的就会退回交易发起者,这也是为什么我把这个费用称为预算的原因。
有些人会认为直接设置高一点的值,反正会退回,但如果合约执行出错,就会吃掉所有的gas,对于ERC20转账,一般推荐设置的值为90000, 如果是运行非标准的智能合约,如使用DAPP,可以使用ethEstimateGas 函数进行预测。
在钱包中运行DAPP,也是钱包的一项重要功能,我会在小专栏进行介绍。
这里使用推荐默认值,在FetchGasSettingsInteract加入方法:
    public Single<GasSettings> fetch(ConfirmationType type) {

        return Single.fromCallable( () -> {
            BigInteger gasLimit;
            if (type == ConfirmationType.ETH) {
                gasLimit = new BigInteger(21000);
            } else if (type == ConfirmationType.ERC20) {
                gasLimit = new BigInteger(21000);
            } else {
                ...
            }
            return new GasSettings(cachedGasPrice, gasLimit);
        });
    }
为了避免 SendActivity(UI) 与数据的耦合使用了ConfirmationViewModel, ConfirmationViewModel 中保留了一个 FetchGasSettingsInteract 对象,界面提供推荐的gas的代码逻辑调用流程是这样:
sequenceDiagram
Title: 获取Gas 过程
SendActivity->ConfirmationViewModel: prepare
ConfirmationViewModel->>FetchGasSettingsInteract: gasPriceUpdate
loop 获取最新价格
    FetchGasSettingsInteract->>FetchGasSettingsInteract: fetchGasPriceByWeb3
end

FetchGasSettingsInteract-->>ConfirmationViewModel: onGasPrice
ConfirmationViewModel->>FetchGasSettingsInteract: fetch
FetchGasSettingsInteract->>FetchGasSettingsInteract: fetch
FetchGasSettingsInteract-->>ConfirmationViewModel: onGasSettings
ConfirmationViewModel-->>SendActivity: onGasSettings
其中虚线部分是数据订阅回调,在SendActivity拿到GasSettings就可以进行展示。
代码调用代码逻辑,大家最好把代码https://github.com/xilibi2003/Upchain-wallet 克隆到本地跟一下。
确认交易数据
用户在没有填写收款地址、发送金额以及调整好Gas(可选),在发送交易之前,一般需要用户再次确认下交易详情,使用下面这个对话框:

代码中使用的一个自定义的ConfirmTransactionView来展示这个信息,UI部分的代码就不贴了。
在用户确认无误之后,点击确认,用户输入密码之后,就可以正式发起交易了。
获取nonce
细心的同学可能会发现,现在构造交易结构还差nonce,web3j提供了相应的API,获取的逻辑在EthereumNetworkRepository类中,代码如下:
public Single<BigInteger> getLastTransactionNonce(Web3j web3j, String walletAddress)
{
    return Single.fromCallable(() -> {
        EthGetTransactionCount ethGetTransactionCount = web3j
                .ethGetTransactionCount(walletAddress, DefaultBlockParameterName.PENDING)
                .send();
        return ethGetTransactionCount.getTransactionCount();
    });
}
发起交易
完整的交易流程调用序列图如下:
sequenceDiagram
Title: 用户发起交易调用
Note left of SendActivity: 用户点击发送
SendActivity->ConfirmationViewModel: createTransaction
ConfirmationViewModel->>CreateTransactionInteract: createEthTransaction
CreateTransactionInteract->>EthereumNetworkRepository: getLastTransactionNonce
CreateTransactionInteract->>CreateTransactionInteract: createRawTransaction
CreateTransactionInteract->>CreateTransactionInteract: signMessage
CreateTransactionInteract->>CreateTransactionInteract: ethSendRawTransaction
CreateTransactionInteract-->>ConfirmationViewModel: onCreateTransaction
ConfirmationViewModel-->>SendActivity:onTransaction交易主要在createEthTransaction函数完成,逻辑有:
- 获取交易nonce
- 使用nonce, gasPrice, gasLimit, to, amount 构造一个原始交易
- 使用 密码 + keystore 对原始交易进行签名
- 发送交易, 把txHash 封装为一个可回调的数据
createEthTransaction代码如下:
public Single<String>  createEthTransaction(ETHWallet from,  String to,
    BigInteger amount,
    BigInteger gasPrice, BigInteger gasLimit,
    String password) {
    final Web3j web3j = Web3j.build(rpcServerUrl));

    return networkRepository.getLastTransactionNonce(web3j, from.address)
            .flatMap(nonce -> Single.fromCallable( () -> {

        Credentials credentials = WalletUtils.loadCredentials(password,  keystorePath);
        RawTransaction rawTransaction = RawTransaction.createEtherTransaction(nonce, gasPrice, gasLimit, to, amount);
        byte[] signedMessage = TransactionEncoder.signMessage(rawTransaction, credentials);

        String hexValue = Numeric.toHexString(signedMessage);
        EthSendTransaction ethSendTransaction = web3j.ethSendRawTransaction(hexValue).send();

        return ethSendTransaction.getTransactionHash();

    } ).subscribeOn(Schedulers.computation())
                    .observeOn(AndroidSchedulers.mainThread()));
}
Token 转账交易
Token 转账交易部分,请订阅我的小专栏。
<div style='display: none'>
对于Token 转账交易,有两点需要注意:
- 交易的目标地址(即交易字段的
to字段)其实不是用户填写的收款人钱包地址,目标地址是Token 合约地址。 - 需要把对转账函数transfer的调用转化为交易的附加数据
data。
转化为交易的附加数据的方法如下:
    public String createTokenTransferData(String to, BigInteger tokenAmount) {
        List<Type> params = Arrays.<Type>asList(new Address(to), new Uint256(tokenAmount));

        List<TypeReference<?>> returnTypes = Arrays.<TypeReference<?>>asList(new TypeReference<Bool>() {
        });

        Function function = new Function("transfer", params, returnTypes);
        return FunctionEncoder.encode(function);
}ERC20转账函数createERC20Transfer 有一点点不同:得到调用函数附加数据之后,在构造交易对象时,加入附加数据,部分代码如下:
String callFuncData = createTokenTransferData(to, amount);
rawTransaction = RawTransaction.createTransaction(
                    nonce, gasPrice, gasLimit, contractAddress, callFuncData);
</div>
参考文档
学习中如遇问题,欢迎到区块链技术问答提问,这里有老师为你解惑。
- Remitano、GAMBL、Rocketswap:当操作失误击败代码漏洞 42 浏览
- 打破 Gas 陷阱:保护智能合约免受拒绝服务攻击 66 浏览
- 安全指南:使用 Solodit 保护智能合约 292 浏览
- 本周加密货币市场回顾 (2025年06月30日) 330 浏览
- 以太坊扩容从链上到链下:状态通道和Rollups 方案对比 174 浏览
- Solidity ABI 编码深度解析:第二部分 301 浏览
- 为什么看好ETH? 355 浏览
- 使用 txping 实时测量以太坊交易延迟 172 浏览
- 什么是BLS签名以及它们如何工作? 712 浏览
- 以太坊区块证明 290 浏览
- Solana Passkeys:加密钱包用户体验的未来 163 浏览
- 现代重入攻击:超越常见利用方式 357 浏览

