用 Rig 打造你的专属 AI Agent
震撼来袭!Rust+Rig 魔法配方,打造 AI 驱动 Discord 神器
- King
- 发布于 2025-02-03 11:51
- 阅读 3684
TL;DR:本综合指南将带你使用Rust和Rig库创建一个AI驱动的Discord机器人。你将学习如何设置环境、构建语言模型代理并将其与Discord集成。最终,你将拥有一个AI驱动的聊天机器人,它可以根据你的文档回答问题、提供编程帮助,并作为自动化支持工具。介绍欢迎来到“使用Rig构
TL;DR: 本综合指南将带你使用Rust和Rig库创建一个AI驱动的Discord机器人。你将学习如何设置环境、构建语言模型代理并将其与Discord集成。最终,你将拥有一个AI驱动的聊天机器人,它可以根据你的文档回答问题、提供编程帮助,并作为自动化支持工具。
介绍
欢迎来到“使用Rig构建”系列。
在这个实践教程中,我们将使用Rust和Rig库构建一个功能齐全的AI Discord机器人。
我们的机器人将能够:
- • 使用基于Markdown的自定义知识库回答用户问题
- • 提供编程帮助和解释
- • 作为自动化客户服务或社区辅助工具
在本指南中,我们将涵盖以下内容:
- • 设置Rust开发环境
- • 使用Rig实现语言模型代理
- • 将机器人与Discord集成
- • 部署和测试机器人
虽然本指南假设你对Rust、LLM和Discord有一定的了解,但如果你是第一次接触Rust项目,也不必担心。我们将专注于实际实现,并在过程中解释关键概念和设计决策。
通过本教程,你将拥有一个可工作的AI Discord机器人,并对使用Rig构建LLM驱动的应用程序有扎实的理解。
让我们开始吧。
💡 如果你是Rig的新手,想从头开始或寻找更多教程,请查看博客系列或访问GitHub仓库。
前提条件
在开始构建之前,请确保你具备以下条件:
- • Rust:如果尚未安装Rust,请先安装。
- • Discord账户和机器人设置:你需要一个Discord账户和一个机器人应用程序。请按照Discord机器人设置指南操作。
- • OpenAI API密钥:为了启用AI功能,你需要通过获取OpenAI API密钥来集成OpenAI API。注册OpenAI API密钥。
重要提示:切勿将API密钥或
.env文件提交到版本控制中。确保你的.gitignore文件包含这些文件,以防止意外泄露。
项目设置
在具备先决条件后,让我们设置Rust项目并安装必要的依赖项。
1. 初始化一个新的Rust项目
打开终端并运行以下命令:
cargo new discord_rig_bot
cd discord_rig_bot这将创建一个名为discord_rig_bot的新Rust项目,并进入项目目录。
2. 添加依赖项
打开项目目录中的Cargo.toml文件,并在[dependencies]部分添加以下依赖项:
[dependencies]
rig-core = "0.7.0" # [Rig Crate](https://crates.io/crates/rig-core)
tokio = { version = "1.34.0", features = ["full"] }
serenity = { version = "0.11", default-features = false, features = ["client", "gateway", "rustls_backend", "cache", "model", "http"] }
dotenv = "0.15.0"
anyhow = "1.0.75"
tracing = "0.1"
tracing-subscriber = "0.3"
reqwest = { version = "0.11", features = ["json"] }
serde = { version = "1.0", features = ["derive"] }
serde_json = "1.0"
schemars = "0.8"
async-trait = "0.1.83"
这些依赖项在我们的项目中扮演着关键角色:
- • Rig:用于构建语言模型应用程序的核心库,简化了将AI功能集成到Discord机器人中的过程。
- • Serenity:用于与Discord API交互的第三方库。
- • Tokio:Rust的异步运行时,允许我们的机器人同时处理多个任务。
- • 其他用于错误处理(
anyhow)、日志记录(tracing、tracing-subscriber)、发出HTTP请求(reqwest)和序列化(serde、serde_json、schemars)的crate。
理解机器人架构
我们的机器人由两个主要组件组成,它们共同协作以提供智能和交互式的用户体验:
- • Rig代理(rig_agent.rs):机器人智能的核心。Rig代理管理AI交互,处理自然语言处理,使用Rig集成的检索增强生成(RAG)功能从基于Markdown的知识库中检索相关信息,并生成上下文相关的响应。
- • Discord机器人(main.rs):AI与用户之间的接口。Discord机器人管理与Discord的通信,监听用户命令和消息,并将生成的响应发送回用户。
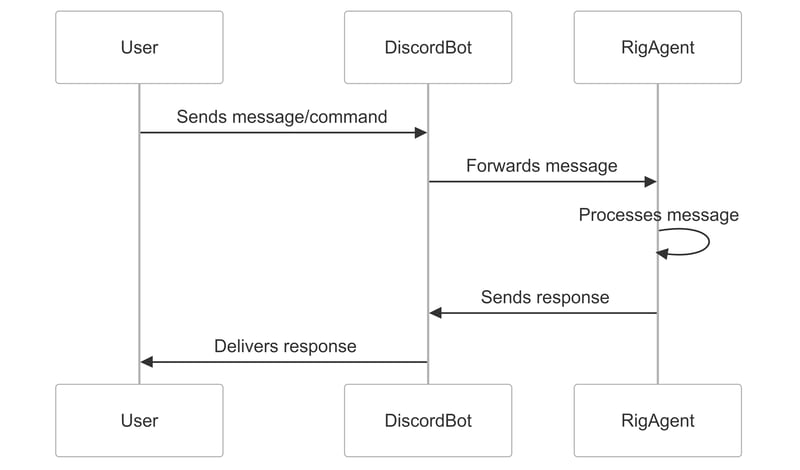
消息处理流程
为了理解我们的机器人如何工作,让我们逐步了解消息处理流程:
- 1. 用户输入:用户在机器人所在的Discord频道中发送消息或命令。
- 2. Discord机器人:机器人始终监听新消息,接收用户的输入并将其传递给Rig代理进行处理。
- 3. Rig代理:代理处理用户的输入,从知识库中检索相关信息,并使用其语言理解和生成能力生成适当的响应。
- 4. 响应:Discord机器人从Rig代理接收生成的响应,并将其发送回Discord频道中的用户。
以下是一个简化的消息处理流程图:

有关使用Rig构建RAG系统的深入探讨,请参阅我们关于使用Rig构建简单RAG系统的综合文章。
构建Rig代理(rig_agent.rs)
Rig代理是我们机器人的大脑,负责理解用户查询、检索相关信息并生成智能响应。让我们逐步构建它。
1. 创建rig_agent.rs文件
在src目录中,创建一个名为rig_agent.rs的新文件。该文件将包含我们Rig代理的实现。
2. 导入必要的模块
在rig_agent.rs的顶部,导入所需的模块:
use anyhow::{Context, Result};
use rig::providers::openai;
use rig::vector_store::in_memory_store::InMemoryVectorStore;
use rig::vector_store::VectorStore;
use rig::embeddings::EmbeddingsBuilder;
use rig::agent::Agent;
use rig::completion::Prompt;
use std::path::Path;
use std::fs;
use std::sync::Arc;
这些模块为 Rig 代理提供了必要的功能,包括错误处理(anyhow)、OpenAI语言模型和嵌入(rig::providers::openai)、向量存储(rig::vector_store::in_memory_store)、嵌入生成(rig::embeddings::EmbeddingsBuilder)和代理(rig::agent::Agent)。
3. 定义RigAgent结构体
创建RigAgent结构体,它将管理检索和响应生成:
pub struct RigAgent {
    agent: Arc<Agent<openai::CompletionModel>>,
}RigAgent结构体包含一个Arc(原子引用计数)指针,指向Agent。Arc类型允许多个部分共享对同一数据的所有权,且是线程安全的。在我们的案例中,由于机器人将处理多个异步事件,因此在程序的不同部分之间共享RigAgent而不转移所有权是至关重要的,Arc提供了一种线程安全的方式来实现这一点。
注意:
Arc代表原子引用计数。它用于在线程之间安全地共享数据。
4. 实现new方法
new方法负责初始化Rig代理,设置OpenAI客户端,加载和嵌入知识库文档,并创建RAG代理。
impl RigAgent {
    pub async fn new() -> Result<Self> {
        // 初始化OpenAI客户端
        let openai_client = openai::Client::from_env();
        let embedding_model = openai_client.embedding_model(openai::TEXT_EMBEDDING_3_SMALL);

        // 创建向量存储
        let mut vector_store = InMemoryVectorStore::default();

        // 获取当前目录并构建Markdown文件的路径
        let current_dir = std::env::current_dir()?;
        let documents_dir = current_dir.join("documents");

        let md1_path = documents_dir.join("Rig_guide.md");
        let md2_path = documents_dir.join("Rig_faq.md");
        let md3_path = documents_dir.join("Rig_examples.md");

        // 加载Markdown文档
        let md1_content = Self::load_md_content(&md1_path)?;
        let md2_content = Self::load_md_content(&md2_path)?;
        let md3_content = Self::load_md_content(&md3_path)?;

        // 创建嵌入并添加到向量存储
        let embeddings = EmbeddingsBuilder::new(embedding_model.clone())
            .simple_document("Rig_guide", &md1_content)
            .simple_document("Rig_faq", &md2_content)
            .simple_document("Rig_examples", &md3_content)
            .build()
            .await?;

        vector_store.add_documents(embeddings).await?;

        // 创建索引
        let index = vector_store.index(embedding_model);

        // 创建代理
        let agent = Arc::new(openai_client.agent(openai::GPT_4O)
            .preamble("You are an advanced AI assistant powered by Rig, a Rust library for building LLM applications. Your primary function is to provide accurate, helpful, and context-aware responses by leveraging both your general knowledge and specific information retrieved from a curated knowledge base.

                    Key responsibilities and behaviors:
                    1. Information Retrieval: You have access to a vast knowledge base. When answering questions, always consider the context provided by the retrieved information.
                    2. Clarity and Conciseness: Provide clear and concise answers. Ensure responses are short and concise. Use bullet points or numbered lists for complex information when appropriate.
                    3. Technical Proficiency: You have deep knowledge about Rig and its capabilities. When discussing Rig or answering related questions, provide detailed and technically accurate information.
                    4. Code Examples: When appropriate, provide Rust code examples to illustrate concepts, especially when discussing Rig's functionalities. Always format code examples for proper rendering in Discord by wrapping them in triple backticks and specifying the language as 'rust'.
                    5. Keep your responses short and concise. If the user needs more information, they can ask follow-up questions.
                    ")
            .dynamic_context(2, index)
            .build());

        Ok(Self { agent })
    }

    // ... 我们将在构建过程中添加更多代码
}
让我们分解关键步骤:
- 1. 初始化OpenAI客户端:使用存储在环境变量中的API密钥设置OpenAI客户端。此客户端对于访问OpenAI的语言模型和嵌入服务至关重要。
- 2. 嵌入模型:选择
text-embedding-3-small模型来生成文档嵌入。该模型创建文本的紧凑向量表示,从而实现高效的语义搜索和检索。 - 3. 向量存储:创建一个内存中的向量存储来保存和管理文档嵌入。向量存储针对快速相似性搜索进行了优化,允许代理根据用户查询快速找到相关信息。
- 4. 加载文档:从
documents目录加载包含知识库的Markdown文件。在本例中,我们有三个文件:Rig_guide.md、Rig_faq.md和Rig_examples.md。这些文件包含有关Rig库的信息、常见问题解答和使用示例。 - 5. 创建嵌入:使用Rig提供的
EmbeddingsBuilder将加载的文档转换为向量嵌入。这些嵌入捕获文档的语义含义,使代理能够根据用户查询理解和检索相关信息。 - 6. 代理创建:通过将语言模型(GPT-4)与包含文档嵌入的向量存储结合,创建一个
RagAgent。代理能够从知识库中检索相关信息并生成上下文相关的响应。 - 7. 前言:精心设计的前言设置了助手的行为和指南。前言定义了代理的主要功能、职责和预期行为,确保其提供准确、简洁且技术熟练的响应。
提示:有关更高级的配置和技术,例如实现自定义向量存储或配置自定义代理和工具,请参阅官方Rig示例。
5. 实现load_md_content函数
load_md_content函数是一个辅助函数,用于从指定的文件路径读取Markdown文件的内容:
fn load_md_content<P: AsRef<Path>>(file_path: P) -> Result<String> {
    fs::read_to_string(file_path.as_ref())
        .with_context(|| format!("Failed to read markdown file: {:?}", file_path.as_ref()))
}该函数接受一个实现AsRef<Path>特征的泛型参数P,允许它接受可以转换为文件路径的各种类型。它使用fs::read_to_string函数读取文件内容,并将内容作为String返回。如果无法读取文件,则返回带有附加上下文信息的错误。
6. 实现process_message函数
process_message函数负责处理用户消息并使用代理生成响应:
pub async fn process_message(&self, message: &str) -> Result<String> {
    self.agent.prompt(message).await.map_err(anyhow::Error::from)
}该函数接受用户消息作为输入,并将其传递给RAG代理的prompt方法。RAG代理根据用户查询从知识库中检索相关信息,并生成上下文相关的响应。生成的响应作为String返回。如果在处理过程中发生错误,则将其映射为anyhow::Error以进行一致的错误处理。
自定义知识库
虽然我们使用了Rig自己的文档作为知识库,但你可以通过使用自己的文档来个性化你的机器人。
以下是操作方法:
-
1. 准备你的文档:将你的Markdown文件放在
documents目录中。确保它们具有清晰且描述性的文件名。 -
2. 修改文件路径:在
rig_agent.rs中,更新文件路径以匹配你的文档名称。let my_doc_path = documents_dir.join("my_custom_doc.md"); let my_doc_content = Self::load_md_content(&my_doc_path)?; -
3. 更新嵌入构建器:调整
EmbeddingsBuilder以包含你的文档。let embeddings = EmbeddingsBuilder::new(embedding_model.clone()) .simple_document("My Custom Doc", &my_doc_content) .build() .await?;
这样,你的机器人将使用你自己的内容生成响应。
与Discord集成(main.rs)
在完成Rig代理的实现后,现在是时候使用 Serenity 库将其与Discord连接了。Serenity 是一个用于Discord API的异步优先的Rust库,提供了一种简单高效的方式来创建Discord机器人。
1. 修改main.rs以包含Rig代理
在main.rs的顶部,导入必要的模块和你的rig_agent:
mod rig_agent;

use anyhow::Result;
use serenity::async_trait;
use serenity::model::application::command::Command;
use serenity::model::application::interaction::{Interaction, InteractionResponseType};
use serenity::model::gateway::Ready;
use serenity::model::channel::Message;
use serenity::prelude::*;
use serenity::model::application::command::CommandOptionType;
use std::env;
use std::sync::Arc;
use tracing::{error, info, debug};
use rig_agent::RigAgent;
use dotenv::dotenv;这些导入从Serenity库中引入了必要的类型和特征,以及从rig_agent模块中引入了RigAgent结构体。dotenv crate用于从.env文件加载环境变量。
2. 存储机器人的用户ID
使用Serenity的TypeMapKey特征定义一个键来存储机器人的用户ID:
struct BotUserId;

impl TypeMapKey for BotUserId {
    type Value = serenity::model::id::UserId;
}该键允许我们从Serenity的TypeMap中存储和检索机器人的用户ID,TypeMap是一个类型安全的键值存储,用于在事件处理程序之间共享数据。
3. 定义Handler结构体
创建包含RigAgent的Handler结构体:
struct Handler {
    rig_agent: Arc<RigAgent>,
}Handler结构体负责处理Discord事件和交互。它包含一个Arc<RigAgent>,这是一个线程安全的引用计数指针,指向Rig代理。这允许处理程序在不转移所有权的情况下跨多个事件处理程序共享Rig代理。
4. 实现EventHandler特征
为Handler结构体实现EventHandler特征,以定义机器人应如何处理各种Discord事件:
#[async_trait]
impl EventHandler for Handler {
    async fn interaction_create(&self, ctx: Context, interaction: Interaction) {
        // ... 处理交互
    }

    async fn message(&self, ctx: Context, msg: Message) {
        // ... 处理消息
    }

    async fn ready(&self, ctx: Context, ready: Ready) {
        // ... 处理准备就绪
    }
}EventHandler特征由 Serenity 提供,并定义了一组在特定事件发生时调用的方法。在此实现中,我们定义了三个事件处理程序:
- •
interaction_create:当用户与机器人交互时调用,例如使用斜杠命令或点击按钮。 - •
message:当机器人在场的频道中发送消息时调用。 - •
ready:当机器人成功连接到Discord并准备好接收事件时调用。
处理交互
在 interaction_create 事件处理程序中,我们处理从 Discord 收到的斜杠命令:
async fn interaction_create(&self, ctx: Context, interaction: Interaction) {
    debug!("Received an interaction");
    if let Interaction::ApplicationCommand(command) = interaction {
        debug!("Received command: {}", command.data.name);
        let content = match command.data.name.as_str() {
            "hello" => "Hello! I'm your helpful Rust and Rig-powered assistant. How can I assist you today?".to_string(),
            "ask" => {
                let query = command
                   .data
                   .options
                   .get(0)
                   .and_then(|opt| opt.value.as_ref())
                   .and_then(|v| v.as_str())
                   .unwrap_or("What would you like to ask?");
                debug!("Query: {}", query);
                match self.rig_agent.process_message(query).await {
                    Ok(response) => response,
                    Err(e) => {
                        error!("Error processing request: {:?}", e);
                        format!("Error processing request: {:?}", e)
                    }
                }
            }
            _ => "Not implemented :(".to_string(),
        };

        debug!("Sending response: {}", content);

        if let Err(why) = command
           .create_interaction_response(&ctx.http, |response| {
                response
                   .kind(InteractionResponseType::ChannelMessageWithSource)
                   .interaction_response_data(|message| message.content(content))
            })
           .await
        {
            error!("Cannot respond to slash command: {}", why);
        } else {
            debug!("Response sent successfully");
        }
    }
}
让我们来详细分析这个过程:
- 1. 当收到一个交互时,首先使用
Interaction::ApplicationCommand枚举变体检查它是否是一个斜杠命令。 - 2. 如果是斜杠命令,根据命令名称进行匹配,以确定相应的操作。
-
- • 对于 “hello” 命令,用一条简单的问候消息进行响应。
- • 对于 “ask” 命令,从命令选项中提取用户的查询内容。如果没有提供查询内容,我们使用一条默认消息。
- • 如果命令是 “ask”,将用户的查询内容传递给 Rig 代理的
process_message方法,以生成响应。
- 3. 如果 Rig 代理成功生成了响应,将其发送回用户。
- 4. 如果处理过程中出现错误,记录错误信息,并向用户发送一条错误消息。
- 5. 对于任何其他命令,用 “Not implemented” 消息进行响应。
- 6. 最后,使用
command.create_interaction_response创建一个交互响应,指定响应类型为ChannelMessageWithSource,并将响应内容设置为生成的消息。
这种实现方式允许用户使用斜杠命令与机器人进行交互,为用户提供了一种结构化的方式来提问并从 Rig 代理获取响应。
处理消息
在消息事件处理程序中,当机器人在消息中被提及,我们会做出响应:
async fn message(&self, ctx: Context, msg: Message) {
    if msg.mentions_me(&ctx.http).await.unwrap_or(false) {
        debug!("Bot mentioned in message: {}", msg.content);

        let bot_id = {
            let data = ctx.data.read().await;
            data.get::<BotUserId>().copied()
        };

        if let Some(bot_id) = bot_id {
            let mention = format!("<@{}>", bot_id);
            let content = msg.content.replace(&mention, "").trim().to_string();

            debug!("Processed content after removing mention: {}", content);

            match self.rig_agent.process_message(&content).await {
                Ok(response) => {
                    if let Err(why) = msg.channel_id.say(&ctx.http, response).await {
                        error!("Error sending message: {:?}", why);
                    }
                }
                Err(e) => {
                    error!("Error processing message: {:?}", e);
                    if let Err(why) = msg
                       .channel_id
                       .say(&ctx.http, format!("Error processing message: {:?}", e))
                       .await
                    {
                        error!("Error sending error message: {:?}", why);
                    }
                }
            }
        } else {
            error!("Bot user ID not found in TypeMap");
        }
    }
}
消息处理的工作原理如下:
- 1. 当收到一条消息时,首先使用
mentions_me方法检查机器人是否在消息中被提及。 - 2. 如果机器人被提及,使用
BotUserId键从TypeMap中检索机器人的用户 ID。 - 3. 如果找到了机器人的用户 ID,从消息内容中移除提及部分,以提取实际的查询内容。
- 4. 将处理后的消息内容传递给 Rig 代理的
process_message方法,以生成响应。 - 5. 如果 Rig 代理成功生成了响应,使用
msg.channel_id.say将其发送回消息所在的频道。 - 6. 如果处理过程中出现错误,记录错误信息,并向频道发送一条错误消息。
- 7. 如果在
TypeMap中没有找到机器人的用户 ID,记录一条错误信息。
这种实现方式允许用户通过在消息中提及机器人来与其进行交互,为用户提供了一种更自然的方式来提问并从 Rig 代理获取响应。
处理机器人就绪事件
在 ready 事件处理程序中,设置斜杠命令并存储机器人的用户 ID:
async fn ready(&self, ctx: Context, ready: Ready) {
    info!("{} is connected!", ready.user.name);

    {
        let mut data = ctx.data.write().await;
        data.insert::<BotUserId>(ready.user.id);
    }

    let commands = Command::set_global_application_commands(&ctx.http, |commands| {
        commands
           .create_application_command(|command| {
                command
                   .name("hello")
                   .description("Say hello to the bot")
            })
           .create_application_command(|command| {
                command
                   .name("ask")
                   .description("Ask the bot a question")
                   .create_option(|option| {
                        option
                           .name("query")
                           .description("Your question for the bot")
                           .kind(CommandOptionType::String)
                           .required(true)
                    })
            })
    })
   .await;

    println!("Created the following global commands: {:#?}", commands);
}
ready 事件处理程序的执行过程如下:
- 1. 当机器人成功连接到 Discord 时,会触发
ready事件。 - 2. 使用
Ready结构体中的机器人名称记录一条消息,表明机器人已连接。 - 3. 使用
BotUserId键将机器人的用户 ID 存储在TypeMap中。这样就可以在其他事件处理程序中访问机器人的用户 ID。 - 4. 使用
Command::set_global_application_commands方法创建全局斜杠命令。 - 5. 定义两个命令:“hello” 和 “ask”。
-
- • “hello” 命令是一个简单的命令,用于向用户打招呼。
- • “ask” 命令允许用户向机器人提问。它有一个必需的 “query” 选项,类型为字符串,用户可以在其中输入他们的问题。
为了调试目的,我们打印出创建的全局命令。
5. 实现 main 函数
在 main 函数中,我们设置并启动机器人:
#[tokio::main]
async fn main() -> Result<()> {
    dotenv().ok();

    tracing_subscriber::fmt()
       .with_max_level(tracing::Level::DEBUG)
       .init();

    let token = env::var("DISCORD_TOKEN").expect("Expected DISCORD_TOKEN in environment");

    let rig_agent = Arc::new(RigAgent::new().await?);

    let intents = GatewayIntents::GUILD_MESSAGES
        | GatewayIntents::DIRECT_MESSAGES
        | GatewayIntents::MESSAGE_CONTENT;

    let mut client = Client::builder(&token, intents)
       .event_handler(Handler {
            rig_agent: Arc::clone(&rig_agent),
        })
       .await
       .expect("Err creating client");

    if let Err(why) = client.start().await {
        error!("Client error: {:?}", why);
    }

    Ok(())
}
main 函数的步骤分解如下:
- 1. 使用
dotenv().ok()从.env文件中加载环境变量。 - 2. 初始化
tracing_subscriber,设置最大日志级别为DEBUG,以进行日志记录。 - 3. 从
DISCORD_TOKEN环境变量中获取 Discord 机器人令牌。 - 4. 创建一个新的
RigAgent实例,并将其包装在Arc中,以实现线程安全的共享。 - 5. 定义
GatewayIntents,指定希望从 Discord 接收的事件。 - 6. 使用
Client::builder方法创建一个新的 Discord 客户端,传入机器人令牌和intents。 - 7. 将客户端的事件处理程序设置为
Handler结构体的一个实例,并传入包装在Arc中的RigAgent。 - 8. 使用
client.start()启动客户端,并处理可能出现的任何错误。
运行和测试机器人
现在 Discord 机器人已经完成,让我们运行它并测试其功能。
1. 设置环境变量
在项目根目录下创建一个 .env 文件,内容如下:
DISCORD_TOKEN=your_discord_bot_token
OPENAI_API_KEY=your_openai_api_key
将 your_discord_bot_token 替换为你实际的 Discord 机器人令牌,将 your_openai_api_key 替换为你的 OpenAI API 密钥。
重要提示:永远不要将你的
.env文件或 API 密钥提交到版本控制系统。将.env添加到你的.gitignore文件中,以防止意外泄露。
2. 运行机器人
在终端中,导航到项目目录并运行以下命令:
cargo run如果一切设置正确,你应该会看到日志显示机器人已连接,并且全局命令已创建。
3. 将机器人邀请到你的 Discord 服务器
要将机器人邀请到你的 Discord 服务器,请按照以下步骤操作:
- • 访问 Discord 开发者门户,选择你的机器人应用程序。
- • 导航到 “OAuth2” 部分,点击 “URL 生成器”。
- • 在 “Scopes” 下,选择
bot和applications.commands。 - • 在 “Bot Permissions” 下,选择 “发送消息”、“读取消息历史记录” 等。
- • 复制生成的 URL 并粘贴到你的浏览器中。
- • 选择你要邀请机器人加入的服务器,然后点击 “授权”。
4. 测试机器人
一旦机器人运行并被邀请到你的服务器,你可以测试其功能:
斜杠命令:
输入 /hello 以接收一条问候消息。\
使用 /ask 后跟一个问题,与机器人进行交互并接收 Rig 代理生成的响应。
提及:
在消息中提及机器人并提出问题,例如 @BotName How do I use Rig?,机器人将处理你的问题并相应地做出响应。
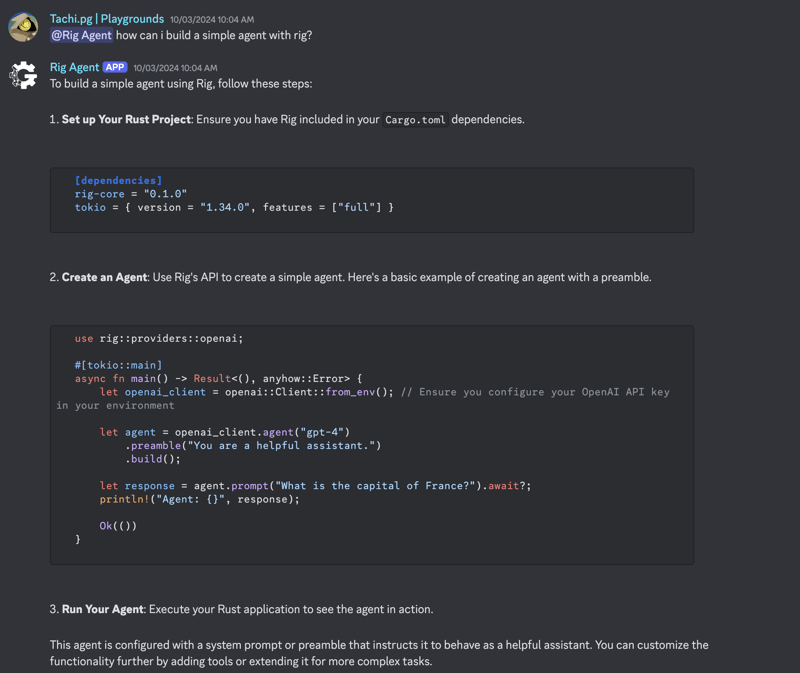
以下是机器人对问题做出响应的两个示例:


错误处理和日志记录
现在已经构建并测试了机器人,我们需要确保正确处理错误并记录机器人的行为,以便进行改进。Rust 提供了强大的库,如 anyhow 和 tracing,用于错误处理和日志记录。
1. 使用 anyhow 进行错误处理
anyhow crate 提供了一种灵活且易于使用的错误处理解决方案。它允许我们传播和处理带有额外上下文的错误,从而更易于诊断和修复问题。以下是在我们的 rig_agent.rs 文件中使用 anyhow 的示例:
use anyhow::{Context, Result};

// rig_agent.rs 中的示例
fn load_md_content<P: AsRef<Path>>(file_path: P) -> Result<String> {
    fs::read_to_string(file_path.as_ref())
       .with_context(|| format!("Failed to read markdown file: {:?}", file_path.as_ref()))
}
在这个示例中,我们使用 with_context 方法为错误提供额外的上下文,指定未能读取的文件路径。这个上下文会包含在错误消息中,从而更易于识别错误的来源。
2. 使用 tracing 进行日志记录
tracing crate 提供了一个强大而灵活的日志记录解决方案,允许我们以不同的详细程度记录消息。以下是如何在我们的 main.rs 文件中设置日志记录的示例:
use tracing::{info, error, debug};
use tracing_subscriber;

// 在 main.rs 中初始化 tracing
tracing_subscriber::fmt()
   .with_max_level(tracing::Level::DEBUG)
   .init();
在这个示例中,我们将 tracing_subscriber 初始化为最大日志级别为 DEBUG。这意味着所有严重级别为 DEBUG 或更高的日志消息都将被捕获并显示。
在我们机器人的整个代码中,我们可以使用 info!、error! 和 debug! 宏以不同的严重级别记录消息,从而深入了解机器人的行为。
常见问题排查
如果你遇到错误,以下是一些常见问题及其解决方法:
API 密钥错误:确保你的 OpenAI API 密钥和 Discord 令牌已在 .env 文件中正确设置。仔细检查是否有拼写错误或多余的空格。
文件未找到:如果你收到 “Failed to read markdown file” 错误,请检查你的文档路径是否正确,并且文件是否存在于文档目录中。
依赖冲突:运行 cargo update 以确保所有依赖项都是最新的。
权限错误:确保你的机器人在 Discord 服务器中具有必要的权限,例如发送消息和读取消息历史记录。
测试和调试指南
独立测试 Rig 代理
在与 Discord 集成之前,你可以独立测试 Rig 代理,以确保它按预期工作。方法如下:
// 在 main.rs 中测试 RigAgent

#[tokio::main]
async fn main() -> Result<()> {
    dotenv().ok();

    let rig_agent = RigAgent::new().await?;
    let response = rig_agent.process_message("What is Rig?").await?;
    println!("Response: {}", response);

    Ok(())
}
运行 cargo run 查看输出。这个测试确认 Rig 代理可以处理消息并根据你的知识库生成响应。
增强你的机器人
恭喜!你已经构建了一个功能齐全的 AI 驱动的 Discord 机器人。现在,让我们探索一些增强它的方法。
1. 扩展知识库
为了使你的机器人更有知识和更通用,考虑在文档目录中添加更多 Markdown 文件。这些文件可以涵盖广泛的主题,从常见问题解答到技术文档等等。
2. 自定义机器人的行为
机器人的行为在很大程度上由 rig_agent.rs 文件中定义的前置内容决定。通过调整这个前置内容,你可以微调机器人与用户的交互方式,塑造其个性、语气和整体对话方式。尝试不同的前置内容,为你的机器人找到适合其预期用途和受众的平衡点。
3. 添加更多命令
斜杠命令为用户与你的机器人进行交互提供了一种结构化和直观的方式。考虑在 main.rs 文件中实现更多命令,以扩展机器人的功能。例如,你可以添加用于检索特定信息、执行计算或触发自动化工作流的命令。
4. 集成其他 API
为了进一步增强机器人的功能,考虑将其与其他 API 集成。例如,你可以将机器人连接到天气 API 以提供实时天气更新,或者将其与新闻 API 集成以提供最新的头条新闻。通过利用外部 API,你可以在 Discord 服务器中创建强大的工作流并自动化任务。
请查看我们关于构建代理工具和集成 API 的指南。你也可以在官方 Rig 仓库中找到更多示例。
结论
在本指南中,我们使用 Rust 和 Rig 成功构建了一个 AI 驱动的 Discord 机器人。我们学习了如何设置环境、构建语言模型代理、与 Discord 集成以及运行机器人。有了这个基础,你可以继续增强和自定义你的机器人,将其转变为一个更强大的自主代理系统,以满足你的需求。
我们下期 “使用 Rig 进行构建” 系列指南再见!
