以太坊 - PolkaVM(3)与Hardhat简介
- CoinsBench
- 发布于 2025-05-15 09:20
- 阅读 1976
本文介绍了如何在PolkaVM上使用Hardhat进行智能合约的开发和测试。文章详细说明了如何创建本地环境、设置本地节点、准备编译器(RESOLC)、配置Hardhat,以及如何编译和在本地PolkaVM节点上进行测试。文章提供了详尽的步骤和代码示例,指导读者完成整个流程。

背景
这是一系列介绍 PolkaVM 的文章。我之前写过以下文章,今天我将介绍如何在 PolkaVM 上使用 hardhat。
目录
- 创建本地环境
- 设置本地节点
- 准备编译器
- 设置 hardhat
- 编译
- 在本地节点上测试
1. 创建本地环境
你应该安装几个软件。请查看此站点并安装软件。
将 Hardhat 与 Asset Hub 配合使用 | Polkadot 开发者文档
2. 设置本地节点
在 hardhat 中,我们使用本地节点。默认情况下,hardhat 有 EVM 节点,但我们当然没有 PolkaVM 的节点。因此,我们应该准备 PolkaVM 的本地节点。我们按照以下站点设置本地节点。
首先,我们应该设置 rust 环境,因为本地节点是用 rust 实现的。
安装 Polkadot SDK 依赖项 | Polkadot 开发者文档
接下来,克隆 Polkadot-SDK 存储库。
git clone https://github.com/paritytech/polkadot-sdk
cd polkadot-sdk
最后一步是构建源代码和测试。
我们需要构建 2 种类型的二进制文件。一个是“substrate node”。这是 Polkadot 的节点二进制文件,包括 PolkaVM。另一个是“eth-rpc”。这是 EVM 的接口,它桥接到“substrate node”。
以下命令用于构建“substrate node”。结果,我们可以找到以下二进制文件。
% cargo build --release以下命令用于构建“eth-rpc”。
% cargo build --release -p pallet-revive-eth-rpc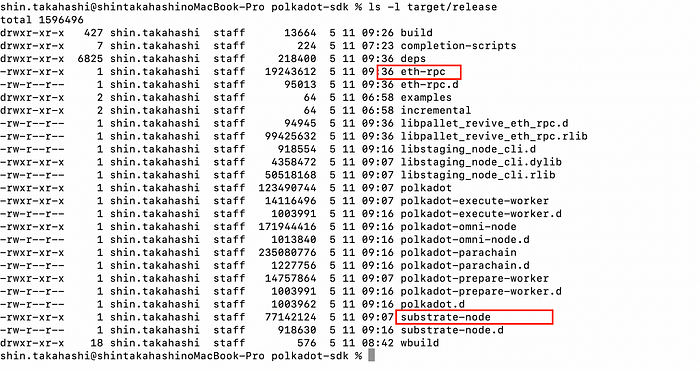
3. 准备编译器
当我们使用 PolkaVM 时,我们需要特定的编译器来构建 solidity 的源代码。这是“RESOLC”二进制文件。我们需要 2 个步骤来准备这个编译器。
- 安装 SOLC
- 安装 RESOLC
要安装 SOLC,请查看此官方文档并安装它。
安装 Solidity 编译器 - Solidity 0.8.31 文档
要安装 RESOLC,请下载适合你环境的特定二进制文件。
安装后,检查二进制文件。

4. 设置 hardhat
要设置 hardhat,我们按照 Polakdot 的官方网站进行操作。
使用 Hardhat 进行测试和部署 | Polkadot 开发者文档
以下内容与官方文档相同。这意味着从官方文档中复制和粘贴。
// 创建工作目录
mkdir storage-hardhat
cd storage-hardhat

// 初始化项目并安装所需的包
npm init -y
npm install --save-dev hardhat @nomicfoundation/hardhat-toolbox
npm install --save-dev hardhat-resolc@0.0.7 hardhat-revive-node@0.0.6 dotenv

// 初始化 hardhat 项目
// * 你必须选择选项 “Create an empty hardhat.config.js"
npx hardhat init
这样,你可以检查名为“hardhat.config.js”的文件。以下是示例(在我的例子中)
require('@nomicfoundation/hardhat-toolbox');

require('hardhat-resolc');
require('hardhat-revive-node');

require('dotenv').config();

/** @type import('hardhat/config').HardhatUserConfig */
module.exports = {
  solidity: '0.8.28',
  resolc: {
    compilerSource: 'binary',
    settings: {
      optimizer: {
        enabled: true,
        runs: 400,
      },
      evmVersion: 'istanbul',
      compilerPath: '/Users/shin.takahashi/develop/polkavm/resolc-universal-apple-darwin',
      standardJson: true,
    },
  },
  networks: {
    hardhat: {
      polkavm: true,
      nodeConfig: {
        nodeBinaryPath: '/Users/shin.takahashi/develop/polkavm/polkadot-sdk/target/release/substrate-node',
        rpcPort: 8000,
        dev: true,
      },
      adapterConfig: {
        adapterBinaryPath: '/Users/shin.takahashi/develop/polkavm/polkadot-sdk/target/release/eth-rpc',
        dev: true,
      },
    },
    localNode: {
      polkavm: true,
      url: `http://127.0.0.1:8545`,
    },
    westendAssetHub: {
      polkavm: true,
      url: 'https://westend-asset-hub-eth-rpc.polkadot.io',
      accounts: [process.env.PRIVATE_KEY],
    },
  },
};
你必须更改 3 个值。
- compilerPath
- nodeBinaryPath
- adapterBinaryPath
“compilerPath” 是你安装 “RESOLC” 二进制文件的地方。
“nodeBinaryPath” 是你编译 “substrate node” 的二进制文件的地方。
“adapterBinaryPath” 是你编译 “eth-rpc” 的二进制文件的地方。
还有一件事。我们需要创建 “.env” 文件,该文件具有私钥,如下所示,位于 hardhat 项目的当前目录中。
% cat .env
PRIVATE_KEY="7777777xxxxxxxx9999999999uuuuuuuuuiiiiiiii"
5. 编译
我们必须准备示例合约。
创建目录 “contracts” 并创建文件 “Storage.sol”。
// SPDX-License-Identifier: MIT
pragma solidity ^0.8.28;

contract Storage {
    // State variable to store our number
    uint256 private number;

    // Event to notify when the number changes
    event NumberChanged(uint256 newNumber);

    // Function to store a new number
    function store(uint256 newNumber) public {
        number = newNumber;
        emit NumberChanged(newNumber);
    }

    // Function to retrieve the stored number
    function retrieve() public view returns (uint256) {
        return number;
    }
}
你可以编译 hardhat 的常用命令。
% npx hardhat compile
6. 在本地节点上测试
一切顺利,因此我们可以在 PolkaVM 的本地节点上进行测试。
在测试目录中准备示例测试文件。
const { expect } = require('chai');
const { ethers } = require('hardhat');

describe('Storage', function () {
  let storage;
  let owner;
  let addr1;

  beforeEach(async function () {
    // Get signers
    [owner, addr1] = await ethers.getSigners();

    // Deploy the Storage contract
    const Storage = await ethers.getContractFactory('Storage');
    storage = await Storage.deploy();
    await storage.waitForDeployment();
  });

  describe('Basic functionality', function () {
    it('Should return 0 initially', async function () {
      expect(await storage.retrieve()).to.equal(0);
    });

    it('Should update when store is called', async function () {
      const testValue = 42;
      // Store a value
      await storage.store(testValue);
      // Check if the value was updated
      expect(await storage.retrieve()).to.equal(testValue);
    });

    it('Should emit an event when storing a value', async function () {
      const testValue = 100;
      // Check if the NumberChanged event is emitted with the correct value
      await expect(storage.store(testValue))
        .to.emit(storage, 'NumberChanged')
        .withArgs(testValue);
    });

    it('Should allow storing sequentially increasing values', async function () {
      const values = [10, 20, 30, 40];

      for (const value of values) {
        await storage.store(value);
        expect(await storage.retrieve()).to.equal(value);
      }
    });
  });
});
运行本地节点。
npx hardhat node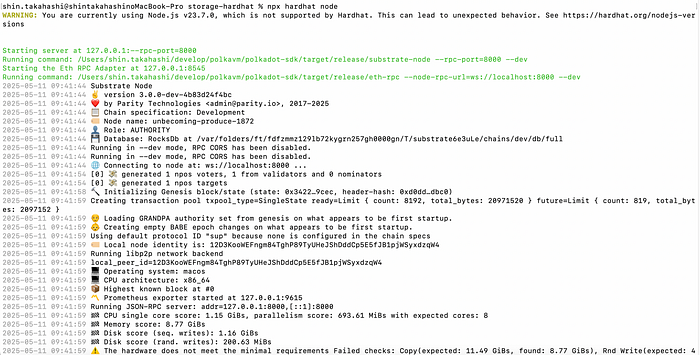
npx hardhat test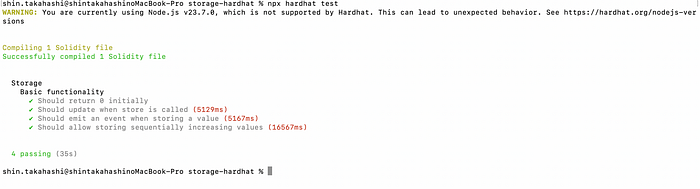
下一步
我喜欢 polkadot,所以我将继续支持 Polkadot 生态系统。Pop-cli 刚刚更新了 ink6 的版本,所以我将检查 Pop-cli 的最新版本。
我将开发另一个 dApp,它可以显示 web3 和我的协议的值。
- 原文链接: coinsbench.com/introduct...
- 登链社区 AI 助手,为大家转译优秀英文文章,如有翻译不通的地方,还请包涵~


