Solana全方位介绍——共识、钱包、生态、合约
介绍Solana的共识机制、生态、钱包、浏览器等内容;介绍Solana合约特性以及从头编写HelloWorld合约。
一、Solana介绍
Solana是一个新兴的高性能的公链,它提供了快速、便宜且可扩展的交易体验,每秒能够处理数千笔交易,并且出块时间达到了亚秒级。它通过拜占庭容错(BFT)共识机制实现了这一点,该机制利用了一种历史证明(PoH)的创新的密码学函数。并且它还支持使用Rust,C++和C语言来编写智能合约。
历史证明
历史证明 (PoH) 通过使用高频可验证延迟函数(VDF),随着时间的推移建立可通过密码验证的事件顺序。从本质上讲,这意味着 PoH 就像一个加密时钟,可以帮助网络就时间和事件顺序达成一致,而无需等待其他节点的消息。这就像古老的水钟可以通过观察水位上升来记录时间的流逝一样,历史证明的区块链状态哈希的连续输出能够给出可验证的事件顺序。
一个简单的类比是想象一个100块的大型拼图。在正常情况下,完成拼图需要一个或多个人一定的时间。但是想象一下,如果事先所有拼图块都印有与其位置相对应的数字,从拼图的左上角到右下角,并按顺序排列成一行。 因为拼图的确切顺序和它们在拼图中的位置是事先知道的,所以可以让多人专注于每个部分,可以更快地解决拼图。 这是相对时间而言具有可验证的事件序列对共识机制的影响;它使得将事务分解为多个并行进程成为可能。
智能合约架构
Solana提供了一种不同于传统的基于EVM的区块链的智能合约模型。在传统的基于EVM的链中,合约代码和状态都存储在链上的合约。Solana中智能合约(或程序)是只读或无状态的,并且只包含程序逻辑。一旦部署后,智能合约就可以通过外部账户进行交互。Solana中与程序交互的账户会存储与程序交互相关的数据。这创建了状态(帐户)和合约逻辑(程序)的逻辑分离。这是Solana 和基于EVM的智能合约之间的关键区别。以太坊上的账户与Solana 上的账户不同,Solana 账户可以存储数据(包括钱包信息),而以太坊账户并不存储数据。
除此之外,Solana还提供了CLI(命令行) 和 JSON RPC API,这些可以用于去中心化应用程序与Solana区块链进行交互。还可以使用现有的SDK,用于客户端与区块链和Solana程序对话。
二、Solana钱包
Solana目前支持的钱包包括:移动应用钱包、网页钱包、硬件钱包、命令行钱包。
- 移动应用钱包:Trust Wallet、Coin98
- 网页钱包:Phantom、SolFlare、Sollet、MathWallet
- 命令行钱包:Solana CLI工具
Solana维护着三个不同的网络,每个网络都有不同的目的,支持着Solana生态。 默认情况下,在 SolFlare 上选择的是 Mainnet,这是部署交易和其他生产应用的永久网络。 要选择其他网络,在钱包仪表板顶部,单击当前选择的网络名称,即“Mainnet”,“Testnet ”或“ Devnet”,然后单击要使用的网络的名称。
三、Solana节点及浏览器
Solana目前包括三个网络,分别是Mainnet Beta、Devnet、Testnet。
- Mainnet Beta Rpc: https://api.mainnet-beta.solana.com
- Devnet Rpc:https://api.devnet.solana.com
- Testnet Rpc:https://api.testnet.solana.com
浏览器:
四、Solana Dex
Raydium是Solana上主流的Dex,支持LimitOrder、Swap、流动性挖矿、质押挖矿、资金筹集、NFT等功能。
五、Solana智能合约介绍
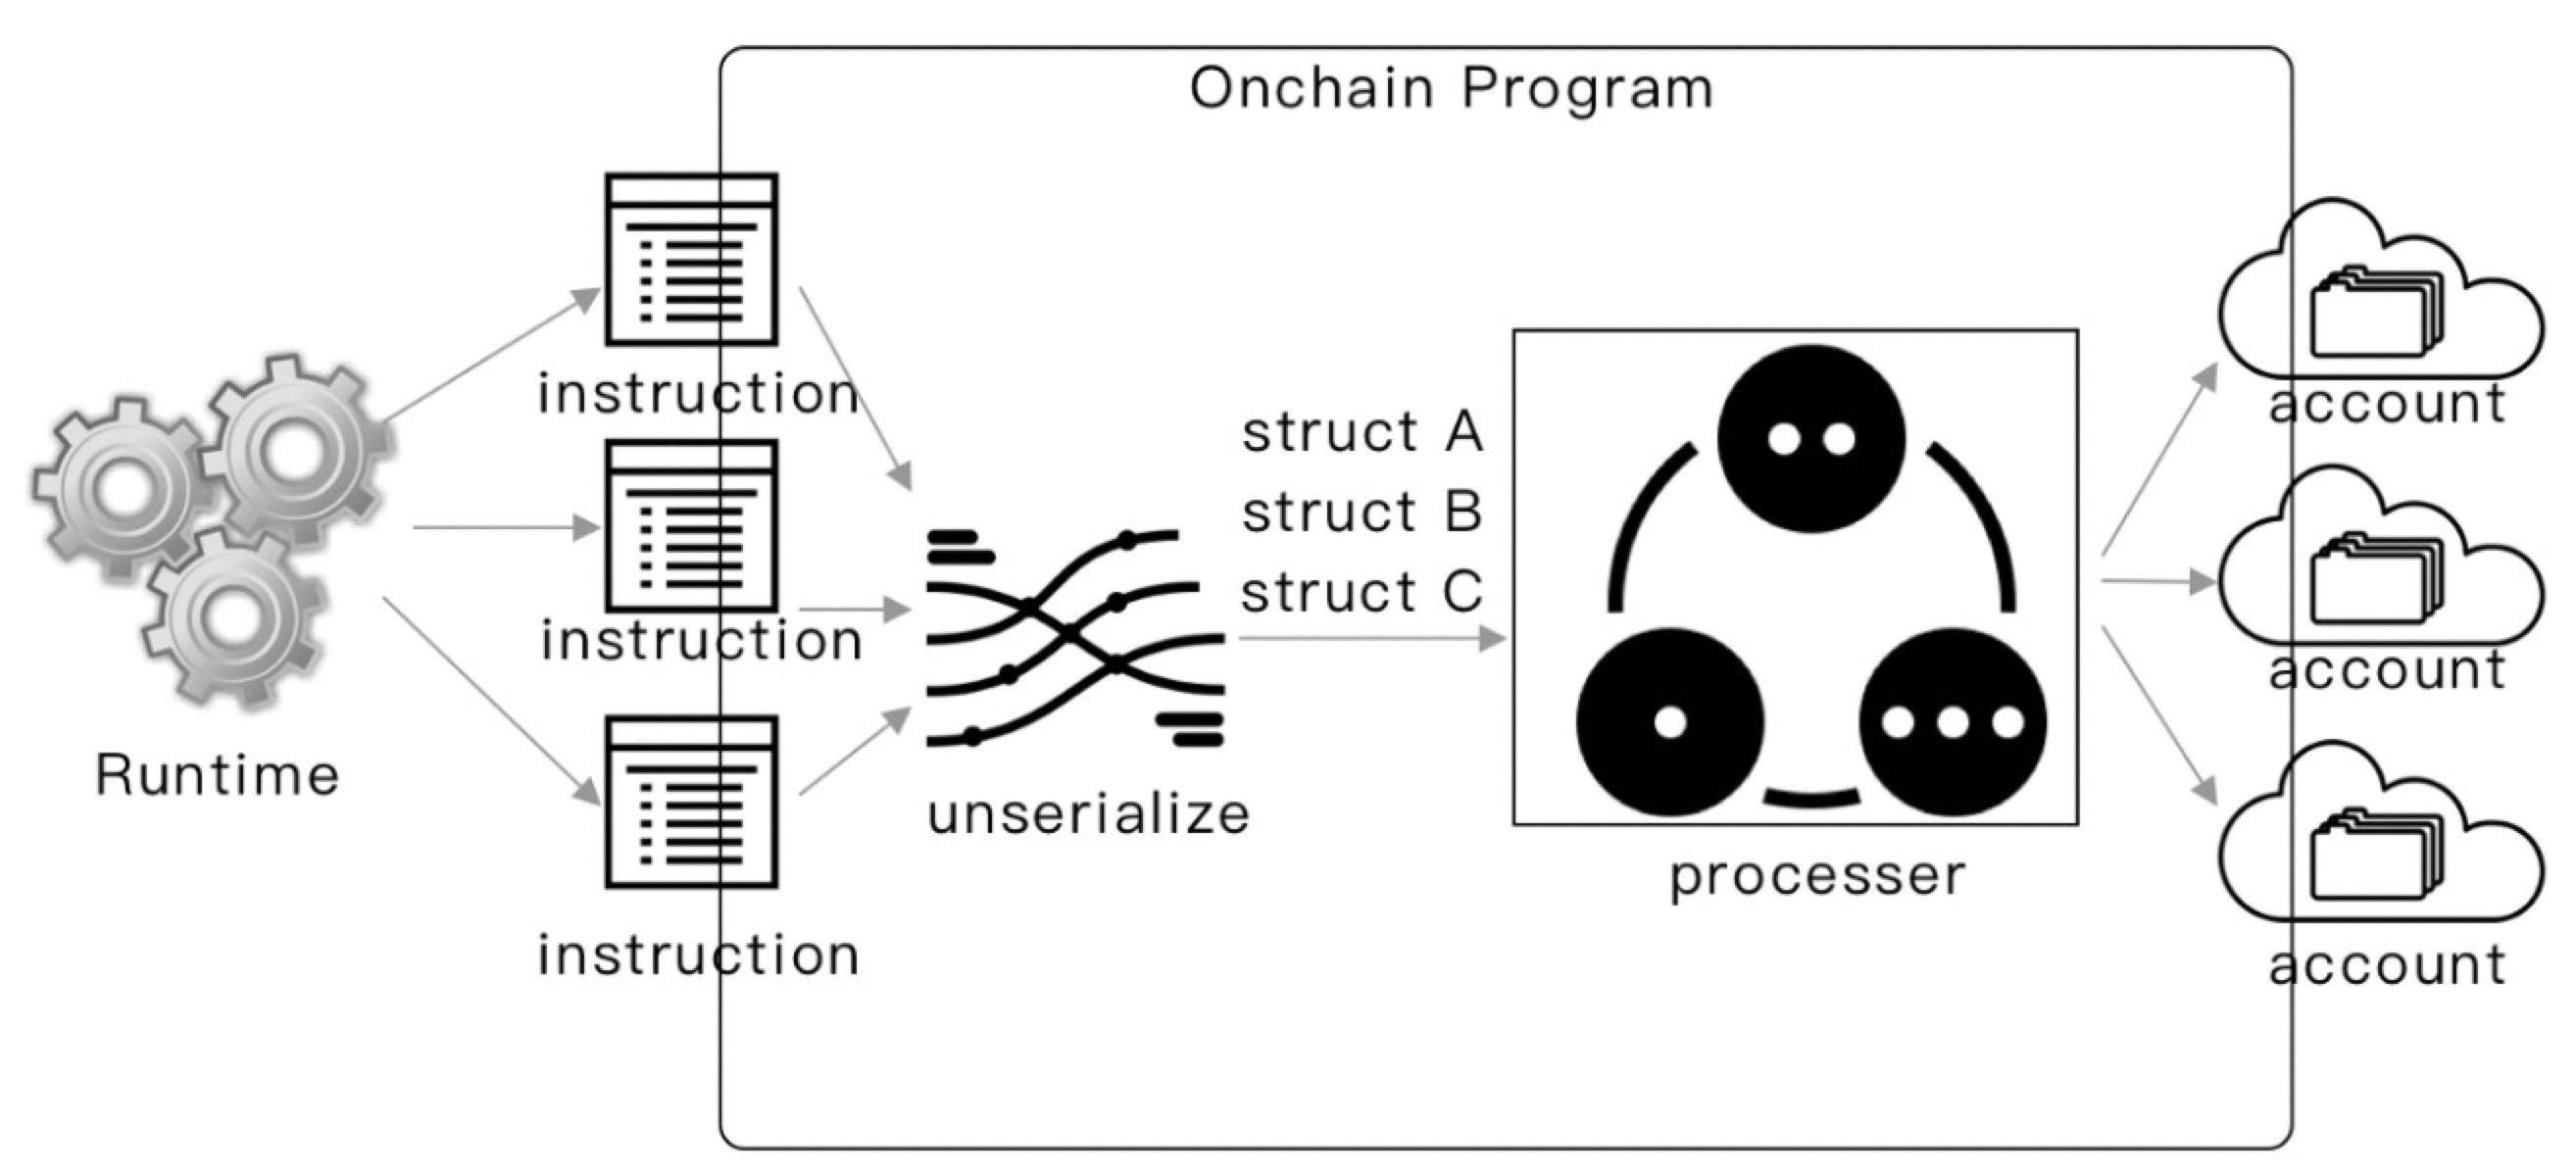
Solana 的智能合约叫做链上程序(On-chain Program),Solana 官方推荐使用 Rust 和 C 来开发Solanan智能合约。开发者使用工具将合约编译成 Berkley Packet Filter (BPF) 字节码(文件以.so为扩展名),并部署到链上。Solana节点的runtime会加载 这个BPF字节码并执行其逻辑。
Transactions
Transaction是由客户端向Solana节点发起请求的单元,一个Transactions可能包含有多个Instruction。Solana 节点在收到一个客户端发起的Transaction后,会先解析里面的每个Instruction,然后根据Instruction里面的program_id字段,来调用对应的智能合约,并将Instruction传递给该智能合约。从用户角度来说,用户发送一笔交易,可以调用多个合约,执行多个合约的不同方法。其中交易中的一条指令执行失败,其余指令都会回退,整个交易都会回滚。Solana执行交易时,会按照顺序和原子的方式处理交易中的每条指令。
Instruction
Instruction是智能合约处理的基本单元:

整体流程是DApp客户端将自定义的指令数据序列化到data里面,然后将账号信息和data发到链上,Solana节点为其找到要执行的程序,并将账号信息和数据data 传递给合约程序,合约程序里面将这个data数据在反序列化,得到客户端传过来的具体参数。
Account
Solana链上的资源包括了内存、文件、CPU(Compute Budge)等,不同于EOS的内存和CPU,Solana上只是对合约运行的的栈大小(4KB),CPU执行时间(200,000 BPF),函数栈深度(64)做了最大数量的约定,所以不会出现 EOS上的抢资源的情况。Solana链上的信息记录在文件中,这个文件在Solana上表现为Account,所以用户所需要支付的就是一个文件存储所需要的花费,是以SOL计价的。这里衍生出一个概念, 如果想要删除账户的话,那么只要把这个Account的SOL都转走,那么这个Account对应的地址,在链上就没有钱来买位置了,也就会被删除掉了。
Runtime
Solana的Runtime前面说了,是执行BPF字节码的,为什么选择了这个runtime而不是WebAssembly或者Lua、Python 之类呢?其实主要还是因为性能的考量,Solana引以为傲的就是TPS,而BPF的执行效率更快。为了限制一个合约不至于占光所有资源,runtime对合约的运行做了一些限制,当前的限制可以在SDK中查询:当执行超过限制时,就会运行失败。
关键数据结构
为了方便合约的书写,Solana官方提供了C和Rust的SDK,对于Rust来说,只要在工程中添加:
solana-program = "1.4.8"
这里介绍一些SDK中提供的主要数据结构。
1. Pubkey
#[repr(transparent)]
#[derive(Serialize, Deserialize, Clone, Copy, Default, Eq, PartialEq, Ord, PartialOrd, Hash, AbiExample)]
pub struct Pubkey([u8; 32]);]
Pubkey实际是就是32个字符表示的base58的Account地址,在上面的Instruction中,我们看到的ProgramId 就是这样的类型,因为Program本身其实一个文件,也就是Account,只是是可执行的文件。
2. AccountInfo
/// Account information
#[derive(Clone)]
pub struct AccountInfo<'a> {
    /// Public key of the account
    pub key: &'a Pubkey,
    /// Was the transaction signed by this account's public key?
    pub is_signer: bool,
    /// Is the account writable?
    pub is_writable: bool,
    /// The lamports in the account.  Modifiable by programs.
    pub lamports: Rc>,
    /// The data held in this account.  Modifiable by programs.
    pub data: Rc>,
    /// Program that owns this account
    pub owner: &'a Pubkey,
    /// This account's data contains a loaded program (and is now read-only)
    pub executable: bool,
    /// The epoch at which this account will next owe rent
    pub rent_epoch: Epoch,
}
AccountInfo就是一个Account在链上的表达形式,可以认为是一个文件的属性,想象一些state函数列出 的文件属性。其中,key表示文件名,也就是base58的地址。而文件大小可以认为是lamports,这里区别与我们操作系统里面的文件,操作系统里面的文件的大小是可以为0的,且文件存在,而Solana链上的Account 如果其大小,也就是lamports为0的话,就认为这个文件被删除了(PS:这里将lamporsts类比作文件大小 是不完全准确的,因为文件大小是data字段内容的大小,但是从花费硬盘资源的角度,确实比较类似)。 这里的”is_writable”表示文件是否可执行,如果是可执行的,那么就是一个智能合约账号。 而data里面则是文件的内容,类似电脑上的ls 列出的文件属性,和cat列出来的文件内容,这里是二进制的buffer来表示。每个文件都要由一个程序来创建,这个程序称之为这个文件的拥有者,也就是这里的owner。
3. ProgramResult
/// Reasons the program may fail
#[derive(Clone, Debug, Deserialize, Eq, Error, PartialEq, Serialize)]
pub enum ProgramError {
    /// Allows on-chain programs to implement program-specific error types and see them returned
    /// by the Solana runtime. A program-specific error may be any type that is represented as
    /// or serialized to a u32 integer.
    #[error("Custom program error: {0:#x}")]
    Custom(u32)
    ...
}use std::{
    result::Result as ResultGeneric,
};
pub type ProgramResult = ResultGeneric<(), ProgramError>;
ProgramResult实际上类型为ProgramError的Result对象,而ProgramError是Solana自定义的一个Error的枚举,也就是Solana抛出来的错误枚举。在合约中,当正常逻辑执行结束后,我们通过Ok()来返回这里Reuslt正确的结果,如果出错了,则通过这里的Result中的ProgramError错误返回。
4. AccountMeta
/// Account metadata used to define Instructions
#[derive(Debug, PartialEq, Clone, Serialize, Deserialize)]
pub struct AccountMeta {
    /// An account's public key
    pub pubkey: Pubkey,
    /// True if an Instruction requires a Transaction signature matching `pubkey`.
    pub is_signer: bool,
    /// True if the `pubkey` can be loaded as a read-write account.
    pub is_writable: bool,
}
AccountMeta主要用于Instruction结构的定义,用于协助传递这个指令需要的其他账号信息,其中包括了账号的地址,这个账号是否为签名账号,以及这个账号对应的内容(AccountInfo)是否可以修改。
5. Instruction
#[derive(Debug, PartialEq, Clone, Serialize, Deserialize)]
pub struct Instruction {
    /// Pubkey of the instruction processor that executes this instruction
    pub program_id: Pubkey,
    /// Metadata for what accounts should be passed to the instruction processor
    pub accounts: Vec,
    /// Opaque data passed to the instruction processor
    pub data: Vec,
}
Instruction在上面已经有介绍了,一个处理指令,包含了要处理他的程序的地址program_id,以及这个程序处理时需要用到的AccountMeta表示的账号信息,还有这个指令对应的具体数据payload部分的data。
用户协议数据是序列化后,存放在data里面的,所以整体流程是DApp客户端将自定义的指令数据序列化到data里面,然后将账号信息和data发到链上,Solana节点为其找到要执行的程序,并将账号信息和数据data 传递给合约程序,合约程序里面将这个data数据在反序列化,得到客户端传过来的具体参数。
六、Solana HelloWorld合约
项目地址:https://github.com/solana-labs/example-helloworld
1、环境准备
安装Node、NPM、Rust稳定版本、Solana CLI、Solana Test Validator。启动本地节点:
% solana-test-validator
启动后如下
Ledger location: test-ledger
Log: test-ledger/validator.log
Identity: EPhgPANa5Rh2wa4V2jxt7YbtWa3Uyw4sTeZ13cQjDDB8
Genesis Hash: 4754oPEMhAKy14CZc8GzQUP93CB4ouELyaTs4P8ittYn
Version: 1.6.7
Shred Version: 13286
Gossip Address: 127.0.0.1:1024
TPU Address: 127.0.0.1:1027
JSON RPC URL: http://127.0.0.1:8899
⠈ 00:36:02 | Processed Slot: 5142 | Confirmed Slot: 5142 | Finalized Slot: 5110 | Snapshot Slot: 5100 | Transactions: 5142 | ◎499.974295000
为Solana CLI设置默认连接的节点
% solana config set --url http://127.0.0.1:8899
查看Solana CLI配置
% solana config get
Config File: /Users/xxx/.config/solana/cli/config.yml
RPC URL: http://localhost:8899
WebSocket URL: ws://localhost:8900/ (computed)
Keypair Path: /Users/xxx/.config/solana/id.json
Commitment: confirmed
准备本地测试账号,输入密码后,为将新创建的账号存在”/Users/username/.config/solana/id.json”这个文件中, 后续如果solana命令没有指定 — key,那么默认就是用的这个文件。
% solana-keygen new
查看私钥对应的公钥。
% solana-keygen pubkey
FpieyACt1dQC6xkta3NqMNvppjr5kjxE1EZLJnCfFXhs
申请Sol代币空投
% solana airdrop 100
Requesting airdrop of 100 SOL

Signature: 2atgBeXPcwxe5r8fjhCbrWSddYRz58R9P6ZjBjf1X7DDLbtCmHC87a6QQpcKbVUHzW3BwHmkFoyNamGZmTU8CWif

500000104.154073715 SOL
查看账户余额
% solana balance
500000104.154073715 SOL
2、编译合约
进入项目src/program-rust,调用以下命令编译
% cargo build-bpf
编译成功后的so文件位于target/deploy/helloworld.so,并同时生成了helloworld合约账户。
BPF SDK: /Users/xxx/.local/share/solana/install/releases/1.8.5/solana-release/bin/sdk/bpf
cargo-build-bpf child: rustup toolchain list -v
cargo-build-bpf child: cargo +bpf build --target bpfel-unknown-unknown --release
Compiling solana-bpf-helloworld v0.0.1 (/Users/xxx/Desktop/mywork/example-helloworld/src/program-rust)
Finished release [optimized] target(s) in 1.27s
cargo-build-bpf child: /Users/xxx/.local/share/solana/install/releases/1.8.5/solana-release/bin/sdk/bpf/scripts/strip.sh /Users/xxx/Desktop/mywork/example-helloworld/src/program-rust/target/bpfel-unknown-unknown/release/helloworld.so /Users/xxx/Desktop/mywork/example-helloworld/src/program-rust/target/deploy/helloworld.so

To deploy this program:
$ solana program deploy /Users/xxx/Desktop/mywork/example-helloworld/src/program-rust/target/deploy/helloworld.so
The program address will default to this keypair (override with --program-id):
/Users/xxx/Desktop/mywork/example-helloworld/src/program-rust/target/deploy/helloworld-keypair.json
3、部署合约
部署合约,会默认使用编译生成的helloworld合约账户作为合约账户。
% solana program deploy target/deploy/helloworld.so
Program Id: 5UUiVavRYdW9x5mH7ehukAAUTDRDQhsPjA4Q4Gq1GJSA
4、源码解读
项目结构
example-helloworld
|
+-- src
|  |
|  +-- client // 客户端源码
|  |  |
|  |  +-- hello_world.ts
|  |  |
|  |  +-- main.ts
|  |  |
|  |  +-- utils.ts
|  |
|  +-- program-rust // Rust程序
|  |  |
|  |  +-- src // 程序源码存储位置
|  |  |  |
|  |  |  +-- lib.rs // 程序源码
|  |  |
|  |  +-- tests
|  |  |  |
|  |  |  +-- lib.rs
|  |  |
|  |  +-- Cargo.toml
|  |  |
|  |  +-- Xargo.toml
|
+-- .gitignore
|
+-- package.json
|
+-- tsconfig.json
program-rust/src/lib.rs 是链上程序的核心代码,实现了将程序被调用次数存储在链上账户中。
use borsh::{BorshDeserialize, BorshSerialize};
use solana_program::{
    account_info::{next_account_info, AccountInfo},
    entrypoint,
    entrypoint::ProgramResult,
    msg,
    program_error::ProgramError,
    pubkey::Pubkey,
};

/// Define the type of state stored in accounts
#[derive(BorshSerialize, BorshDeserialize, Debug)]
pub struct GreetingAccount {
    /// number of greetings
    pub counter: u32,
}

// Declare and export the program's entrypoint
entrypoint!(process_instruction);

// Program entrypoint's implementation
pub fn process_instruction(
    program_id: &Pubkey, // Public key of the account the hello world program was loaded into
    accounts: &[AccountInfo], // The account to say hello to
    _instruction_data: &[u8], // Ignored, all helloworld instructions are hellos
) -> ProgramResult {
    msg!("Hello World Rust program entrypoint");

    // Iterating accounts is safer then indexing
    let accounts_iter = &mut accounts.iter();

    // Get the account to say hello to
    let account = next_account_info(accounts_iter)?;
    // The account must be owned by the program in order to modify its data
    if account.owner != program_id {
        msg!("Greeted account does not have the correct program id");
        return Err(ProgramError::IncorrectProgramId);
    }

    // Increment and store the number of times the account has been greeted
    let mut greeting_account = GreetingAccount::try_from_slice(&account.data.borrow())?;
    greeting_account.counter += 1;
    greeting_account.serialize(&mut &mut account.data.borrow_mut()[..])?;

    msg!("Greeted {} time(s)!", greeting_account.counter);

    Ok(())

}
第 1 行代码将 borsh::BorshDeserialize 和 borsh::BorshSerialize 引入本地作用域,用于序列化和反序列化数据。第 2~9 行代码将 Solana Rust SDK 的模块引入本地作用域,使用 Rust 编写程序都需要这个 SDK。
第 13~16 行代码定义了 GreetingAccount 结构体作为存储在账户中的状态类型,里面有一个 u32类型的字段 counter,用于记录程序被有效调用的次数。
第 19 行代码 entrypoint 声明了 process_instruction 函数是程序入口,每个程序都有一个唯一的入口。第 22~26 行代码是 process_instruction 函数的实现,它要接收 3 个参数:
program_id:链上程序的部署地址,在这里也就是 helloworld 程序账户的公钥。accounts:与程序交互的账户列表,当前程序会使用账户列表中的账户来存储状态或修改账户中的数据。如果当前程序不是某个账户的owner,那就无法使用该账户存储状态或修改数据,当前交易会执行失败。instruction_data:指令数据,比如要转账的代币数量、转账地址等。
process_instruction 函数的返回值类型是 ProgramResult,ProgramResult 类型的定义如下所示。
pub type ProgramResult = Result<(), ProgramError>;
当程序的逻辑执行成功时返回 Ok(()),否则将 ProgramError 错误返回。ProgramError 是自定义错误的枚举类型,其中包含程序可能失败的各种原因。
第 27 行代码使用 msg! 宏将字符串输出到日志中,方便观察业务的执行逻辑和调试信息。第 30 行代码通过 iter 方法将账户列表转换为迭代器,以安全的方式获取账户地址。第 33 行代码使用了 ? 操作符,如果迭代器中有账户地址,会将账户地址与变量 account 绑定。如果迭代器中没有账户地址,? 操作符会让程序执行失败。
第 36~39 行代码判断存储状态的账户所有者是否是当前程序。只有账户所有者才能修改数据,否则输出日志并返回。
第 42~44 行代码先对账户中的数据进行反序列化操作,再将 counter 加一,最后将其序列化后存储到账户中。
5、项目配置文件
[package]
name = "solana-bpf-helloworld"
version = "0.0.1"
description = "Example template program written in Rust"
authors = ["Solana Maintainers "]
repository = "https://github.com/solana-labs/solana"
license = "Apache-2.0"
homepage = "https://solana.com/"
edition = "2018"

[features]
no-entrypoint = []

[dependencies]
borsh = "0.9.1"
borsh-derive = "0.9.1"
solana-program = "=1.7.9" // solana-program 的依赖

[dev-dependencies]
solana-program-test = "=1.7.9"
solana-sdk = "=1.7.9"

[lib]
name = "helloworld"
crate-type = ["cdylib", "lib"]  // 指定生成的库文件类型
如果要从头创建一个solanan合约,使用命令生成项目目录及目录下的Cargo.toml文件
% cargo new onchain_program
同时在这个目录下增加Xargo.toml
[target.bpfel-unknown-unknown.dependencies.std]
features = []
用于增加bpf的跨平台编译支持。接着编写合约内容,在src/lib.rs里面设置entrypoint:
// 声明是程序的主入口
entrypoint!(process_instruction);
然后在lib.rs编写合约内容:
//! Program entrypoint
use solana_program::{
     account_info::AccountInfo, entrypoint, entrypoint::ProgramResult, program_error::ProgramError, pubkey::Pubkey,
};
use std::str::from_utf8;entrypoint!(process_instruction);

fn process_instruction(
    _program_id: &Pubkey,
    _accounts: &[AccountInfo],
    instruction_data: &[u8],
) -> ProgramResult {
    Ok(())
}
这个合约的内容,是不做任何处理。直接返回成功。
函数process_instruction是整个合约入口,传入的是一个instruction结构。他包含了用于执行指令的程序账户地址:_program_id,所要执行使用的账户集:_accounts,以及序列化之后的 instruction_data部分。当认为执行成功时,通过Ok(())返回成功,否则用Err(error) 返回出错。
6、从头创建合约项目
创建工程,指定--lib代表为库文件。
% cargo new  helloworld --lib
Created library `helloworld` package
生成的Cargo.toml文件。
[package]
name = "helloworld"
version = "0.1.0"
edition = "2021"

[dependencies]
对其进行修改,features 里面增加了no-entrypoint特性,dependencies里面增加了Solana合约SDK:solana-program 的依赖。通过crate-type指定生成的库文件类型。
[package]
name = "helloworld"
version = "0.1.0"
edition = "2021"

[features]
no-entrypoint = []

[dependencies]
solana-program = "1.8.1"

[lib]
crate-type = ["cdylib", "lib"]
同时在Cargo.toml同级目录创建文件”Xargo.toml” 用于跨平台生成BPF目标文件格式。内容为:
[target.bpfel-unknown-unknown.dependencies.std]
features = []
目的是Solana Rust程序可能会依赖其他Rust程序,这样就需要避免加入入口点符号,因为它们可能与程序本身符号冲突, 为避免这种情况,程序应在 Cargo.toml 中定义一个 exclude_entrypoint功能,并使用它来排除入口点。
然后修改src/lib.rs内容为:
pub use solana_program;
导入了Solana合约的SDK。然后就可以再这个目录下进行编译了:
% cargo build-bpf
BPF SDK: /Users/xxx/.local/share/solana/install/releases/1.8.5/solana-release/bin/sdk/bpf
cargo-build-bpf child: rustup toolchain list -v
cargo-build-bpf child: cargo +bpf build --target bpfel-unknown-unknown --release
Compiling helloworld v0.1.0 (/Users/xxx/Desktop/mywork/learning-rust/helloworld)
Finished release [optimized] target(s) in 0.55s
cargo-build-bpf child: /Users/xxx/.local/share/solana/install/releases/1.8.5/solana-release/bin/sdk/bpf/scripts/strip.sh /Users/xxx/Desktop/mywork/learning-rust/helloworld/target/bpfel-unknown-unknown/release/helloworld.so /Users/xxx/Desktop/mywork/learning-rust/helloworld/target/deploy/helloworld.so
cargo-build-bpf child: /Users/xxx/.local/share/solana/install/releases/1.8.5/solana-release/bin/sdk/bpf/dependencies/bpf-tools/llvm/bin/llvm-readelf --dyn-symbols /Users/xxx/Desktop/mywork/learning-rust/helloworld/target/deploy/helloworld.so
Solana的合约程序,其实主要干三个事情:
- 解析由runtime传过来的instruction
- 执行instruction对应的逻辑
- 将执行结果中需要落地的部分,pack打包输出到指定的Account文件
根据这个逻辑结构,我们依次创建如下几个文件:
instruction.rs: 解析由runtime传过来的instructionprocessor.rs: 针对instruction的合约逻辑state.rs: 将需要存储的内容进行打包存储
同时为了方便程序书写,我们创建:
error.rs: 出错处理,定义各种错误entrypoint.rs: 结合“entrypoint”特性,封装合约入口
├── Cargo.lock
├── Cargo.toml
├── src
│   ├── entrypoint.rs
│   ├── error.rs
│   ├── instruction.rs
│   ├── lib.rs
│   ├── processsor.rs
│   └── state.rs
└── Xargo.toml
1. entrypoint:合约入口
entrypoint是所有合约的入口,是一个处理函数,原型为:
entrypoint!(process_instruction);
fn process_instruction(
    program_id: &Pubkey,
    accounts: &[AccountInfo],
    instruction_data: &[u8],
) -> ProgramResult
通过entrypoint特性指定入口函数的函数名,而函数定义为接受三个参数并返回ProgramResult类型的函数,三个参数依次是合约的地址program_id、instruction里面keys经过runtime解析得到的账号信息数组accounts,以及instruction里面的data部分。
这里将对instrcution封装到了process里面,因此这里直接调用process的函数:
entrypoint!(process_instruction);
fn process_instruction(
    program_id: &Pubkey,
    accounts: &[AccountInfo],
    instruction_data: &[u8],
) -> ProgramResult {
    if let Err(error) = Processor::process(program_id, accounts, instruction_data) {
        // catch the error so we can print it
        error.print::();
        return Err(error);
    }
    Ok(())
}
注意这里增加了错误时候的捕捉:
error.print::();
当出错的时候,会在日志和RPC调用里面返回出错信息。这里HelloWorldError就是error.rs里面定义的程序错误。
2. error:处理错误
error的定义主要是用于收敛程序中的错误,并给出具体的错误消息,如果对应的错误出现,在RPC调用时,会明确给出错误提示:
Custom Error: 0x02
对应错误的枚举值。
/// Errors that may be returned by the hello-world program.
#[derive(Clone, Debug, Eq, Error, FromPrimitive, PartialEq)]
pub enum HelloWorldError {
    /// Invalid instruction
    #[error("Invalid instruction")]
    InvalidInstruction,
}

impl From for ProgramError {
    fn from(e: HelloWorldError) -> Self {
        ProgramError::Custom(e as u32)
    }
}

impl DecodeError for HelloWorldError {
    fn type_of() -> &'static str {
        "HelloWorldError"
    }
}

impl PrintProgramError for HelloWorldError {
    fn print(&self)
    where
        E: 'static + std::error::Error + DecodeError + PrintProgramError + FromPrimitive,
    {
        match self {
            RegistryError::InvalidInstruction => info!("Invalid instruction"),
        }
    }
}
这里为了使得Error可以打印,用了几个辅助库,所以在Cargo.toml的dependence里面增加:
num-derive = "0.3"
thiserror = "1.0"
num-traits = "0.2"
arrayref = "0.3.6"
num_enum = "0.5.1"
HelloWorldError即为定义的错误枚举,然后为枚举实现了”From”、”DecodeError” 以及”PrintProgramError” 等traits。
3. instruction:反序列化指令
/// Instructions supported by the hello-world program.
#[repr(C)]
#[derive(Clone, Debug, PartialEq)]
pub enum HelloWorldInstruction {
    /// Hello print hello to an Account file
    Hello{
        /// message for hello
        message: String,
    },
    /// Erase free the hello account
    Erase ,
}
定义了2个指令,一个是带有一个String类型参数的 “Hello” 另一个是删除文件的不带参数的 “Erase”。定义好结构后,需要为其 书写反序列化函数,对于instruction真正工作的其实只有反序列化函数,比如这里叫unpack,而序列化是在客户端请求做的,因此pack函数不是必须的,但是如果使用单元测试的时候,可能需要通过pack来构建hook内容。
对于序列化的格式,采用了固定长度的二进制堆叠法:
+-----------------------------------+
Hello:      |   0    |       message            |
            +-----------------------------------+
Erase:      |   1    |
            +--------+
如上图,第一个字节表示消息的类型,对于Hello消息,消息内容紧随其后。
所以解析代码可以这样写:
impl HelloWorldInstruction {
    /// Unpacks a byte buffer into a [HelloWorldInstruction](enum.HelloWorldInstruction.html).
    pub fn unpack(input: &[u8]) -> Result {
        use HelloWorldError::InvalidInstruction;
        let (&tag, rest) = input.split_first().ok_or(InvalidInstruction)?;
        Ok(match tag { //HelloWorld
             0 => {
                 let message= String::from(from_utf8(rest).unwrap());
                 Self::Hello{
                      message,
                 }
            },
            1 => Self::Erase,  _ => return Err(HelloWorldError::InvalidInstruction.into()),
        })
}
4. state:存储数据的格式定义
state是用来将内容存储到对应的文件时,存储格式的定义,类似一个ORM或者所谓的MVC中Model层。 因此首先定义Model:
/// HelloWorld data.
#[repr(C)]
#[derive(Clone, Debug, Default, PartialEq)]
pub struct HelloWorldState {
    /// account
    pub account_key: Pubkey,
    /// message
    pub message: String
}
这里定义了谁:account 说了什么:message。然后定义了Model层操作文件的方法,这里通过Solana的SDK 提供的Pack trate来实现其序列化和反序列化。
impl Pack for HelloWorldState {
    const LEN: usize = 32+1+256; // max hello message's length is 256
    // 反序列化
    fn unpack_from_slice(src: &[u8]) -> Result {
        ...
    }
    // 序列化
    fn pack_into_slice(&self, dst: &mut [u8]) {
        ...
    }
}
LEN定义了Account所占用的总大小。注意,当前Solana上,Account仅可以初始化一次长度信息,创建后不可更改。
然后实现unpack_from_slice,从文件中解析Model:
fn unpack_from_slice(src: &[u8]) -> Result {
    let src = array_ref![src, 0, 289];
    let (account_key_buf, message_len_buf, message_buf) = array_refs![src, 32, 1, 256];
    let account_key = Pubkey::new_from_array(*account_key_buf);
    let message_len = message_len_buf[0] as u8;
    let (msg_buf, _rest) = message_buf.split_at(message_len.into());
    let message = String::from(from_utf8(msg_buf).unwrap()) ;
    Ok(HelloWorldState {
        account_key,
        message
    })
}
这里首先通过array_ref得到一个array,然后通过array_refs指定三个成员 的内容,这里我们在序列化文件内容 时,采用和Instruction一样的二进制序列化方法,对于Pubkey其固定为32个字节。对于Message,其长度 我们约定小于256,这样用一个字节表示长度,后面256个字节表示内容(256不一定全部用完,但是任然分配空间).
+-------------------------------------------+
|  key   |l|message                         |
+-------------------------------------------+
读出对应的buffer内容后,进行类型转换。
同样的,对于序列化的使用使用:
fn pack_into_slice(&self, dst: &mut [u8]) {
    msg!("pack into slice");
    let dst = array_mut_ref![dst, 0, 289];
    let (
        account_key_buf,
        message_len_buf,
        message_buf,
    ) = mut_array_refs![dst, 32, 1, 256];    msg!("pack into slice key");
    account_key_buf.copy_from_slice(self.account_key.as_ref());
    msg!("pack into slice len");
    message_len_buf[0] = self.message.len() as u8;
    msg!(&format!("pack into slice msg:{}", self.message));
    let (msg_buf, _rest) = message_buf.split_at_mut(self.message.len());
    msg_buf.copy_from_slice(self.message.as_bytes());
    msg!("pack into slice out");
}
这里采用mut_array_refs预先给几个要存储的元素分配好地址,然后使用copy_from_slice复制32字节的key,用as u8转换长度,copy_from_slice copy字符串内容。
5. process:处理合约逻辑
最关键的处理程序来了。首先我们将runtime给过来要处理的instruction进行反序列化操作:
/// Processes an [Instruction](enum.Instruction.html).
pub fn process(_program_id: &Pubkey, accounts: &[AccountInfo], input: &[u8]) -> ProgramResult {
    let instruction = HelloWorldInstruction::unpack(input)?;

    match instruction {
        HelloWorldInstruction::Hello {
        message,
    } => {
        msg!(&format!("hello-world: HelloWorld msg:{}", message));
        Self::process_hello(accounts, message)
    }
    HelloWorldInstruction::Erase=>{
        msg!("hello-world: Erase");
        Self::process_erase(accounts)
    }
}
对于Hello,处理就是将消息内容和谁发的信息,进行记录:
/// Processes an [Hello](enum.HelloWorldInstruction.html) instruction.
fn process_hello(
    accounts: &[AccountInfo],
    message: String,
) -> ProgramResult {
    let account_info_iter = &mut accounts.iter();
    let client_info = next_account_info(account_info_iter)?;
    let message_info = next_account_info(account_info_iter)?;    // check permission
    if !client_info.is_signer || !message_info.is_signer{
        return Err(ProgramError::MissingRequiredSignature);
    }

    msg!("before unpack hello");
    let mut state = HelloWorldState::unpack_unchecked(&message_info.data.borrow())?;
    msg!("after unpack hello");
    state.account_key = *client_info.key;
    state.message = message;

    msg!("before pack hello");
    HelloWorldState::pack(state, &mut message_info.data.borrow_mut())?;
    msg!("after pack hello");
    Ok(())
}
用户传递instruction里面的keys数组就对应这里的accounts数组,用户将其创建的消息账号通过这个数组传递过来,通过next_account_info进行获取,分别获取了用户账号client_info和消息账号message_info 。这里通过判断!client_info.is_signer来判断,用户构建transaction是否用了自己的进行签名, 如果是的话,runtime会进行校验,因此只要判断,他是否是被校验的单元就好了,无需自己去调用鉴权接口。
接着就是Model里面先解析Model对象,然后进行修改后,在写回Model对象。
 GitHub 登录
 Web3 钱包登录
