零知识证明 - zkEVM源代码分析(EVM Circuit)
这篇文章将详细讲解EVM Circuit各个Column的设计,每种Opcode如何约束以及多个Opcode之间是如何约束以及组合。
zkEVM是零知识证明相对复杂的零知识证明应用,源代码值得反复阅读和学习。
https://github.com/appliedzkp/zkevm-circuits.git
本文中采用的源代码对应的最后一个提交信息如下:
commit 1ec38f207f150733a90081d3825b4de9c3a0a724 (HEAD -> main)
Author: z2trillion <z2trillion@users.noreply.github.com>
Date:   Thu Mar 24 15:42:09 2022 -0400
zkEVM的电路主要由两部分电路组成:EVM Circuit和State Circuit。本文先讲解EVM Circuit的电路相关的源代码。其他部分在后续的文章中介绍。这篇文章将详细讲解EVM Circuit各个Column的设计,每种Opcode如何约束以及多个Opcode之间是如何约束以及组合。
整体电路结构
EVM Circuit的整体的电路结构如下图所示:
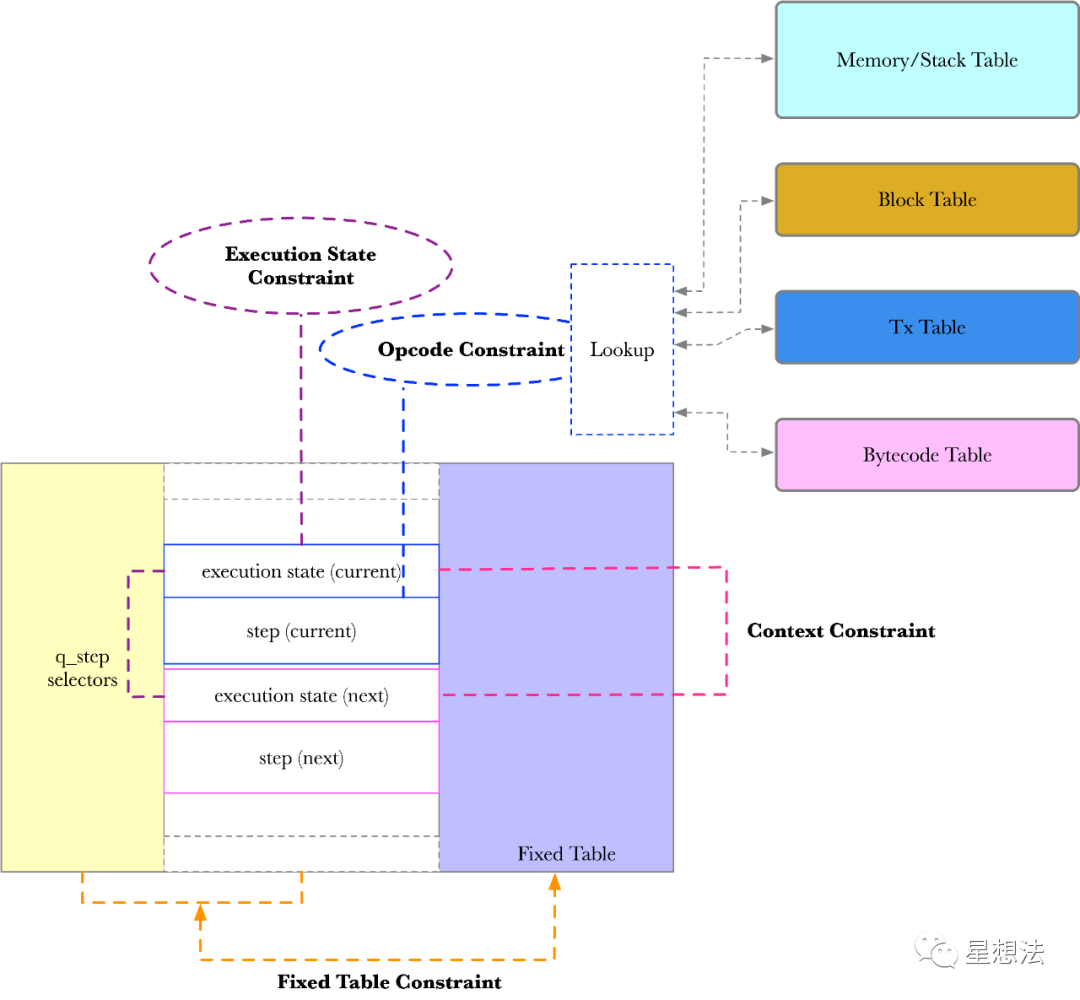
从Column的角度来看,EVM Circuit分为三部分:1/ Step选择子(包括当前Step,第一个Step,最后一个Step等等)2/ Step电路 3/ Fixed Table(固定的查找表)。Step电路逻辑是核心部分。所谓的Step是指从电路约束角度的执行的一步。这一部分又分为两部分:a/ execution state (Step状态选择子) b/ 各种执行状态的约束逻辑。图中用虚线画出了大体的约束逻辑模块。
理解EVM Circuit从Configure和Assign入手。
EVM Circuit Configure
EVM Circuit电路实现在zkevm-circuits/src/evm_circuit.rs。从它的configure函数看起:
pub fn configure<TxTable, RwTable, BytecodeTable, BlockTable>(
  meta: &mut ConstraintSystem<F>,
  power_of_randomness: [Expression<F>; 31],
  tx_table: TxTable,
  rw_table: RwTable,
  bytecode_table: BytecodeTable,
  block_table: BlockTable,
) -> Self
where
  TxTable: LookupTable<F, 4>,
  RwTable: LookupTable<F, 11>,
  BytecodeTable: LookupTable<F, 4>,
  BlockTable: LookupTable<F, 3>,
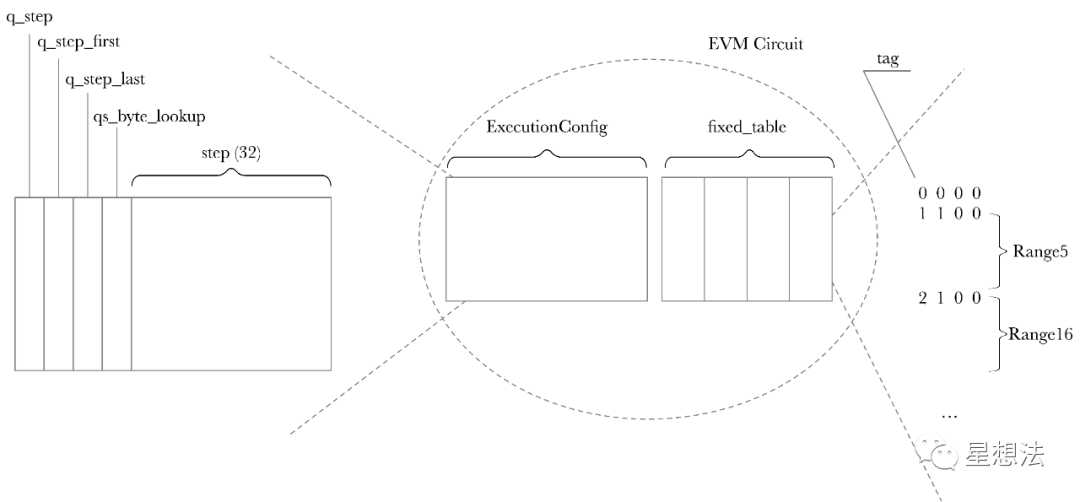
EVM Circuit的电路约束由两部分组成:1/ fixed_table 2/ Execution 部分。fixed_table是一些固定的表信息,占用4个column,分别对应tag/value1/value2/结果。
tag的种类为10种,定义在zkevm-circuits/src/evm_circuit/table.rs:
pub enum FixedTableTag {
  Range5 = 1,
  Range16,
  Range32,
  Range256,
  Range512,
  SignByte,
  BitwiseAnd,
  BitwiseOr,
  BitwiseXor,
  ResponsibleOpcode,
}
接着查看Execution的部分。ExecutionConfig的configure函数定义了电路的其他约束:
pub(crate) fn configure<TxTable, RwTable, BytecodeTable, BlockTable>(
  meta: &mut ConstraintSystem<F>,
  power_of_randomness: [Expression<F>; 31],
  fixed_table: [Column<Fixed>; 4],
  tx_table: TxTable,
  rw_table: RwTable,
  bytecode_table: BytecodeTable,
  block_table: BlockTable,
 ) -> Self
 where
    TxTable: LookupTable<F, 4>,
    RwTable: LookupTable<F, 11>,
    BytecodeTable: LookupTable<F, 4>,
    BlockTable: LookupTable<F, 3>,
 {
q_step - Step的选择子(selector)
q_step_first - 第一个Step的选择子
q_step_last - 最后一个Step的选择子
qs_byte_lookup - byte范围检查的选择子
对于一个Step,采用32个Column的数据进行约束。
   let q_step = meta.complex_selector();
   let q_step_first = meta.complex_selector();
   let q_step_last = meta.complex_selector();
   let qs_byte_lookup = meta.advice_column();
   let advices = [(); STEP_WIDTH].map(|_| meta.advice_column());
什么是Step?
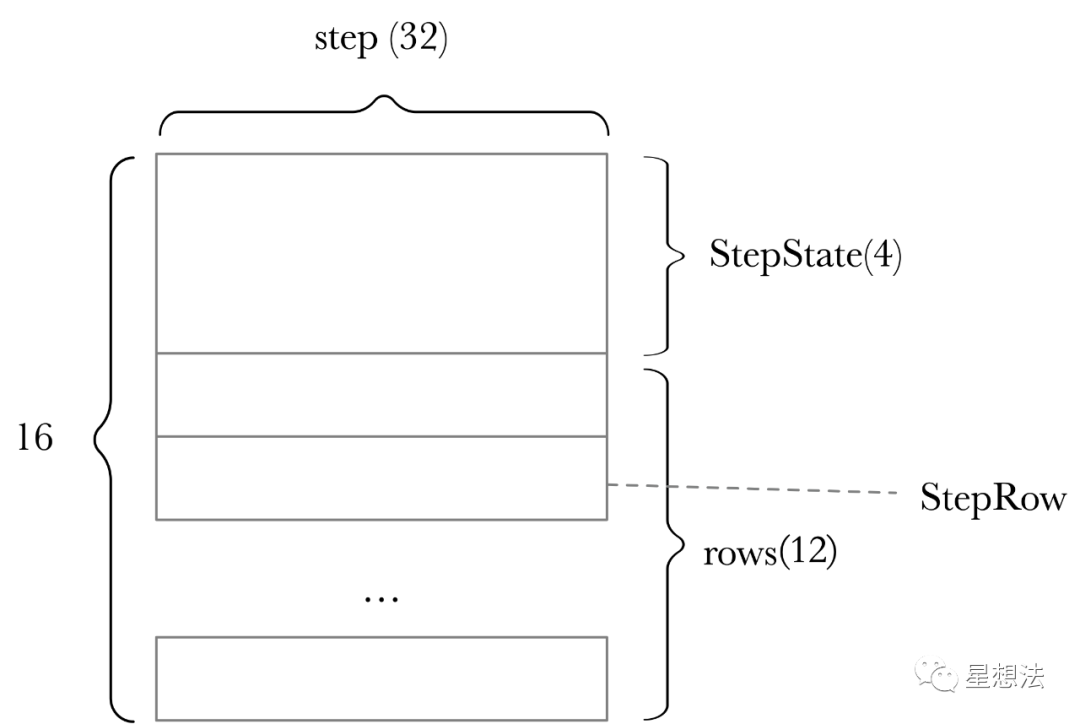
从功能角度看,Step是“一步”执行。从电路角度看,Step是一个由32列16行的电路构成。Step的参数信息定义在zkevm-circuits/src/evm_circuit/param.rs:
const STEP_WIDTH: usize = 32;
const STEP_HEIGHT: usize = 16;
Step定义在zkevm-circuits/src/evm_circuit/step.rs中:
pub(crate) struct Step<F> {
  pub(crate) state: StepState<F>,
  pub(crate) rows: Vec<StepRow<F>>,
}
Step由StepState和16个StepRow组成。先说StepRow,Step Row包含了一个Step中某个Row涉及的所有信息:
pub(crate) struct StepRow<F> {
  pub(crate) qs_byte_lookup: Cell<F>,
  pub(crate) cells: [Cell<F>; STEP_WIDTH],
}
对于一个Step中的某个Row来说,除了cell的数据外(cells),还有该Row对应的qs_byte_lookup,是否该Row的Cell中的数据被Range256进行约束(qs_byte_lookup后续会详细讲解)。
StepState数据结构包括了一个Step对应的状态信息:
pub(crate) struct StepState<F> {
  /// The execution state for the step
  pub(crate) execution_state: Vec<Cell<F>>,
  /// The Read/Write counter
  pub(crate) rw_counter: Cell<F>,
  /// The unique identifier of call in the whole proof, using the
  /// `rw_counter` at the call step.
  pub(crate) call_id: Cell<F>,
  /// Whether the call is root call
  pub(crate) is_root: Cell<F>,
  /// Whether the call is a create call
  pub(crate) is_create: Cell<F>,
  // This is the identifier of current executed bytecode, which is used to
  // lookup current executed code and used to do code copy. In most time,
  // it would be bytecode_hash, but when it comes to root creation call, the
  // executed bytecode is actually from transaction calldata, so it might be
  // tx_id if we decide to lookup different table.
  // However, how to handle root creation call is yet to be determined, see
  // issue https://github.com/appliedzkp/zkevm-specs/issues/73 for more
  // discussion.
  pub(crate) code_source: Cell<F>,
  /// The program counter
  pub(crate) program_counter: Cell<F>,
  /// The stack pointer
  pub(crate) stack_pointer: Cell<F>,
  /// The amount of gas left
  pub(crate) gas_left: Cell<F>,
  /// Memory size in words (32 bytes)
  pub(crate) memory_word_size: Cell<F>,
  /// The counter for state writes
  pub(crate) state_write_counter: Cell<F>,
}
先详细介绍一下StepState的各个变量的含义。
- execution_state - 表明当前Step的执行状态。一个Step的执行状态定义在step.rs中:
pub enum ExecutionState {
  // Internal state
  BeginTx,
  EndTx,
  EndBlock,
  CopyToMemory,
  // Opcode successful cases
  STOP,
  ADD, // ADD, SUB
  ...
  // Error cases
  ErrorInvalidOpcode,
  ErrorStackOverflow,
  ErrorStackUnderflow,
  ...
}
一个Step的执行状态,包括了内部的状态(一个区块中的交易,通过BeginTx, EndTx隔离),Opcode的成功执行状态以及错误状态。有关Opcode的成功执行状态,表示的是一个约束能表示的情况下的执行状态。也就是说,多个Opcode,如果是采用的同一个约束,可以用一个执行状态表示。举个例子,ADD/SUB Opcode采用的是一个约束,对于这两个Opcode,可以采用同一个执行状态进行约束。
- rw_counter - Stack/Memory访问时采用rw_counter区分开同一个地址的访问
- call_id - 每一个函数调用赋予一个id,用于区分不同的程序
- is_root - 是否是根
- is_create - 是否是create调用
- code_source - 调用程序的标示(一般是个程序的hash结果)
- program_counter - PC
- stack_point - 栈指针
- gas_left - 剩下的gas数量
- memory_word_size - memory的大小(以word(32字节)为单位)
- state_write_counter - 状态写入的计数器
仔细查看Step的创建函数(new),发现在创建Step的时候分别创建StepState和StepRow。
pub(crate) fn new(
      meta: &mut ConstraintSystem<F>,
      qs_byte_lookup: Column<Advice>,
      advices: [Column<Advice>; STEP_WIDTH],
      is_next_step: bool,
 ) -> Self {
创建StepState的逻辑如下:
let num_state_cells = ExecutionState::amount() + N_CELLS_STEP_STATE;

let mut cells = VecDeque::with_capacity(num_state_cells);
      meta.create_gate("Query state for step", |meta| {
        for idx in 0..num_state_cells {
           let column_idx = idx % STEP_WIDTH;
           let rotation = idx / STEP_WIDTH + if is_next_step { STEP_HEIGHT } else { 0
};
           cells.push_back(Cell::new(meta, advices[column_idx], rotation));
        }

        vec![0.expr()]
      });

      StepState {
         execution_state: cells.drain(..ExecutionState::amount()).collect(),
         rw_counter: cells.pop_front().unwrap(),
         call_id: cells.pop_front().unwrap(),
         is_root: cells.pop_front().unwrap(),
         is_create: cells.pop_front().unwrap(),
         code_source: cells.pop_front().unwrap(),
         program_counter: cells.pop_front().unwrap(),
         stack_pointer: cells.pop_front().unwrap(),
         gas_left: cells.pop_front().unwrap(),
         memory_word_size: cells.pop_front().unwrap(),
         state_write_counter: cells.pop_front().unwrap(),
       }
N_CELLS_STEP_STATE=10是StepState中除了execution_state外的其他Cell的个数。
按照16行*32列,创建出对应于advices这些Column的Cell。重点要理解好Cell的表示,在同一个Column中的不同的Cell,采用Rotation(偏移)进行区分。在编写电路业务的时候,特别注意对Cell的抽象和描述,这些模块化的电路可能会应用多个实例。再观察这些StepState对应的Cell,这些Cell再配合上q_step相应的选择子,就可以精确的描述一个Step的电路约束逻辑。简单的说,q_step选择子约束行,Step中的Cell采用Rotation(相对偏移)定位。
创建StepRow的逻辑如下:
let mut rows = Vec::with_capacity(STEP_HEIGHT - rotation_offset);
  meta.create_gate("Query rows for step", |meta| {
   for rotation in rotation_offset..STEP_HEIGHT {
      let rotation = rotation + if is_next_step { STEP_HEIGHT } else { 0 };
      rows.push(StepRow {
        qs_byte_lookup: Cell::new(meta, qs_byte_lookup, rotation),
        cells: advices.map(|column| Cell::new(meta, column, rotation)),
      });
    }

    vec![0.expr()]
 });
从StepState下面的第一个行开始是一个个的StepRow。
Custom Gate约束
Custom Gate的约束相对来说最复杂。Custom Gate的约束包括:
a. 每一个Step中的execution_state只有一个有效状态:
let sum_to_one = (
   "Only one of execution_state should be enabled",
    step_curr
      .state
      .execution_state
      .iter()
      .fold(1u64.expr(), |acc, cell| acc - cell.expr()), // expression -> 1 - sum(state's cells)
 );
实现的方法是将所有的状态的Cell的数值累加起来。sum_to_one是1-sum的表达式(expression)。
b. 每一个Step中execution_state是布尔值:
let bool_checks = step_curr.state.execution_state.iter().map(|cell| {
    (
        "Representation for execution_state should be bool",
         cell.expr() * (1u64.expr() - cell.expr()),
     )
 });
检查的方法就是采用x*(1-x)。
c. 相邻的两个Step中的ExecuteState满足约定的条件:比如说,EndTx状态后,只能是BeginTx或者EndBlock。
                      [
                          (
                              "EndTx can only transit to BeginTx or EndBlock",
                              ExecutionState::EndTx,
                              vec![ExecutionState::BeginTx, ExecutionState::EndBlock],
                          ),
                          (
                              "EndBlock can only transit to EndBlock",
                              ExecutionState::EndBlock,
                              vec![ExecutionState::EndBlock],
                          ),
                      ]
                      .map(|(name, from, to)| {
                          (
                              name,
                              step_curr.execution_state_selector([from])
                                  * (1.expr() - step_next.execution_state_selector(to)),
                          )
                      }),
注意,这些相邻的约束,对于最后一个Step不需要满足:
.map(move |(name, poly)| (name, (1.expr() - q_step_last.clone()) * poly))
d. 第一个Step的状态必须是BeginTx,最后一个Step的状态必须是EndBlock:
         let _first_step_check = {
              let begin_tx_selector =
                  step_curr.execution_state_selector([ExecutionState::BeginTx]);
              iter::once((
                  "First step should be BeginTx",
                  q_step_first * (1.expr() - begin_tx_selector),
              ))
          };

          let _last_step_check = {
              let end_block_selector =
                  step_curr.execution_state_selector([ExecutionState::EndBlock]);
              iter::once((
                  "Last step should be EndBlock",
                  q_step_last * (1.expr() - end_block_selector),
              ))
          };
特别注意的是,如上的这些custom gate的约束都是相对于某个Step而已的,所以所有的约束必须加上q_step的限制:
          iter::once(sum_to_one)
              .chain(bool_checks)
              .chain(execution_state_transition)
              .map(move |(name, poly)| (name, q_step.clone() * poly))
              // TODO: Enable these after test of CALLDATACOPY is complete.
              // .chain(first_step_check)
              // .chain(last_step_check)
当前的代码不是最终的代码,first_step_check以及last_step_check都被注释掉了。从TODO可以看出,这些约束在CALLDATACOPY的约束实现测试完成后会加上。
Advice Column的数据范围约束
约束每个advice都是byte(也就是Range256)的范围内。因为范围(Range)的约束实现在fixed_table中,由4个fixed column组成。所以Range256的范围约束由tag/value等四部分对应。
     for advice in advices {
          meta.lookup_any("Qs byte", |meta| {
              let advice = meta.query_advice(advice, Rotation::cur());
              let qs_byte_lookup = meta.query_advice(qs_byte_lookup, Rotation::cur());

              vec![
                  qs_byte_lookup.clone() * FixedTableTag::Range256.expr(), //tag约束
                  qs_byte_lookup * advice, //值约束
                  0u64.expr(), //ignore
                  0u64.expr(), //ignore
              ]
              .into_iter()
              .zip(fixed_table.table_exprs(meta).to_vec().into_iter())
              .collect::<Vec<_>>()
          });
      }
到目前为止,整个电路的大致的样子有了,划分了Column的类型,定义了每个Step的电路范围。并且约束了每个Step中的状态以及相邻两个Step的状态关系。
Gadget约束
对于每一种类型的操作(Opcode),创建对应的Gadget约束。具体的逻辑实现在configure_gadget函数中:
fn configure_gadget<G: ExecutionGadget<F>>(
      meta: &mut ConstraintSystem<F>,
      q_step: Selector,
      q_step_first: Selector,
      power_of_randomness: &[Expression<F>; 31],
      step_curr: &Step<F>,
      step_next: &Step<F>,
      independent_lookups: &mut Vec<Vec<Lookup<F>>>,
      presets_map: &mut HashMap<ExecutionState, Vec<Preset<F>>>,
  ) -> G {
对于Gadget的约束,抽象出ConstraintBuilder:
     let mut cb = ConstraintBuilder::new(
          step_curr,
          step_next,
          power_of_randomness,
          G::EXECUTION_STATE,
      );

      let gadget = G::configure(&mut cb);

      let (constraints, constraints_first_step, lookups, presets) = cb.build();
      debug_assert!(
          presets_map.insert(G::EXECUTION_STATE, presets).is_none(),
          "execution state already configured"
      );
通过ConstraintBuilder::new创建ConstraintBuilder。对于每一种Gadget,调用相应的configure函数。最终调用ConstraintBuilder的build函数完成约束配置。
先从ConstraintBuilder的定义讲起。ConstraintBuilder定义在zkevm-circuits/src/evm_circuit/util/constraint_builder.rs中:
pub(crate) struct ConstraintBuilder<'a, F> {
  pub(crate) curr: &'a Step<F>, //current Step
  pub(crate) next: &'a Step<F>, //next Step
  power_of_randomness: &'a [Expression<F>; 31],
  execution_state: ExecutionState, //execution state
  cb: BaseConstraintBuilder<F>, //base builder
  constraints_first_step: Vec<(&'static str, Expression<F>)>,
  lookups: Vec<(&'static str, Lookup<F>)>,
  curr_row_usages: Vec<StepRowUsage>, //当前StepRow的使用情况
  next_row_usages: Vec<StepRowUsage>, //下一个StepRow的使用情况
  rw_counter_offset: Expression<F>, //
  program_counter_offset: usize, //PC
  stack_pointer_offset: i32, //栈指针
  in_next_step: bool, //
  condition: Option<Expression<F>>,
}
a. ConstraintBuilder::new
创建了ConstraintBuilder对象。
b. G::configure
所有的Opcode相关的Gadget相关的代码在zkevm-circuits/src/evm_circuit/execution/目录下。目前已经支持三十多种Gadget,也就是说,支持三十多种execution_state。以比较简单的AddGadget介绍相关的约束实现:
pub(crate) struct AddGadget<F> {
  same_context: SameContextGadget<F>,
  add_words: AddWordsGadget<F, 2, false>,
  is_sub: PairSelectGadget<F>,
}
AddGadget依赖于其他三个Gadget: SameContextGadget (约束Context),AddWordsGadget(Words相加)和PairSelectGadget(选边,选择a或者b)。通过AddGadget的configure函数可以查看相关的约束。
1/ 约定opcode,a/b/c(操作字)的Cell(通过cb.query_cell)
let opcode = cb.query_cell();
let a = cb.query_word();
let b = cb.query_word();
let c = cb.query_word();
2/ 构建加法约束(减法也转化为加法)
let add_words = AddWordsGadget::construct(cb, [a.clone(), b.clone()], c.clone());
3/ 确定是加法还是减法操作,查看opcode是ADD还是SUB
let is_sub = PairSelectGadget::construct(
  cb,
  opcode.expr(),
  OpcodeId::SUB.expr(),
  OpcodeId::ADD.expr(),
);
4/ 约束对应的Stack的变化
cb.stack_pop(select::expr(is_sub.expr().0, c.expr(), a.expr()));
cb.stack_pop(b.expr());
cb.stack_push(select::expr(is_sub.expr().0, a.expr(), c.expr()));
5/ 约束Context的变化
let step_state_transition = StepStateTransition {
  rw_counter: Delta(3.expr()),
  program_counter: Delta(1.expr()),
  stack_pointer: Delta(1.expr()),
  gas_left: Delta(-OpcodeId::ADD.constant_gas_cost().expr()),
  ..StepStateTransition::default()
};
let same_context = SameContextGadget::construct(cb, opcode, step_state_transition);
注意所有的约束最后都是保存在cb.constraints变量。
c. cb.build
cb.build就是对于每个Gadget的约束进行修正和补充。对于当前Step的所有的Row:
1/ 如果没有用到的Cell,需要限制为0
2/ 如果需要检查范围的,检查qs_byte_lookup
     for (row, usage) in self.curr.rows.iter().zip(self.curr_row_usages.iter()) {
          if usage.is_byte_lookup_enabled {
              constraints.push(("Enable byte lookup", row.qs_byte_lookup.expr() - 1.expr()));
          }

          presets.extend(
              row.cells[usage.next_idx..]
                  .iter()
                  .map(|cell| (cell.clone(), F::zero())),
          );
          presets.push((
              row.qs_byte_lookup.clone(),
              if usage.is_byte_lookup_enabled {
                  F::one()
              } else {
                  F::zero()
              },
          ));
      }
对于当前Step的约束或者查找表,加上execution_state的选择子。
    let execution_state_selector = self.curr.execution_state_selector([self.execution_state]);

      (
          constraints
              .into_iter()
              .map(|(name, constraint)| (name, execution_state_selector.clone() * constraint))
              .collect(),
          self.constraints_first_step
              .into_iter()
              .map(|(name, constraint)| (name, execution_state_selector.clone() * constraint))
              .collect(),
          self.lookups
              .into_iter()
              .map(|(name, lookup)| (name, lookup.conditional(execution_state_selector.clone())))
              .collect(),
          presets,
      )
到此,Step的约束框架浮现出来了。ExecuteState是可能的执行状态,相对于qs_step来说,execute_state的相对位置固定。并且execute_state的每个Cell的值必须是布尔类型,有且只有一个执行状态有效。针对每个执行状态,存在相应的Gadget电路。所有的Gadget电路在cb.build的阶段都必须加上execution_state_selector选择子。也就是说,整个EVM Circuit电路逻辑上包括了所有执行状态的约束。
在讲最后一部分,其他Lookup约束之前,介绍一下Stack约束和Context约束。
Stack约束
回头再看Add电路约束,利用cb.stack_pop和cb.stack_push函数实现相应的Stack的约束。
pub(crate) fn stack_pop(&mut self, value: Expression<F>) {
      self.stack_lookup(false.expr(), self.stack_pointer_offset.expr(), value);
      self.stack_pointer_offset += 1;
 }

  pub(crate) fn stack_push(&mut self, value: Expression<F>) {
      self.stack_pointer_offset -= 1;
      self.stack_lookup(true.expr(), self.stack_pointer_offset.expr(), value);
 }
stack_pop和stack_push的实现类似,都是调整stack_pointer_offset偏移,并通过stack_lookup约束Stack上stack_pointer_offset对应的值。
pub(crate) fn stack_lookup(
      &mut self,
      is_write: Expression<F>, //是否是写操作?
      stack_pointer_offset: Expression<F>, //Stack偏移
      value: Expression<F>, //Stack的值
  ) {
      self.rw_lookup(
          "Stack lookup",
          is_write,
          RwTableTag::Stack,
          [
              self.curr.state.call_id.expr(),
              0.expr(),
              self.curr.state.stack_pointer.expr() + stack_pointer_offset,
              0.expr(),
              value,
              0.expr(),
              0.expr(),
              0.expr(),
          ],
      );
  }
核心逻辑是rw_loopup,rw_loopup实现又是基于rw_lookup_with_counter。Stack的访问细化为call_id, Stack的偏移以及rw的次数。在同一个Step State中,对同一个Stack的偏移存在多次读写的可能性,这些可能性的约束需要加上读写的次数。
rw_loopup_with_counter的实现就是将lookup(查找表)通过add_lookup记录在ConstraintBuilder的lookups变量中,为后面的查找表的Configure做准备。
fn rw_lookup_with_counter(
      &mut self,
      name: &'static str,
      counter: Expression<F>,
      is_write: Expression<F>,
      tag: RwTableTag,
      values: [Expression<F>; 8],
  ) {
      self.add_lookup(
          name,
          Lookup::Rw {
              counter,
              is_write,
              tag: tag.expr(),
              values,
          },
      );
  }
除了RW(可读可写的)查找表外,目前还支持其他一些查找表类型。Lookup枚举类型定义在zkevm-circuits/src/evm_circuit/table.rs:
pub(crate) enum Lookup<F> {
  /// Lookup to fixed table, which contains serveral pre-built tables such as
  /// range tables or bitwise tables.
  Fixed {
...
  },
  Tx {
  ...
  },
  Rw {
  ...
  },
  Bytecode {
  ...
  },
  Block {
  ...
  },
  Conditional {
  ...
  }
Tx查找表约束交易数据,RW查找表约束可读可写的数据访问(Stack/Memory),Bytecode约束执行的程序,Block约束的是区块相关的数据。
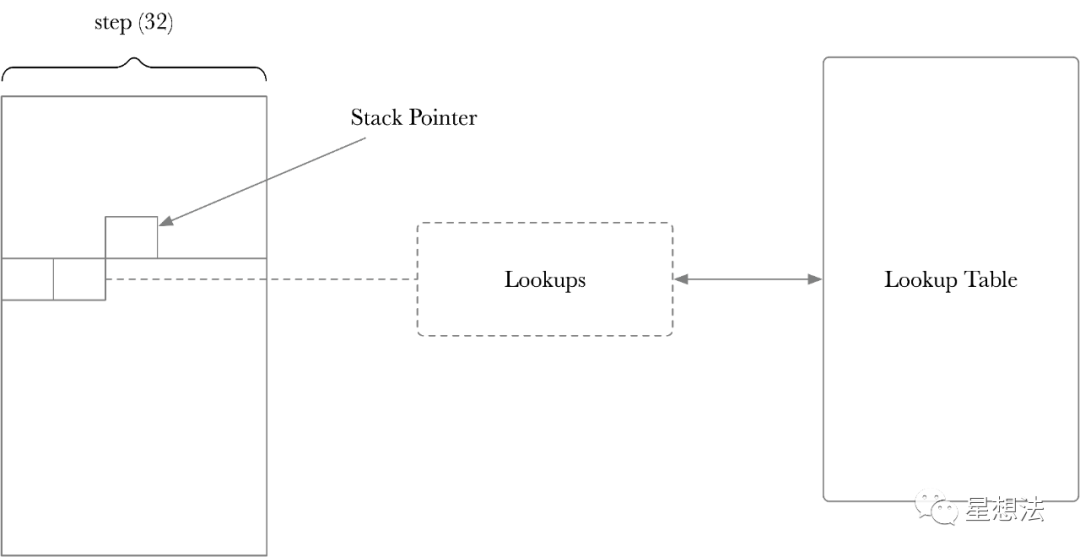
再重头看一下Stack的约束实现。对于每一种Step,可能存在Stack或者Memory的操作。为了约束这些操作,除了申请和这些操作数据相关的Cell外,还需要指定Stack Pointer。在Stack Pointer锚定的情况下,某个Step内部的Stack的操作可以独立约束。并且,Stack Pointer对应的Cell在Step中的位置可以通过q_step进行锚定。也就是说,从单个Step的角度来说,约束可以独立表达和实现。当然,Stack的约束除了单个Step的约束外,多个Step之间也存在Stack数据一致性和正确性的约束。这些约束由后续“Lookup约束”进行约束(请查看Lookup约束章节)。
Context约束
之前的重点是单个Execution State的约束实现。SameContextGadget约束的是多个Execution State之间约束实现。
pub(crate) struct SameContextGadget<F> {
  opcode: Cell<F>,
  sufficient_gas_left: RangeCheckGadget<F, N_BYTES_GAS>,
}
具体的约束逻辑实现在contruct函数中:
pub(crate) fn construct(
  cb: &mut ConstraintBuilder<F>,
  opcode: Cell<F>,
  step_state_transition: StepStateTransition<F>,
) -> Self {
  cb.opcode_lookup(opcode.expr(), 1.expr());
  cb.add_lookup(
      "Responsible opcode lookup",
      Lookup::Fixed {
          tag: FixedTableTag::ResponsibleOpcode.expr(),
          values: [
              cb.execution_state().as_u64().expr(),
              opcode.expr(),
              0.expr(),
          ],
      },
  );

  // Check gas_left is sufficient
  let sufficient_gas_left = RangeCheckGadget::construct(cb, cb.next.state.gas_left.expr());

  // State transition
  cb.require_step_state_transition(step_state_transition);

  Self {
      opcode,
      sufficient_gas_left,
  }
}
逻辑简单清晰,实现了如下的约束:
1/ opcode_lookup - 约束PC对应的op code一致
2/ add_lookup - 约束opcode和Step中的execution state的一致性
3/ 查看gas是否足够
4/ require_step_state_transition - 约束状态的转换是否一致(涉及到两个Step之间的约束)。比如说PC的关系,Stack Pointer的关系,Call id的关系等等。
具体的代码,感兴趣的小伙伴可以自行查看。
Lookup约束
在每个Execution State的约束准备就绪后,开始处理所有的Lookup的约束。
     Self::configure_lookup(
          meta,
          q_step,
          fixed_table,
          tx_table,
          rw_table,
          bytecode_table,
          block_table,
          independent_lookups,
      );
实现的逻辑相对简单,每个Lookup的约束需要额外加上q_step约束外,建立不同的表的约束关系。其中independent_lookups就是某个Step约束中除去常见表外的查找表约束。
EVM Circuit Assign
EVM Circuit通过assign_block对一个Block中的所有的交易进行证明。
pub fn assign_block(
      &self,
      layouter: &mut impl Layouter<F>,
      block: &Block<F>,
  ) -> Result<(), Error> {
      self.execution.assign_block(layouter, block)
  }
ExecutionState的assign_block,除了设置q_step_first以及q_step_last外,对Block中的每一笔交易Tx进行约束。
            self.q_step_first.enable(&mut region, offset)?;

              for transaction in &block.txs {
                  for step in &transaction.steps {
                      let call = &transaction.calls[step.call_index];

                      self.q_step.enable(&mut region, offset)?;
                      self.assign_exec_step(&mut region, offset, block, transaction, call, step)?;

                      offset += STEP_HEIGHT;
                  }
              }

              self.q_step_last.enable(&mut region, offset - STEP_HEIGHT)?;
一笔交易Tx的一个个步骤(step)存储在steps变量中。针对每个Step,调用assign_exec_step进行assign。在理解Configure的逻辑的基础上,这些逻辑相对简单。感兴趣的小伙伴可以自行深入查看相应源代码。
EVM Circuit的电路实现先介绍到这里,后续的文章接着介绍State Circuit和Bytecode Circuit。

本文首发于:https://mp.weixin.qq.com/s/-sUsId_555hzBRhR7O93Lw
 GitHub 登录
 Web3 钱包登录
