Web3 Devops with Azure Devops pipeline 2
Web3 Devops with Azure Devops pipeline 第二部分
Web3 Devops with Azure Devops pipeline 2

在上一篇文章中,设计了pipelines的6个阶段,并完成了build部分的实现:
1、build:编译、测试和打包工件
2、dev:部署基础设施、合约和前端
3、dev_validation:等待手动验证dev并删除dev环境
4、qa:部署基础设施、合约和前端
5、qa_validation 等待手动验证 qa 并删除 qa 环境
6、prod:部署基础设施、合约和前端
整体看下来大概是这样一个流程:
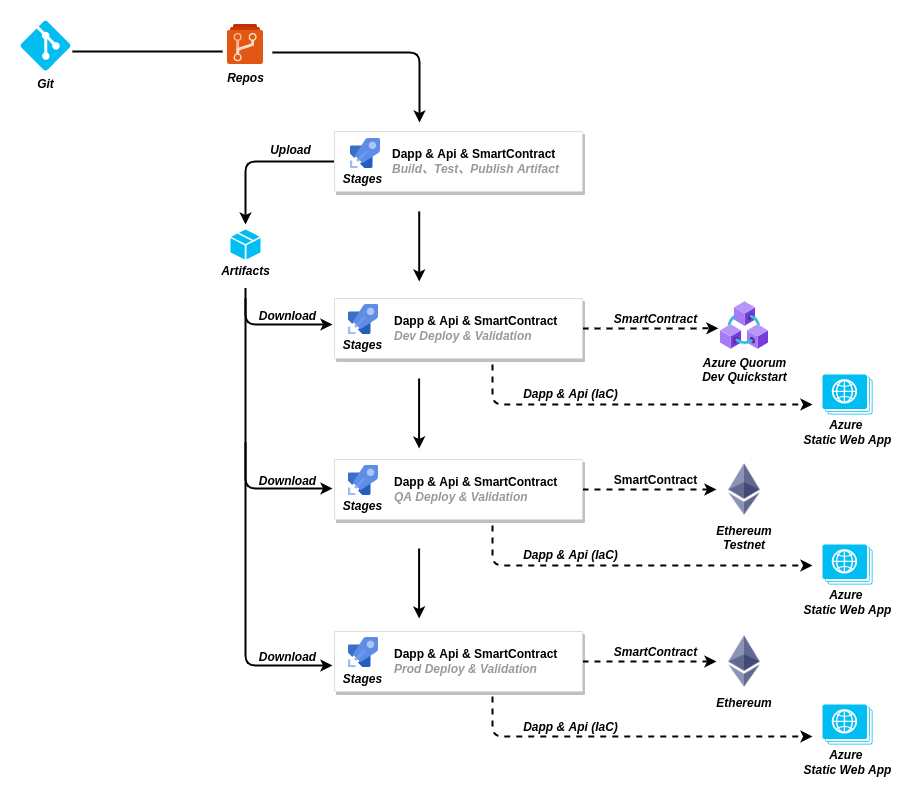
- 部署的时候遇到个问题,所以在项目中又加入了一个API,详细问题后面再讲。
IaC (Infrastructure as Code)
因为测试项目的前端Dapp比较简单,所以使用Azure Static Web App来部署。SWA的部署是通过在Pipeline中使用脚本和模板来部署的,这种方式也称为基础设施即代码(IaC)(使用DevOps方法和版本控制与描述性模型来定义和部署基础设施,如网络、虚拟机、负载平衡器等等。就像相同的源代码总是生成相同的二进制文件一样,IaC模型每次部署时都会生成相同的环境)
IaC的模板是使用Azure Bicep编写的。它是一种特定领域的语言(DSL),使用声明式语法来部署Azure资源。在Bicep文件中,可以定义要部署到Azure的基础设施,然后在整个开发生命周期中使用该文件以一种一致的方式来重复部署基础设施。
在工程目录中新建iac文件夹,并创建 saw.becip 文件,在其中定义Azure SWA资源:
param repoUrl string
param location string

resource swa 'Microsoft.Web/staticSites@2022-03-01' = {
  name: 'swa${uniqueString(resourceGroup().id)}'
  location: location
  tags: {
    tagName1: 'demo'
  }
  sku: {
    name: 'Free'
    tier: 'Free'
  }
  properties: {
    branch: 'v2.1'
    repositoryToken: ''
    repositoryUrl: repoUrl
    buildProperties: {
      apiLocation: ''
      appLocation: '/'
      appArtifactLocation: 'dist'
    }
  }
}

output swaName string = swa.name
output deploymentToken string = swa.listSecrets().properties.apiKey
还需要在创建一个 main.bechip 来定义资源组:
targetScope = 'subscription'

param repoUrl string
param swaName string = 'web3swa'
param location string = 'eastasia'
param rgName string = 'truffle_demo'

resource rg 'Microsoft.Resources/resourceGroups@2021-04-01' = {
  name: rgName
  location: location
}

module web3swa './saw.bicep' = {
  name: swaName
  scope: resourceGroup(rg.name)
  params: {
    repoUrl: repoUrl
    location: location
  }
}

output swaName string = web3swa.outputs.swaName
output deploymentToken string = web3swa.outputs.deploymentToken
最后使用powershell来编写部署脚本 deploy.ps1:
[CmdletBinding()]
param(
    # Parameter help description
    [Parameter(Position=0)]
    [string]
    $rgName="web3devops_dev",

    # Parameter help description
    [Parameter(Position=1)]
    [string]
    $location="eastasia",

    [string]
    $repoUrl
)

Write-Verbose $rgName
Write-Output 'Deploying the Azure infrastructure'

$deployment = $(az deployment sub create --name $rgName `
                --location $location `
                --template-file ./main.bicep `
                --parameters rgName=$rgName `
                --parameters location=$location `
                --parameters repoUrl=$repoUrl `
                --output json) | ConvertFrom-Json

$swaName = $deployment.properties.outputs.swaName.value
$deploymentToken = $deployment.properties.outputs.deploymentToken.value
Write-Host "##vso[task.setvariable variable=swaName;isOutput=true]$swaName"
Write-Host "##vso[task.setvariable variable=resourceGroup;isOutput=true]$rgName"
Write-Host "##vso[task.setvariable variable=deploymentToken;isOutput=true]$deploymentToken"
修改之前的Azure pipelines文件,在Build阶段添加两个task,用于将iac文件打包并发布到Artifact:
- task: CopyFiles@2
  displayName: Package IaC
  inputs:
    Contents: $(System.DefaultWorkingDirectory)/myapp/iac/**
    TargetFolder: $(Build.ArtifactStagingDirectory)/iac
    flattenFolders: true
- task: PublishPipelineArtifact@1
  displayName: Publish IaC
  inputs:
    targetPath: "$(Build.ArtifactStagingDirectory)/iac"
    artifact: "iac"
    publishLocation: "pipeline"
修改dev阶段的iac job,将部署脚本添加到Azure pipelines文件中:
- job: iac
  steps:
    - checkout: none
    - download: none
    - task: DownloadPipelineArtifact@2
      displayName: "Download IaC artifacts"
      inputs:
        buildType: "current"
        artifact: "iac"
        targetPath: "$(Pipeline.Workspace)/iac"
    - task: AzureCLI@2
      name: "deploy"
      displayName: "Deploy Infra"
      inputs:
        azureSubscription: "web3devops"
        scriptType: "pscore"
        scriptLocation: "scriptPath"
        scriptPath: "$(Agent.BuildDirectory)/iac/deploy.ps1"
        arguments: "-repoUrl $(Build.Repository.Uri) -rgName $(resourceGroup)-dev -verbose"
        workingDirectory: "$(Agent.BuildDirectory)/iac"
这样每次部署业务代码之前,都会先部署基础架构服务
API (Azure Function)
这里就要讲到一开始提到的那个问题了,也是加入这个API的原因。
在测试部署的时候遇到了一个问题,合约编译后的ABI文件(Application Binary Interface,JSON 文件。描述了已部署的合约及其功能)需要在Dapp中引用以便获取Contract Address,但在合约部署之前ABI文件中没有Contract Address信息,这部分内容是在合约部署之后自动添加到ABI文件中的。
在本地测试的时候,使用软链接的方式把合约的编译目录链到了Dapp的src目录,每次发布合约后再编译Dapp进行前端页面的测试,所以不会遇到这个问题
ln -s /mycontract/build/contracts /myapp/src/contracts
但是在pipelines里,是需要在Build阶段编译Contract和Dapp,然后发布到Actifact。这样就没有办法等到合约部署完成之后再编译Dapp。所以想到了另外一种方法来解决,流程图如下:
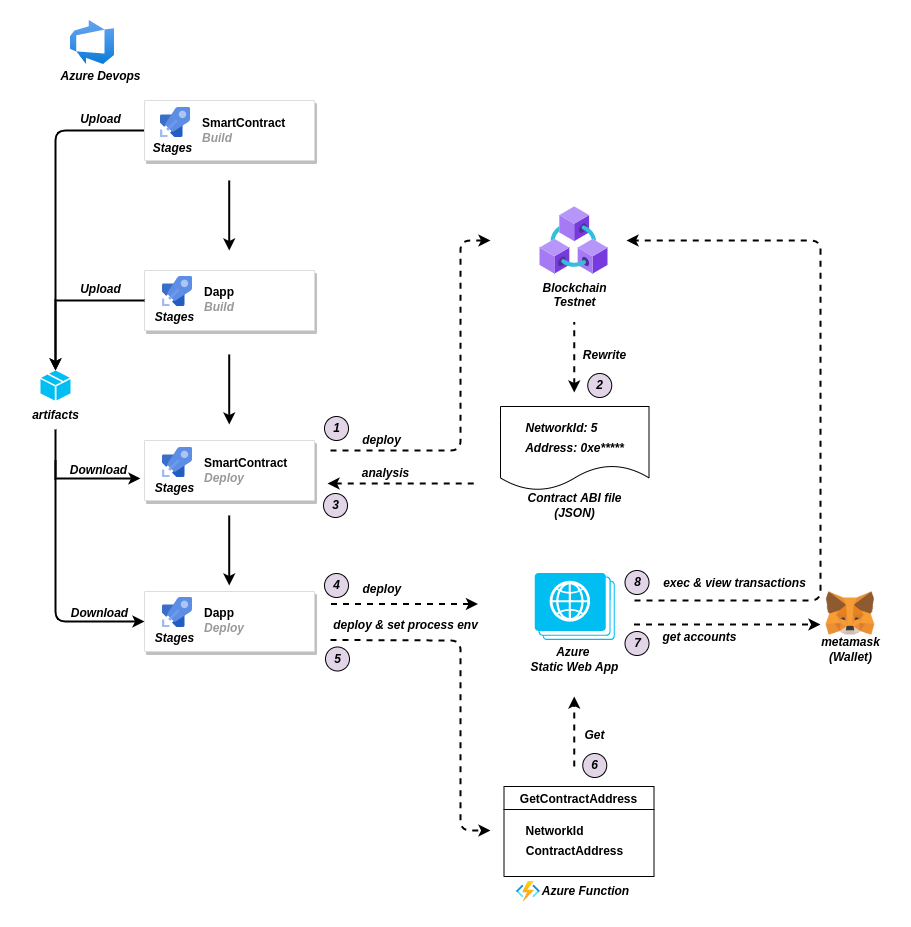
1、部署合约
2、合约部署成功后会将Contract Address写回到ABI文件
3、在Pipelines中解析ABI文件,拿到Network ID和Contract Address,并添加到Pipelines变量中
4、部署Dapp到SWA
5、部署API到Azure Function,并将Pipelines变量中的值设置成Function的环境变量
6、当浏览器打开Dapp的时候,会调用GET方法调用API获取Network ID和Contract Address
7、从metamask钱包中读取网络地址和用户地址
8、执行交易并查看结果
首先要在vscode中安装一个插件
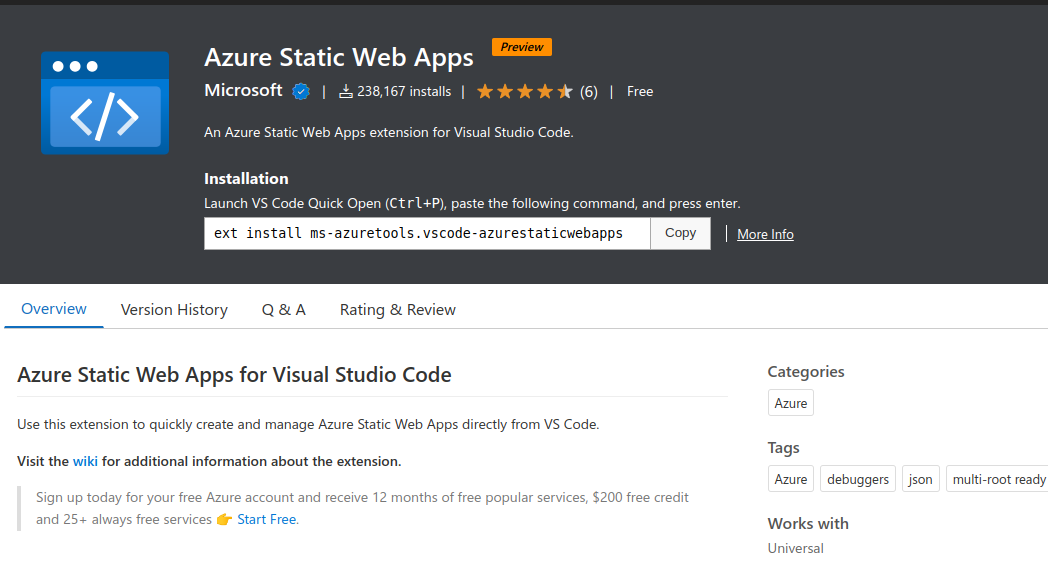
使用 CTRL + SHIFT + P快捷键,打开vscode快捷命令行,执行:
Azure Static Web App: Create HTTP Function
根据提示创建一个JavaScript Function工程,并切换到工程目录修改 index.js 文件。这是一个非常简单的服务,返回一个从环境变量中读取的值:
module.exports = async function (context, req) {
    context.log('GetContractAddress: process a request.');
    const networkId = (req.query.networkId || undefined);

    if(!networkId) {
        context.res = {
            status: 400
        };
        return;
    }

    const address = process.env[`networkAddress_${networkId}`]

    context.log(`Returning: ${address}`)

    context.res = {
        // status: 200, /* Defaults to 200 */
        body: address
    };
}
API使用 dotenv 来管理环境变量,并使用 Jest 作为测试框架,所以编写测试方法需要安装 jest 和 jest-junit
npm install dotenv jest jest-junit
传递给Function的第一个参数,是一个暴露了日志函数的上下文对象。为了模拟上下文对象,在API文件夹下创建了TestMocks文件夹,并在此文件夹中创建了一个名为 defaultContext.js 的文件,用于模拟的上下文对象,来跟踪调用以便记录和检查消息
module.exports = {
    log: jest.fn()
};
现在可以编写测试了,在工程目录新建测试文件 index.test.js ,并添加以下内容:
require('dotenv').config();
const httpFunction = require('./index');
const context = require('../TestMocks/defaultContext');

afterEach(()=>{
    jest.clearAllMocks();
});

test('Should return address', async () => {
    const request = {
        query: { networkId: 4 }
    };

    await httpFunction(context, request);

    expect(context.log.mock.calls.length).toBe(2);
    expect(context.res.body).toEqual('0x7a063c7e4A0EC2fB4dC0F73103Fd45F17b46Ae52');
});

test('Should return 400 error',async () => {
    const request = {
        query: {}
    };

    await httpFunction(context, request);

    expect(context.log.mock.calls.length).toBe(1);
    expect(context.res.status).toEqual(400);
});
另外在本地测试为了模拟环境变量,还需要增加.env文件:
networkAddress_4=0x7a063c7e4A0EC2fB4dC0F73103Fd45F17b46Ae52
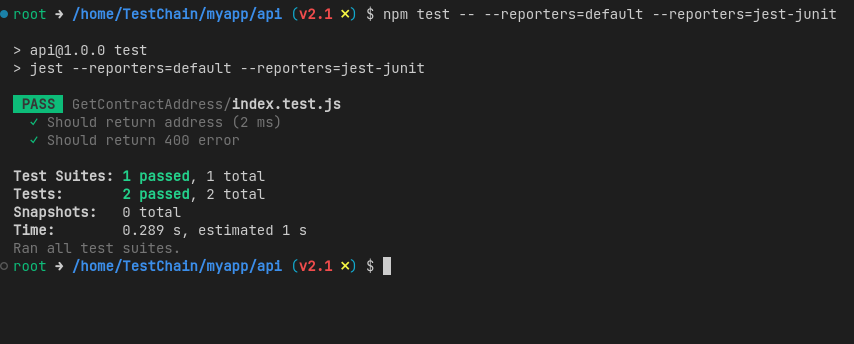
执行测试
修改Azure Pipelines文件
1、在Build阶段 Publish frontend 之后增加以下内容,用于测试和发布API
- task: PublishPipelineArtifact@1
  displayName: Publish API
  inputs:
    targetPath: "$(System.DefaultWorkingDirectory)/myapp/api"
    artifact: "api"
    publishLocation: "pipeline"
- script: npm install
  displayName: "Install API dependencies"
  workingDirectory: $(System.DefaultWorkingDirectory)/myapp/api
- script: npm test -- --reporters=default --reporters=jest-junit
  displayName: "Test API"
  workingDirectory: $(System.DefaultWorkingDirectory)/myapp/api
  env:
    CI: true
    networkAddress_4: "0x7a063c7e4A0EC2fB4dC0F73103Fd45F17b46Ae52"
- task: PublishTestResults@2
  displayName: "Publish API test results"
  inputs:
    testRunTitle: "API"
    testResultsFormat: "JUnit"
    failTaskOnFailedTests: true
    testResultsFiles: "myapp/api/junit*.xml"
2、在dev阶段,需要修改 deploy_contract 和 deploy_frontend
在contract部署之后需要解析ABI文件,并创建pipelines变量
- job: deploy_contracts
  dependsOn: iac
  steps:
    - checkout: none
    - download: none
    - task: DownloadPipelineArtifact@2
      displayName: "Download artifacts"
    - script: npm install --global web3 ethereumjs-testrpc ganache-cli truffle
      displayName: "Install Global npm package"
    - script: npm install
      displayName: "Install npm package"
      workingDirectory: "$(Agent.BuildDirectory)/contracts/contracts3"
    - script: "truffle migrate --reset --compile-none --network development"
      displayName: "Deploy contracts"
      workingDirectory: "$(Agent.BuildDirectory)/contracts/contracts3"
    - pwsh: |
        $contract = Get-Content ./build/contracts/TestNFT.json | ConvertFrom-Json

        $networkId = $contract.networks[0] | Get-Member -MemberType NoteProperty | Select-Object -ExpandProperty name

        $address = $contract.networks.$networkId.address

        if($address) {
          Write-Host "##[section]Contract address: $address"
        } else {
          Write-Host "##vso[task.logissue type=error]Address not found"
        }

        Write-Host "##vso[task.setvariable variable=networkId;isOutput=true]$networkId"
        Write-Host "##vso[task.setvariable variable=contractAddress;isOutput=true]$address"
      displayName: "Find contract address"
      name: "Contract"
      workingDirectory: "$(Agent.BuildDirectory)/contracts/contracts3"
在frontend部署的时候会读取变量,并设置API的环境变量
- job: deploy_frontend
  dependsOn:
    - iac
    - deploy_contracts
  variables:
    swaName: $[ dependencies.IaC.outputs['deploy.swaName'] ]
    deploymentToken: $[ dependencies.IaC.outputs['deploy.deploymentToken'] ]
    networkId: $[ dependencies.Deploy_Contracts.outputs['contract.networkId'] ]
    contractAddress: $[ dependencies.Deploy_Contracts.outputs['contract.contractAddress'] ]
  steps:
    - checkout: none
    - download: none
    - task: DownloadPipelineArtifact@2
      displayName: Download artifacts
    - task: AzureStaticWebApp@0
      displayName: Deploy frontend
      inputs:
        api_location: api
        app_location: client
        skip_app_build: true
        workingDirectory: $(Pipeline.Workspace)
        azure_static_web_apps_api_token: $(deploymentToken)
    - task: AzureCLI@2
      displayName: "Configure API"
      inputs:
        azureSubscription: "Web3DevOps"
        scriptType: "pscore"
        scriptLocation: "inlineScript"
        inlineScript: |
          az staticwebapp appsettings set --name $(swaName) `
            --setting-names networkAddress=$(contractAddress) `
            networkAddress_$(networkId)=$(contractAddress)
    - task: AzureCLI@2
      displayName: "Update summary"
      inputs:
        azureSubscription: "Web3DevOps"
        scriptType: "pscore"
        scriptLocation: "inlineScript"
        inlineScript: |
          dir env: | Out-String

          Write-Host "resourceGroup: $(resourceGroup)"

          $summaryPath = "$(Agent.BuildDirectory)/contracts/Contract_Information.md"
          $swaUrl = $env:AZURESTATICWEBAPP_STATIC_WEB_APP_URL
          Write-Host "Writing summary to $summaryPath"

          $data = @"
          ### SPA Information
          App URL: [$swaUrl]($swaUrl)
          "@

          Set-Content -Path $summaryPath -Value $data -Verbose
          $cmd = '[task.addattachment type=Distributedtask.Core.Summary;name=dApp Information;]'

          Write-Host "##vso$cmd$summaryPath"
这样就可以在浏览器打开dapp的时候,从API中获取合约地址
DApps(Decentralized Applications)
在上一篇文章中,我把两个测试帐号以及测试网络地址都Hardcoded在了页面里,这次修改为从钱包中读取网络地址和用户帐号,只保留了一个交易对方的账户
import './App.css';
import React, {Component} from "react";
import testnft from "./contracts/TestNFT.json";

class App extends Component{
  state = { storageValue: null, web3: null, account: null, toaccount: null, contract: null };

  componentDidMount = async () =>{
    try{
      //Get network provider and web3 instance.
      const Web3 = require('web3');
      const toaccount = '0x212b13B538e25F16A80D2e9e1B9CC1c1aeCBe279';
      const web3 = new Web3(window.ethereum);

      //Use web3 to get the user's accounts.
      const accounts = await window.ethereum.request({ method: 'eth_requestAccounts' });

      //Get the contract instance.
      const networkId = await web3.eth.net.getId();
      const deployedNetwork = testnft.networks[networkId];
      let contractAddress = deployedNetwork && deployedNetwork.address;

      // If the network can't be found in the contract JSON call the
      // backend API for the address.
      if(!contractAddress){
        console.log('Address not found in contract JSON. Calling backup api');
        const text = await (await fetch(`/api/GetContractAddress/?networkId=${networkId}`)).text();
        contractAddress = text;
      }

      const instance = new web3.eth.Contract(
          testnft.abi,
          contractAddress,
      );

      // Set web3, accounts, and contract to the state, and then proceed with an
      // example of interacting with the contract's methods.
      this.setState({ web3, accounts, toaccount, contract: instance }, this.runExample);
    }catch(error){
      alert(
        `Failed to load web3, accounts, or contract. Check console for details.`,
      );
      console.error(error);
    }
  };

  runExample = async () => {
    const { web3, accounts, toaccount, contract } = this.state;
    console.log(accounts[0]);
    console.log(toaccount);

    const response = await contract.methods.mintNFT('ipfs://QmYGkmHAhySYR6zvizG3xoMEyLPs2h68swsg5BeStxL5uK', toaccount).send( {from: accounts[0], gasLimit: 3500000, gasPrice: web3.utils.toWei('3', 'Gwei')} );
    this.setState({ storageValue: 'from: '+ response['from'] + '. to: ' + response['to'] + '. In the block: ' + response['blockNumber'] });
  };

  render() {
    if (!this.state.web3) {
      return <div>!Loading Web3, accounts, and contract...{this.state.web3},test</div>;
    }
    return (
      <div className="App">
        <h1>Good to Go!</h1>
        <p>Your Truffle Box is installed and ready.</p>
        <h2>Smart Contract Example</h2>
        <p>
          This is a simple demo of casting NFT, if successfully executed,
          will print the <strong>from</strong> and <strong>to</strong> addresses,
          and the <strong>blocknumber</strong>
        </p>
        <p>
          Try changing the value stored on <strong>runExample()</strong> of App.js.
        </p>
        <div>The stored value is: {this.state.storageValue}</div>
      </div>
    );
  }
}

export default App;
Azure Pipelines
解决了dev阶段的部署问题之后,在dev_validation阶段,还要以来人工手动来验证。在pipelines中设置了等待时间,在超过等待时间后,会清除环境
- stage: dev_validation
  dependsOn: dev
  jobs:
    - job: wait_for_dev_validation
      displayName: "Wait for external validation"
      pool: server
      timeoutInMinutes: 1440 # job times out in 1 day
      steps:
        - task: ManualValidation@0
          timeoutInMinutes: 1440 # task times out in 1 day
          inputs:
            notifyUsers: $(Build.RequestedForEmail)
            instructions: Use the App URL on the Extensions tab and validate the recent changes to your dApp and click resume.
            onTimeout: reject
    - job: delete_dev
      dependsOn: wait_for_dev_validation
      steps:
        - task: AzureCLI@2
          displayName: "Delete Dev resource group"
          inputs:
            azureSubscription: "Web3DevOps"
            scriptType: "pscore"
            scriptLocation: "inlineScript"
            inlineScript: "az group delete --name $(resourceGroup)-dev --yes --no-wait"
QA和Prod的流程基本一致,只是合约部署的位置不同。修改 truffle-config.js 文件,添加 Dev、QA、Prod 环境的定义,部署时选择各自的环境。
networks: {
    // Useful for testing. The `development` name is special - truffle uses it by default
    // if it's defined here and no other network is specified at the command line.
    // You should run a client (like ganache, geth, or parity) in a separate terminal
    // tab if you use this network and you must also set the `host`, `port` and `network_id`
    // options below to some value.
    //

    dev_development: {
      provider: () => new HDWalletProvider(mnemonic, `https://chain.azure-api.net/testrpc`),
      network_id: "5",       // Any network (default: none)
    },

		qa_development: {
      provider: () => new HDWalletProvider(mnemonic, `https://goerli.infura.io/v3/******`),
      network_id: "1337",       // Any network (default: none)
    },


		pord_development: {
      provider: () => new HDWalletProvider(mnemonic, `https://goerli.infura.io/v3/******`),
      network_id: "1",       // Any network (default: none)
    },
  },
- 最后关于Quorum Dev Quickstart的部署,可以看看我之前写的部署方案。
 GitHub 登录
 Web3 钱包登录

我们是微软CSI(Micorosft China Strategic Incubator)团队,目前微软有孵化Startup项目的计划,如果大家有好的项目或者问题欢迎随时来跟我们聊一聊,我们很希望能和社区的开发者们一起探讨web3的新技术以及未来的发展方向,如果有机会合作并加入微软孵化计划还有免费的资源可以使用 联系邮箱:xiaopingfeng@microsoft.com