Hardhat 开发框架 - Solidity开发教程连载
Decert.me 连载教程 《Solidity开发教程》 -- 工具篇
Decert.me 要连载教程了, 《Solidity 开发教程》 力求系统、深入的介绍 Solidity 开发, 同时这是一套交互式教程,你可以实时的修改教程里的合约代码并运行。
本教程来自贡献者 @Tiny熊,让我们正式开始学习吧。
如果你已经熟练使用 Hardhat ,可以直接跳到文末,参与挑战领取技能认证 NFT。
Hardhat 提供了一个灵活且易于使用的环境,可以轻松地编写、测试和部署智能合约。类似的开发工具或框架还有: Remix IDE, Truffle , Foundry, 目前最受欢迎的是 Hardhat 与 Foundry。
Hardhat 使用 Node 进行包管理,如果你熟悉 Node 及 Javascript, Hardhat 将非常简单上手。
Hardhat还内置了Hardhat 网络(Hardhat Node),它是为开发而设计的本地以太坊网络。 用来部署合约,运行测试和调试代码。
在本文中,我们将介绍:
- 创建及配置Hardhat项目
- 编写智能合约
- Hardhat 编译合约
- 使用 Ethers.js 和为合约编写自动化测试
- 使用
console.log()调试 Solidity - 使用 Hardhat 部署合约
- 使用 Hardhat Etherscan 进行开源验证。
- Hardhat 插件的使用
本文对应的代码在:https://github.com/xilibi2003/training_camp_2/tree/main/w1_hardhat
创建及配置Hardhat项目
Hardhat 构建在Node.js之上, 使用 Hardhat 要求我们在电脑先安装好Node.js (>= 16.0), 环境准备可以参考这里。
先创建项目目录:
mkdir hardhat-tutorial
cd hardhat-tutorial
初始化 Node 项目:
npm init
安装 Hardhat :
npm install --save-dev hardhat
在安装Hardhat的目录下运行:
npx hardhat
使用键盘选择"创建一个新的hardhat.config.js(Create a JavaScript project)" ,然后回车。
$ npx hardhat
888 888 888 888 888
888 888 888 888 888
888 888 888 888 888
8888888888 8888b. 888d888 .d88888 88888b. 8888b. 888888
888 888 "88b 888P" d88" 888 888 "88b "88b 888
888 888 .d888888 888 888 888 888 888 .d888888 888
888 888 888 888 888 Y88b 888 888 888 888 888 Y88b.
888 888 "Y888888 888 "Y88888 888 888 "Y888888 "Y888
? Welcome to Hardhat v2.13.0 ?
? What do you want to do? …
❯ Create a JavaScript project
Create a TypeScript project
Create an empty hardhat.config.js
Quit
这个 JavaScript Hardhat 工程会默认下载 hardhat-toolbox 插件及一些常规设置:
创建好的Hardhat工程包含文件有:
contracts:智能合约目录scripts:部署脚本文件test:智能合约测试用例文件夹。hardhat.config.js:配置文件,配置hardhat连接的网络及编译选项。
编写合约
合约开发推荐使用 VSCode 编辑器 + solidity 插件,在contracts 下新建一个合约文件 Counter.sol (*.sol 是 Solidity 合约文件的后缀名), 复制如下代码:
//SPDX-License-Identifier: MIT
pragma solidity ^0.8.0;

contract Counter {
    uint counter;

    constructor() {
        counter = 0;
    }

    function count() public {
        counter = counter + 1;
    }

    function get() public view returns (uint) {
        return counter;
    }
}
接下来就可以编译这个合约了。
使用OpenZepplin 等第三方库
在编写合约时,尽量不要重复造轮子,基于优质开源的第三方库,不仅可以提交效率,还可以让我们的合约代码更安全,例如要开发一个 Token,可以用npm 安装OpenZepplin 库:
npm install @openzeppelin/contracts --save-dev
然后在合约中 import 相应库中的合约文件及可。
pragma solidity ^0.8.0;

import "@openzeppelin/contracts/token/ERC20/ERC20.sol";

contract Token is ERC20 {
  constructor(uint256 initialSupply) ERC20("Token Name", "Token Symbol") {
    _mint(msg.sender, initialSupply);
  }
}
编译合约
hardhat.config.js 有默认的Solidity 编译器配置:
require("@nomicfoundation/hardhat-toolbox");

/** @type import('hardhat/config').HardhatUserConfig */
module.exports = {
  solidity: "0.8.18",
};
因此我们直接编译合约即可,在终端中运行 npx hardhat compile 。 compile任务是内置任务之一。
$ npx hardhat compile
Compiling 1 file with 0.8.18
Compilation finished successfully
合约已成功编译了。
成功编译后,会在 artifacts/contracts/ 目录下生成Counter.json 和 build-info, Counter.json包含了智能合约的 ABI 、字节码(Bytecode)等。
:::tip
智能合约的 **ABI(Application Binary Interface)**信息,其中包括了合约的函数、事件等接口信息。这个文件通常会在与其他合约交互时使用,因为它可以被其他合约和 DApp 使用。
Bytecode 是部署合约所需的字节码(也称为创建时字节码),部署合约时,就是把该字节码作为交易的输入数据发送链上。:::
:::
编写测试用例
为智能合约编写自动化测试至关重要,因为事关用户资金。
在我们的测试中,使用 Harhdat 内置的网络,使用ethers.js与前面的合约进行交互,并使用 Mocha 作为测试运行器。
在项目 test下,并创建一个名为Counter.js的新文件:
const { ethers } = require("hardhat");
const { expect } = require("chai");

let counter;

describe("Counter", function () {
  async function init() {
    const [owner, otherAccount] = await ethers.getSigners();
    const Counter = await ethers.getContractFactory("Counter");
    counter = await Counter.deploy();
    await counter.deployed();
    console.log("counter:" + counter.address);
  }

  before(async function () {
    await init();
  });

  //
  it("init equal 0", async function () {
    expect(await counter.get()).to.equal(0);
  });

  it("add 1 equal 1", async function () {
    let tx = await counter.count();
    await tx.wait();
    expect(await counter.get()).to.equal(1);
  });

});
在终端上运行npx hardhat test。 你应该看到以下输出:
> npx hardhat test


  Counter
counter:0x5FbDB2315678afecb367f032d93F642f64180aa3
    ✔ init equal 0
    ✔ add 1 equal 1

  2 passing (1s)
这意味着测试通过了。 现在我们解释主要代码:
const Counter = await ethers.getContractFactory("Counter");
ethers.js中的ContractFactory是用于部署新智能合约的抽象,因此此处的Counter是用来实例合约的工厂。
counter = await Counter.deploy();
在ContractFactory上调用deploy()将启动部署,并返回解析为Contract的Promise。 该对象包含了智能合约所有函数的方法。
let tx = await counter.count();
await tx.wait();
在counter 上调用合约方法, 并等待交易执行完毕。
注意,默认情况下, ContractFactory和Contract实例连接到第一个签名者(Singer)。
若需要使用其他的签名这, 可以使用合约实例connect 到另一个签名者, 如 counter.connect(otherAccount)
expect(await counter.get()).to.equal(0);
判断相等,我们使用Chai,这是一个断言库。 这些断言函数称为“匹配器”,在此实际上使用的“匹配器”来自Hardhat Chai Matchers。
使用 Console.log 调试合约
在**Hardhat Node **节点上运行合约和测试时,你可以在Solidity代码中调用console.log()打印日志信息和合约变量,可以方便我们调试代码。
在合约代码中导入**Hardhat **的console.log就可以使用它。
pragma solidity ^0.8.0;

import "hardhat/console.sol";

contract Counter {
    uint public counter;

    constructor(uint x) {
        counter = x;
    }

    function count() public {
        counter = counter + 1;
        console.log("counter is %s ", counter);
    }

}
就像在JavaScript中使用一样, 将一些console.log添加函数中,运行测试时,将输出日志记录:
> npx hardhat test

  Counter
counter:0x5FbDB2315678afecb367f032d93F642f64180aa3
    ✔ init equal 0
counter is 1
    ✔ add 1 equal 1 (38ms)


  2 passing (1s)
可以在这里了解更多 console.log 。
部署合约
其实我们在测试时, 合约已经部署到了Hardhat 内置的网络上,部署合约我们需要编写一个部署脚本。
在scripts文件夹,新建一个deploy.js 用来写部署脚本,部署脚本其实和前面测试时 init 函数类似:
const { ethers } = require("hardhat");

async function main() {

   const Counter = await ethers.getContractFactory("Counter");
   const counter = await Counter.deploy();
   await counter.deployed();

  console.log("Counter address:", counter.address);
}

main();
运行 npx hardhat run scripts/deploy.js 时, 可以合约会部署到Hardhat 内置网络上。
> npx hardhat run scripts/deploy.js
Counter address: 0x5FbDB2315678afecb367f032d93F642f64180aa3
为了在运行任何任务时指示Hardhat连接到特定的EVM网络,可以使用--network参数。 像这样:
npx hardhat run scripts/deploy.js --network <network-name>
network-name 需要在 hardhat.config.js 文件中进行配置:
require("@nomicfoundation/hardhat-toolbox");

// 填入自己的私钥或助记词,
const PRIVATE_KEY1 = "0x.... YOUR PRIVATE KEY1";
const PRIVATE_KEY2 = "0x....  YOUR PRIVATE KEY1";
const Mnemonic = "YOUR Mnemonic";


module.exports = {
  solidity: "0.8.9", // solidity的编译版本
  networks: {
    goerli: {
      url: "https://eth-goerli.api.onfinality.io/public",
      accounts: [PRIVATE_KEY1,PRIVATE_KEY2],
      chainId: 5,
    },

     mumbai: {
      url: "https://endpoints.omniatech.io/v1/matic/mumbai/public",
      accounts: {
        mnemonic: Mnemonic,
      },
      chainId: 80001,
    },
  }
};
以上配置了两个网络,一个是以太坊测试网 goerli, 一个是 Polygon 测试网mumbai, 我们可以在 https://chainlist.org 找到每个网络的节点 URL 及 chainID。
在网络配置中,需要提供提交交易账号, 可以通过私钥或助记词 进行配置,这里配置的账号(需要提前充币进入到账号中),在hardhat 脚本中(测试及部署脚本)调用getSigners 即可获得:
const [owner, otherAccount] = await ethers.getSigners();
一个私钥对应一个Singer,助记词则对应无数个 Singer , 为每个项目生成一个独立的账号是比较推荐的做法,使用 ChainTool 开源工具 可以生成账号。
:::tip
助记词可以推导出无数了私钥,可参考:BIP39
:::
另外要注意, 在 Goerli 上进行部署,需要将Goerli-ETH发送到将要进行部署的地址中。 可以从水龙头免费或一些测试币,这是Goerli的一个水龙头:
最后运行:
npx hardhat run scripts/deploy.js --network goerli
如果一切顺利,你应该看到已部署的合约地址。
代码开源验证
智能代码开源会增加了合约的透明度和可靠性,是项目建立信任很重要的一个步骤。
在 hardhat-toolbox 工具箱里,包含了 hardhat-etherscan 插件用于验证已经部署到区块链网络上的智能合约代码与源代码是否匹配,在完成验证后在区块链浏览器中合约标签上会出现✅, 如图:
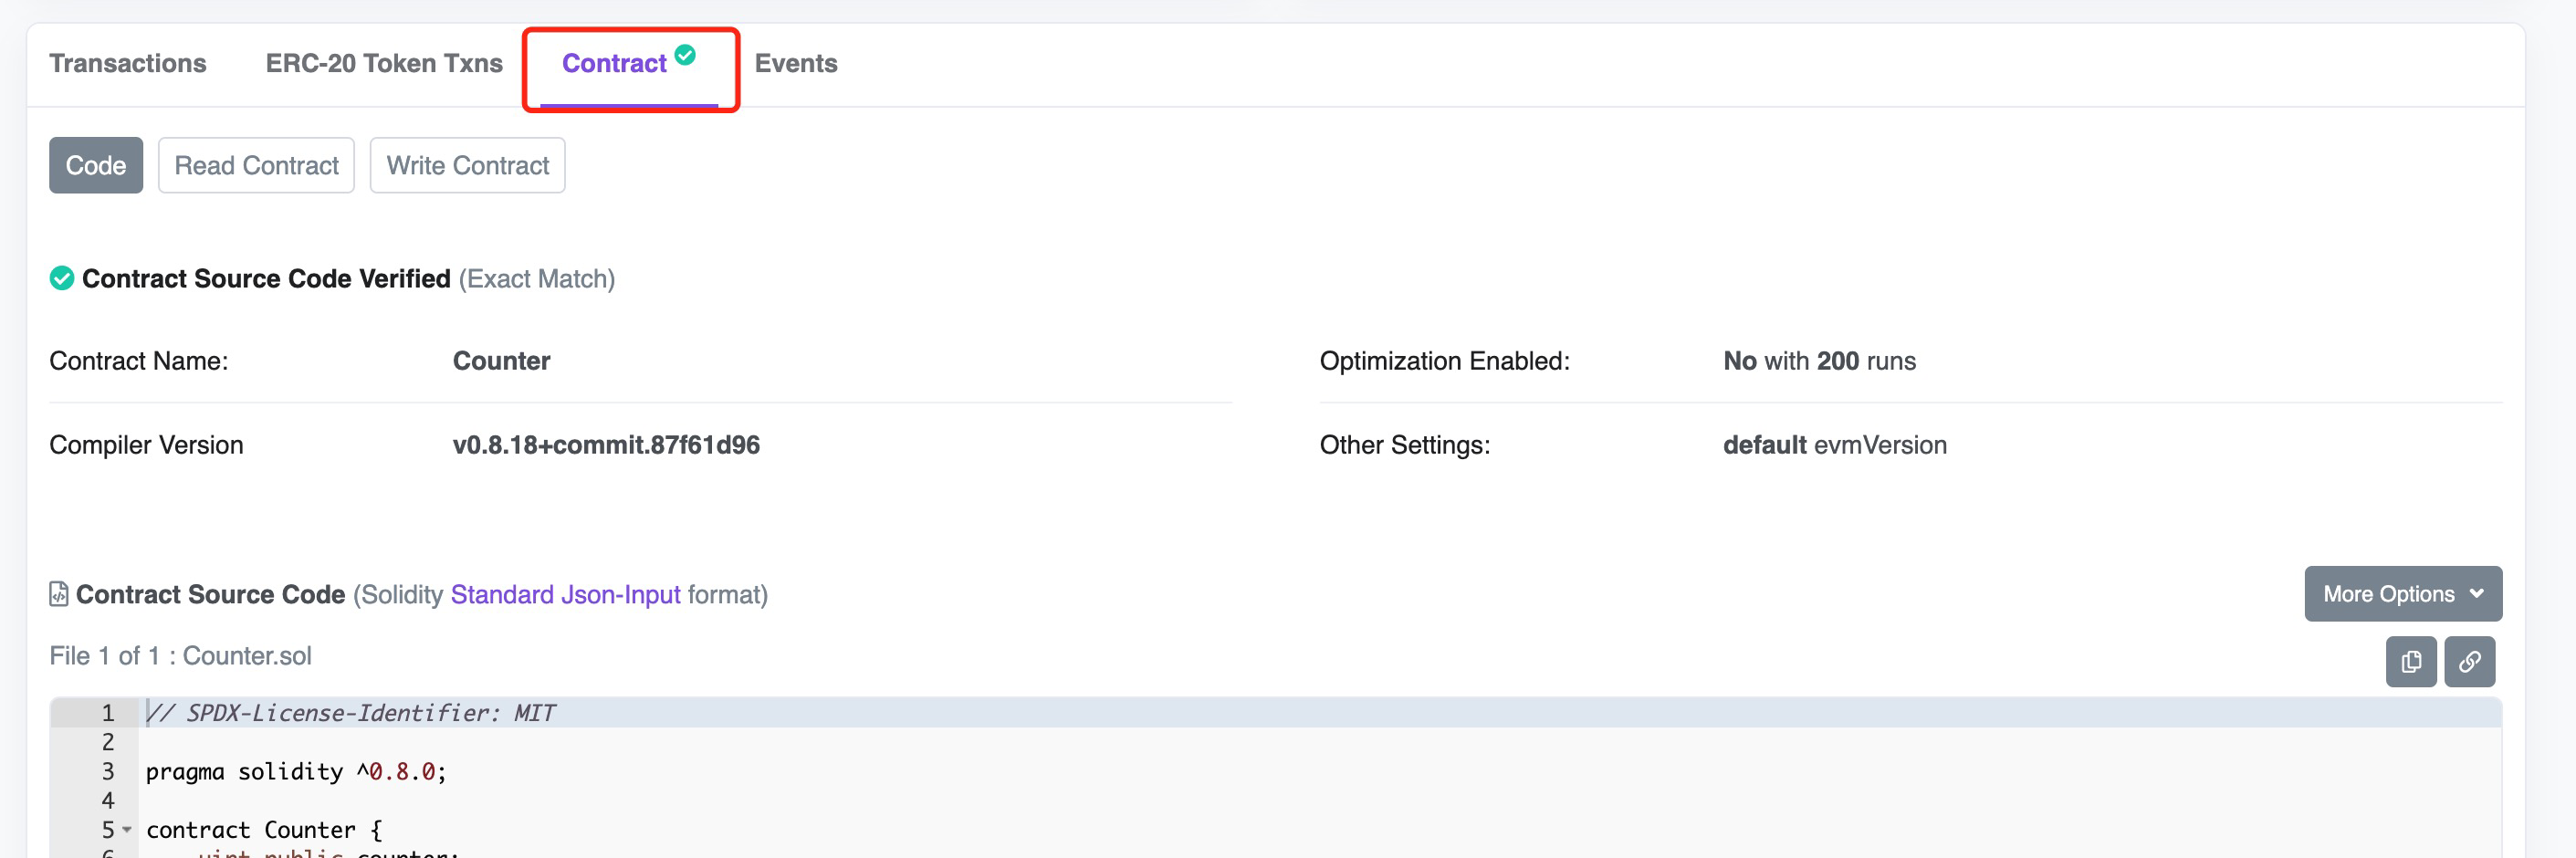
在部署智能合约时,合约字节码会被写入到区块链中,这意味着其他人无法检查合约的源代码。代码验证的过程是将已部署合约的字节码与原始Solidity代码再次编译后与部署的字节码进行比较,确保它们是一致的。
相比在区块链浏览器上上传代码验证, hardhat-etherscan 有很多优点,否则会自动使用 hardhat config 值设置的编译器选项,并且当代码中引用的第三方库或合约, hardhat-etherscan 能自动探测并处理。
开源验证的步骤是:
-
安装
hardhat-toolbox或hardhat-etherscan, 这一步我们这里已经完成,因为在初始化项目的时候安装了hardhat-toolbox, 如果没有安装,可以使用以下命令安装npm install --save-dev @nomiclabs/hardhat-etherscan -
在
hardhat.config.js中配置您的 Etherscan API 密钥和网络设置,例如:
  require("@nomicfoundation/hardhat-toolbox");
  或
  // require("@nomiclabs/hardhat-etherscan");

  etherscan: {
    apiKey: ""
  },
如何获取 Etherscan API 密钥?
- 访问部署网络<b>对应主网</b>的 Etherscan 网站,并注册一个账号(如果还没有账号的话)。
- 登录你的账号并进入 Etherscan 的「我的帐户」页面。
- 点击页面左侧的「API-KEYs」标签页。
- 在页面上方的「Create New API KEY」部分,输入 API 密钥的名称和描述,然后选择需要访问的 API 权限。
- 点击「Generate」按钮来生成 API 密钥。
-
执行验证命令:
npx hardhat verify <deployed-contract-address> "参数(若有)" --network <network-name>例如,要在 goerli 网络上验证合约,可以运行以下命令:
npx hardhat verify 0x..... --network goerli
该命令会为我们上传合约代码并验证其源代码。如果一切顺利(网络顺畅的话),在 Etherscan 上看到的合约被成功验证。
Hardhat 插件(Plugin)的使用
上面代码开源验证时,使用了hardhat-etherscan插件,其实也可以使用 hardhat-verify 插件。
在 https://hardhat.org/hardhat-runner/plugins 链接可以找到当前使用较多的插件,例如:hardhat-gas-reporter 可以对部署合约及函数执行的Gas消耗给出报告;solidity-coverage 可以对测试覆盖率给出报告。
要使用一个插件通常要:
-
用 Node.js 包管理先安装相应的插件
-
在 hardhat.config.js 文件中引入插件,以便Hardhat 能加载上对应的插件。
参考文档
示例非常简单, 更多使用方法,可参考文档:
-
Hardhat 官方文档:https://hardhat.org/getting-started/
-
Hardhat 中文文档:https://learnblockchain.cn/docs/hardhat/getting-started/
-
Harhdat 入门教程:https://learnblockchain.cn/docs/hardhat/tutorial/
-
Ethers.js 文档:https://learnblockchain.cn/ethers_v5/
小结
本文介绍了 Hardhat 开发框架的一些基本概念和使用方法,了解了如何使用 Hardhat 进行合约编译、部署、调试及测试,在开发中要经常查看文档,了解更多Hardhat 用法。
Hardhat 的使用你掌握了吗?来这里挑战一下看看,挑战完成你就可以领取到一枚技能认证 NFT。

原教程链接:https://decert.me/tutorial/solidity/tools/hardhat Decert.me -- 码一个未来
 GitHub 登录
 Web3 钱包登录

您好,我在执行npx hardhat test 的时候报错 TypeError: counter.deploy is not a function 是什么原因?感谢您的解答
describe("Counter", function () { async function init() { const [owner, otherAccount] = await ethers.getSigners(); const Counter = await ethers.getContractFactory("Counter"); counter = await Counter.deploy(); // 这里直接返回部署后的实例 console.log("counter:" + counter.address); }
before(async function () { await init(); });
// it("init equal 0", async function () { expect(await counter.get()).to.equal(0); });
it("add 1 equal 1", async function () { let tx = await counter.count(); await tx.wait(); expect(await counter.get()).to.equal(1); });
});
你可以改成这段试试
感谢感谢 可以了!