基于 ZK 的资产证明
如果每个用户都可以验证自己部分的资产是否有财务作假行为,那么只要验证的用户足够多,那么一个组织想要去做财务欺诈难度就会非常高。
Summa
我们一般持有加密货币常常会在中心化交易所进行货币的买卖兑换等操作。在中心化交易所进行交易非常便捷迅速,自比特币发行以来十多年的时间,市场上涌现过许许多多的中心化交易所,极大的方便了用户进行加密货币买卖操作。但是伴随着中心化交易所的繁荣,欺诈和恶意卷款跑路等行为屡见不鲜。奈飞曾为此专门拍摄过一部关于交易所突然倒闭,创始人神秘死亡的宣传片:别信任任何人,虚拟货币悬案[^1]。特别的,2022 年 FTX 因为资不抵债而宣布破产更是震惊了世界,诸多用户和基金公司为此蒙受巨大损失。
事实上,不止在加密货币领域,其他传统领域通过会计做假账的方式欺瞒投资者的行为也是难以计数。如 21 世纪初轰动世界的安然事件。安然是一家连续六年被《财富》杂志评选为「美国最具创新精神公司」,然而就是这样拥有上千亿资产的公司,在 2002 年在几周内迅速破产。又比如恒大公司,将本来用于盖楼的专款资金挪去他用,最终导致无数业主背上 30 年房贷苦等来的却是烂尾房屋。
多个不同领域层出不穷的欺诈行为背后的一个重要原因就是审计和会计工作本身并不完全公开透明,于是产生巨大的腐败和作弊空间。但是为了保护公司利益和投资者隐私,关键财务数据又不可能做到完全公开透明,因此应对财务造假除了加强监管一直没有很好的解决办法,但是随着零知识证明技术逐渐成熟,我们可以看到一种新的解决思路。
如果每个用户都可以验证自己部分的资产是否有财务作假行为,那么只要验证的用户足够多,那么一个组织想要去做财务欺诈难度就会非常高。而又因为验证的过程是零知识的,那么验证数据在网络传输过程中,第三者即使截获了数据,他也不知道用户的真实资产到底是多少,这样一来,验证过程就完全可以在网络上公开展示出来。在零知识证明技术的帮助下,相当多的审计工作不再是像四大会计事务所一样是某些组织的专利,关起门来秘密进行。而是任何利益相关方都可以参与的公开过程。
Summa[^2]是一个 PSE 研究项目,旨在用 zk 的办法来去做用户资产验证。本文接下来的内容就概要的介绍一下该项目,以及技术实现原理。
合约
Summa 的整体数据流如图所示。智能合约在这里主要用于对一些公共数据存储和验证。并不一定和以太坊强绑定,即使将来部署在像 Solana 等其他区块链也是可以的(只要 Halo2 有对应区块链支持,本项目中一些合约是由Halo2 证明生成的[^3])。
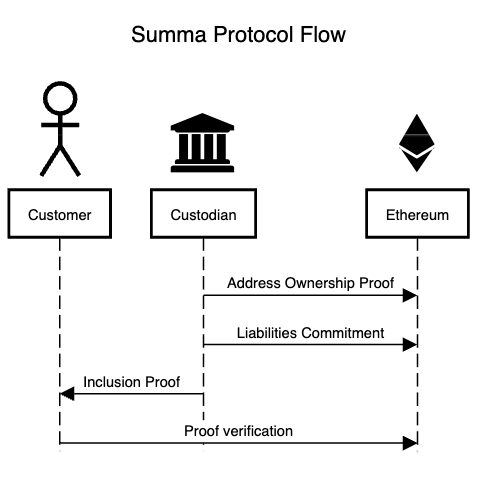
图中 Custodian 表示中心化交易所。合约由交易所部署上链,合约所有权归交易所所有,公共数据只能由交易所提交。公共数据包含两部分,一部分是交易所掌控的链基本信息以及数字签名等。
/** * @dev Struct representing an address ownership proof submitted by the CEX * @param cexAddress The address owned by the CEX (submitted as a string, as it can be a non-EVM address) * @param chain The name of the chain name where the address belongs (e.g., ETH, BTC) * @param signature The signature of the message signed by the address public key * @param message The message signed by the address public key */
struct AddressOwnershipProof {
 string cexAddress;
 string chain;
 bytes signature;
 bytes message;
}
第二部分是链上资产的信息,包括 Merkle sum tree 的 root hash,以及 root balance(链上资产的具体数量,比如多少个 BTC ),该部分数据将用于 zk 证明的 instance 输入。
/** * @dev Submit commitment for a CEX * @param mstRoot Merkle sum tree root of the CEX's liabilities * @param rootBalances The total sums of the liabilities included into the Merkle sum tree * @param cryptocurrencies The cryptocurrencies included into the Merkle sum tree * @param timestamp The timestamp at which the CEX took the snapshot of its assets and liabilities */
function submitCommitment( uint256 mstRoot, uint256[] memory rootBalances, Cryptocurrency[] memory cryptocurrencies, uint256 timestamp) public onlyOwner {

/** * @dev Struct identifying a cryptocurrency traded on the CEX * @param name The name of the cryptocurrency * @param chain The name of the chain name where the cryptocurrency lives (e.g., ETH, BTC) */
struct Cryptocurrency {
 string name;
 string chain;
}

// example
cryptocurrencies = [
  {
 chain: "ETH",
 name: "ETH",
  },
  {
 chain: "BTC",
 name: "BTC",
  },
]
这两部分数据都是很容易在链上公开可以查询到的(除了 root hash )。交易所很难对这些数据作弊。任何人都可以对比合约中存储的数据和区块链地址上实际数据结果。

proof 生成目前是由交易所生成,由用户向交易所提交需要验证的关键信息,然后由交易所生成 proof 返回给用户。用户可以拿着这个 proof 向智能合约请求,由合约来验证 proof。
最后 Proof Verify 是用户同合约直接交互的。该部分合约是由 Halo2 电路翻译成 Solidity 代码然后作为一个单独的验证合约部署上链。
fn main() {
// Assert that there is no risk of overflow in the Merkle Root given the combination of `N_BYTES` and `LEVELS`
assert!(!is_there_risk_of_overflow(N_BYTES, LEVELS), "There is a risk of balance overflow in the Merkle Root, given the combination of `N_BYTES` and `LEVELS`");
// In order to generate the verifier we create the circuit using the init_empty() method, which means that the circuit is not initialized with any data.
let circuit = MstInclusionCircuit::<LEVELS, N_CURRENCIES, N_BYTES>::init_empty();
// generate a universal trusted setup for testing, along with the verification key (vk) and the proving key (pk).
let (params, pk, _) =
generate_setup_artifacts(11, Some("../backend/ptau/hermez-raw-11"), circuit.clone())
.unwrap();
let num_instances = circuit.num_instances();
let generator: SolidityGenerator<'_> =
SolidityGenerator::new(¶ms, pk.get_vk(), Bdfg21, num_instances);
let verifier_solidity = generator
.render()
.unwrap()
.replace("Halo2Verifier", "Verifier")
.replace(") public returns (bool)", ") public view returns (bool)");
save_solidity("InclusionVerifier.sol", &verifier_solidity);
let deployment_code = compile_solidity(&verifier_solidity);
let verifier_creation_code_size = deployment_code.len();
println!("Verifier creation code size: {verifier_creation_code_size}");
}
在实际使用时可以通过传入 proof 来在链上计算和验证。
try inclusionVerifier.verifyProof(proof, publicInputs) returns (
  bool result
 ) {
  return result;
 } catch (bytes memory /*lowLevelData*/) {
  // force revert to return the error message
  require(false, "Invalid inclusion proof");
  return false;
 }
Merkle Sum Tree
Summa 的核心是一个由用户各个资产所组成的 Merkle Sum Tree。该树的根节点会作为公共输入存储在合约中(将来 Verify 时使用)。
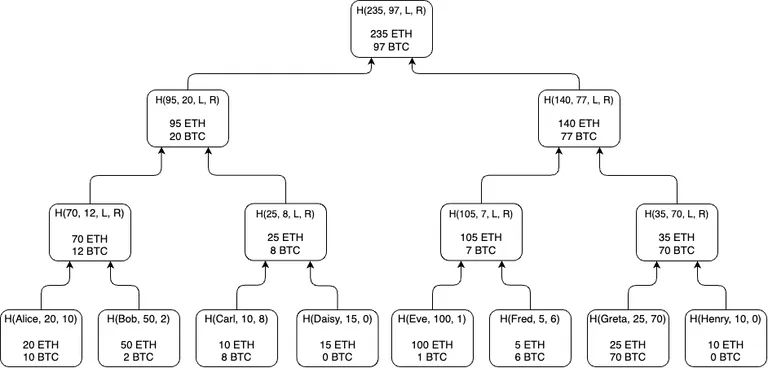
每一个叶子结点都是都是在某一个时间戳下用户的实际资产情况(以及用户名或者用户在交易所的 address)。叶子结点的数据既存储在交易所中也可以由用户有意存储(记在脑子里,或者手机登陆交易所时做截图或者其他方式),一般难以作假。
这些叶子结点按照 Merkle Tree 的计算方式共同构成一个 Merkle Sum Tree。
构建 Merkle Tree 需要用到 Hash 运算,传统的 Hash 运算需要频繁用到位运算。Halo2 是基于 Plonk 算法构建的 zk 证明系统,Plonk 算法对加法和乘法约束支持良好,但是对于位运算约束证明支持的就不是很好了。Poseidon Hash[^4]是一个对 zk 支持比较良好的 Hash 计算,因此在构建 Merkle Tree 时使用 Poseidon Hash 来代替传统的 Hash 运算。
Poseidon Hash 计算大致可以分成参数准备阶段和 Hash 运算阶段[^5]。输入数据在实际 hash 运算之前会先经过参数准备,参数准备过程虽然会用到 LFSR(Linear-feedback shift register[^6])如代码示例所示,确实会涉及位运算,但是参数准备是一次性的,对于 Hash 过程计算而言,可以将位运算的计算过程看作是一个常数。
def calc_next_bits(state, prime_bit_len):
    """    Function generate new LFSR state after shifts new field_size number generated    - Update the bits using bi+80 = bi+62 ⊕ bi+51 ⊕ bi+38 ⊕ bi+23 ⊕ bi+13 ⊕ bi.    - Evaluate bits in pairs: If the first bit is a 1, output the second bit. If it is a 0, discard the second bit.    :param list state: Current LFSR state    :param int prime_bit_len: The number of bits of the Poseidon prime field modulus.    :return: New LFSR state after shifts and new field_size number generated.    :rtype list, list:    """
    bits = []
    while len(bits) < prime_bit_len:
        # XOR is linear operation
        new_bit_1 = state[62] ^ state[51] ^ state[38] ^ state[23] ^ state[13] ^ state[0]
        state.pop(0)
        state.append(new_bit_1)

        new_bit_2 = state[62] ^ state[51] ^ state[38] ^ state[23] ^ state[13] ^ state[0]
        state.pop(0)
        state.append(new_bit_2)

        # LFSR self-shrinking mode provide nonlinearity
        if new_bit_1 == 1:
            bits.append(new_bit_2)

    return state, bits
下面的代码示例是实际的 Hash 运算所用到的函数,可以看到整个 hash 计算本身并没有用到位运算,只有加法和乘法计算,是 zk 友好的。
def s_box(self, element):
 return element ** self.alpha

def full_rounds(self):
 ''' In these rounds, all elements of the internal state are subjected to the full set of operations, including the non-linear S-box transformation, which is a critical component for the security of Poseidon.  '''
 for r in range(0, self.half_full_round):
  # add round constants, apply s-box
  for i in range(0, self.t):
   self.state[i] = self.state[i] + self.rc_field[self.rc_counter]
   self.rc_counter += 1

   self.state[i] = self.s_box(self.state[i])

  # apply MDS matrix
  # This step is linear transformation that ensure high diffusion across the internal state,
  # meaning the output bits are heavily mixed , contributing to the avalanche effect.
  self.state = np.matmul(self.mds_matrix, self.state)

def partial_rounds(self):
 ''' only a subset of the internal state elements will undergo the S-box tranformation, while the rest will go through a linear transformation. This helps to reduce the computational complexity without significantly compromising the security '''
 for r in range(0, self.partial_round):
  # add round constants, apply s-box
  for i in range(0, self.t):
   self.state[i] = self.state[i] + self.rc_field[self.rc_counter]
   self.rc_counter += 1

  self.state[0] = self.s_box(self.state[0])

  # apply MDS matrix
  self.state = np.matmul(self.mds_matrix, self.state)
zk 数据计算和传统的程序计算不同的是 zk 数据要在有限域中计算,Merkle Tree 构建时确保每一个结点数据不能超过有限域就十分必要了,为此在计算前先要对数据做 range check 以后数据 overflow。
range check 的大致原理类似下面示例所示。首先对于输入的数据,以 8 位为长度单位,截出多份,方便将来做减法运算。然后每次进行 next数值计算的时候都按照下面示例的计算步骤去做计算。range check 电路做约束的时候实际上是根据中间结果diff = z_cur - z_next * Expression::Constant(Fp::from(1 << 8))去做约束,要求 diff 只要在 8 位数值之内即可。这样对于一个 32 位数据的约束,只需要占用 4 个计算 cell,还有 256 个 lookup table,以后最高位为 0 的 instance 约束即可。如果不是这样设计,单纯去做 32 位数值的 range check,需要 $2^{32}$ 大小的 lookup table,显然这样的电路就太大了,无法实际应用。
's say we want to constraint 0x1f2f3f4f to be within the range N_BYTES=4(4 bytes).////// * `z(0) = 0x1f2f3f4f`/// * `z(1) = (0x1f2f3f4f - 0x4f) / 2^8 = 0x1f2f3f`/// * `z(2) = (0x1f2f3f - 0x3f) / 2^8 = 0x1f2f`/// * `z(3) = (0x1f2f - 0x2f) / 2^8 = 0x1f`/// * `z(4) = (0x1f - 0x1f) / 2^8 = 0x00`////// | | `z` |/// | ------------ | -------------|/// | 0 | `0x1f2f3f4f` |/// | 1 | `0x1f2f3f` |/// | 2 | `0x1f2f` |/// | 3 | `0x1f` |/// | 4 | `0x00` |////// The column z contains the witnessed value to be checked at offset 0/// At offset i, the column z contains the value `z(i+1) = (z(i) - k(i)) / 2^8` (shift right by 8 bits) where k(i) is the i-th decomposition big-endian of `value`/// The constraints that are enforced are:/// * `z(i) - 2^8⋅z(i+1) ∈ lookup_u8_table` (enabled by lookup_enable_selector at offset [0, N_BYTES - 1])/// * `z(N_BYTES) == 0
有了这些辅助结构就可以正式构建 Merkle Sum Tree。每一个用户输入数据都称之为 Entry,其结构为:
pub struct Entry<const N_CURRENCIES: usize> {
    username_as_big_uint: BigUint,
    balances: [BigUint; N_CURRENCIES],
    username: String,
}
不过 Merkle Tree 不会使用 Entry 直接构建树,而是将其转换为 Node。其中 hash 运算是对包含 uint 转换后的 username,以及所有 balance 的 hash 计算,也就是H(username, balance[0], balance[1], ... balance[N_CURRENCIES - 1]):
pub struct Node<const N_CURRENCIES: usize> {
    pub hash: Fp,
    pub balances: [Fp; N_CURRENCIES],
}

pub fn leaf_node_from_preimage(preimage: &[Fp; N_CURRENCIES + 1]) -> Node<N_CURRENCIES>
where
 [usize; N_CURRENCIES + 1]: Sized,
{
 Node {
  hash: Self::poseidon_hash_leaf(preimage[0], preimage[1..].try_into().unwrap()),
  balances: preimage[1..].try_into().unwrap(),
 }
}
Merkle Tree 中间结点的 hash 计算方式是H(LeftChild.balance[0] + RightChild.balance[0], LeftChild.balance[1] + RightChild.balance[1], ..., LeftChild.balance[N_CURRENCIES - 1] + RightChild.balance[N_CURRENCIES - 1], LeftChild.hash, RightChild.hash),因此实际要计算的 vec 数组长度是N_CURRENCIES + 2。
下面我们完整构建一下整个 Merkle Tree。叶子结点部分比较简单,只需要将 Entry 转换为 Node 即可。中间结点需要逐层构建,每一个中间结点的值都和下一层的左子树和右子树的值有关。最后将计算的中间结点结果放到 tree 数组里:
fn build_middle_level<const N_CURRENCIES: usize>(level: usize, tree: &mut [Vec<Node<N_CURRENCIES>>])
where
    [usize; N_CURRENCIES + 2]: Sized,
{
    let results: Vec<Node<N_CURRENCIES>> = (0..tree[level - 1].len())
        .into_par_iter()
        .step_by(2)
        .map(|index| {
            let mut hash_preimage = [Fp::zero(); N_CURRENCIES + 2];

            for (i, balance) in hash_preimage.iter_mut().enumerate().take(N_CURRENCIES) {
                *balance =
                    tree[level - 1][index].balances[i] + tree[level - 1][index + 1].balances[i];
            }

            hash_preimage[N_CURRENCIES] = tree[level - 1][index].hash;
            hash_preimage[N_CURRENCIES + 1] = tree[level - 1][index + 1].hash;
            Node::middle_node_from_preimage(&hash_preimage)
        })
        .collect();

    for (index, new_node) in results.into_iter().enumerate() {
        tree[level][index] = new_node;
    }
}
逐层构建到最上层,可以得到 root 结果和整个树。
现在整个 Merkle Tree 构建完成,其结构是这样的,其中 cryptocurrencies 和合约中的对应结构是一样的:
pub struct MerkleSumTree<const N_CURRENCIES: usize, const N_BYTES: usize> {
    root: Node<N_CURRENCIES>,
    nodes: Vec<Vec<Node<N_CURRENCIES>>>,
    depth: usize,
    entries: Vec<Entry<N_CURRENCIES>>,
    cryptocurrencies: Vec<Cryptocurrency>,
    is_sorted: bool,
}
接下来我们使用 Merkle Tree 构建 zk proof。zk 要证明的是某个用户的 entry 确实在该 Merkle Tree 上。所以首先需要对制定具体的 entry 索引,根据 Merkle Tree 生成 zk proof 需要的数据结构。
fn generate_proof(
 &self,
 index: usize,
) -> Result<MerkleProof<N_CURRENCIES, N_BYTES>, Box<dyn std::error::Error>>
where
 [usize; N_CURRENCIES + 1]: Sized,
 [usize; N_CURRENCIES + 2]: Sized,
{
 let nodes = self.nodes();
 let depth = *self.depth();
 let root = self.root();

 if index >= nodes[0].len() {
  return Err(Box::from("Index out of bounds"));
 }

 let mut sibling_middle_node_hash_preimages = Vec::with_capacity(depth - 1);

 let sibling_leaf_index = if index % 2 == 0 { index + 1 } else { index - 1 };

 let sibling_leaf_node_hash_preimage: [Fp; N_CURRENCIES + 1] =
  self.get_leaf_node_hash_preimage(sibling_leaf_index)?;
 let mut path_indices = vec![Fp::zero(); depth];
 let mut current_index = index;

 for level in 0..depth {
  let position = current_index % 2;
  let sibling_index = current_index - position + (1 - position);

  if sibling_index < nodes[level].len() && level != 0 {
   // Fetch hash preimage for sibling middle nodes
   let sibling_node_preimage =
    self.get_middle_node_hash_preimage(level, sibling_index)?;
   sibling_middle_node_hash_preimages.push(sibling_node_preimage);
  }

  path_indices[level] = Fp::from(position as u64);
  current_index /= 2;
 }

 let entry = self.get_entry(index).clone();

 Ok(MerkleProof {
  entry,
  root: root.clone(),
  sibling_leaf_node_hash_preimage,
  sibling_middle_node_hash_preimages,
  path_indices,
 })
}
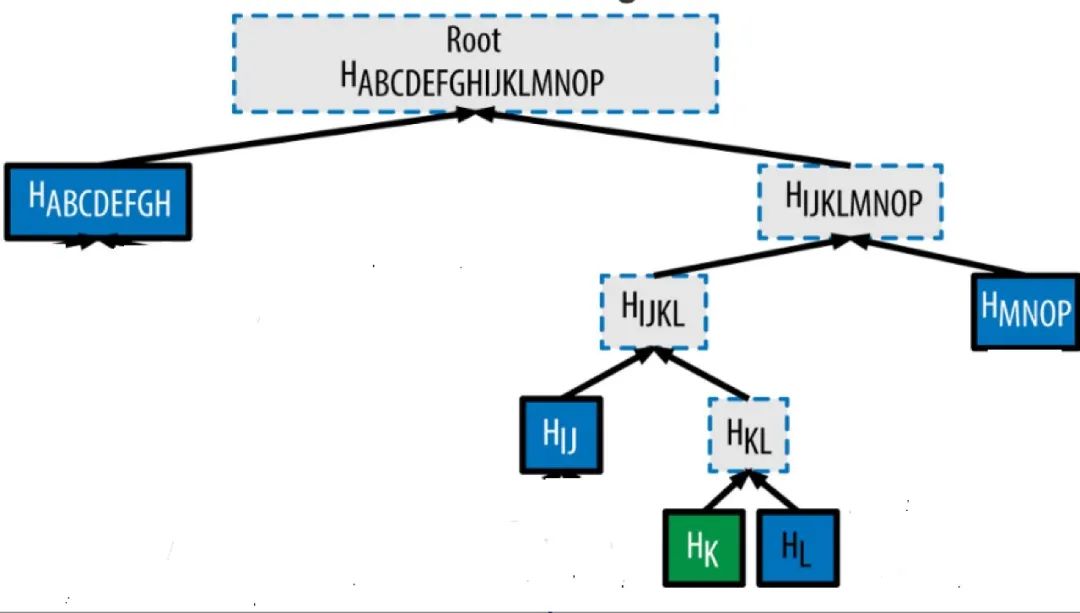
上述代码构建新的数据结构实际用于在 zk 证明过程中重建 Merkle Tree 根节点。entry 就是用户的具体 entry。sibling_leaf_node 是与 entry 对应的 Leaf node 结点。sibling_middle_node 是重新 Merkle Tree 所需的中间结点,是一个结点数组。path_indices 表示从最底层的 leaf node 开始,每一层 entry 数组所对应的位置。也就是下图中最底层绿色方框以及上层的每一层虚线方框所标识的位置(0 表示该结点是二叉树的左侧,1 表示该结点是二叉树的右侧)。
我们可以从该定义中进一步理解上述文字表示所对应数据结构是什么样子。
pub struct MstInclusionCircuit<const LEVELS: usize, const N_CURRENCIES: usize, const N_BYTES: usize>
where
    [usize; N_CURRENCIES + 1]: Sized,
    [usize; N_CURRENCIES + 2]: Sized,
{
    pub entry: Entry<N_CURRENCIES>,
    pub path_indices: Vec<Fp>,
    pub sibling_leaf_node_hash_preimage: [Fp; N_CURRENCIES + 1],
    pub sibling_middle_node_hash_preimages: Vec<[Fp; N_CURRENCIES + 2]>,
    pub root: Node<N_CURRENCIES>,
}
Merkle Tree zk 约束主要有两部分,一部分是 swap 约束,以确保交易所在生成证明的时候确实是按照上图的真实顺序生成的。另一部分是 balance 约束,即父结点的 balance 确实来自左子结点和右子结点的和。关于 balance 的 sum 约束比较简单,这里着重看一下 swap 约束。
我们之前介绍的 Merkle zk tree 数据结构sibling_middle_node_hash_preimages是一个数组,并没有包含位置信息。图中虚线方框的位置到底是在应该在树的左侧还是右侧,要有path_indices的 0 和 1 来判断。因此我们一定要确保当数值为 0 的时候,该生成父结点位于左侧,他对应的同 level 的兄弟结点位于右侧,1 的时候相反。在数据导入 zk 电路时该逻辑可以比较轻松的用代码实现:
// perform the swap according to the swap bit
// if swap_bit is 0 return (l1, r1) else return (r1, l1)
swap_bit.value().copied().map(|x| {
 (l1_val, r1_val) = if x == Fp::zero() {
  (l1_val, r1_val)
 } else {
  (r1_val, l1_val)
 };
});
对于约束电路,可以设置两层,竖着对每一个 cell 做约束。如果不交换位置,那么 next left cell 就应该和 current left cell 相同。如果交换位置,那么 next left cell 应该和 current right cell 相同。
/// Swap the values of two cells in a region following this layout on 3 advice columns:

///

/// | a | b | c |

/// | ------------ | ------------- | ---------- |

/// | `current_hash` | `sibling_hash` | `1` |

/// | `sibling_hash` | `current_hash` | - |

///

/// At row 0 bool_and_swap_selector is enabled

/// If swap_bit is 0, the values will remain the same on the next row

/// If swap_bit is 1, the values will be swapped on the next row
我们可以通过设置 0 和 1 来巧妙的达到让整个等式为 0 的约束效果。
meta.create_gate("swap constraint", |meta| {
 let s = meta.query_selector(bool_and_swap_selector);
 let swap_bit = meta.query_advice(col_c, Rotation::cur());
 let element_l_cur = meta.query_advice(col_a, Rotation::cur());
 let element_r_cur = meta.query_advice(col_b, Rotation::cur());
 let element_l_next = meta.query_advice(col_a, Rotation::next());
 let element_r_next = meta.query_advice(col_b, Rotation::next());

 // element_l_next = (element_r_cur - element_l_cur)*s + element_l_cur
 let swap_constraint_1 = s.clone()
  * ((element_r_cur.clone() - element_l_cur.clone()) * swap_bit.clone()
   + element_l_cur.clone()
   - element_l_next);

 // element_r_next = (element_l_cur - element_r_cur)*s + element_r_cur
 let swap_constraint_2 = s
  * ((element_l_cur - element_r_cur.clone()) * swap_bit + element_r_cur
   - element_r_next);

 vec![swap_constraint_1, swap_constraint_2]
});
整体的 Merkle Sum Tree zk proof 的过程就是逐层的处理数据,然后将对应位置数据输入 zk 约束电路检查。构建起整个 Merkle Tree。最后输出的是根节点 hash 和总的 balance,它应该和合约中的对应数据保持一致,使用 instance 来验证一致性。如果所有验证都没有问题,至此整个 Merkle Tree 的证明工作算是结束。
Solvency Verify
生成 proof 的过程是由用户向交易所请求,然后交易所返回 proof 数据,随后用户再向智能合约去做验证。目前该项目暂时不支持用户绕过交易所自行生成 proof,但是觉得未来或许可能是一个可以探索的方向。由用户直接生成 proof,而不是由交易所返回。整个 halo2 证明电路可以用 rust 打包成 web assembly,然后使用 ethers rs[^7] 作出对应的交互 api。Merkle Tree root 验证时间复杂度是 log(n),或许用户的设备做验证并不需要太多的时间,这样进一步增强了去中心化的安全性。
参考
[^1]: 别信任任何人,虚拟货币悬案: https://www.netflix.com/hk/title/81349029
[^2]: Summa: https://github.com/summa-dev
[^3]: Halo2证明生成的: https://github.com/privacy-scaling-explorations/halo2-solidity-verifier
[^4]: Poseidon Hash: https://github.com/ingonyama-zk/poseidon-hash
[^5]: 参数准备阶段和Hash运算阶段: https://autoparallel.github.io/overview/index.html
[^6]: Linear-feedback shift register: https://en.wikipedia.org/wiki/Linear-feedback_shift_register
[^7]: ethers rs: https://github.com/gakonst/ethers-rs
 GitHub 登录
 Web3 钱包登录
