Creating Your Private Network
With your custom chain spec created and distributed to all participants, you're ready to launch your own custom chain. In this section it is no longer required to use a single physical machine or a single binary.
First Participant Starts a Bootnode
You've completed all the necessary prep work and you're now ready to launch your chain. This process is very similar to when you launched a chain earlier, as Alice and Bob. It's important to start with a clean base path, so if you plan to use the same path that you've used previously, please delete all contents from that directory.
The first participant can launch her node with:
./target/release/node-template \
  --base-path /tmp/node01 \
  --chain ./customSpecRaw.json \
  --port 30333 \
  --ws-port 9944 \
  --rpc-port 9933 \
  --telemetry-url 'wss://telemetry.polkadot.io/submit/ 0' \
  --validator \
  --rpc-methods=Unsafe \
  --name MyNode01
Here are some differences from when we launched as Alice.
- I've omitted the
--aliceflag. Instead we will insert our own custom keys into the keystore through the RPC shortly. - The
--chainflag has changed to use our custom chain spec. - I've added the optional
--nameflag. You may use it to give your node a human-readable name in the telemetry UI. - The optional
--rpc-methods=Unsafeflag has been added. As the name indicates, this flag is not safe to use in a production setting, but it allows this tutorial to stay focused on the topic at hand.
You should see the console outputs something as follows:
Sep 24 13:28:56.804  INFO Substrate Node
Sep 24 13:28:56.804  INFO ✌️  version 2.0.0-24da767-x86_64-linux-gnu
Sep 24 13:28:56.804  INFO ❤️  by Substrate DevHub <https://github.com/substrate-developer-hub>, 2017-2020
Sep 24 13:28:56.804  INFO 📋 Chain specification: Local Testnet
Sep 24 13:28:56.804  INFO 🏷  Node name: MyNode01
Sep 24 13:28:56.804  INFO 👤 Role: AUTHORITY
Sep 24 13:28:56.804  INFO 💾 Database: RocksDb at /tmp/node01/chains/local_testnet/db
Sep 24 13:28:56.804  INFO ⛓  Native runtime: node-template-1 (node-template-1.tx1.au1)
Sep 24 13:28:57.188  INFO 🔨 Initializing Genesis block/state (state: 0xe3cb…c5ca, header-hash: 0x0ded…9b9d)
Sep 24 13:28:57.191  INFO 👴 Loading GRANDPA authority set from genesis on what appears to be first startup.
Sep 24 13:28:57.380  INFO ⏱  Loaded block-time = 6000 milliseconds from genesis on first-launch
Sep 24 13:28:57.381  WARN Using default protocol ID "sup" because none is configured in the chain specs
Sep 24 13:28:57.382  INFO 🏷  Local node identity is: 12D3KooWQa2M77x2hFviVAFLHt9pMUYQVC93fdiVMKDbL3XvYSzj (legacy representation: 12D3KooWQa2M77x2hFviVAFLHt9pMUYQVC93fdiVMKDbL3XvYSzj)
Sep 24 13:28:57.402  INFO 📦 Highest known block at #0
Sep 24 13:28:57.403  INFO 〽️ Prometheus server started at 127.0.0.1:9615
Sep 24 13:28:57.434  INFO Listening for new connections on 127.0.0.1:9944.
Sep 24 13:29:02.436  INFO 💤 Idle (0 peers), best: #0 (0x0ded…9b9d), finalized #0 (0x0ded…9b9d), ⬇ 0 ⬆ 0
Sep 24 13:29:07.437  INFO 💤 Idle (0 peers), best: #0 (0x0ded…9b9d), finalized #0 (0x0ded…9b9d), ⬇ 0 ⬆ 0
Add Keys to Keystore
Once your node is running, you will again notice that no blocks are being produced. At this point, you need to add your keys into the keystore. Remember you will need to complete these steps for each node in your network. You will add two types of keys for each node: Aura and GRANDPA keys. Aura keys are necessary for block production; GRANDPA keys are necessary for block finalization.
Option 1: Use the Polkadot-JS Apps UI
You can use the Apps UI to insert your keys into the keystore. Navigate to the "Toolbox" tab and the "RPC Call" sub-tab. Choose "author" and "insertKey". The fields can be filled like this:
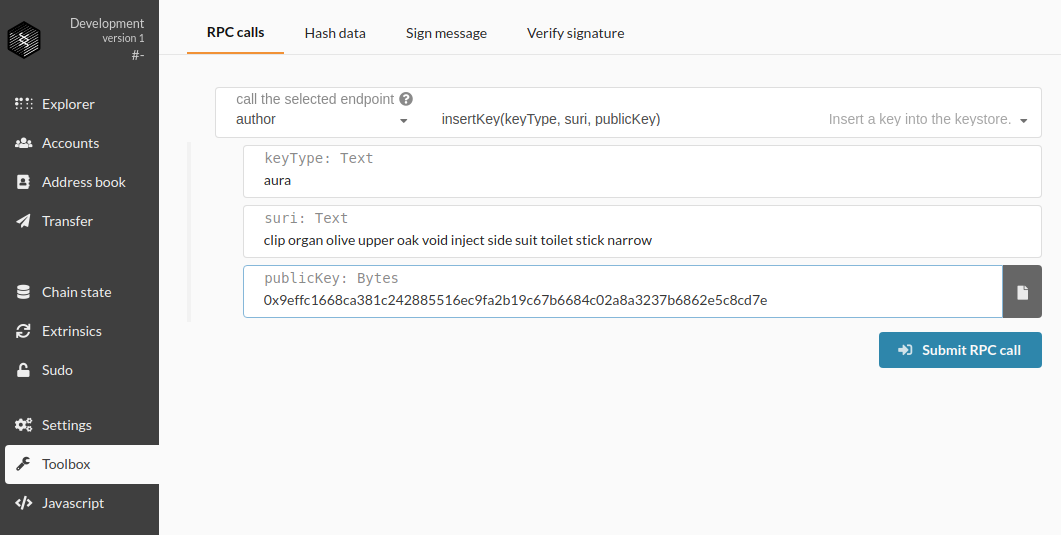
keytype: aura
suri: <your mnemonic phrase> (eg. clip organ olive upper oak void inject side suit toilet stick narrow)
publicKey: <your raw sr25519 key> (eg. 0x9effc1668ca381c242885516ec9fa2b19c67b6684c02a8a3237b6862e5c8cd7e)
If you generated your keys with the Apps UI you will not know your raw public key. In this case you may use your SS58 address (
5FfBQ3kwXrbdyoqLPvcXRp7ikWydXawpNs2Ceu3WwFdhZ8W4) instead.
You've now successfully inserted your Aura key. You can repeat those steps to insert your GRANDPA key (the ed25519 key)

keytype: gran
suri: <your mnemonic phrase> (eg. clip organ olive upper oak void inject side suit toilet stick narrow)
publicKey: <your raw ed25519 key> (eg. 0xb48004c6e1625282313b07d1c9950935e86894a2e4f21fb1ffee9854d180c781)
If you generated your keys with the Apps UI you will not know your raw public key. In this case you may use your SS58 address (
5G9NWJ5P9uk7am24yCKeLZJqXWW6hjuMyRJDmw4ofqxG8Js2) instead.
If you are following these steps for the second node in the network, you must connect the UI to the second node before inserting the keys.
Option 2: Use curl
You can also insert a key into the keystore by using curl from the
command line. This approach may be preferable in a production setting, where you may be using a
cloud-based virtual private server.
Because security is of the utmost concern in a production environment, it is important to take every
precaution possible. In this case, that means taking care that you do not leave any traces of your
keys behind, such as in your terminal's history. Create a file that you will use to define the body
for your curl request:
{
  "jsonrpc":"2.0",
  "id":1,
  "method":"author_insertKey",
  "params": [
    "<aura/gran>",
    "<mnemonic phrase>",
    "<public key>"
  ]
}
# Submit a new key via RPC, connect to where your `rpc-port` is listening
$ curl http://localhost:9933 -H "Content-Type:application/json;charset=utf-8" -d "@/path/to/file"
If you enter the command and parameters correctly, the node will return a JSON response as follows.
{ "jsonrpc": "2.0", "result": null, "id": 1 }
Make sure you delete the file that contains the keys when you are done.
Subsequent Participants Join
Subsequent validators can now join the network. This can be done by specifying the --bootnodes
parameter as Bob did previously.
./target/release/node-template \
  --base-path /tmp/node02 \
  --chain ./customSpecRaw.json \
  --port 30334 \
  --ws-port 9945 \
  --rpc-port 9934 \
  --telemetry-url 'wss://telemetry.polkadot.io/submit/ 0' \
  --validator \
  --rpc-methods=Unsafe \
  --name MyNode02 \
  --bootnodes /ip4/<IP Address>/tcp/<Port>/p2p/<Peer ID>
As before, we specify another base-path, give it another name, and also specify this node as a
validator.
Once the second node is up, you should see them authoring:
Sep 24 13:32:29.909  INFO Substrate Node
Sep 24 13:32:29.909  INFO ✌️  version 2.0.0-24da767-x86_64-linux-gnu
Sep 24 13:32:29.909  INFO ❤️  by Substrate DevHub <https://github.com/substrate-developer-hub>, 2017-2020
Sep 24 13:32:29.909  INFO 📋 Chain specification: Local Testnet
Sep 24 13:32:29.909  INFO 🏷  Node name: MyNode02
Sep 24 13:32:29.909  INFO 👤 Role: AUTHORITY
Sep 24 13:32:29.909  INFO 💾 Database: RocksDb at /tmp/node02/chains/local_testnet/db
Sep 24 13:32:29.909  INFO ⛓  Native runtime: node-template-1 (node-template-1.tx1.au1)
Sep 24 13:32:30.342  INFO 🔨 Initializing Genesis block/state (state: 0xe3cb…c5ca, header-hash: 0x0ded…9b9d)
Sep 24 13:32:30.346  INFO 👴 Loading GRANDPA authority set from genesis on what appears to be first startup.
Sep 24 13:32:30.552  INFO ⏱  Loaded block-time = 6000 milliseconds from genesis on first-launch
Sep 24 13:32:30.553  WARN Using default protocol ID "sup" because none is configured in the chain specs
Sep 24 13:32:30.554  INFO 🏷  Local node identity is: 12D3KooWBHwymjRsTipVZbGqiZV2rtxJiwTjLzPKZ7rYMsa9poUn (legacy representation: 12D3KooWBHwymjRsTipVZbGqiZV2rtxJiwTjLzPKZ7rYMsa9poUn)
Sep 24 13:32:30.577  INFO 📦 Highest known block at #0
Sep 24 13:32:30.611  INFO Listening for new connections on 127.0.0.1:9945.
Sep 24 13:32:31.126  INFO 🔍 Discovered new external address for our node: /ip4/127.0.0.1/tcp/30334/p2p/12D3KooWBHwymjRsTipVZbGqiZV2rtxJiwTjLzPKZ7rYMsa9poUn
Sep 24 13:32:31.175  INFO 🔍 Discovered new external address for our node: /ip4/192.168.0.117/tcp/30334/p2p/12D3KooWBHwymjRsTipVZbGqiZV2rtxJiwTjLzPKZ7rYMsa9poUn
Sep 24 13:32:35.614  INFO 💤 Idle (1 peers), best: #0 (0x0ded…9b9d), finalized #0 (0x0ded…9b9d), ⬇ 1.1kiB/s ⬆ 1.1kiB/s
Sep 24 13:32:36.844  INFO ✨ Imported #1 (0xad75…d784)
Sep 24 13:32:40.615  INFO 💤 Idle (1 peers), best: #1 (0xad75…d784), finalized #0 (0x0ded…9b9d), ⬇ 0.2kiB/s ⬆ 0.1kiB/s
The final lines shows that your node has peered with another (1 peers), and they have produced
a block (best: #1 (0xad75…d784)).
Now you're ready to add keys to its keystore by following the process (in the previous section) just like you did for the first node.
If you're inserting keys with the UI, you must connect the UI to the second node's WebSocket endpoint before inserting the second node's keys.
A node will not be able to produce blocks if it has not added its Aura key.
Block finalization can only happen if more than two-thirds of the validators have added their GRANDPA keys to their keystores. Since this network was configured with two validators (in the chain spec), block finalization can occur after the second node has added its keys (i.e. 50% < 66% < 100%).
Reminder: All validators must be using identical chain specifications in order to peer. You should see the same genesis block and state root hashes.
You will notice that even after you add the keys for the second node no block finalization has
happened (finalized #0 (0x0ded…9b9d)). Substrate nodes require a restart after inserting a
GRANDPA key. Kill your nodes and restart them with the same commands you used previously. Now blocks
should be finalized.
Sep 24 13:37:33.863  INFO Substrate Node
Sep 24 13:37:33.864  INFO ✌️  version 2.0.0-24da767-x86_64-linux-gnu
Sep 24 13:37:33.864  INFO ❤️  by Substrate DevHub <https://github.com/substrate-developer-hub>, 2017-2020
Sep 24 13:37:33.864  INFO 📋 Chain specification: Local Testnet
Sep 24 13:37:33.864  INFO 🏷  Node name: MyNode02
Sep 24 13:37:33.864  INFO 👤 Role: AUTHORITY
Sep 24 13:37:33.864  INFO 💾 Database: RocksDb at /tmp/node02/chains/local_testnet/db
Sep 24 13:37:33.864  INFO ⛓  Native runtime: node-template-1 (node-template-1.tx1.au1)
Sep 24 13:37:33.918  WARN Using default protocol ID "sup" because none is configured in the chain specs
Sep 24 13:37:33.918  INFO 🏷  Local node identity is: 12D3KooWBHwymjRsTipVZbGqiZV2rtxJiwTjLzPKZ7rYMsa9poUn (legacy representation: 12D3KooWBHwymjRsTipVZbGqiZV2rtxJiwTjLzPKZ7rYMsa9poUn)
Sep 24 13:37:33.942  INFO 📦 Highest known block at #23
Sep 24 13:37:33.973  INFO Listening for new connections on 127.0.0.1:9945.
Sep 24 13:37:34.486  INFO 🔍 Discovered new external address for our node: /ip4/127.0.0.1/tcp/30334/p2p/12D3KooWBHwymjRsTipVZbGqiZV2rtxJiwTjLzPKZ7rYMsa9poUn
Sep 24 13:37:36.593  INFO ✨ Imported #24 (0xa7e8…7596)
Sep 24 13:37:38.976  INFO 💤 Idle (1 peers), best: #24 (0xa7e8…7596), finalized #22 (0x753e…ddb0), ⬇ 1.5kiB/s ⬆ 1.5kiB/s
You're Finished
Congratulations! You've started your own blockchain!
In this tutorial you've learned to generate your own keypairs, create a custom chain spec that uses those keypairs, and start a private network based on your custom chain spec.
Learn More
That big Wasm blob we encountered in the chain spec was necessary to enable forkless upgrades. Learn more about how the executor uses on-chain Wasm.