Web3系列教程之进阶篇---5. 本地区块链测试
- 李留白
- 发布于 2022-08-15 15:22
- 阅读 6088
了解以太坊生态系统,这样你就不会每次都重新发明轮子。使用Chainlink, ENS, The Graph, IPFS, Ceramic, Polygon, NEAR等开发吧!
本教程让您熟悉使用 Hardhat 启动本地区块链、将示例智能合约部署到本地区块链以及使用 Metamask 和 Remix 与该区块链交互。
为什么选择本地区块链?
-
运行本地区块链非常有用,因为测试会变得非常快速和高效。
-
它只在您的机器运行区块链,因此共识速度很快,您不必等待其他节点同步或验证。
-
您还可以使用许多专门为本地测试构建的专用模块,例如Hardhat console.log,它可以帮助您在合同中添加打印。
构建
为了构建智能合约,我们将使用Hardhat。Hardhat 是一个以太坊开发环境和框架,专为 Solidity 中的全栈开发而设计。简单来说,您可以编写智能合约、部署它们、运行测试和调试代码。
- 要设置Hardhat 项目,请打开终端并执行以下命令
npm init --yes
npm install --save-dev hardhat- 在安装 Hardhat 的同一目录中运行:
npx hardhat- 选择
Create a basic sample project - 按回车键已指定
Hardhat Project root - 如果您想添加一个问题,请按 Enter 键
.gitignore - 按回车键
Do you want to install this sample project's dependencies with npm (@nomiclabs/hardhat-waffle ethereum-waffle chai @nomiclabs/hardhat-ethers ethers)?
现在你有一个Hardhat 项目准备好了!
如果您不在 Mac 上,请执行此额外步骤并安装这些库:)
npm install --save-dev @nomiclabs/hardhat-waffle ethereum-waffle chai @nomiclabs/hardhat-ethers ethers并按下enter所有问题。
基本的Hardhat 项目还附带一个示例智能合约。我们将在示例中使用此智能合约。您应该在 中看到此合同contracts\Greeter.sol。它应该看起来像这样:
//SPDX-License-Identifier: Unlicense
pragma solidity ^0.8.0;

import "hardhat/console.sol";

contract Greeter {
    string private greeting;

    constructor(string memory _greeting) {
        console.log("Deploying a Greeter with greeting:", _greeting);
        greeting = _greeting;
    }

    function greet() public view returns (string memory) {
        return greeting;
    }

    function setGreeting(string memory _greeting) public {
        console.log("Changing greeting from '%s' to '%s'", greeting, _greeting);
        greeting = _greeting;
    }
}- 该合约声明了一个字符串 -
greeting。还有两个方法和一个构造函数。构造函数使用提供的字符串值启动 greeting 变量。 - 该
greet方法返回问候字符串。由于这是一个view函数,它不消耗gas,也不需要签名来执行。 - 该
setGreeting方法使用提供的用户值设置问候字符串。由于这会更新智能合约状态,因此会消耗 gas,并且需要签名。 关于该方法的一件有趣的事情setGreeting是它使用了 Hardhat 的 console.log 合约,因此我们可以实际调试并查看greeting更改为哪些值!
现在要在指向您的目录的终端中实际开始运行本地区块链,请执行以下命令:
npx hardhat node(保持这个终端运行)
此命令为您启动一个本地区块链节点。你应该可以看到一些已经被安全帽注资的账户有 10000 ETH

现在,您可以继续使用 Hardhat 将合约部署到本地区块链,方法是运行npx hardhat run scripts/sample-script.js.
或者,你也可以使用 Remix 之类的东西,让它将合约部署到你的本地区块链。第二种方法还将涉及设置 Metamask 以与您的本地区块链一起使用,并让您了解如何使用在本地区块链上运行的合约在本地测试您的 React/Next.js 应用程序,所以让我们这样做。
连接MetaMesk
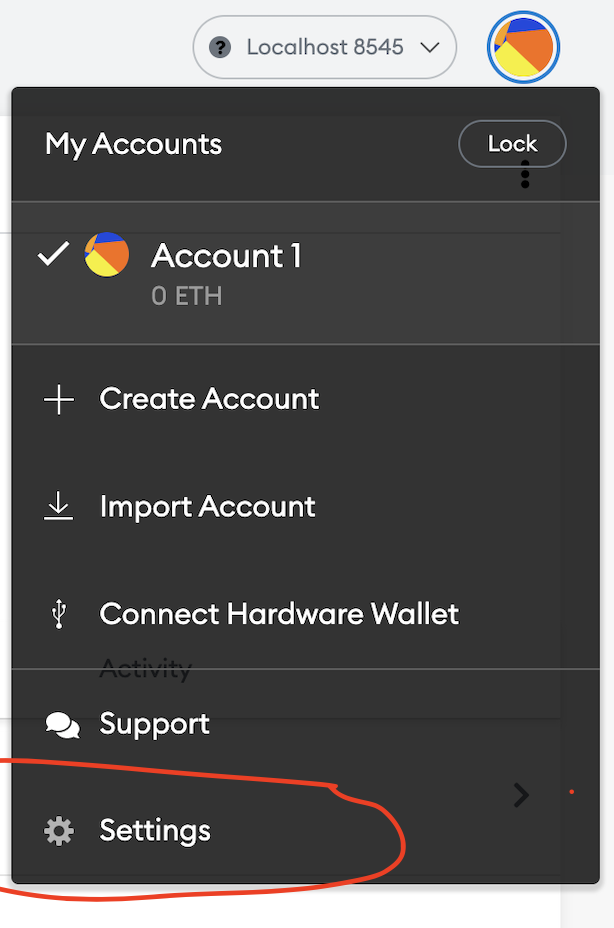
- 要使用MetaMesk连接到此网络,请单击您的个人资料,然后单击设置
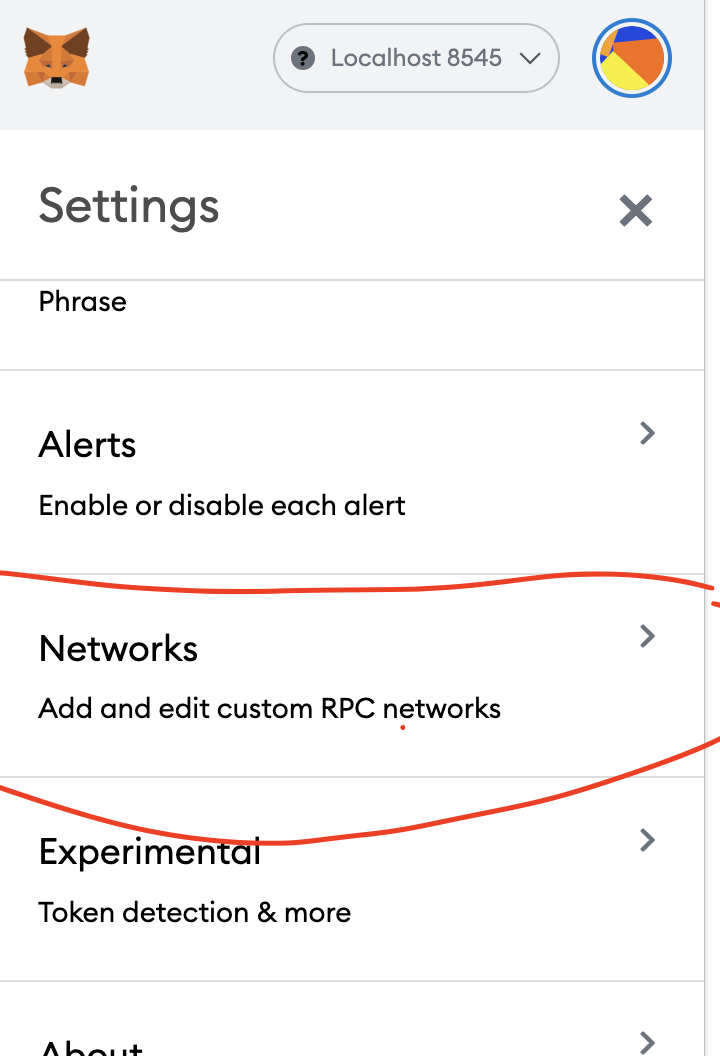
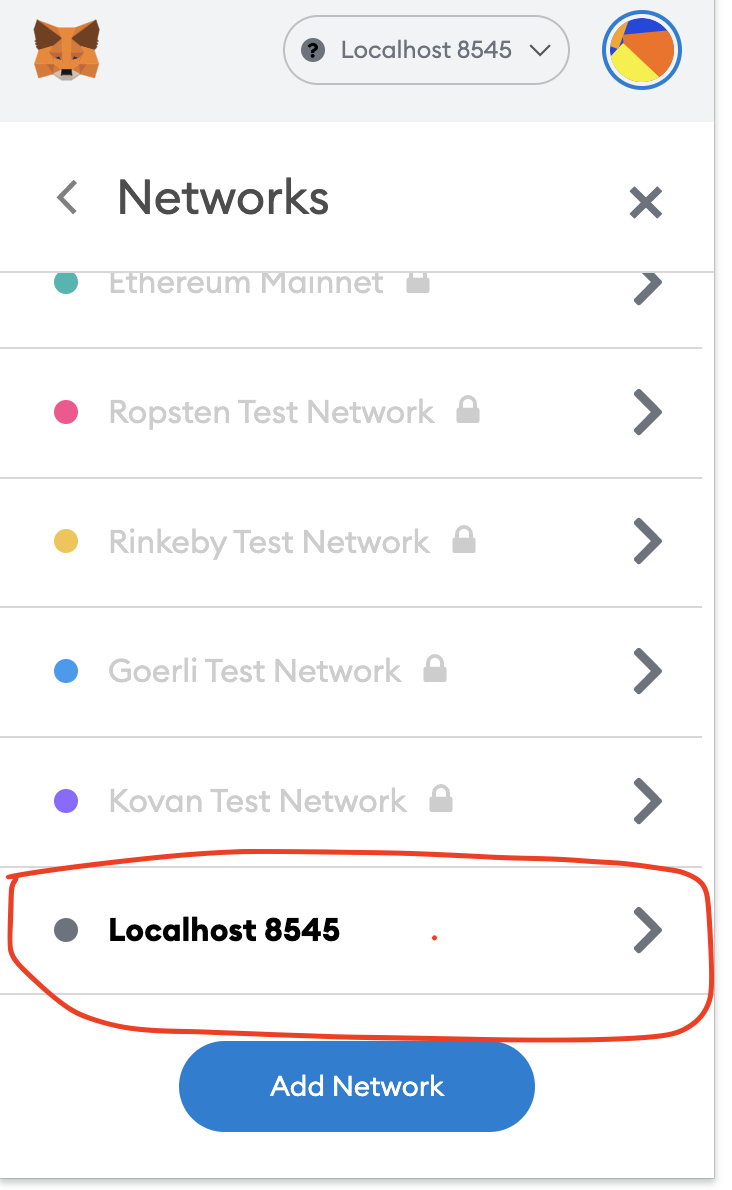
- 然后点击网络,然后
Localhost 8545
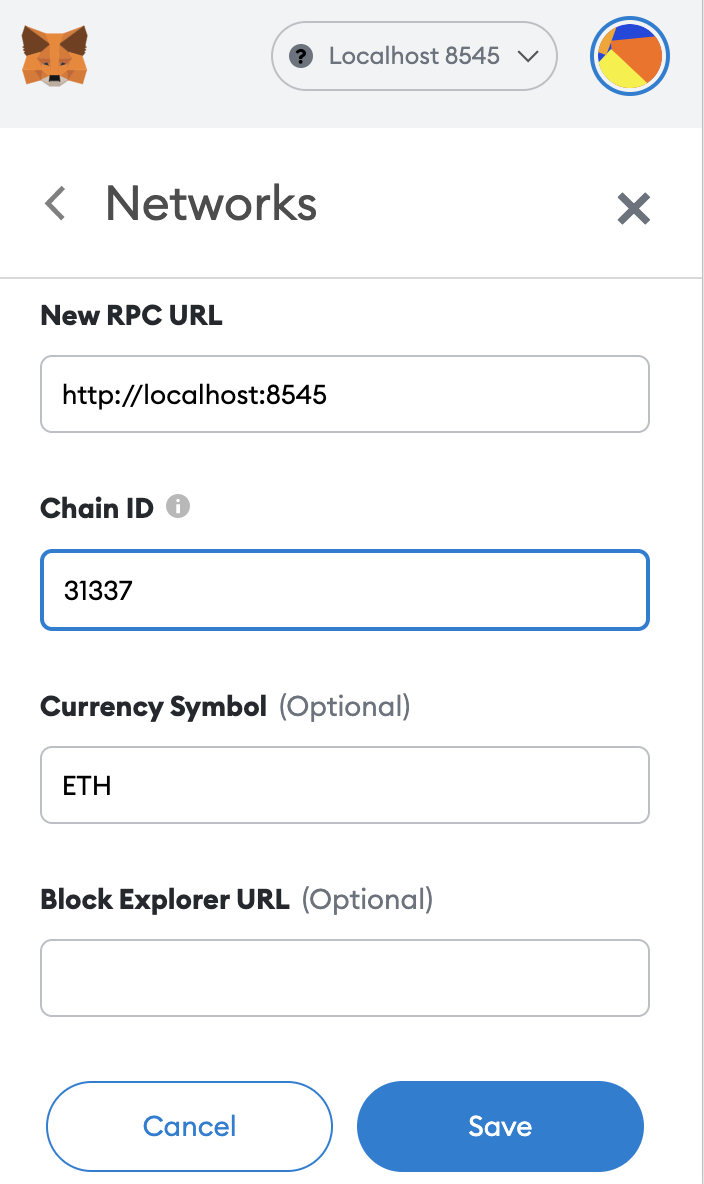
- 将链 ID 更改为
31337(这是您正在运行的本地区块链的链 ID),然后单击Save
- 太棒了,现在您的 MetaMask 已连接到您的本地区块链,我们现在将添加 Hardhat 提供给我们的帐户
- 在节点终端中,您应该看到显示了几个帐户。让我们选择其中一个:
Account #0: 0xf39fd6e51aad88f6f4ce6ab8827279cfffb92266 (10000 ETH)
Private Key: 0xac0974bec39a17e36ba4a6b4d238ff944bacb478cbed5efcae784d7bf4f2ff80
转到 metamask --> 单击您的个人资料 --> 导入帐户。在下拉列表中选择私钥并粘贴您想要的帐户中的私钥。您现在应该会看到一个拥有 10000 ETH 的账户
Remix
我们现在将我们的合约部署到本地区块链并使用 Remix 与之交互
转到remix.ethereum.org并在名为的 contracts 文件夹中创建一个新文件Greeter.sol
- 将此代码复制到其中:
//SPDX-License-Identifier: Unlicense
pragma solidity ^0.8.0;

import "hardhat/console.sol";

contract Greeter {
    string private greeting;

    constructor(string memory _greeting) {
        console.log("Deploying a Greeter with greeting:", _greeting);
        greeting = _greeting;
    }

    function greet() public view returns (string memory) {
        return greeting;
    }

    function setGreeting(string memory _greeting) public {
        console.log("Changing greeting from '%s' to '%s'", greeting, _greeting);
        greeting = _greeting;
    }
}
这是相同的代码,我们在上面解释过
- 编译
Greeter.sol
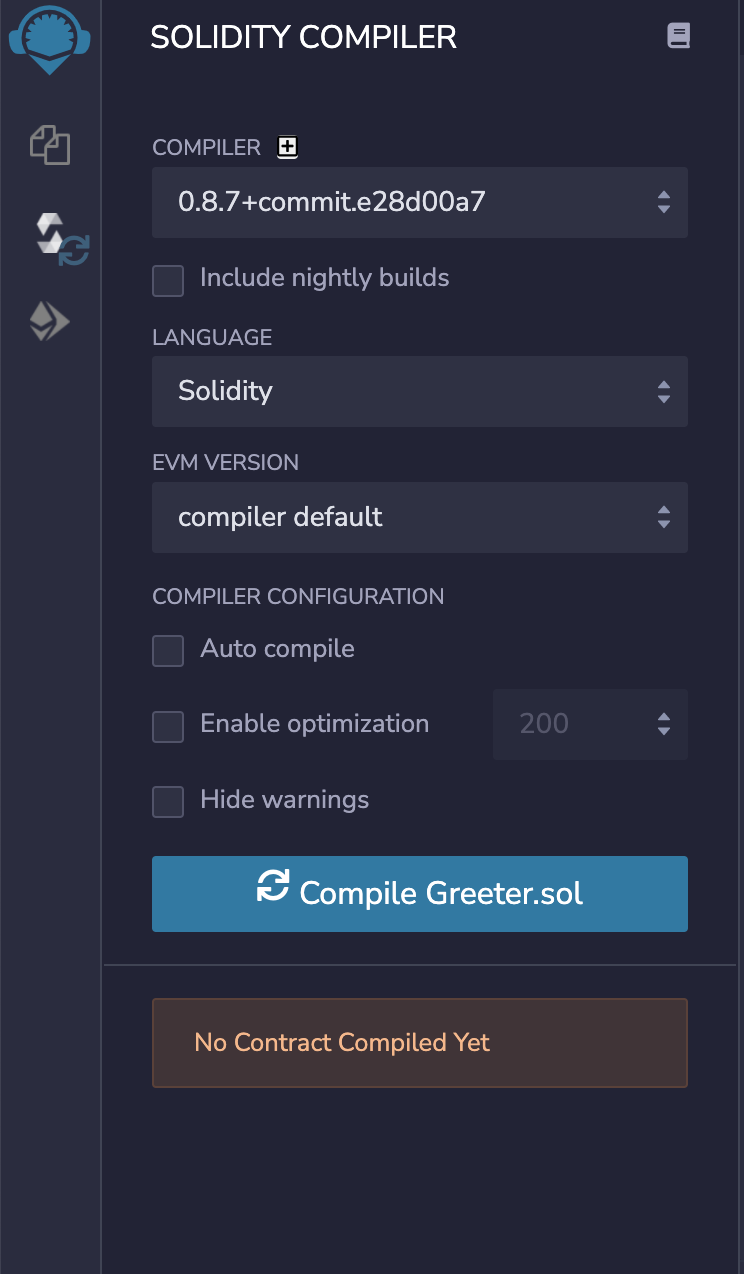
- 现在要部署,转到部署选项卡并在您的环境中选择
Injected Web3,确保连接的帐户是您在上面导入的帐户,并且网络Localhost 8545在您的 MetaMask 上
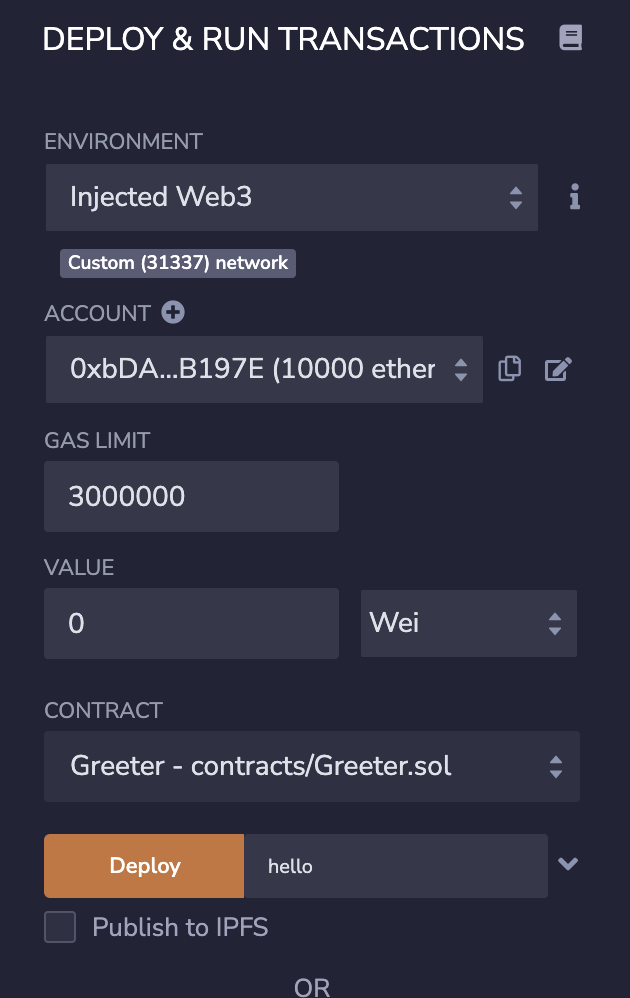

- 设置问候语并单击部署
- 你的合约现在已经部署了🎉
- 设置问候语并点击
setGreeting
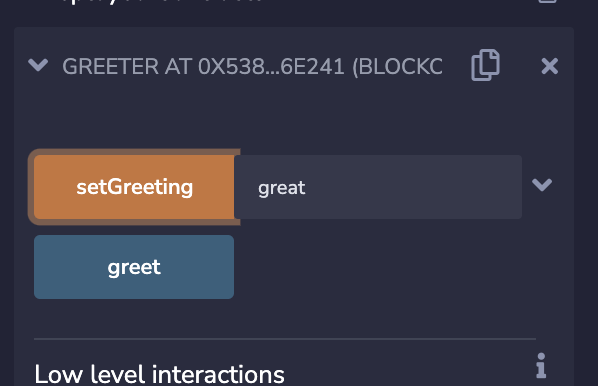
- 检查运行Hardhat节点的终端,它应该有 console.log

原文: https://www.learnweb3.io/tracks/junior/local-hardhat-node
- AI 正热,加密货币遇冷,那又如何? 52 浏览
- EVM Gas 分析:新的执行跟踪数据 70 浏览
- Layer Zero 发布 Zero 链:去中心化的多核世界计算机 119 浏览
- 如何在不到一分钟内发现Web3骗局 44 浏览
- 质押和链上信贷市场之间的微妙张力 122 浏览
- 加密货币的长期博弈 141 浏览
- 加密货币的2026年 = 互联网的2002年:黎明前最黑暗的时刻 109 浏览
- 以太坊应该停止担心扩展性,去做人们想要的东西 228 浏览
- 极致轻量:Solana Pinocchio v0.10 演进实战,0.15s 极速开启托管合约新篇章 351 浏览
- Vitalik的L2重置:以太坊为何需要此航向修正 150 浏览
- 如何桥接到MegaETH(今天测试网,主网即将上线) 275 浏览
- Vitalik: 重新评估以太坊 Layer2 295 浏览

