Aptos合约开发之HelloWorld篇
- 欧皇.eth
- 发布于 2022-09-13 15:41
- 阅读 5654
本文讲Aptos环境搭建以及运行一个Aptos版本的Hello World!
前言
上手任何一门语言时,搭建好环境然后跑一个Hello World程序是一件很有成就感的事。那么这篇教程,就来讲讲Aptos环境搭建以及运行一个Aptos版本的Hello World!
关键词
Apto环境搭建、Aptos-cli、Hello World程序
Aptos环境搭建
首先,在开始这篇文章之前,你需要在WSL2上先搭建好Move开发环境。如果对Move开发环境搭建不了解。你可以参考我之前的文章进行搭建。
搭建Aptos开发环境,你需要安装Aptos开发脚手架,Aptos-cli。Aptos-cli的定义如下。
The aptos tool is a command line interface (CLI) for debugging, development, and node operations. This document describes how to install the aptos CLI tool. See Use Aptos CLI for how to use the CLI.
官方文档: https://aptos.dev/cli-tools/aptos-cli-tool/install-aptos-cli
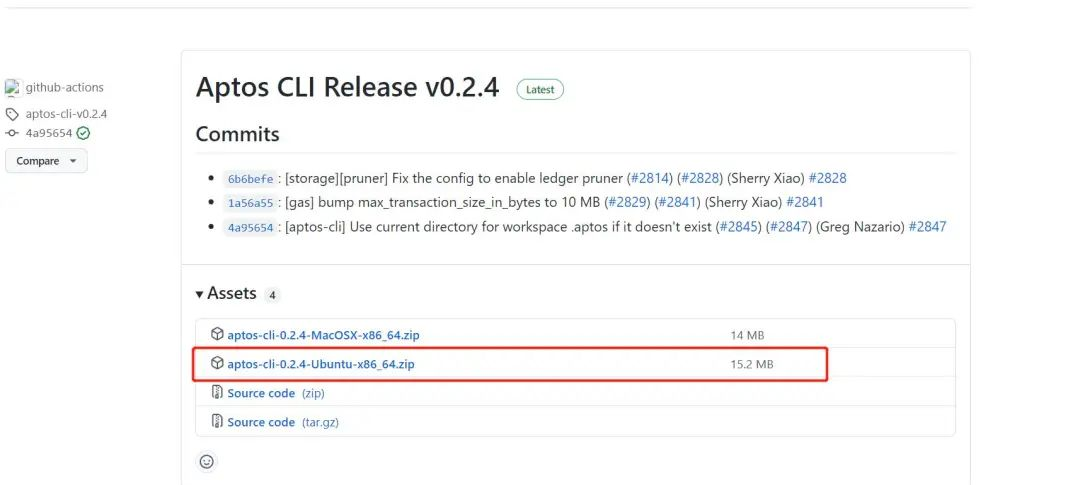
安装Aptos-cli有两种方式,第一种使用源码自行编译,这种安装方式耗时很长,大约需要4~5h,这种方式我个人不推荐。我推荐使用官方已经编译好的安装包进行安装,省时省力。
安装Aptos-cli预编译版
- Navigate to the release page for Aptos CLI. # 下载压缩包文件
- Download the latest release for your platform.
- Place this at a location for you to run it e.g.
~/bin/aptosin Linux. #解压后把aptos复制到这个目录下 - On Linux and Mac, make this executable
chmod +x ~/bin/aptos. #给文件赋权限 - Now type
~/bin/aptos helpto read help instructions. - If you want you can add
~/binto your path in your appropriate.bashrcor.zshrcfor future use.
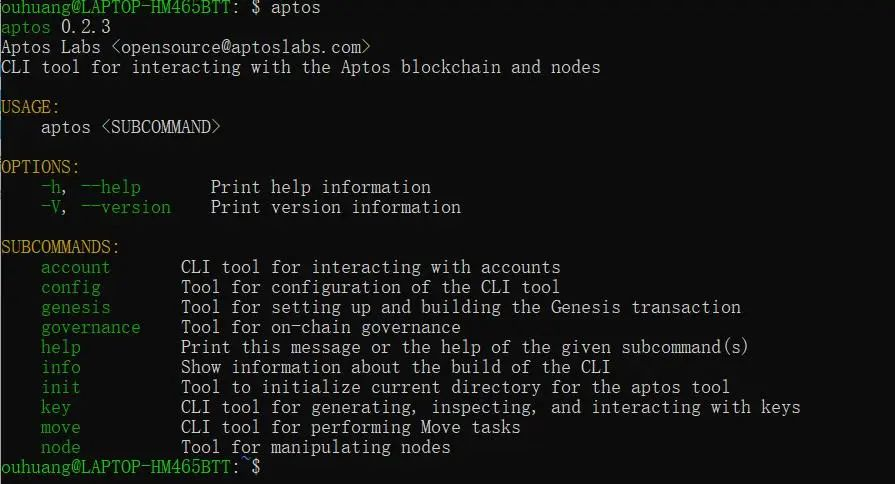
安装完成之后,打开wsl控制台,输入aptos查看是否安装完成。


Hello World工程
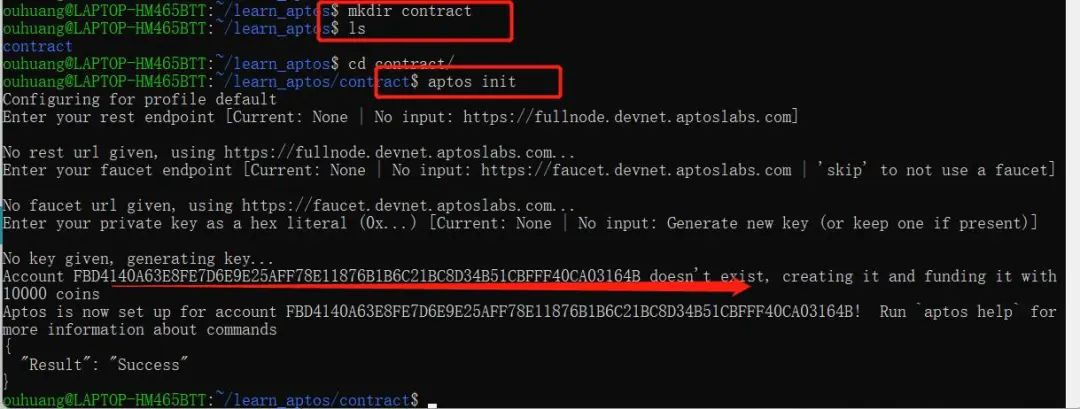
区块链工程项目的创建步骤,通常来讲有以下几个动作。
2、创建目录,编写合约文件 你可以参考我的目录结构,然后创建相应的文件夹和文件。

HelloAptos.move
module HelloAptos::Message{

  use std::string;
  use std::error;
  use std::debug;
  use aptos_std::event;
  use std::signer;
  struct  Message has key{
      msg:string::String,
      message_change_events: event::EventHandle<MessageEvent>,
  }
  struct MessageEvent has drop, store {
      from_message: string::String,
      to_message: string::String,
  }

  const ENO_MESSAGE: u64 = 0;

  public entry fun  say_message(account:&signer, message_bytes: vector<u8>) acquires Message {
      let message = string::utf8(message_bytes);
      let account_addr = signer::address_of(account);
      if (!exists<Message>(account_addr)) {
          debug::print(&account_addr);
          move_to(account, Message {
             msg:message,
             message_change_events: event::new_event_handle<MessageEvent>(account),
          });
      } else {
          // debug::print(message);
          let old_message = borrow_global_mut<Message>(account_addr);
          let from_message = *&old_message.msg;
          event::emit_event(&mut old_message.message_change_events, MessageEvent {
              from_message,
              to_message: copy message,
          });
          old_message.msg = message;
      }

  }
  public fun get_message(addr: address): string::String acquires Message {
      assert!(exists<Message>(addr), error::not_found(ENO_MESSAGE));
      *&borrow_global<Message>(addr).msg
  }

  #[test(account = @0x1)]
  public entry fun sender_can_set_message(account: signer) acquires Message {
      let addr = signer::address_of(&account);
      say_message(&account,  b"Hello, Aptos");

      assert!(
        get_message(addr) == string::utf8(b"Hello, Aptos"),
        ENO_MESSAGE
      );
  }
}
Move.toml
[package]
name = "hello-aptos"
version = "0.0.0"
[dependencies]
AptosFramework = { git = "https://github.com/aptos-labs/aptos-core.git", subdir = "aptos-move/framework/aptos-framework/", rev = "devnet" }
[addresses]
HelloAptos = "fbd4140a63e8fe7d6e9e25aff78e11876b1b6c21bc8d34b51cbfff40ca03164b"
其中fbd4140a63e8fe7d6e9e25aff78e11876b1b6c21bc8d34b51cbfff40ca03164b 需要替换成你的账号信息。
4、编译合约
ouhuang@LAPTOP-HM465BTT:~/learn_aptos/contract$ sudo aptos  move  compile --package-dir /home/ouhuang/learn_aptos/contract/
[sudo] password for ouhuang:
{
  "Result": [
    "FBD4140A63E8FE7D6E9E25AFF78E11876B1B6C21BC8D34B51CBFFF40CA03164B::Message"
  ]
}
ouhuang@LAPTOP-HM465BTT:~/learn_aptos/contract$ sudo aptos  move  compile --package-dir .
{
  "Result": [
    "FBD4140A63E8FE7D6E9E25AFF78E11876B1B6C21BC8D34B51CBFFF40CA03164B::Message"
  ]
}
5、部署合约
ouhuang@LAPTOP-HM465BTT:~/learn_aptos/contract$ sudo aptos move publish  --package-dir  .
{
  "Result": {
    "changes": [
      {
        "address": "fbd4140a63e8fe7d6e9e25aff78e11876b1b6c21bc8d34b51cbfff40ca03164b",
        "data": {
          "authentication_key": "0xfbd4140a63e8fe7d6e9e25aff78e11876b1b6c21bc8d34b51cbfff40ca03164b",
          "coin_register_events": {
            "counter": "1",
            "guid": {
              "id": {
                "addr": "0xfbd4140a63e8fe7d6e9e25aff78e11876b1b6c21bc8d34b51cbfff40ca03164b",
                "creation_num": "0"
              }
            }
          },
          "sequence_number": "1"
        },
        "event": "write_resource",
        "resource": "0x1::account::Account"
      },
      {
        "address": "fbd4140a63e8fe7d6e9e25aff78e11876b1b6c21bc8d34b51cbfff40ca03164b",
        "data": {
          "coin": {
            "value": "9998"
          },
          "deposit_events": {
            "counter": "1",
            "guid": {
              "id": {
                "addr": "0xfbd4140a63e8fe7d6e9e25aff78e11876b1b6c21bc8d34b51cbfff40ca03164b",
                "creation_num": "1"
              }
            }
          },
          "withdraw_events": {
            "counter": "0",
            "guid": {
              "id": {
                "addr": "0xfbd4140a63e8fe7d6e9e25aff78e11876b1b6c21bc8d34b51cbfff40ca03164b",
                "creation_num": "2"
              }
            }
          }
        },
        "event": "write_resource",
        "resource": "0x1::coin::CoinStore<0x1::aptos_coin::AptosCoin>"
      },
      {
        "address": "fbd4140a63e8fe7d6e9e25aff78e11876b1b6c21bc8d34b51cbfff40ca03164b",
        "event": "write_module"
      }
    ],
    "gas_used": 2,
    "success": true,
    "version": 452397,
    "vm_status": "Executed successfully"
  }
}
至此,Hello World程序运行成功。我将在下一篇文章里,拆解HelloAptos.move中的合约代码。
参考文档
- 使用 Move Prover 验证 Aptos Vault 的正确性 321 浏览
- 什么是 Shelby 协议? 662 浏览
- 102:从 ERC 到多链:鸟瞰各公链标准体系 981 浏览
- 101:账户模型是标准的根:UTXO vs Account vs Object 1436 浏览
- 从 EVM 迁移到 Move,第一部分 1815 浏览
- Move 智能合约实战:在 Aptos 上构建你的首个 Web3 应用 2961 浏览
- Solana vs Sui (2025):架构、执行模型与安全性对比 2704 浏览
- Aptos Move 全栈实战:构建链上价格预言机与客户端交互 3299 浏览
- Aptos Move 实战:从零构建一个链上价格预言机 (含源码和测试) 3060 浏览
- Aptos Move实战:5分钟掌握链上向量(Vector)核心操作 3167 浏览
- Aptos Move 实操:如何用 Tables 构建一个链上房产管理系统 3143 浏览
- Aptos Move 实操:如何用 Tables 构建一个链上房产管理系统 3474 浏览

