Starknet Cairo 中的可组合性和组件
- Esther Oche
- 发布于 2024-10-15 18:44
- 阅读 2239
Starknet Cairo 中的可组合性和组件
在学习如何使用 Cairo 编写 Starknet 合约时,我遇到了组件的概念,并对其底层工作原理感到着迷。我不禁对背后的优秀工程师表示赞赏,并深知像这样的概念可能难以理解,让我通过详细的解释来分解这些内容。
前提条件
为了从本文中获得最佳效果,你应该已经:
- 完全设置了你的 Cairo 开发环境(即你已安装 Scarb、Starkli、Sn-Foundry 和 VS-Code)。
- 理解 Cairo 的语法和数据类型。
- 知道如何使用 Cairo 编写基本的 Starknet 智能合约。
可组合性和组件是 Cairo(Cairo 1)中的重要概念,这是一种为在 Starknet 区块链上开发智能合约而设计的编程语言。
可组合性: 在 Cairo 中,这指的是将不同的代码片段或智能合约组合在一起以创建更复杂和功能丰富的应用程序的能力。它使开发人员能够重用现有代码和智能合约,构建在其他合约之上,并创建模块化和可互操作的系统。
组件(Components): Cairo 中的组件是封装特定功能的可重用代码片段。Solidity 中组件的等价物是抽象合约,尽管它们在使用方式上略有不同,但它们共享相似的可重用代码概念,这些代码不能直接实例化,旨在由其他合约扩展或使用。
与 Cairo 中的合约类似,组件可以包含存储、事件和函数,但它们不能被声明或部署。它们只能被注入到任何智能合约中,并最终成为嵌入它们的合约字节码的一部分。
可嵌入实现:组件的构建基石
虽然组件为 Starknet 上的智能合约提供了强大的模块化功能,但它依赖于一些底层概念,其中之一是可嵌入实现。
可嵌入实现(embeddable implementation)是可以嵌入到任何其他智能合约中的接口实现。
让我们分解一下:假设你有一个接口(即用 #[starknet::interface] 标记的trait),然后你为该接口创建了一个 impl,要使该实现可嵌入,你必须用 #[starknet::embeddable] 属性标记它。这样,你创建的实现块可以嵌入到其他智能合约中,并且嵌入的实现块中的函数将在其嵌入的任何智能合约中可用,并且也将在其注入的合约的 ABI 中可用。
让我们使用以下代码片段来展示可嵌入实现的工作原理:
#[starknet::interface]
trait SimpleTrait<TContractState> {
    fn return_num(self: @TContractState) -> u8;
}

#[starknet::embeddable]
impl SimpleImpl<TContractState> of SimpleTrait<TContractState> {
    fn return_num(self: @TContractState) -> u8 {
        4
    }
}

#[starknet::contract]
mod simple_contract {
    #[storage]
    struct Storage {}

    #[abi(embed_v0)]
    impl MySimpleImpl = super::SimpleImpl<ContractState>;
}
从上图中,红色框中的部分是一个接口,即用 #[starknet::interface] 属性标记的trait。它包含一个函数签名。
绿色框中的部分是接口的实现。impl SimpleImpl 用 #[starknet::embeddable] 标记,这使其成为可以嵌入到其他智能合约中的可嵌入实现。
最后,黄色框中的部分是一个 Starknet 智能合约,其中嵌入了 SimpleImpl(可嵌入实现)。第 19 行是将 SimpleImpl 嵌入到 simple_contract 中,使用了实现别名语法。
请注意,SimpleImpl 嵌入到 simple_contract 的行上方标记了 #[abi(embed_v0)],这使得 SimpleImpl(嵌入的实现)中的函数成为其嵌入的合约的入口点。
这里的入口点意味着它对公众可见并且可以从外部调用。
通过将 SimpleImpl 嵌入到 simple_contract,我们在 simple_contract 的 ABI 中公开了 return_num 函数。
创建组件
现在我们已经解释了嵌入机制,我们已经理解了组件工作原理的一半,我们需要从创建一个组件开始,然后在进行过程中分解涉及的逻辑。
创建组件涉及以下步骤:
- 在其自己的模块中定义组件,并用
#[starknet::component]属性装饰。 - 在此模块中,声明一个
Storage结构体和一个Event枚举,就像在智能合约中一样。 - 为组件定义一个接口,其中包含将提供访问组件逻辑的函数签名。接口定义类似于在智能合约中使用用
#[starknet::interface]标记的trait。 - 在组件模块中创建一个标记为
#[embeddable_as(name)]的impl块。name是你希望在合约中使用组件时引用的任何名称。 - 要定义没有外部访问权限的内部函数,请创建另一个不使用
#[embeddable_as(name)]的impl块。这些内部函数可以在附加组件的合约中使用,但不能从外部调用。 impl块中的函数期望参数如:ref self: ComponentState<TContractState>:用于状态修改函数self: @ComponentState<TContractState>:用于视图函数
这使得 impl 对 TContractState 是泛型的,允许组件在任何智能合约中使用。
这类似于 SimpleImpl 可嵌入实现,也可以嵌入到任何合约中。
说够了,让我们展示一些代码。
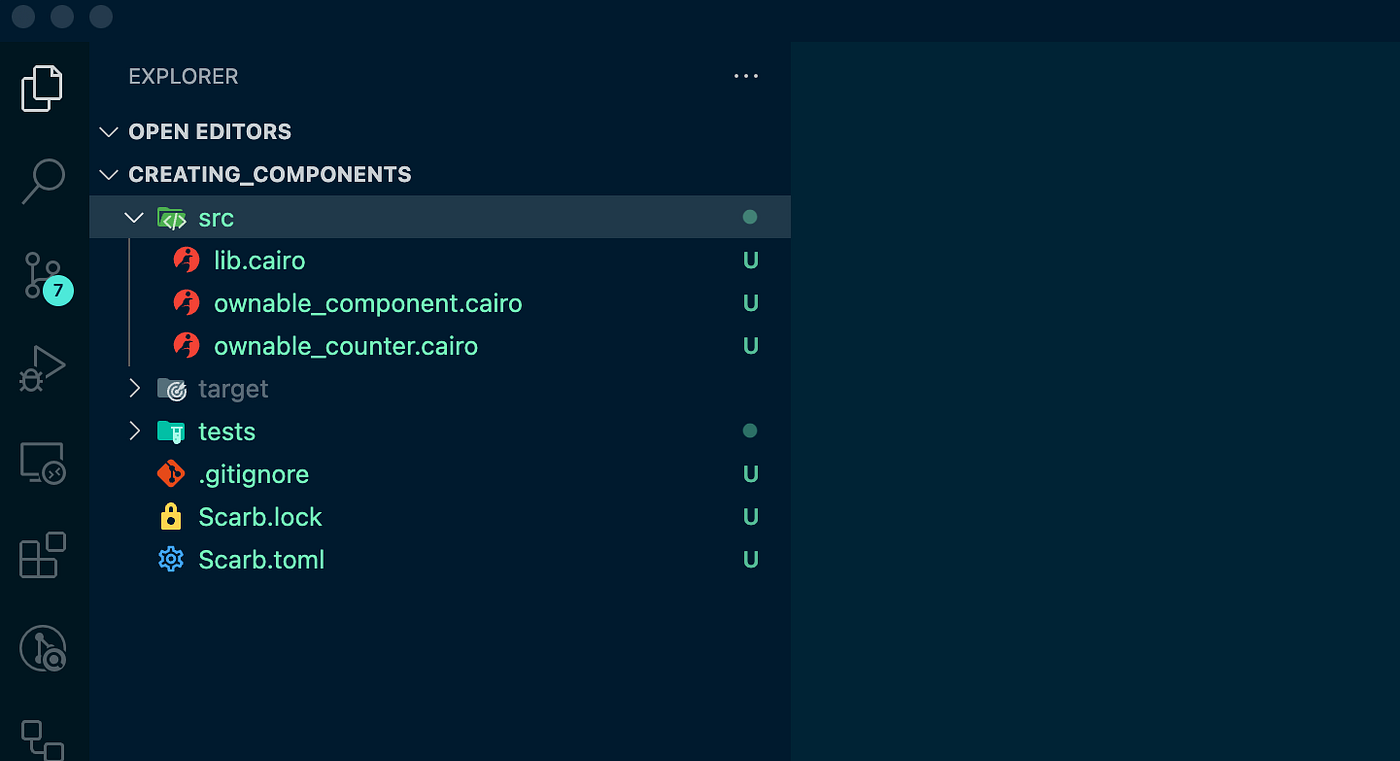
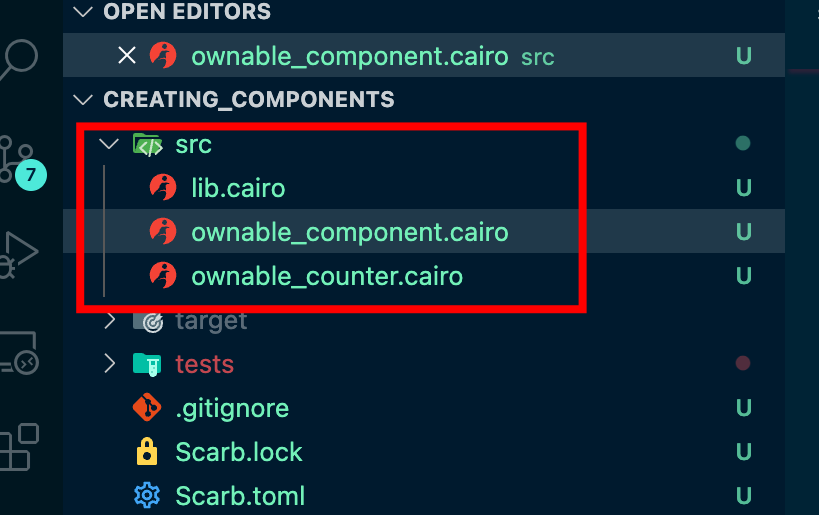
我使用命令 scarb init –name creating_components 创建一个项目。作为 Cairo 开发人员,你应该已经知道如何做到这一点。 请参见我的项目结构如下:
将以下代码粘贴到 ownable_component.cairo 中
use core::starknet::ContractAddress;

#[starknet::interface]
trait IOwnable<TContractState> {
    fn owner(self: @TContractState) -> ContractAddress;
    fn transfer_ownership(ref self: TContractState, new_owner: ContractAddress);
    fn renounce_ownership(ref self: TContractState);
    fn increase_count(ref self: TContractState);
}

#[starknet::component]
pub mod OwnableComponent {
    use core::starknet::{ContractAddress, get_caller_address};
    use core::starknet::storage::{StoragePointerReadAccess, StoragePointerWriteAccess};
    use core::num::traits::Zero;

    #[storage]
    struct Storage {
        owner: ContractAddress,
        count: u64,
    }

    #[event]
    #[derive(Drop, starknet::Event)]
    pub enum Event {
        OwnershipTransferred: OwnershipTransferred,
    }

    #[derive(Drop, starknet::Event)]
    pub struct OwnershipTransferred {
        previous_owner: ContractAddress,
        new_owner: ContractAddress,
    }

    mod Errors {
        pub const NOT_OWNER: felt252 = 'Caller is not the owner';
        pub const ZERO_ADDRESS_CALLER: felt252 = 'Caller is the zero address';
        pub const ZERO_ADDRESS_OWNER: felt252 = 'New owner is the zero address';
    }

    #[embeddable_as(Ownable)]
    impl OwnableImpl<TContractState, +HasComponent<TContractState>> of super::IOwnable<ComponentState<TContractState>> {
        fn owner(self: @ComponentState<TContractState>) -> ContractAddress {
            self.owner.read()
        }

        fn transfer_ownership(ref self: ComponentState<TContractState>, new_owner: ContractAddress) {
            assert(!new_owner.is_zero(), Errors::ZERO_ADDRESS_OWNER);
            self.assert_only_owner();
            self._transfer_ownership(new_owner);
        }

        fn renounce_ownership(ref self: ComponentState<TContractState>) {
            self.assert_only_owner();
            self._transfer_ownership(Zero::zero());
        }

        fn increase_count(ref self: ComponentState<TContractState>) {
            let prev_count = self.count.read();
            self.count.write(prev_count + 1);
        }
    }

    #[generate_trait]
    pub impl InternalImpl<TContractState, +HasComponent<TContractState>> of InternalTrait<TContractState> {
        fn initializer(ref self: ComponentState<TContractState>, owner: ContractAddress) {
            self._transfer_ownership(owner);
        }

        fn assert_only_owner(self: @ComponentState<TContractState>) {
            let owner: ContractAddress = self.owner.read();
            let caller: ContractAddress = get_caller_address();
            assert(!caller.is_zero(), Errors::ZERO_ADDRESS_CALLER);
            assert(caller == owner, Errors::NOT_OWNER);
        }

        fn _transfer_ownership(ref self: ComponentState<TContractState>, new_owner: ContractAddress) {
            let previous_owner: ContractAddress = self.owner.read();
            self.owner.write(new_owner);
            self.emit(OwnershipTransferred { previous_owner: previous_owner, new_owner: new_owner });
        }
    }
}
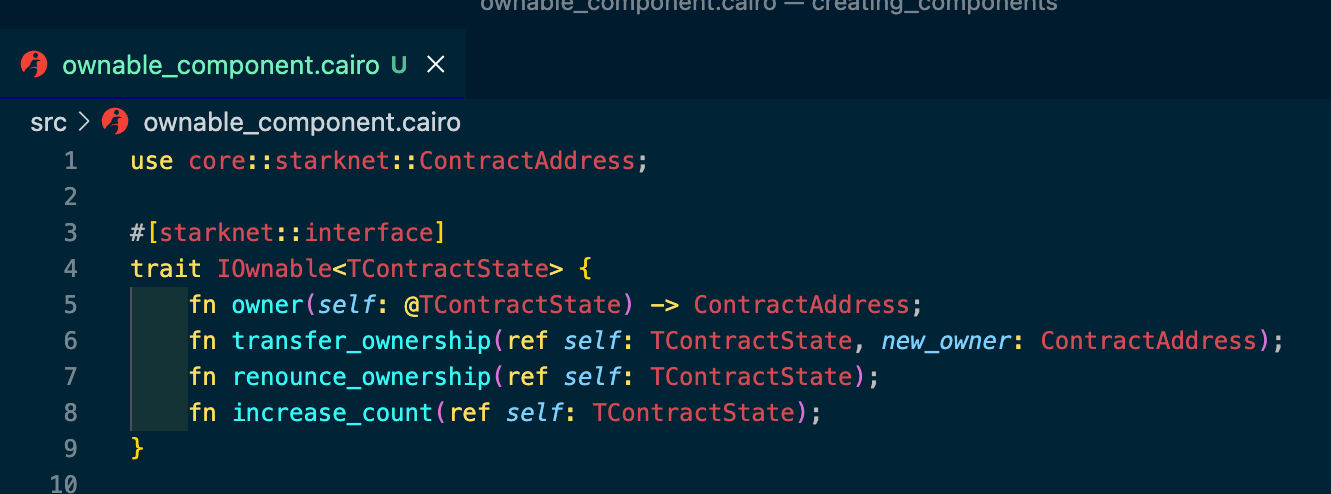
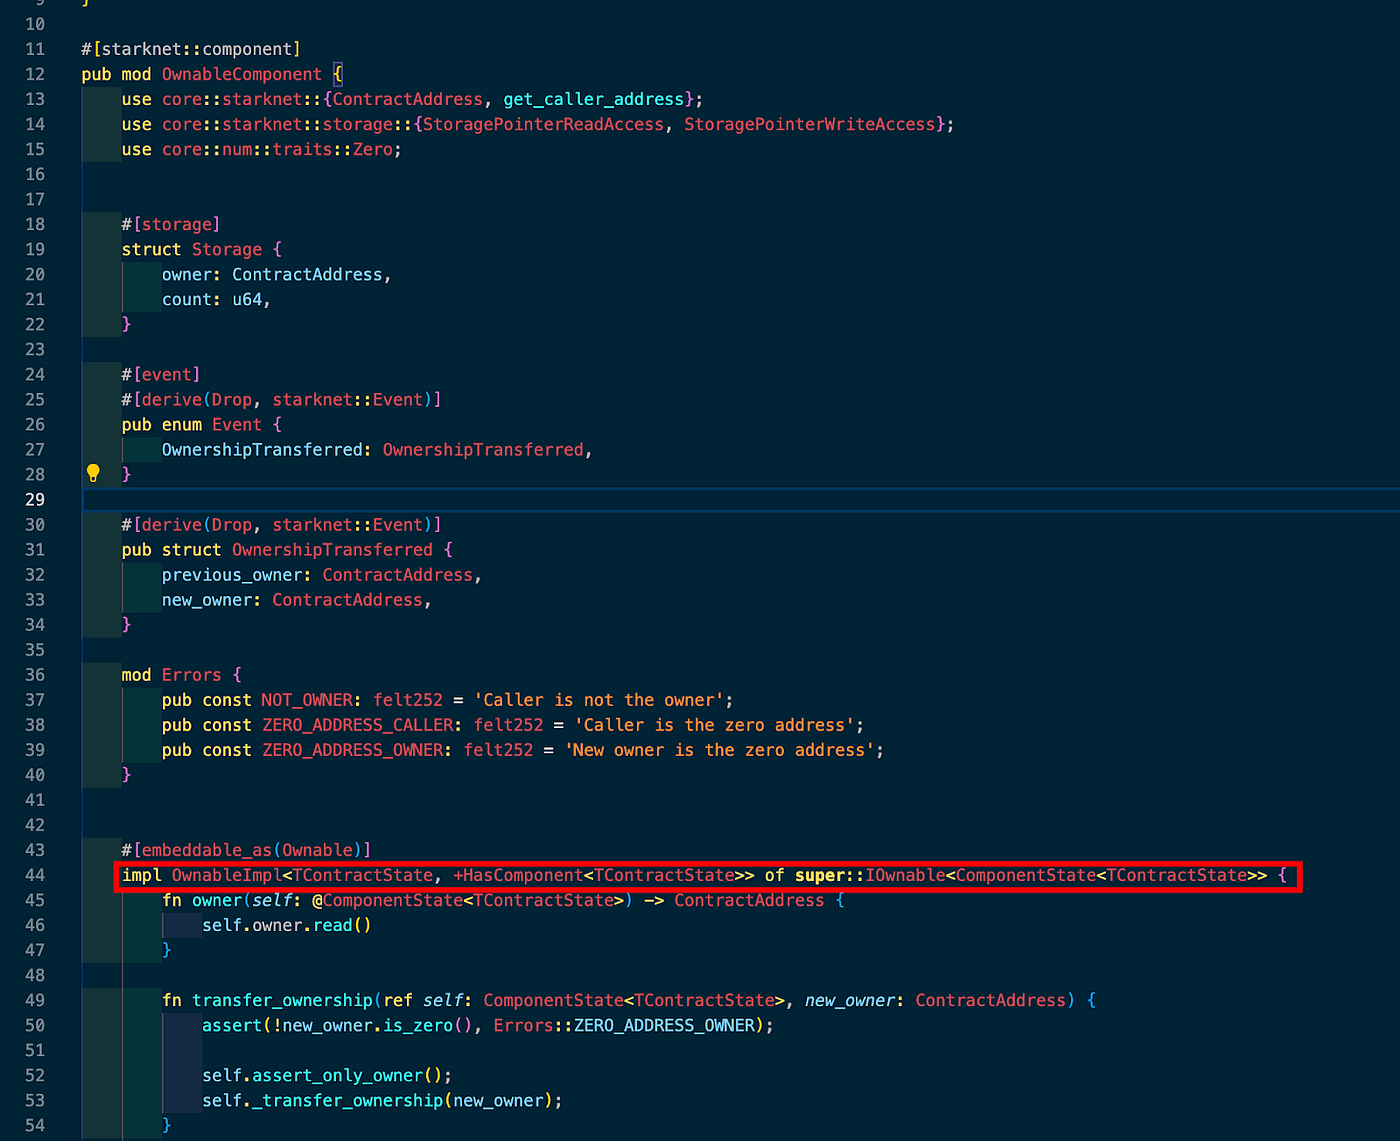
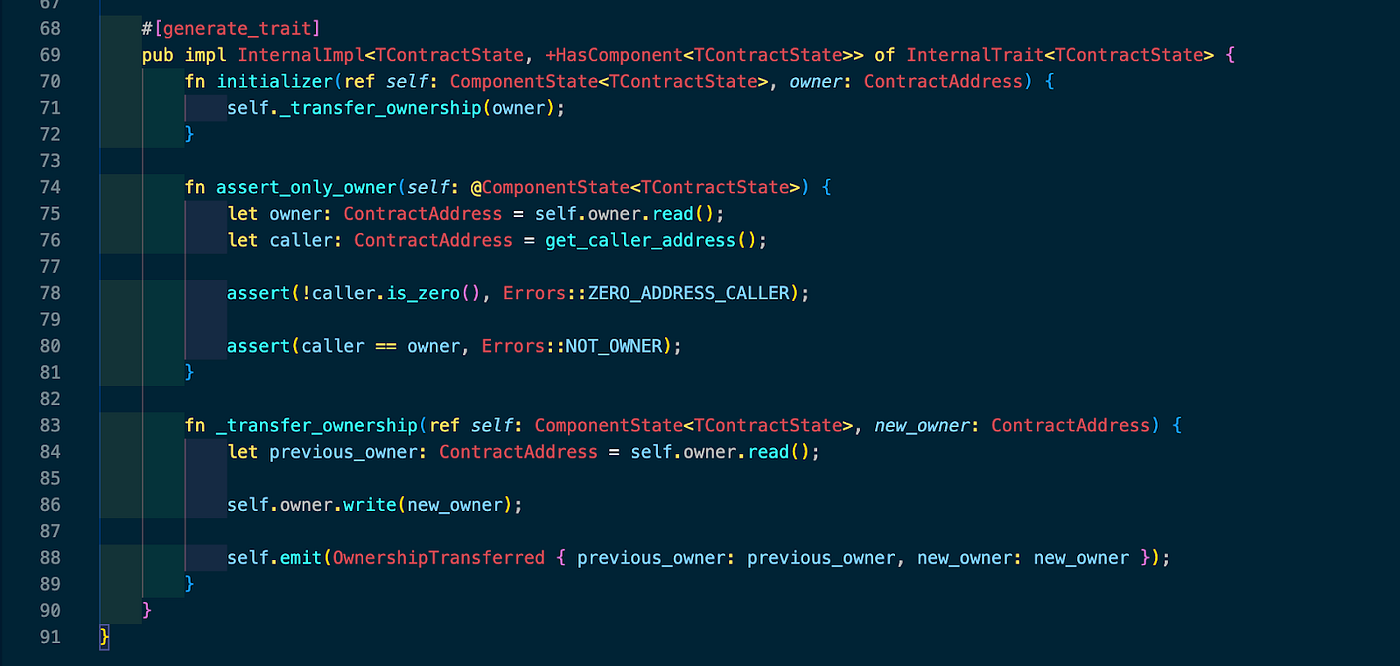
从上面的代码开始,我们将通过截图逐节进行解释。
尽管组件中的代码看起来与合约代码非常相似,但仍存在差异,并且有些地方需要更多的关注和详细的解释。
全局导入和组件接口
第 1 行是对ContractAddress类型的导入。第 3-9 行是组件接口,包含将在使用该组件的任何合约中提供外部访问的函数签名。
组件模块、存储、事件和实现
第 12 行是组件模块的定义,在第 11 行用#[starkent::component]属性装饰。
第 18-22 行是组件的存储结构体Storage。
第 24-28 行是组件的事件枚举Event。
第 36-40 行是一个模块Errors,其中包含将在impl块中使用的错误消息常量。
组件的亮点是impl块。在第 44 行,注意到它与智能合约中定义impl块的方式非常不同。这就是精彩之处的开始。
impl OwnableImpl<TContractState, +HasComponent<TContractState>>
第 44 行定义了一个impl块,它传递了一个带有trait约束+HasComponent<TContractState>的泛型TContractState。
TContractState是一个泛型类型,传递给OwnableImpl。由于它是一个泛型,可以是任何类型,但额外的trait约束+HasComponent<TContractState>规定泛型类型TContractState必须是实现了HasComponenttrait的类型。
我知道这听起来可能很多,让我们用简单的术语来解释:trait约束就像是一个“类型”在以某种方式使用之前必须满足的要求。
想象一下你有一个需要与不同类型对象一起工作的函数,在我们的例子中,对象是TContractState。但你不希望它与任何对象一起工作——你希望它与可以执行某些操作的对象一起工作(例如HasComponent)。这就是trait约束的用途。
在第 44 行,+HasComponent<TContractState>表示:“此实现将与任何TContractState一起工作,但仅当TContractState具有HasComponenttrait中定义的功能时。”
这更像是在说“我可以与任何类型的蛋糕(TContractState)一起工作,但前提是蛋糕上有糖霜(HasComponent)”。
super::IOwnable<ComponentState<TContractState>>
仍在第 44 行,让我们看看另一部分,即super::IOwnable<ComponentState<TContractState>>。super是一种将IOwnable接口引入范围的方法,因为它是在组件模块之外声明的。ComponentState<TContractState>是作为泛型参数传递给IOwnable的类型。
TContractState是表示合约状态的泛型类型参数。
ComponentState<TContractState>意味着ComponentState是TContractState的包装器。
随着我们的进展,你将理解为什么HasComponent被用作TContractState的trait约束。
通过使用TContractState作为泛型的impl,确保实际的ContractState实现HasComponent<T>trait,这使我们能够在任何合约中使用组件,只要合约实现了HasComponenttrait。
组件的内部函数实现
第 68-91 行是一个impl块,包含内部函数,这些函数不会被暴露以供使用该组件的合约外部访问,但可以在合约内部访问。
在合约中使用组件
创建组件是理解组件的目标之一。将组件用于合约将帮助你理解在组件创建过程中编写的一些代码。
组件的强大之处在于其在智能合约中的可重用性。将其集成到智能合约中需要以下步骤:
- 使用
component!()宏声明你的组件,并在宏中指定以下内容: - 组件的路径
path::to::component(这是将组件导入智能合约的部分)。 - 指向组件存储的合约存储变量的名称。(要访问组件的存储,你需要在合约的存储中有一个变量指向组件的存储)。
- 合约的
Event枚举变体的名称,指向组件的事件。(同样,要访问组件的事件,你需要在合约中创建一个事件变体,指向组件的事件)。 - 将组件的存储和事件的路径添加为合约的
Storage变量和Event枚举变体的值。 - 存储必须用
#[substorage(v0)]属性注释。 - 使用与我们在可嵌入实现中相同的 impl 别名语法将组件的逻辑嵌入到合约中。在执行此操作时,用具体的
ContractState实例化组件的泛型。确保此别名用#[abi(embed_v0)]注释,以外部暴露组件的功能。
这有很多步骤,当涉及太多术语时可能会令人困惑,让我们看看代码以更好地理解。
还记得我的项目目录结构吗?请看下面:
我们已经处理了ownable_component.cairo文件。让我们用代码填充其他文件。
在lib.cairo中,复制并粘贴以下代码:
mod ownable_component;
mod ownable_counter;在ownable_counter.cairo中,复制并粘贴以下代码:
#[starknet::contract]
mod OwnableCounter {
    use creating_components::ownable_component::OwnableComponent;
    use core::starknet::storage::{StoragePointerReadAccess, StoragePointerWriteAccess};

    component!(path: OwnableComponent, storage: ownable, event: OwnableEvent);
    #[abi(embed_v0)]
    impl OwnableImpl = OwnableComponent::Ownable<ContractState>;
    impl OwnableInternalImpl = OwnableComponent::InternalImpl<ContractState>;
    #[storage]
    struct Storage {
        counter: u128,
        #[substorage(v0)]
        ownable: OwnableComponent::Storage
    }
    #[event]
    #[derive(Drop, starknet::Event)]
    enum Event {
        OwnableEvent: OwnableComponent::Event
    }
    #[abi(embed_v0)]
    fn foo(ref self: ContractState) {
        self.ownable.assert_only_owner();
        self.counter.write(self.counter.read() + 1);
        self.ownable.increase_count();
    }
}
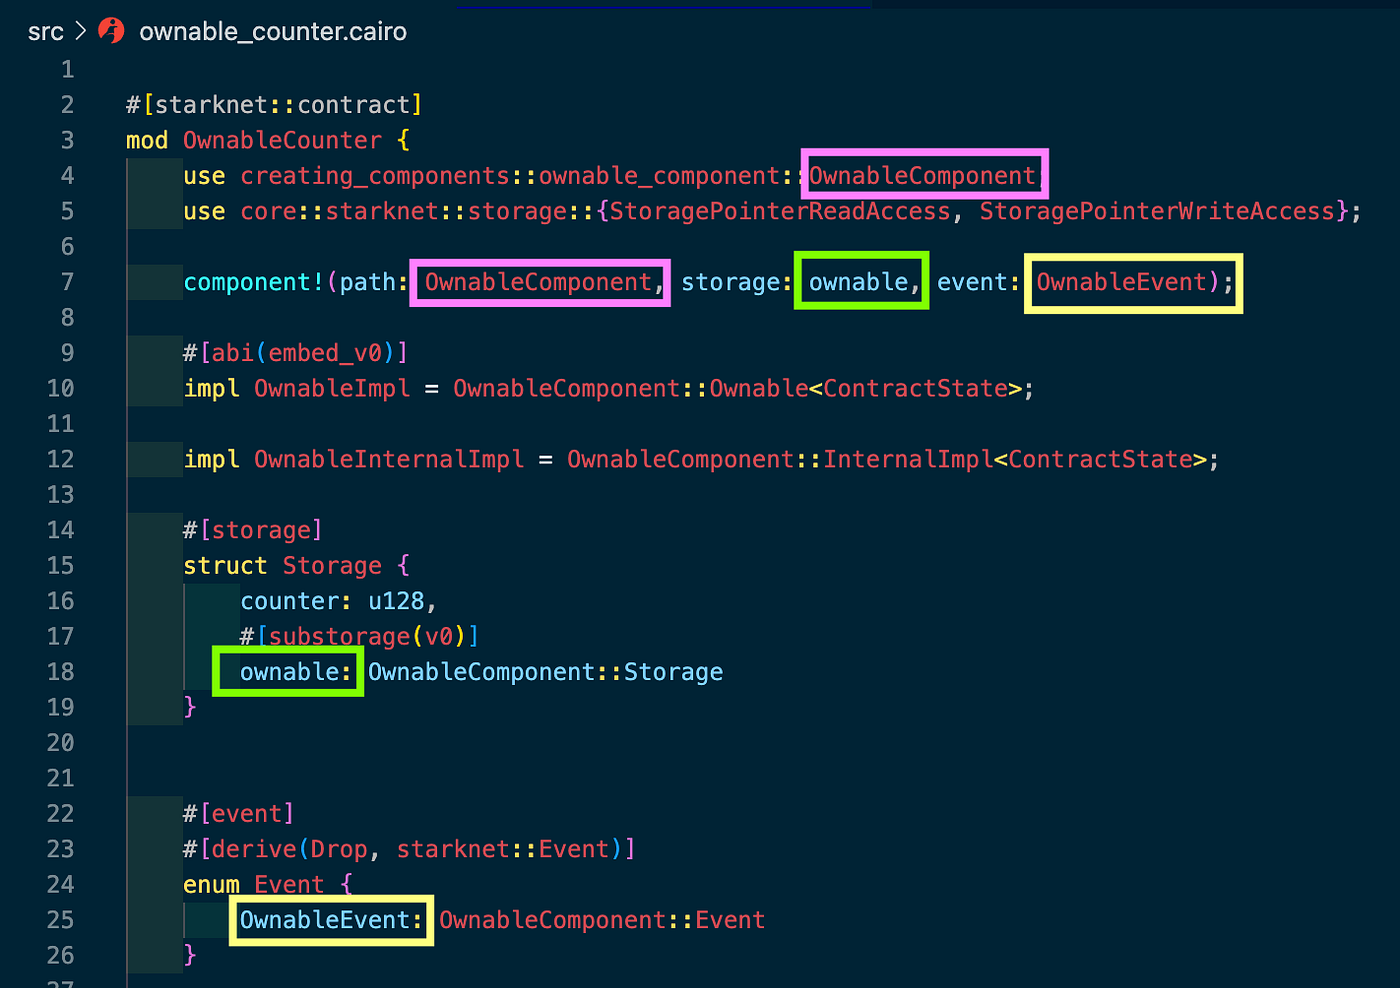
这里是有趣的部分。让我们分解上面代码片段中发生的事情,以实现对组件及其工作原理的完全(100%)理解。我们将使用代码截图进行解释。
参考使用组件的步骤:
- 使用
component!()宏声明你的组件,并在宏中指定以下内容:
- 组件的路径
path::to::component(这是将组件导入智能合约的部分) - 指向组件存储的合约存储变量的名称。(要访问组件的存储,你需要在合约的存储中有一个变量指向组件的存储)
- 合约的
Event枚举变体的名称,指向组件的事件。(同样,要访问组件的事件,你需要在合约中创建一个事件变体,指向组件的事件)
component!() 宏声明
第 3 行是合约模块,在第 2 行用 #[starknet::contract] 注解。第 4 行是我们将组件导入到 OwnableCounter 模块的地方。这也是 path::to::component。
第 7 行是我们使用 component!() 宏的地方,并传递了上面指定的 3 个参数。
OwnableComponent 是我们组件模块的名称,storage: ownable 指定了我们合约中要指向组件存储的存储变量,而 event: OwnableEvent 指向将持有组件事件的 Event 枚举变体。
component!() 宏
当在合约中使用 component!() 时,Cairo 编译器会自动为使用 component!() 宏的合约生成 HasComponent 特性的实现。
现在使用了 component!() 宏,合约的 ContractState 现在实现了 HasComponent 特性,这是在组件实现中添加的特性绑定。
那么 HasComponent 特性的重要性是什么?为什么在组件的实现中需要它? 别担心,你很快就会知道原因。
- 将组件的存储和事件路径添加为合约的
Storage变量和Event枚举变体的值。
将组件的存储和事件路径添加到合约的存储和事件中
- 使用 impl 别名语法将组件的逻辑嵌入到合约中,就像我们在可嵌入的 impl 中所做的那样。在这样做时,用具体的
ContractState实例化组件的泛型。确保这个别名用#[abi(embed_v0)]注解,以便通过我们的合约外部公开组件的功能。
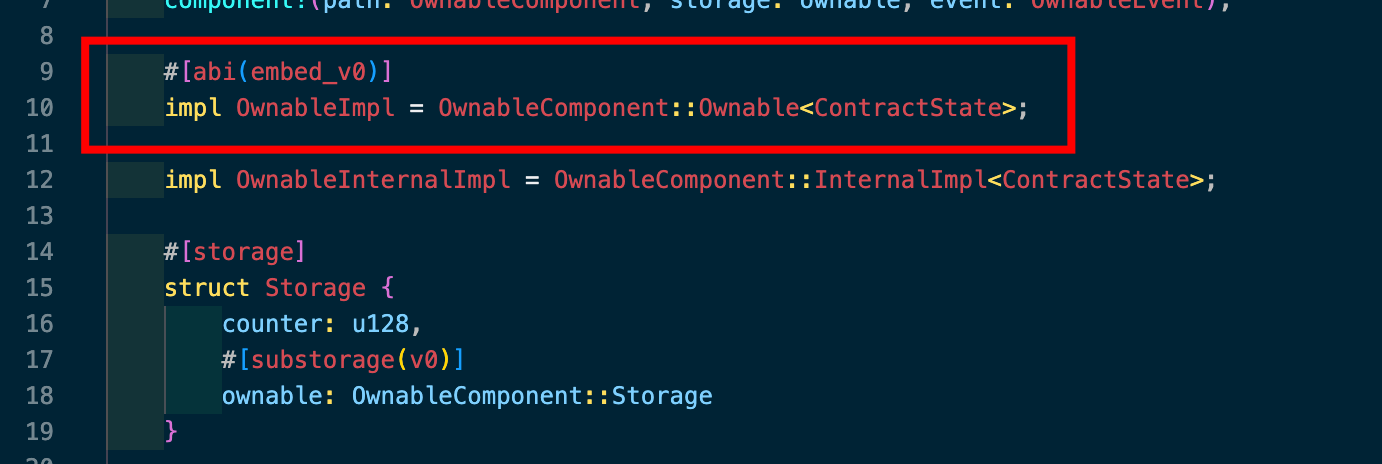
在合约中嵌入组件的逻辑
在上图中,高亮部分是我们使用 impl 别名语法将组件的逻辑嵌入到智能合约中的地方。我们还用 #[abi(embed_v0)] 注解了 impl,使得组件的功能可以通过我们的合约在外部访问。
在合约中嵌入内部函数逻辑
为什么 HasComponent 特性重要?
让我们回答这个问题:那么 HasComponent 特性的重要性是什么?为什么在组件的实现中需要它?
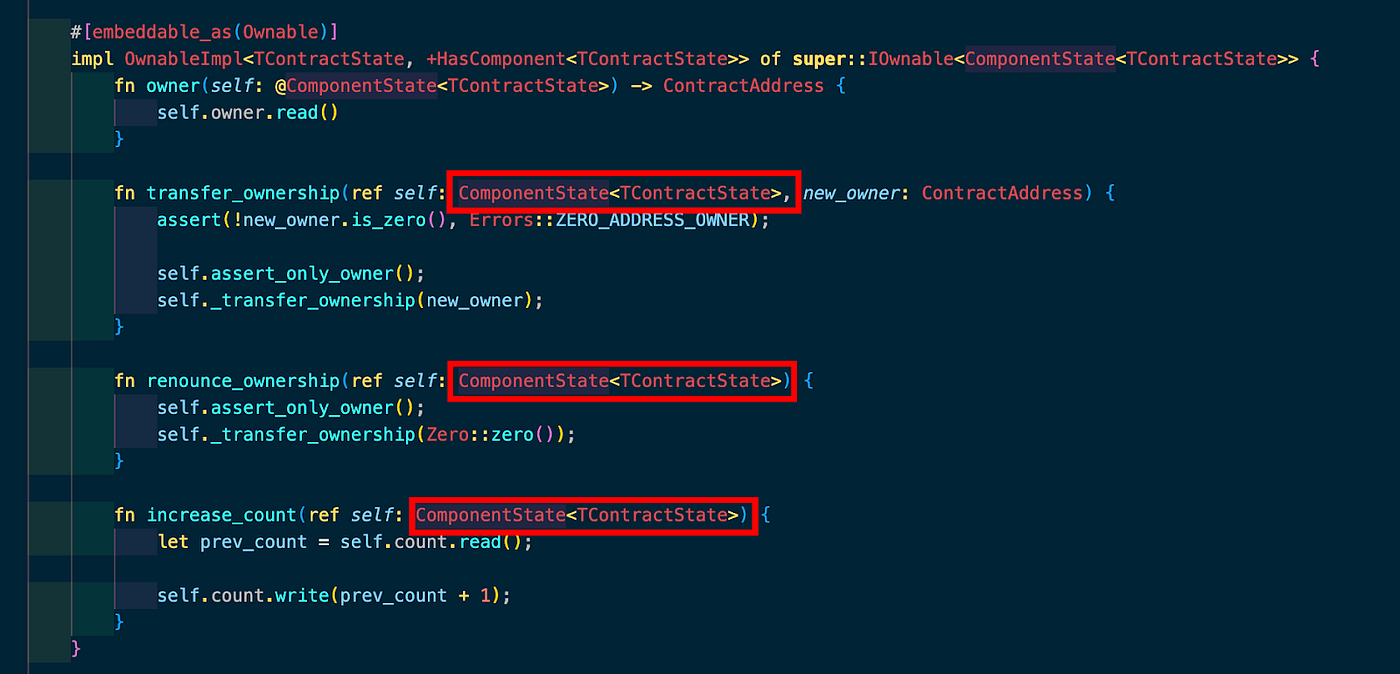
回想一下,在组件的 impl 块中,函数的 self 参数是一个用 ComponentState 包装的泛型类型 TContractState,见下图:
注意,这里没有使用 TContractState 作为 self 的泛型类型,而是使用了 ComponentState<TContractState>。
这就是 HasComponent 特性变得非常有用的地方。请更仔细地阅读以下段落。
组件中的 OwnableImpl 要求底层合约实现 HasComponent<TContractState> 特性,这在我们在合约中使用 component!() 宏时会自动生成。当这样做时,编译器会生成一个 impl,将 OwnableImpl 中的任何函数包装起来,将 self: ComponentState<TContractState> 参数替换为 self: TContractState,其中通过 HasComponent<TContractState> 特性中的 get_component 函数访问组件状态。
HasComponent 特性定义了一个接口,用于在泛型合约的实际 TContractState 和 ComponentState<TContractState> 之间进行桥接。这意味着, HasComponent 特性负责在 TContractState 和 ComponentState<TContractState> 之间切换。
以下函数签名构成了 HasComponent 特性:
// 每个组件生成
trait HasComponent<TContractState> {
    fn get_component(self: @TContractState) -> @ComponentState<TContractState>;
fn get_component_mut(ref self: TContractState) -> ComponentState<TContractState>;
fn get_contract(self: @ComponentState<TContractState>) -> @TContractState;
fn get_contract_mut(ref self: ComponentState<TContractState>) -> TContractState;
fn emit<S, impl IntoImp: traits::Into<S, Event>>(ref self: ComponentState<TContractState>, event: S);
}结论
好吧!说实话,我不知道在这里写什么,但为了不让这一部分空着,我相信理解 Cairo 中组件的最佳方式是更频繁地使用组件。将你的一些合约转换为可重用的组件并尝试使用它。
我在这篇文章中所说的一切都在 Cairo 书中。从这里读到这里 ,不要着急,慢慢来,你会知道如何创建和使用组件。
- Starknet 智能合约开发实战:Counter 合约编写、测试与部署全流程 655 浏览
- Starknet 开发实战:从环境配置到账户转账全流程指南 1232 浏览
- 零知识证据,给 Cashu 带来任意的花费条件 728 浏览
- Cairo 语言介绍 1108 浏览
- 面向 Solidity 开发者的 Cairo 教程 1748 浏览
- Starknet 中的事件 686 浏览
- Starknet上的ERC-20代币 1770 浏览
- 基础合约的结构 660 浏览
- Cairo 中的整数 756 浏览
- 类型转换 887 浏览
- Cairo 中的构造函数 623 浏览
- Cairo 中的函数可见性 842 浏览
