使用Jupiter API创建Solana交易机器人
本文详细介绍了如何使用Jupiter的v6 API和QuickNode的Metis插件在Solana区块链上创建一个简单的交易机器人。文章适用于有TypeScript和Solana基础的开发者,目标是通过监控市场条件自动执行交易。
概述
Jupiter 是Solan 领先的交换汇总器和路由协议,是开发者构建交易工具、去中心化应用 (dApps) 和其他 DeFi 应用程序的强大工具。在本指南中,我们将学习如何使用Jupiter的 v6 API 和 QuickNode 的 Metis 插件创建一个简单的Solana交易机器人。本指南面向对 TypeScript 和Solana区块链有扎实理解的开发者。无论你是希望增强投资组合、尝试新交易策略,还是探索Solana及其 DeFi 应用的能力,本指南都将为你提供必要的支持。
偏好视频操作指南?跟随 Sahil,学习如何使用Jupiter API 创建一个Solana交易机器人。
你将做哪些事情
在本指南中,你将:
- 获取Jupiter的概述
- 学习如何使用Jupiter的 v6 API
- 创建一个基于类的交易机器人,该机器人使用Jupiter的 API 将 SOL 交换为 USDC。该机器人将使用Jupiter API 监控市场特定条件,并在条件满足时执行Jupiter交易。
你将需要
- 基础的 Solana 基础知识
- 对Solana 版本化交易 的基本经验
- 安装 Node.js(版本 18.16 或更高)
- 安装最新版本的 Typescript 和 ts-node
- 拥有 SOL 和 USDC 余额的 Solana 文件系统钱包
通过 QuickNode 提升性能
可靠且高性能的区块链基础设施是充分利用你的Solana交易机器人的关键。QuickNode 提供快速和可扩展的Solana RPC 节点端点,极大地提高了你的机器人的响应能力和效率。 注册 免费账户,今天就开始使用 QuickNode。
除了可靠的 RPC 端点,考虑利用 QuickNode 的Jupiter API 插件 Metis 来优化交易执行。此附加组件可让你充分利用Jupiter的 V6 Swap API。无需担心服务器的设置或维护,我们提供滚动重启和低延迟,市场和流动池会立即显示。
此附加组件将不会使用你的账户积分,因为它依赖于它自己的Solana验证者节点,与我们的专业网络隔离,以最大限度地提高可靠性。
或者,你可以在这里访问Jupiter API 的公共端点: https://www.jupiterapi.com/。
Jupiter是什么?
Jupiter是Solana上的一个 Web3 交换程序。Jupiter允许用户寻找在Solana上交换代币的高效路径。代币交换是 DeFi 的核心特征,使用户能够在考虑每个代币市场价值的情况下,交换一种代币为另一种代币。
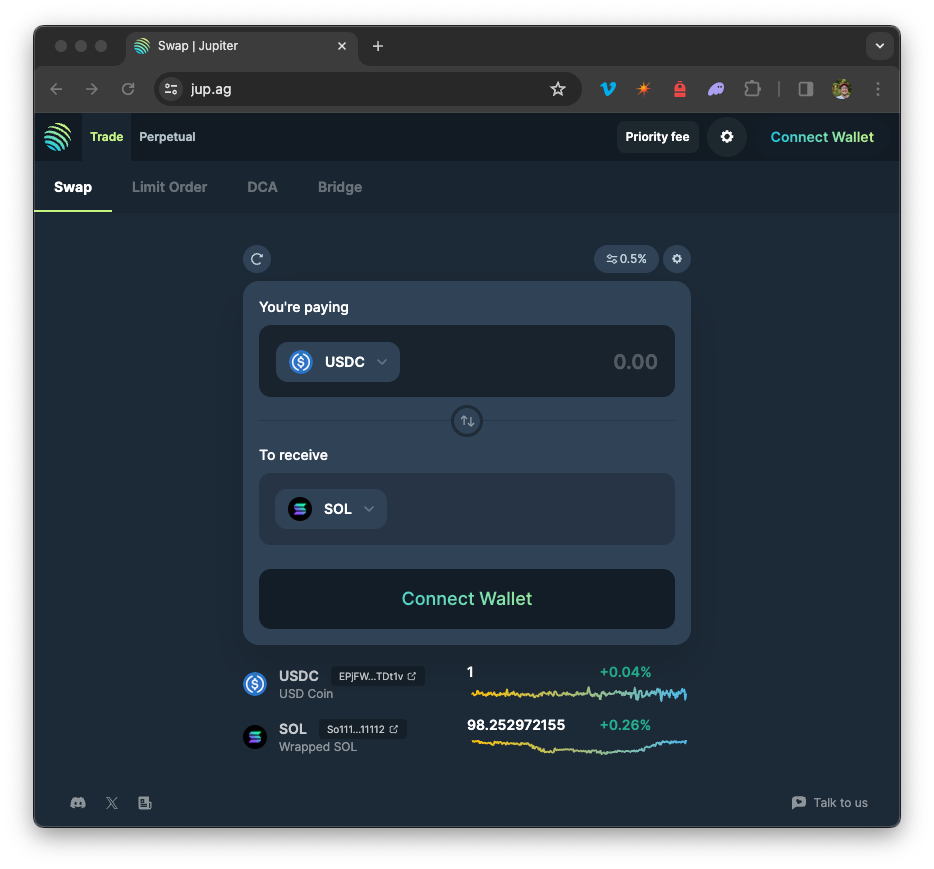 来源: jup.ag
Jupiter会从许多去中心化交易所 (DEXs) 和自动化做市商 (AMMs) 中聚合定价,并采用一种名为“智能路由”的独特算法,使用户能够寻找其交换的最佳价格。
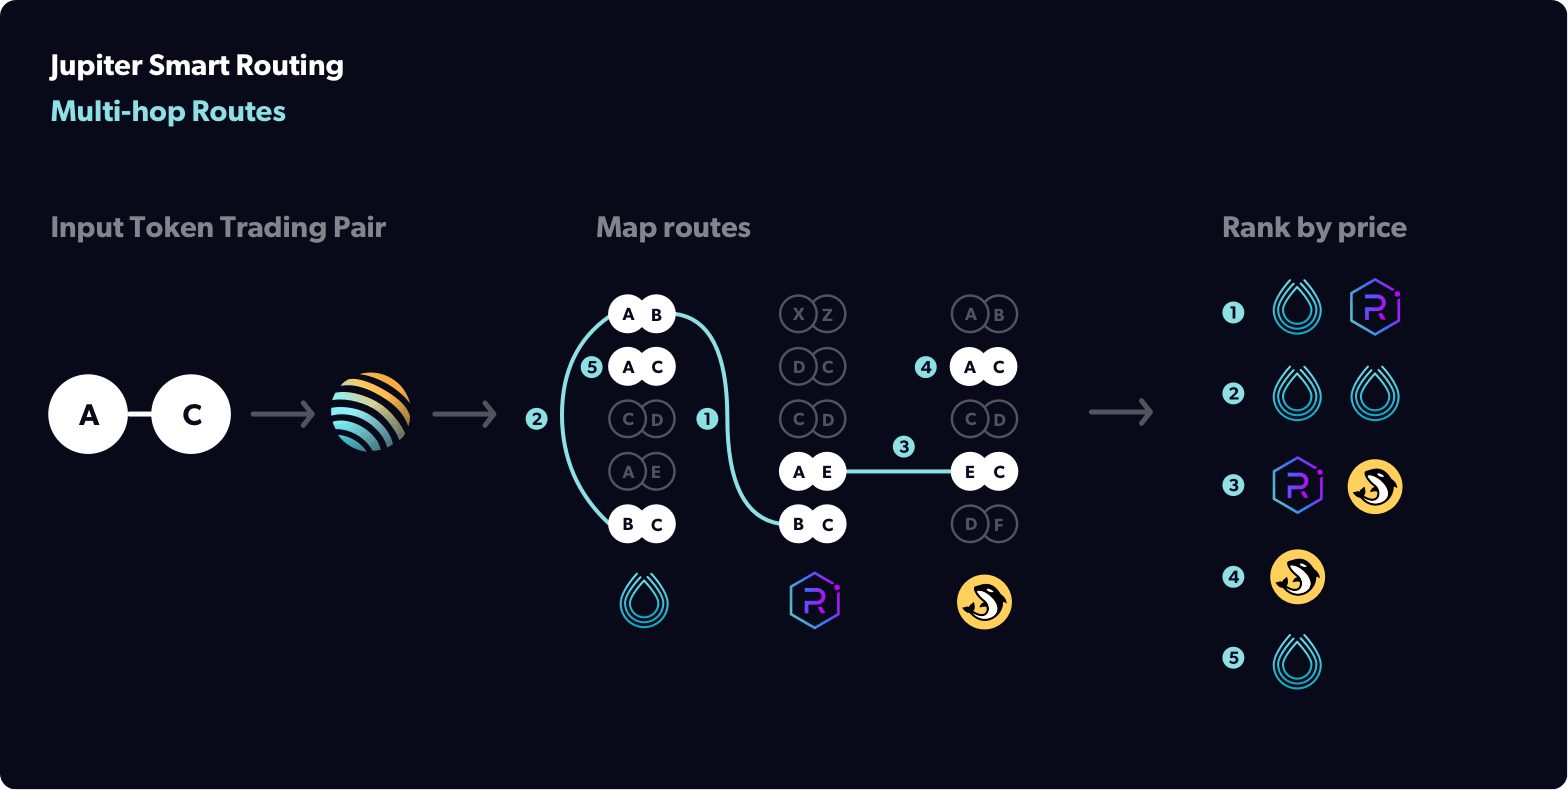 来源:
来源: Jupiter还将搜索中间交换(例如,USDC-mSOL-SOL 而不是 USDC-SOL)中的低效之处,以便为用户找到更低的成本。在执行交换时,Jupiter还利用了一个名为 交易拆分 的概念,该概念将交易拆分为跨多个 DEX 的小型交易,以找到最佳价格。
使用Jupiter的 v6 API
Jupiter交换 API 是开发者构建交易工具、去中心化应用 (dApps) 和其他 DeFi 应用的强大工具。该 API 提供对Jupiter智能路由算法的访问,允许开发者找到最佳的交换价格并创建Solana交易/指令以执行交易。该 API 包含五个主要方法:
| 端点 | JS 方法名称 | 类型 | 描述 |
|---|---|---|---|
/quote |
quoteGet<br>quoteGetRaw |
GET | 获取两个代币和交换金额所给出的最佳价格报价 |
/swap |
swapPost<br>swapPostRaw |
POST | 从报价返回Solana交换事务 |
/swap-instructions |
swapInstructionsPost<br>swapInstructionsPostRaw |
POST | 从报价返回Solana交换指令 |
/program-id-to-label |
programIdToLabelGet<br>programIdToLabelGetRaw |
GET | 返回所有程序 ID 的名称/标签映射 |
/indexed-route-map |
indexedRouteMapGet<br>indexedRouteMapGetRaw |
GET | 返回一个哈希图,输入铸造作为键,作为值的有效输出铸造的数组 |
请求可以采用以下格式:{server}/{endpoint}?{query/body}。以下是一个 cURL 示例,用于获取将 100 USDC 交换为 SOL 的报价:
curl -L 'https://jupiter-swap-api.quiknode.pro/YOUR_ENDPOINT/quote?inputMint=EPjFWdd5AufqSSqeM2qN1xzybapC8G4wEGGkZwyTDt1v&outputMint=So11111111111111111111111111111111111111112&amount=100000000' \
-H 'Accept: application/json'
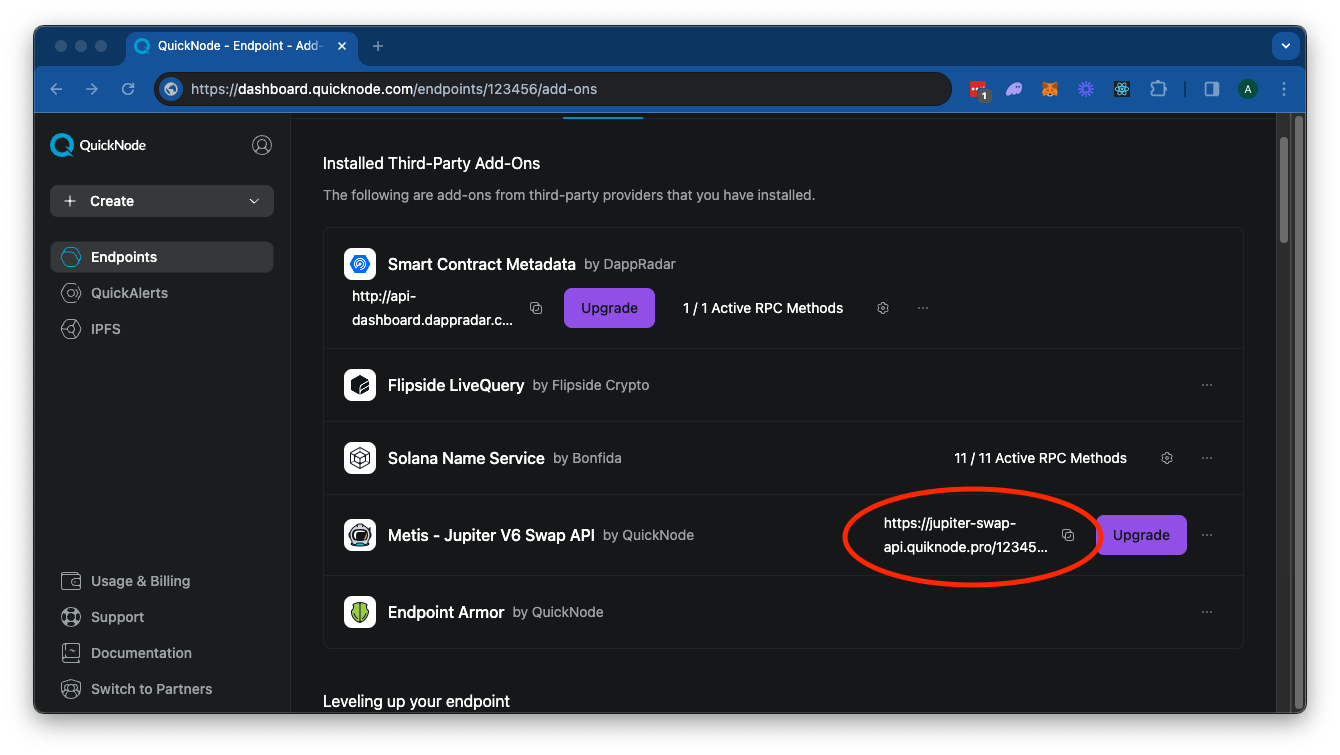
确保将 https://jupiter-swap-api.quiknode.pro/YOUR_ENDPOINT 替换为你自己的 Metis 端点(或者,你可以使用我们的公共端点:https://public.jupiterapi.com - 尽管某些方法可能不可用)。你可以从你的 QuickNode 数据仪表板的附加组件页面 ( https://dashboard.quicknode.com/endpoints/YOUR_ENDPOINT/add-ons) 找到你的 Metis 地址:
要使用Jupiter JS 客户端,你可以通过 npm 安装它:
npm install @jup-ag/api
你需要创建Jupiter API 客户端的一个实例,并传递你的 Metis 密钥(例如,https://jupiter-swap-api.quiknode.pro/YOUR_ENDPOINT)或在此处找到的公共端点 可用链接:
import { createJupiterApiClient } from '@jup-ag/api';

const ENDPOINT = `https://jupiter-swap-api.quiknode.pro/XX123456`; // ? 用你的 Metis 密钥或公共端点替换 https://www.jupiterapi.com/
const CONFIG = {
    basePath: ENDPOINT
};
const jupiterApi = createJupiterApiClient(CONFIG);
然后调用你需要的方法,例如:
    jupiterApi.quoteGet({
        inputMint: "EPjFWdd5AufqSSqeM2qN1xzybapC8G4wEGGkZwyTDt1v",
        outputMint: "So11111111111111111111111111111111111111112",
        amount: 100_000_000,
    }).then((quote) => {
        console.log(quote.outAmount, quote.outputMint);
    }).catch((error) => {
        console.error(error);
    });
所有方法和文档可在 [Jupiter站点] 查找:
让我们通过创建一个简单的交易机器人来测试一下,它使用Jupiter的 API 监控市场特定条件,并在满足条件时执行交易。
交易机器人
开始之前
这个示例只是用于教育目的。请勿在生产环境中使用此代码。在Solana主网执行的交易是不可逆的,并可能导致财务损失。在做出任何投资决定之前,请务必进行自己的研究并咨询财务顾问。
下面是我们的机器人将要做的事情:
- 机器人将期待一个拥有 SOL 和 USDC 余额的钱包。
- 机器人将在指定的时间间隔内监控市场(使用Jupiter的获取报价方法)。
- 机器人将在市场价格满足我们定义的条件时,使用Jupiter的交换方法执行交易。
- 如果我们的交换成功,机器人将记录这次交换,并更新下一个交易条件,以便机器人将在之前交换的预定义百分比变化基础上执行下一个交换。
- 机器人将运行,直到我们终止它或 SOL 不足以执行下一次交易。
设置你的项目
首先,让我们创建一个新的项目目录:
mkdir jupiter-trading-bot
cd jupiter-trading-bot
然后,初始化一个新的 Node.js 项目:
npm init -y
接下来,安装依赖项。我们将需要Jupiter API、Solana Web3.js、Solana SPL Token 程序和 dotenv:
npm install @jup-ag/api @solana/web3.js@1 dotenv @solana/spl-token
在你的项目目录中创建三个文件:bot.ts、index.ts 和 .env:
echo > bot.ts && echo > index.ts && echo > .env
定义 .env 变量
打开 .env 文件,添加以下变量:
## 用你的 Solana 钱包秘密密钥替换
SECRET_KEY=[00, 00, ... 00]
## 用你的 QuickNode Solana 主网 RPC 端点替换
SOLANA_ENDPOINT=https://example.solana-mainnet.quiknode.pro/123456/
## 用你的 QuickNode Jupiter API 端点替换(或公共端点:https://www.jupiterapi.com/)
METIS_ENDPOINT=https://jupiter-swap-api.quiknode.pro/123456
确保用你自己的变量替换这些。如果你没有文件系统钱包,可以通过运行以下命令创建一个:
solana-keygen new --no-bip39-passphrase --silent --outfile ./my-keypair.json
导入依赖项
打开 bot.ts 并导入必要的依赖项:
import { Keypair, Connection, PublicKey, VersionedTransaction, LAMPORTS_PER_SOL, TransactionInstruction, AddressLookupTableAccount, TransactionMessage, TransactionSignature, TransactionConfirmationStatus, SignatureStatus } from "@solana/web3.js";
import { createJupiterApiClient, DefaultApi, ResponseError, QuoteGetRequest, QuoteResponse, Instruction, AccountMeta } from '@jup-ag/api';
import { getAssociatedTokenAddressSync } from "@solana/spl-token";
import * as fs from 'fs';
import * as path from 'path';
定义接口
让我们创建几个接口来定义机器人的配置和交易条件:
interface ArbBotConfig {
    solanaEndpoint: string; // 例如,“https://ex-am-ple.solana-mainnet.quiknode.pro/123456/”
    metisEndpoint: string;  // 例如,“https://jupiter-swap-api.quiknode.pro/123456/”
    secretKey: Uint8Array;
    firstTradePrice: number; // 例如 94 USDC/SOL
    targetGainPercentage?: number;
    checkInterval?: number;
    initialInputToken: SwapToken;
    initialInputAmount: number;
}

interface NextTrade extends QuoteGetRequest {
    nextTradeThreshold: number;
}

export enum SwapToken {
    SOL,
    USDC
}

interface LogSwapArgs {
    inputToken: string;
    inAmount: string;
    outputToken: string;
    outAmount: string;
    txId: string;
    timestamp: string;
}
- ArbBotConfig 将用于定义机器人的配置,包括Solana和Jupiter API 端点、秘密密钥、初始交易价格、目标收益百分比、检查间隔以及初始输入代币和金额。
- NextTrade 将用于定义下一个交易的条件,包括输入和输出代币、金额和阈值。
- LogSwapArgs 将用于记录每次交易的详细信息到 JSON 文件中。
定义机器人类
让我们构建一个 ArbBot 类来处理机器人的逻辑。我们将预定义类及其方法,然后在下一节中填充详细信息。将以下内容添加到 bot.ts:
export class ArbBot {
    private solanaConnection: Connection;
    private jupiterApi: DefaultApi;
    private wallet: Keypair;
    private usdcMint: PublicKey = new PublicKey("EPjFWdd5AufqSSqeM2qN1xzybapC8G4wEGGkZwyTDt1v");
    private solMint: PublicKey = new PublicKey("So11111111111111111111111111111111111111112");
    private usdcTokenAccount: PublicKey;
    private solBalance: number = 0;
    private usdcBalance: number = 0;
    private checkInterval: number = 1000 * 10;
    private lastCheck: number = 0;
    private priceWatchIntervalId?: NodeJS.Timeout;
    private targetGainPercentage: number = 1;
    private nextTrade: NextTrade;
    private waitingForConfirmation: boolean = false;

    constructor(config: ArbBotConfig) {
        // TODO
    }

    async init(): Promise<void> {
        console.log(`? 为钱包: ${this.wallet.publicKey.toBase58()} 启动套利机器人。`)
        await this.refreshBalances();
        console.log(`? 当前余额:\nSOL: ${this.solBalance / LAMPORTS_PER_SOL},\nUSDC: ${this.usdcBalance}`);
        this.initiatePriceWatch();
    }

    private async refreshBalances(): Promise<void> {
        // TODO
    }

    private initiatePriceWatch(): void {
        // TODO
    }

    private async getQuote(quoteRequest: QuoteGetRequest): Promise<QuoteResponse> {
        // TODO
    }

    private async evaluateQuoteAndSwap(quote: QuoteResponse): Promise<void> {
        // TODO
    }

    private async confirmTransaction(
        connection: Connection,
        signature: TransactionSignature,
        desiredConfirmationStatus: TransactionConfirmationStatus = 'confirmed',
        timeout: number = 30000,
        pollInterval: number = 1000,
        searchTransactionHistory: boolean = false
    ): Promise<SignatureStatus> {
        // TODO
    }

    private async executeSwap(route: QuoteResponse): Promise<void> {
        // TODO
    }

    private async updateNextTrade(lastTrade: QuoteResponse): Promise<void> {
        // TODO
    }

    private async logSwap(args: LogSwapArgs): Promise<void> {
        const { inputToken, inAmount, outputToken, outAmount, txId, timestamp } = args;
        const logEntry = {
            inputToken,
            inAmount,
            outputToken,
            outAmount,
            txId,
            timestamp,
        };

        const filePath = path.join(__dirname, 'trades.json');

        try {
            if (!fs.existsSync(filePath)) {
                fs.writeFileSync(filePath, JSON.stringify([logEntry], null, 2), 'utf-8');
            } else {
                const data = fs.readFileSync(filePath, { encoding: 'utf-8' });
                const trades = JSON.parse(data);
                trades.push(logEntry);
                fs.writeFileSync(filePath, JSON.stringify(trades, null, 2), 'utf-8');
            }
            console.log(`✅ 记录交换: ${inAmount} ${inputToken} -> ${outAmount} ${outputToken},\n  TX: ${txId}}`);
        } catch (error) {
            console.error('记录交换时出错:', error);
        }
    }

    private terminateSession(reason: string): void {
        console.warn(`❌ 正在终止机器人...${reason}`);
        console.log(`当前余额:\nSOL: ${this.solBalance / LAMPORTS_PER_SOL},\nUSDC: ${this.usdcBalance}`);
        if (this.priceWatchIntervalId) {
            clearInterval(this.priceWatchIntervalId);
            this.priceWatchIntervalId = undefined; // 清除对间隔的引用
        }
        setTimeout(() => {
            console.log('机器人已被终止。');
            process.exit(1);
        }, 1000);
    }

    private instructionDataToTransactionInstruction (
        instruction: Instruction | undefined
    ) {
        if (instruction === null || instruction === undefined) return null;
        return new TransactionInstruction({
            programId: new PublicKey(instruction.programId),
            keys: instruction.accounts.map((key: AccountMeta) => ({
                pubkey: new PublicKey(key.pubkey),
                isSigner: key.isSigner,
                isWritable: key.isWritable,
            })),
            data: Buffer.from(instruction.data, "base64"),
        });
    };

    private async getAdressLookupTableAccounts (
        keys: string[], connection: Connection
    ): Promise<AddressLookupTableAccount[]> {
        const addressLookupTableAccountInfos =
            await connection.getMultipleAccountsInfo(
                keys.map((key) => new PublicKey(key))
            );

        return addressLookupTableAccountInfos.reduce((acc, accountInfo, index) => {
            const addressLookupTableAddress = keys[index];
            if (accountInfo) {
                const addressLookupTableAccount = new AddressLookupTableAccount({
                    key: new PublicKey(addressLookupTableAddress),
                    state: AddressLookupTableAccount.deserialize(accountInfo.data),
                });
                acc.push(addressLookupTableAccount);
            }

            return acc;
        }, new Array<AddressLookupTableAccount>());
    };

    private async postTransactionProcessing(quote: QuoteResponse, txid: string): Promise<void> {
        const { inputMint, inAmount, outputMint, outAmount } = quote;
        await this.updateNextTrade(quote);
        await this.refreshBalances();
        await this.logSwap({ inputToken: inputMint, inAmount, outputToken: outputMint, outAmount, txId: txid, timestamp: new Date().toISOString() });
    }
}
在继续之前,让我们用以下内容概述一下这里的内容:
- 首先,我们定义了一些类属性,包括Solana连接、Jupiter API、钱包、USDC 和 SOL 代币及其流动池、余额、检查间隔、上次检查时间、价格监控间隔 ID、目标收益百分比、下一个交易条件,以及一个标志以指示机器人是否在等待确认。我们将利用这些属性来跟踪机器人的状态并管理其交易逻辑。
- 我们定义一个构造函数,接收配置对象并初始化机器人的属性。我们还定义了一个
init方法,用于启动机器人并获取初始余额。 - 我们定义了一些助手方法:
logSwap将用于记录每次交易的详细信息到 JSON 文件中。terminateSession将用于终止机器人并记录终止原因。instructionDataToTransactionInstruction将把一条指令转换为交易指令。getAdressLookupTableAccounts将用于获取地址查找表账户。postTransactionProcessing将在成功完成交换后触发必要步骤(updateNextTrade、refreshBalances和logSwap)。我们将在下一节中定义这些方法。
构造函数
让我们构建构造函数以初始化 ArbBot 的实例。我们已经定义了 ArbBotConfig 接口,所以可以用于定义构造函数的参数。将以下内容添加到 bot.ts:
    constructor(config: ArbBotConfig) {
        const {
            solanaEndpoint,
            metisEndpoint,
            secretKey,
            targetGainPercentage,
            checkInterval,
            initialInputToken,
            initialInputAmount,
            firstTradePrice
        } = config;
        this.solanaConnection = new Connection(solanaEndpoint);
        this.jupiterApi = createJupiterApiClient({ basePath: metisEndpoint });
        this.wallet = Keypair.fromSecretKey(secretKey);
        this.usdcTokenAccount = getAssociatedTokenAddressSync(this.usdcMint, this.wallet.publicKey);
        if (targetGainPercentage) { this.targetGainPercentage = targetGainPercentage }
        if (checkInterval) { this.checkInterval = checkInterval }
        this.nextTrade = {
            inputMint: initialInputToken === SwapToken.SOL ? this.solMint.toBase58() : this.usdcMint.toBase58(),
            outputMint: initialInputToken === SwapToken.SOL ? this.usdcMint.toBase58() : this.solMint.toBase58(),
            amount: initialInputAmount,
            nextTradeThreshold: firstTradePrice,
        };
    }
- 首先,我们对配置对象进行结构解构,并将属性分配给类实例。
- 然后使用其各自的端点创建新的Solana连接和Jupiter API 客户端。
- 我们还定义从秘密密钥构建的新钱包实例。
- 然后我们蒐集与钱包相关的 USDC 代币账户。
- 如果提供了目标收益百分比和检查间隔,则为它们赋值(如我们在类中设置了默认值)。
- 最后,我们基于初始输入代币(和金额)及首次交易价格设置下一个交易条件。交易的方向依据传入初始输入代币配置参数的代币决定。
我们已经定义了公共的 .init() 方法。此方法可以与构造函数结合使用,以初始化机器人并启动价格监控间隔。以下是在客户端中可能的用法示例:
    const bot = new ArbBot({
        solanaEndpoint: process.env.SOLANA_ENDPOINT ?? defaultConfig.solanaEndpoint,
        metisEndpoint: process.env.METIS_ENDPOINT ?? defaultConfig.jupiter,
        secretKey: decodedSecretKey,
        firstTradePrice: 0.1036 * LAMPORTS_PER_SOL,
        targetGainPercentage: 0.15,
        initialInputToken: SwapToken.USDC,
        initialInputAmount: 10_000_000,
    });

    await bot.init();
现在让我们定义 refreshBalances 和 initiatePriceWatch 方法,这两个方法是构造函数的 init 中的调用。
刷新余额
refreshBalances 方法将用于获取机器人钱包的当前 SOL 和 USDC 余额。将以下内容添加到 bot.ts:
    private async refreshBalances(): Promise<void> {
        try {
            const results = await Promise.allSettled([\
                this.solanaConnection.getBalance(this.wallet.publicKey),\
                this.solanaConnection.getTokenAccountBalance(this.usdcTokenAccount)\
            ]);

            const solBalanceResult = results[0];
            const usdcBalanceResult = results[1];

            if (solBalanceResult.status === 'fulfilled') {
                this.solBalance = solBalanceResult.value;
            } else {
                console.error('获取 SOL 余额时出错:', solBalanceResult.reason);
            }

            if (usdcBalanceResult.status === 'fulfilled') {
                this.usdcBalance = usdcBalanceResult.value.value.uiAmount ?? 0;
            } else {
                this.usdcBalance = 0;
            }

            if (this.solBalance < LAMPORTS_PER_SOL / 100) {
                this.terminateSession("SOL 余额低。");
            }
        } catch (error) {
            console.error('刷新余额时意外出错:', error);
        }
    }
以下是我们所做的:
- 使用
Promise.allSettled同时获取 SOL 和 USDC 余额,使用getBalance和getTokenAccountBalance方法来获取。 - 然后根据结果更新机器人的 SOL 和 USDC 余额,如果成功则更新,否则记录错误。
- 我们还检查 SOL 余额是否低于 0.01 SOL,如果是,则终止机器人。
启动价格监控
initiatePriceWatch 方法将用于启动价格监控间隔。将以下内容添加到 bot.ts:
    private initiatePriceWatch(): void {
        this.priceWatchIntervalId = setInterval(async () => {
            const currentTime = Date.now();
            if (currentTime - this.lastCheck >= this.checkInterval) {
                this.lastCheck = currentTime;
                try {
                    if (this.waitingForConfirmation) {
                        console.log('等待之前的交易确认...');
                        return;
                    }
                    const quote = await this.getQuote(this.nextTrade);
                    this.evaluateQuoteAndSwap(quote);
                } catch (error) {
                    console.error('获取报价时出错:', error);
                }
            }
        }, this.checkInterval);
    }
这只是一个简单的间隔,这将在:
- 上次检查时间与检查间隔时间大于时。
- 机器人没有在等待确认的情况下继续执行(我们将在
executeSwap和postTransactionProcessing方法中对这个标志进行开关,以确保机器人在等待确认时不会执行交易)。
让我们接下来定义 getQuote、evaluateQuoteAndSwap 和 executeSwap 方法。
获取报价
要获取报价,我们将依赖Jupiter的 quoteGet 方法。将以下内容添加到 bot.ts:
    private async getQuote(quoteRequest: QuoteGetRequest): Promise<QuoteResponse> {
        try {
            const quote: QuoteResponse | null = await this.jupiterApi.quoteGet(quoteRequest);
            if (!quote) {
                throw new Error('未找到报价');
            }
            return quote;
        } catch (error) {
            if (error instanceof ResponseError) {
                console.log(await error.response.json());
            }
            else {
                console.error(error);
            }
            throw new Error('无法找到报价');
        }
    }
这应该与我们在概述部分的示例类似。我们只是将报价请求传递给 quoteGet 方法,并在存在报价的情况下返回。如果发现错误,则记录错误并抛出新错误。如果你回头看看 initiatePriceWatch,你会看到我们将 this.nextTrade 传递给了此方法,我们的 NextTrade 接口扩展了 QuoteGetRequest 接口,因此我们可以直接将其传递给 quoteGet 方法。
评估报价并交换
我们需要一种方法来确保报价满足我们的条件,然后才能执行交易。我们将定义 evaluateQuoteAndSwap 方法来处理它。将以下内容添加到 bot.ts:
    private async evaluateQuoteAndSwap(quote: QuoteResponse): Promise<void> {
        let difference = (parseInt(quote.outAmount) - this.nextTrade.nextTradeThreshold) / this.nextTrade.nextTradeThreshold;
        console.log(`? 当前价格: ${quote.outAmount} 高于或低于下次交易阈值: ${this.nextTrade.nextTradeThreshold} 的差异为 ${Math.abs(difference * 100).toFixed(2)}%。`);
        if (parseInt(quote.outAmount) > this.nextTrade.nextTradeThreshold) {
            try {
                this.waitingForConfirmation = true;
                await this.executeSwap(quote);
            } catch (error) {
                console.error('执行交换时出错:', error);
            }
        }
    }
我们的 evaluateQuoteAndSwap 方法将接受来自 quoteGet 方法的响应,然后计算报价的输出金额和下一个交易阈值之间的差异。如果差异为正,我们将执行交换。我们还将将 waitingForConfirmation 标志设置为 true,以防止机器人在等待确认时尝试执行其他交易。为了调试/演示,我们还将记录当前价格以及当前价格和下一个交易阈值之间的差异。
确认交易
我们需要一种方式确保交易得到确认。我们将定义 confirmTransaction 方法来处理它。将以下内容添加到 bot.ts:
    private async confirmTransaction(
        connection: Connection,
        signature: TransactionSignature,
        desiredConfirmationStatus: TransactionConfirmationStatus = 'confirmed',
        timeout: number = 30000,
        pollInterval: number = 1000,
        searchTransactionHistory: boolean = false
    ): Promise<SignatureStatus> {
        const start = Date.now();

        while (Date.now() - start < timeout) {
            const { value: statuses } = await connection.getSignatureStatuses([signature], { searchTransactionHistory });

            if (!statuses || statuses.length === 0) {
                throw new Error('获取签名状态失败');
            }

            const status = statuses[0];

            if (status === null) {
                await new Promise(resolve => setTimeout(resolve, pollInterval));
                continue;
            }

            if (status.err) {
                throw new Error(`交易失败: ${JSON.stringify(status.err)}`);
            }

            if (status.confirmationStatus && status.confirmationStatus === desiredConfirmationStatus) {
                return status;
            }

            if (status.confirmationStatus === 'finalized') {
                return status;
            }

            await new Promise(resolve => setTimeout(resolve, pollInterval));
        }

        throw new Error(`交易确认超时,持续时间为 ${timeout}ms`);
    };
此方法将轮询Solana网络以查看交易状态,直到其确认或超时到达。我们为超时和轮询间隔中包括了一些默认值,但你可以根据需要调整它们。
执行交换
最后,如果我们的机器人检测到市场条件适宜以满足我们的交易要求,我们应该执行交易。我们将为此方法打包很多内容:
- 从Jupiter的 API 获取交换指令
- 将接收到的指令数据重构为交易指令
- 获取地址查找表账户
- 创建并发送Solana交易
- 成功后,记录交换并更新下一个交易条件
让我们添加我们的代码,然后我们将分解它:
    private async executeSwap(route: QuoteResponse): Promise<void> {
        try {
            const {
                computeBudgetInstructions,
                setupInstructions,
                swapInstruction,
                cleanupInstruction,
                addressLookupTableAddresses,
            } = await this.jupiterApi.swapInstructionsPost({
                swapRequest: {
                    quoteResponse: route,
                    userPublicKey: this.wallet.publicKey.toBase58(),
                    prioritizationFeeLamports: 'auto'
                },
            });

            const instructions: TransactionInstruction[] = [\
                ...computeBudgetInstructions.map(this.instructionDataToTransactionInstruction),\
                ...setupInstructions.map(this.instructionDataToTransactionInstruction),\
                this.instructionDataToTransactionInstruction(swapInstruction),\
                this.instructionDataToTransactionInstruction(cleanupInstruction),\
            ].filter((ix) => ix !== null) as TransactionInstruction[];

            const addressLookupTableAccounts = await this.getAdressLookupTableAccounts(
                addressLookupTableAddresses,
                this.solanaConnection
            );

            const { blockhash, lastValidBlockHeight } = await this.solanaConnection.getLatestBlockhash();

            const messageV0 = new TransactionMessage({
                payerKey: this.wallet.publicKey,
                recentBlockhash: blockhash,
                instructions,
            }).compileToV0Message(addressLookupTableAccounts);

            const transaction = new VersionedTransaction(messageV0);
            transaction.sign([this.wallet]);

            const rawTransaction = transaction.serialize();
            const txid = await this.solanaConnection.sendRawTransaction(rawTransaction, {
                skipPreflight: true,
                maxRetries: 2
            });
            const confirmation = await this.confirmTransaction(this.solanaConnection, txid);
            if (confirmation.err) {
                throw new Error('交易失败');
            }
            await this.postTransactionProcessing(route, txid);
        } catch (error) {
            if (error instanceof ResponseError) {
                console.log(await error.response.json());
            }
            else {
                console.error(error);
            }
            throw new Error('无法执行交换');
        } finally {
            this.waitingForConfirmation = false;
        }
    }
- 首先,我们通过调用
this.jupiterApi.swapInstructionsPost从Jupiter的 API 中获取交换指令。我们将使用来自getQuote方法的报价、钱包的公钥(这对于构建用户特定的指令集是必要的)以及优先费用(我们将其设置为“自动”,以便让Jupiter确定费用)。可以通过查看 Jupiter API 文档 来探索其他可选参数。 - 然后我们利用
instructionDataToTransactionInstruction方法将接收到的指令数据重构为交易指令。这样做的主要原因是为了从数组中删除可能为 null 或 undefined 的指令,并确保我们有一个干净且扁平化的指令数组,可以传递给Solana交易。 - 然后,我们使用之前定义的
getAdressLookupTableAccounts方法查询地址查找表账户。此举对交易指令特别有用,因为它使我们能够将多个账户传递给该交易部分。 - 然后我们使用指令、地址查找表账户和最新的区块哈希创建并发送Solana交易。使用我们的钱包对交易进行签名并将其发送到Solana网络。
- 在确认交易成功后,我们调用
postTransactionProcessing方法来触发成功交换后必要的步骤(updateNextTrade、refreshBalances和logSwap)。我们已经定义了refreshBalances和logSwap,因此我们将在下一部分定义updateNextTrade。
更新下一个交易
最后,在交易执行之后,我们需要改变下一个交换的参数(重新定义我们的 NextTrade 接口)。我们将定义 updateNextTrade 方法来处理此事。将以下内容添加到 bot.ts:
    private async updateNextTrade(lastTrade: QuoteResponse): Promise<void> {
        const priceChange = this.targetGainPercentage / 100;
        this.nextTrade = {
            inputMint: this.nextTrade.outputMint,
            outputMint: this.nextTrade.inputMint,
            amount: parseInt(lastTrade.outAmount),
            nextTradeThreshold: parseInt(lastTrade.inAmount) * (1 + priceChange),
        };
    }
为简单起见,在这个例子中,我们将仅交换输入和输出铸造(这意味着,如果我们之前使用 USDC 买 SOL,则下一个交换应该是以 SOL 卖出 USDC)。我们还将设置接下来的交易阈值。我们的 amount 是我们将在下次交易中投入的代币数量——我们把它设置为之前交易中获得的代币数量。我们的 nextTradeThreshold 是我们将在下次交易中执行的价格。我们将其定义为输入我们交易的代币数量加上我们的目标收益百分比。例如,如果我们使用 10 USDC 兑换 0.1 SOL,而我们的目标收益百分比是 15%;下一个交易输入(amount)将是 0.1 SOL,下一个交易阈值将是 11.5 USDC (这意味着我们期望下次触发将产生 11.5 USDC)。
很好!你现在已经定义了我们的交易机器人的核心逻辑。我们只需要创建一个客户端并运行机器人。现在让我们这样做。
创建客户端
打开 index.ts 并添加以下代码:
import { LAMPORTS_PER_SOL, clusterApiUrl } from "@solana/web3.js";
import { ArbBot, SwapToken } from './bot';
import dotenv from "dotenv";

dotenv.config({
    path: ".env",
});

const defaultConfig = {
    solanaEndpoint: clusterApiUrl("mainnet-beta"),
    jupiter: "https://quote-api.jup.ag/v6",
};

async function main() {
    if (!process.env.SECRET_KEY) {
        throw new Error("SECRET_KEY 环境变量未设置");
    }
    let decodedSecretKey = Uint8Array.from(JSON.parse(process.env.SECRET_KEY));
const bot = new ArbBot({
        solanaEndpoint: process.env.SOLANA_ENDPOINT ?? defaultConfig.solanaEndpoint,
        metisEndpoint: process.env.METIS_ENDPOINT ?? defaultConfig.jupiter,
        secretKey: decodedSecretKey,
        firstTradePrice: 0.11 * LAMPORTS_PER_SOL,
        targetGainPercentage: 1.5,
        initialInputToken: SwapToken.USDC,
        initialInputAmount: 10_000_000,
    });

    await bot.init();

}

main().catch(console.error);
这个简单的客户端将创建我们的 ArbBot 的一个实例并调用 init 方法。我们还使用 dotenv 包从 .env 文件加载环境变量。如果未设置环境变量,我们包含了一个将被使用的默认配置对象。让我们解释一下其他输入参数,以确保我们理解发生了什么:
firstTradePrice是我们期望在第一次交易中获得的价格。在我们的例子中,我们将在知道可以用我们的inputTokenAmount购买 0.11 SOL 时购买 SOL。targetGainPercentage是我们希望在交易中实现的百分比收益。在我们的例子中,我们将其设置为 1.5%。这意味着后续交易将在 SOL 的价格高于或低于上一次交易的 1.5% 时被触发。initialInputToken是我们将用于启动第一次交易的代币。在我们的例子中,我们将其设置为 USDC。initialInputAmount是我们将用于启动第一次交易的代币数量。在我们的例子中,我们将其设置为 10 USDC。
简而言之,我们正在设置我们的机器人,在可用时以 10 USDC 买入 0.11 SOL。当 SOL 的价格高于或低于上一次交易的 1.5% 时,将触发后续交易。
运行机器人
在主网进行交易
当前,Jupiter 交易 API 仅可用于主网,这意味着任何执行的交易将是真实的且不可逆转。在将在主网上运行之前,请确保对机器人的逻辑和潜在风险有充分的理解。
在你的终端中,运行以下命令以启动机器人:
ts-node index.ts
就这样!你应该看到我们的 ? 日志启动机器人以及价格更新和成功交易确认的常规日志!
QuickNode $ts-node index.ts
? 为钱包启动套利机器人: JUPz...Q1ie.
? 当前余额:
SOL: 0.01271548,
USDC: 10.087
? 当前价格: 97624457 低于下一个交易阈值: 100000000 2.38%。
干得不错。
你可以在我们的 GitHub 上找到我们的完整代码。
总结
你现在已经尝试了 Jupiter API 和 QuickNode 的 Metis 附加组件。你还构建了一个简单的交易机器人,它使用 Jupiter 的 API 监控市场特定条件,并在满足这些条件时执行交易。你现在可以尝试不同的交易条件和策略,看看机器人表现如何。想找点灵感?以下是一些想法:
- 将 durable nonces 集成到你的机器人中,以提高交易速度
- 利用 Solana 的 Websocket 方法 实时监控你机器人的交易活动
- 在你的网站中集成 Jupiter Terminal
如果你有问题或想要分享的想法,请在 Discord 或 Twitter 上给我们留言!
资源
- Jupiter API 文档
- Jupiter API GitHub
- Metis:QuickNode Jupiter API 附加组件
- JupiterAPI.com - 公共 Jupiter API 端点
- 原文链接: quicknode.com/guides/sol...
- 登链社区 AI 助手,为大家转译优秀英文文章,如有翻译不通的地方,还请包涵~
 GitHub 登录
 Web3 钱包登录
