科赫尔的时间攻击:从理论到实践的旅程
- zksecurity
- 发布于 2025-09-20 16:53
- 阅读 1770
本文详细介绍了如何利用时间侧信道攻击破解密码系统,通过模块化指数运算中的平方-乘算法,揭示了密钥比特为1时额外的乘法操作导致的时间差异。文章通过逐步实现的案例,从理想化的指令成本模型到实际系统中的噪声挑战,再到工程解决方案,展示了实际攻击中克服噪声、提取关键信息的技术,强调了防御方需要采用恒定时间实现、盲化等措施来防止信息泄露。

1996年,Paul Kocher 发表了一篇具有开创意义的论文,证明了密码运算的执行时间可能会泄露关于密钥的信息。这并非抽象密码算法中的数学弱点,而是一种利用高效实现的侧信道攻击。这项工作开创了 side-channel cryptanalysis 的整个领域,表明物理实现会以意想不到的方式泄露信息。
本教程通过三个渐进式的实现来探索 timing attacks,每个实现都揭示了挑战的不同方面。我们首先从一个简单的指令成本模型开始,来说明攻击的核心动态。然后,我们将转向更实际的实现中的实际 timing measurements,并展示现代处理器和操作系统带来的挑战。最后,我们展示了一些工程技术,以从noisy measurements 中恢复关键信号。这种渐进过程说明了 side-channel cryptanalysis 的理论基础和实际工程挑战。
预览并下载交互式 Notebook 以跟随工作代码,或者仅阅读独立帖子。
The Vulnerable Algorithm
RSA 加密和 Diffie-Hellman 密钥交换的核心是 modular exponentiation:计算 mkmodn。将底数 k 乘以 k 次这种朴素方法对于典型的加密密钥将需要数百万次运算。相反,实现通常使用高效的 square-and-multiply 算法,将其减少到大约 logk 次运算。
该算法逐位处理 exponent。对于每一位,它总是对当前底数求平方。但这里有一个关键细节:当当前位为 1 时,它会执行额外的乘法。这种条件运算会产生漏洞:
def fast_exp(base, exponent, modulus):
    result = 1
    base = base % modulus
    while exponent > 0:
        if exponent & 1:            # THE LEAK: extra work when secret bit = 1
            result = (result * base) % modulus
        base = (base * base) % modulus
        exponent >>= 1
    return result
当 secret key bit 为 1 时,算法会执行额外的乘法。当该位为 0 时,它会跳过该步骤。这会在两种情况下产生可测量的 timing 差异。Kocher 的突破在于意识到对许多此类 measurements 进行统计分析可以逐位恢复整个 secret key。
Part 1: Clean Signal, Clean Results
请注意,当计算两个数字 a⋅b 模 n 的乘法时,乘法的结果可能小于或大于 n,这反过来意味着 a⋅b 可能需要模约简,也可能不需要。这反过来意味着当计算对于同一密钥 k 的 mkmodn 时,并非所有消息 m 都将花费相同的时间。对于多个消息和固定密钥,timing 的这种可变性对于我们的开发策略至关重要。
为了说明攻击,我们没有处理noisy wall-clock measurements,而是使用了一个简单的成本模型:每个 modular multiplication 的成本是一个乘法,加上减少结果所需的“trial subtractions”的数量。这个玩具模型在没有系统干扰的情况下捕获了基本的 timing 变化。请注意,在实践中,使用了更有效的 multiplication modulo 算法,但正如我们接下来将看到的,它们也同样会引起类似分布的指令可变性。
def mul_mod_with_cost(a, b, n):
    """通过 trial subtraction 进行 realistic cost modeling 的乘法"""
    x = a * b
    k = x // n
    x = x - k * n
    return x, 1 + int(k)
def fast_exp_with_cost(base, exponent, modulus):
    """具有成本计数的 LSB-first square-and-multiply """
    result = 1
    base = base % modulus
    total_cost = 0

    while exponent > 0:
        if exponent & 1:  # vulnerable conditional
            result, mul_cost = mul_mod_with_cost(result, base, modulus)
            total_cost += mul_cost

        base, square_cost = mul_mod_with_cost(base, base, modulus)
        total_cost += square_cost

        exponent >>= 1

    return result, total_cost
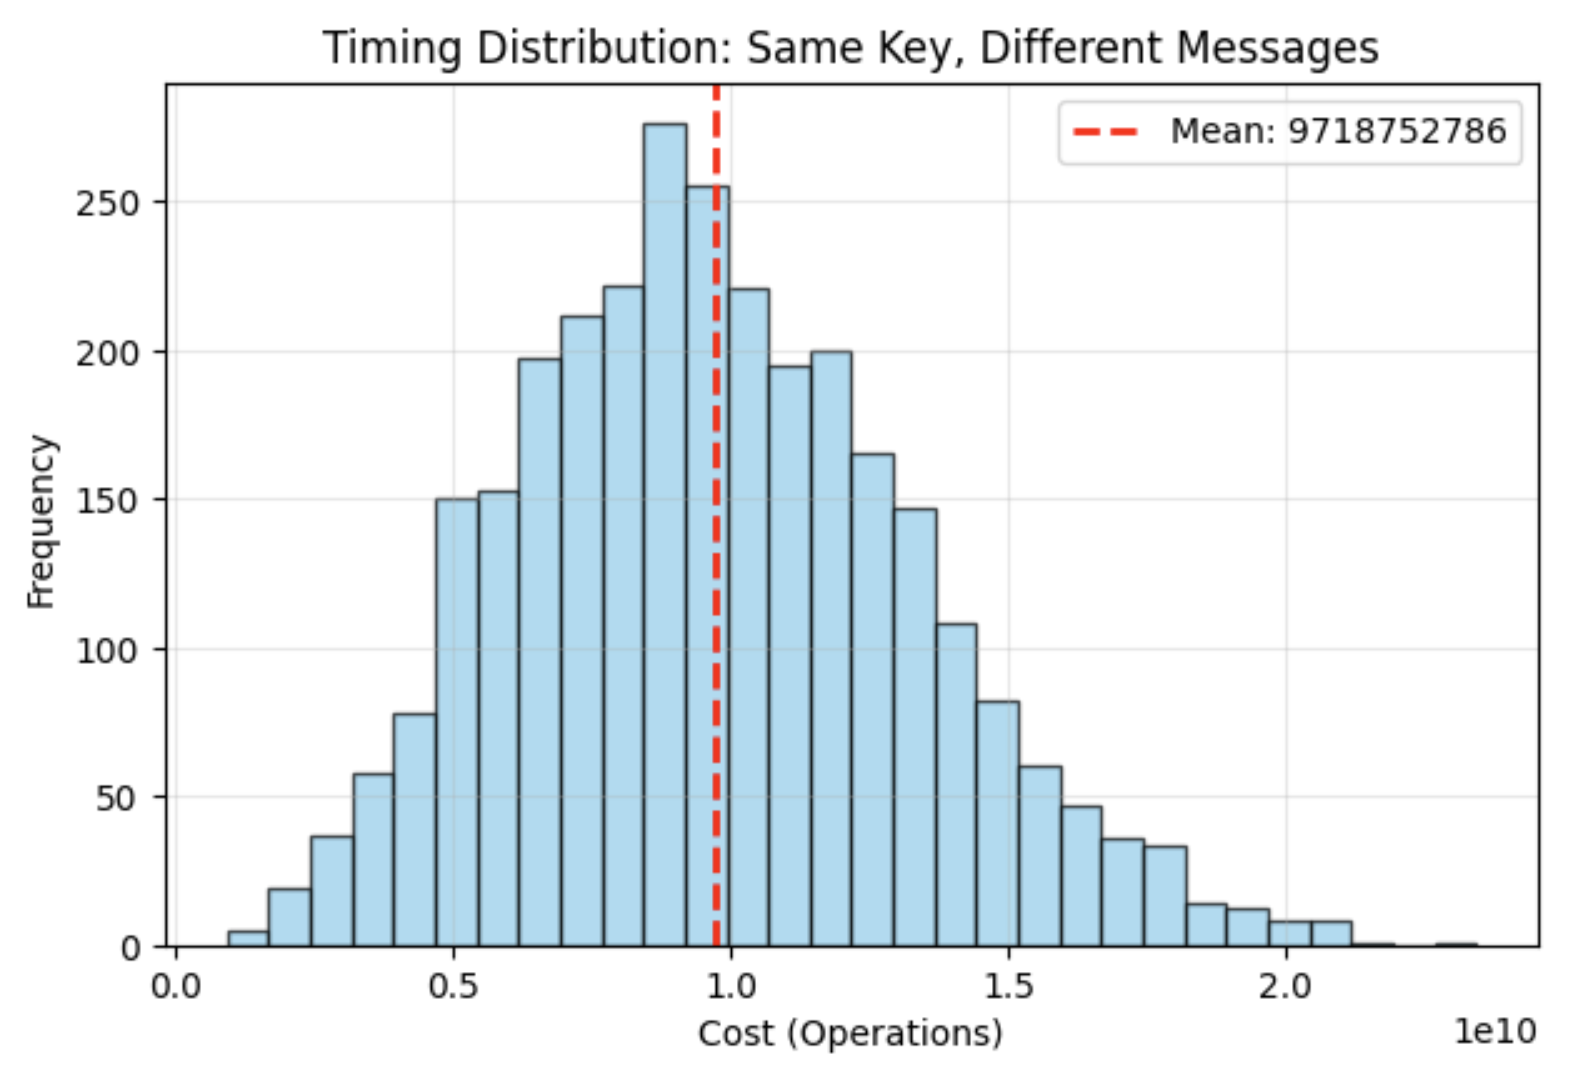
正如我们所看到的,指令的数量(成本或时间)遵循正态分布,因为许多小的随机成本会累加起来。这为 Kocher 的 variance distinguisher 提供了理想的统计基础。
 图 1:Clean normal distributions 能够进行可靠的统计分析。
timing 成本的近似正态分布可以用中心极限定理来解释:modular reductions 引入了许多小的、与消息相关的variation,这些variation的行为类似于独立的噪声项。在多轮中求和,这些variation会收敛为钟形分布。这促使我们将每轮的 timing 视为近似独立,这正是 Kocher 的 variance distinguisher 依赖的假设,即将总 variance 分解为单独的贡献。
我们可以通过经验验证这种独立性假设。当我们测量早期轮次(例如,前 4 轮)和后期轮次在许多消息中的 timing 之间的相关性时,我们始终观察到低于 0.1 的系数。此类值表示非常微弱的依赖性,这支持将这些轮次视为近似独立,以用于 Kocher 的 variance 分析。
Kocher’s Variance Distinguisher Theory
关键的见解是,如果round timings 是独立的,则 variance 以加法方式分解。对于任何总成本为 Tm 的 exponentiation,我们可以写成:
Tm=prefixm(i)+suffixm(i)
其中 prefixm(i) 涵盖前 i 轮,suffixm(i) 涵盖剩余的轮次。
当我们减去前缀的正确假设时: Tm−prefixm(i,correct)=suffixm(i)⇒Var[T−prefix(i,correct)]=Var[suffix(i)]
当我们减去不正确的假设时,我们会得到一个额外的误差项: Tm−prefixm(i,wrong)=suffixm(i)±Δm(i)
由于误差 Δm(i) 在消息之间独立分布: Var[T−prefix(i,wrong)]=Var[suffix(i)]+Var[Δ(i)]
因此:Var[correct]<Var[wrong]
distinguisher 只是比较 variances:当从基线 measurements 中减去时,产生较低 variance 的假设更有可能是正确的。这种数学基础能够通过统计分析逐位 key recovery。
🔓 FULL LSB KEY RECOVERY ATTACK
==================================================
Target key: 55 = 0b110111
Assuming bit 0 (LSB) = 1 for RSA exponents
Recovering bits 1 to 5 (LSB+1 to MSB)...

Attacking bit 1 (LSB+1)
  H0 error variance: 1.10e+19
  H1 error variance: 9.70e+18
  Winner: H1
  Predicted: 1 ✅

Attacking bit 2 (LSB+2)
  H0 error variance: 7.61e+18
  H1 error variance: 7.24e+18
  Winner: H1
  Predicted: 1 ✅

Attacking bit 3 (LSB+3)
  H0 error variance: 5.96e+18
  H1 error variance: 6.14e+18
  Winner: H0
  Predicted: 0 ✅

[... continued ...]

🎯 FINAL RECOVERY ANALYSIS
Target key:     55 = 0b110111
Recovered key:  55 = 0b110111
Accuracy: 6/6 = 100.0%
对于这个简单的成本模型,我们获得了完整的 recovery,所有位都被正确识别。我们能否通过测量wall-clock time 而不是使用玩具模型来重现这些结果?
Part 2: The Challenge of Real Systems
现代计算机引入了多个timing variability来源。操作系统会中断进程以处理其他任务。CPU 根据温度和工作负载调整其时钟速度。内存缓存会产生可变的延迟。此外,Python 的垃圾回收器会引入timing spikes。这意味着在第 1 部分中可靠工作的相同 variance distinguisher 并不能保证能够有效工作。
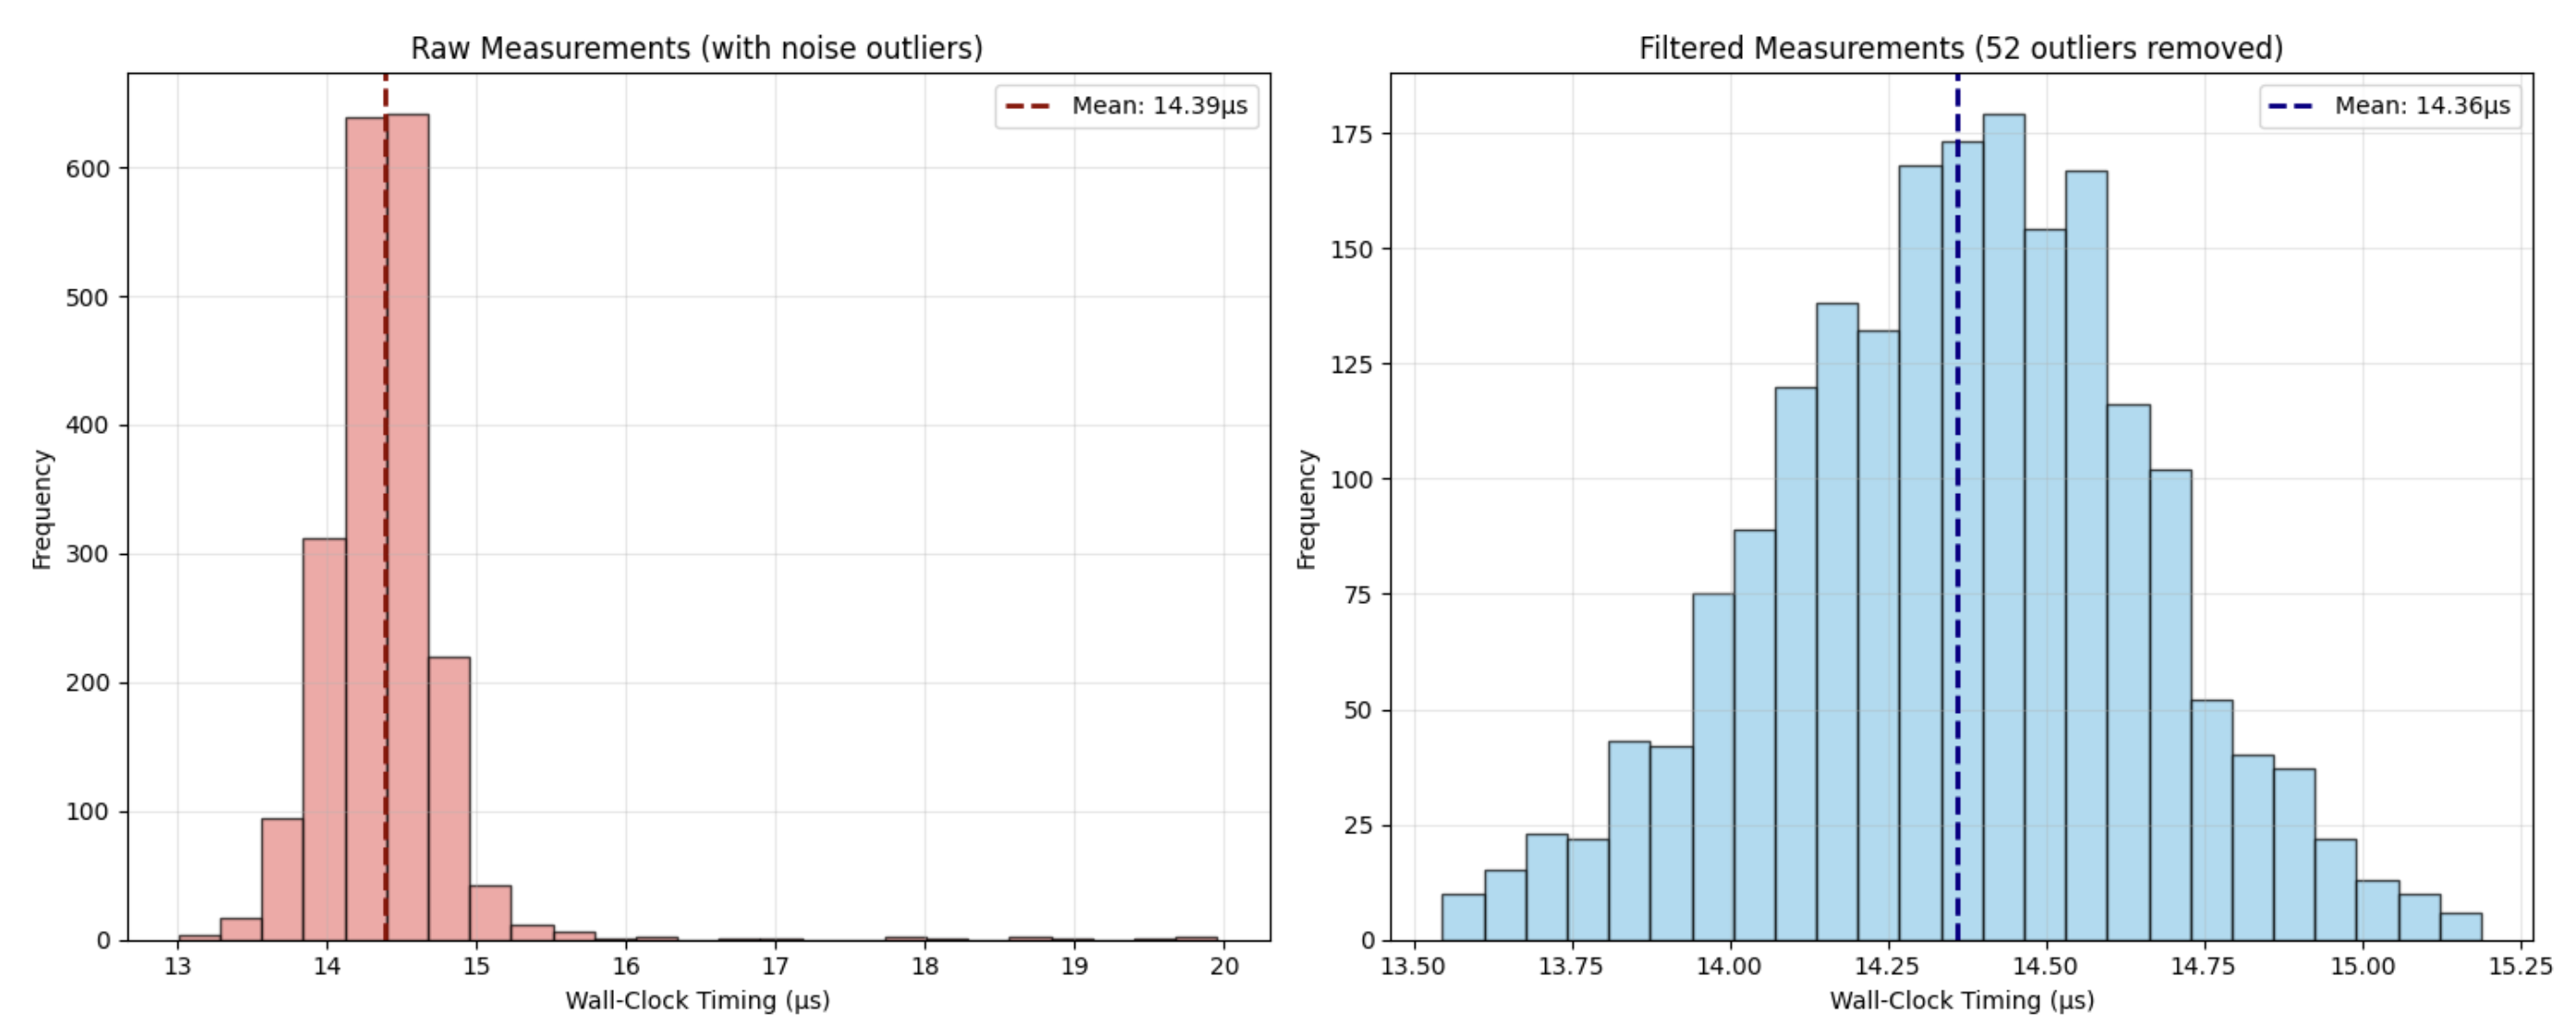
首先,让我们看一下与第 1 部分中相同的密钥的 time measurements 的分布。我们想检查正态分布是否仍然成立,这是我们用来推断每轮时间是随机的并且与轮次无关的提示。
 图 2:删除 outliers 后,wall clock measurements 的分布也是正态的
正如我们所看到的,在删除 outliers 后,似乎存在类似的分布,这表明我们的攻击对于 timing measurements 是可行的。让我们尝试直接重现我们的攻击,使用 100 倍的 time measurement 放大倍数,以避免来自开发利用的harming 噪声。
Part 2 Demonstration
==================================================
Target key: 53 (0b110101)
Modulus: 512-bit prime
Timing source: Wall-clock (realistic noise)
Algorithm: LSB-first with assumed first bit = 1

Reality Check - Naive Wall-Clock Timing Attack
============================================================
Target key: 53 (binary: 0b110101)
Messages: 3000
Amplification: 100 iterations per measurement

Step 1: Generating random messages...
Generated 3000 random messages

Step 2: Collecting baseline measurements (full exponentiation)...
Warning: This uses wall-clock timing - expect noise!
Baseline complete. Mean: 11.491μs, Std: 0.320μs
Coefficient of variation: 2.8% (high = noisy!)

Step 3: Attempting to recover 5 bits...
Warning: With high noise, variance distinguisher becomes unreliable

🔑 Exponent Assumption:
  Bit 0 (LSB): 1 (assumed known and odd)
  Starting attack from bit 1 (second LSB)...

--- Attempting bit 1 (LSB+1) ---
Testing H0: 32769 = 0b1000000000000001 (bit 1 = 0)
Testing H1: 32771 = 0b1000000000000011 (bit 1 = 1)
Actual bit value: 0
Measuring noisy wall-clock timings...
Prediction means: H0=2.435μs, H1=3.773μs
Error variances: H0=0.11, H1=0.11
Decision: bit = 1
Result: ✗ WRONG

--- Attempting bit 2 (LSB+2) ---
Testing H0: 32771 = 0b1000000000000011 (bit 2 = 0)
Testing H1: 32775 = 0b1000000000000111 (bit 2 = 1)
Actual bit value: 1
Measuring noisy wall-clock timings...
Prediction means: H0=4.994μs, H1=6.366μs
Error variances: H0=0.10, H1=0.09
Decision: bit = 1
Result: ✓ CORRECT

--- Attempting bit 3 (LSB+3) ---
Testing H0: 32775 = 0b1000000000000111 (bit 3 = 0)
Testing H1: 32783 = 0b1000000000001111 (bit 3 = 1)
Actual bit value: 0
Measuring noisy wall-clock timings...
Prediction means: H0=7.638μs, H1=9.045μs
Error variances: H0=0.09, H1=0.10
Decision: bit = 0
Result: ✓ CORRECT

--- Attempting bit 4 (LSB+4) ---
Testing H0: 32775 = 0b1000000000000111 (bit 4 = 0)
Testing H1: 32791 = 0b1000000000010111 (bit 4 = 1)
Actual bit value: 1
Measuring noisy wall-clock timings...
Prediction means: H0=8.803μs, H1=10.185μs
Error variances: H0=0.08, H1=0.09
Decision: bit = 0
Result: ✗ WRONG

--- Attempting bit 5 (LSB+5) ---
Testing H0: 32775 = 0b1000000000000111 (bit 5 = 0)
Testing H1: 32807 = 0b1000000000100111 (bit 5 = 1)
Actual bit value: 1
Measuring noisy wall-clock timings...
Prediction means: H0=10.007μs, H1=11.400μs
Error variances: H0=0.07, H1=0.08
Decision: bit = 0
Result: ✗ WRONG

============================================================
FINAL RESULTS
============================================================
Target key:     53 (0b110101)
Recovered key:  7 (0b111)
Accuracy: 3/6 bits correct (50.0%) (includes assumed LSB)
正如我们所看到的,攻击仅达到 50% 的准确率,这相当于随机猜测。请注意,在所有尝试中,误差 variances 几乎相同(0.11 vs 0.11、0.10 vs 0.09、0.09 vs 0.10),这使得 distinguisher 无法可靠地判断哪个假设是正确的。即使有 3000 条消息和 100 倍的放大倍数,信号仍然埋在噪声中。
这种失败说明了一个重要的教训:理论漏洞和实际开发可能完全不同。在第 1 部分中显得清晰的微秒 timing 差异被以相同微秒测量的系统噪声所淹没。现实世界的 timing attacks 需要比简单地 timing 算法执行更复杂的 measurement 技术。
Part 3: Engineering Solutions
我们能比第 2 部分做得更好吗?答案在于系统的工程设计,它可以解决每个variation来源。Python 的垃圾回收器引入timing spikes?在 timing 循环期间禁用它。CPU 缓存和分支预测器导致启动效应?添加预热运行。measurement 之间的系统漂移?交替测试假设的顺序。来自上下文切换的Outlier measurements?使用稳健的统计数据将其过滤掉。
以下是我们使用的一些技术来改进攻击:
import numpy as np
import random
import time
import gc

def iqr_filter(data, factor=1):
    if len(data) < 4:
        return data
    data = np.array(data)
    q1 = np.percentile(data, 25)
    q3 = np.percentile(data, 75)
    iqr = q3 - q1
    if iqr == 0:
        return data.tolist()
    lower = q1 - factor * iqr
    upper = q3 + factor * iqr
    filtered = data[(data >= lower) & (data <= upper)]
    if len(filtered) < len(data) * 0.5:
        lower = q1 - 3.0 * iqr
        upper = q3 + 3.0 * iqr
        filtered = data[(data >= lower) & (data <= upper)]
    return filtered.tolist()

def measure_timing_simple(operation, amplification=5000, num_runs=10):
    gc_was_enabled = gc.isenabled()
    gc.disable()
    try:
        times = []
        for _ in range(10):
            operation()
        for run in range(num_runs):
            if run > 0:
                time.sleep(0.001)
            start = time.perf_counter()
            for _ in range(amplification):
                operation()
            elapsed = time.perf_counter() - start
            times.append((elapsed * 1e6) / amplification)
        times_clean = iqr_filter(times)
        return np.median(times_clean)
    finally:
        if gc_was_enabled:
            gc.enable()
现在让我们针对与第 2 部分类似的目标测试我们的技术。我们将仍然使用随机的 512 模数,但这次我们将仅使用 1200 条消息而不是 3000 条消息。我们将使用更高的放大倍数 1000x,我们将重复 3 次以进一步消除噪声。最后,我们将 measurements 偏向于假设之间具有较大 delta 的 80% 的消息,以使辨别器的错误更加明显。为了使实验在我们的 Python 笔记本中运行相对较快,我们将假设密钥的前 7 位是已知的,我们将专注于恢复接下来的 3 位。
Part 3 Demonstration: Robust Timing Attack
============================================================
Target key: 2475 (0b100110101011)
Key length: 12 bits
Modulus: 512-bit prime modulus

🔧 Engineering Solutions:
• Drift-resistant measurements with order alternation
• Delta-based message filtering (top X% most discriminative)
• Original Kocher variance distinguisher
• Robust statistical analysis with IQR filtering
• Configurable bit start position

Kocher Attack
============================================================
Target key: 2475 (binary: 0b100110101011)
Messages: 1200
Amplification: 1000× × 3 runs
Filter percentile: 20%

Step 1: Generating test messages...
Generated 1200 messages

Step 2: Measuring baseline timings...
Complete! Mean: 23.91μs, Std: 0.51μs

Step 3: Attacking 3 bits starting from bit 8...
🔑 Assumption: bits 1 to 7 are known

--- Attacking bit 8 ---
Testing: H0=0b1000000010101011 vs H1=0b1000000110101011
Actual bit: 1
  Filtering: keeping 960/1200 messages with |delta| >= 1.315 (80% kept)
  Decision: bit = 1
  Prediction means: H0=17.397μs, H1=18.901μs
  Variances: H0=0.144770, H1=0.139724
  Delta stats: mean=1.449μs, std=0.164μs
  Result: ✅ CORRECT

--- Attacking bit 9 ---
Testing: H0=0b1000000110101011 vs H1=0b1000001110101011
Actual bit: 0
  Filtering: keeping 960/1200 messages with |delta| >= 1.328 (80% kept)
  Decision: bit = 0
  Prediction means: H0=20.156μs, H1=21.682μs
  Variances: H0=0.124010, H1=0.141704
  Delta stats: mean=1.465μs, std=0.181μs
  Result: ✅ CORRECT

--- Attacking bit 10 ---
Testing: H0=0b1000000110101011 vs H1=0b1000010110101011
Actual bit: 0
  Filtering: keeping 961/1200 messages with |delta| >= 1.347 (80% kept)
  Decision: bit = 0
  Prediction means: H0=21.482μs, H1=23.034μs
  Variances: H0=0.124903, H1=0.131268
  Delta stats: mean=1.492μs, std=0.181μs
  Result: ✅ CORRECT
我们的配置稳定吗?我们可以重复实验几次来估计它的可靠性。例如,成功运行两次已经大大降低了随机猜测的可能性,即 ((12)3)2=164。尽管如此,为了拥有更可靠的辨别器,我们可以进一步增加消息的数量和/或放大因子。请注意,消除尽可能多的噪声源,例如许多使用 CPU 的并发程序,确实可以提高信号的质量。
结论
这三幕之旅展示了密码分析如何从理论走向实践。在第 1 部分中,漏洞是清晰且易于利用的。在第 2 部分中,噪声和系统效应使其看起来遥不可及。在第 3 部分中,仔细的 measurement 和统计工程将理论重新转化为有效的攻击。
对于防御者来说,信息很明确: “学术”和 “实践”之间的差距通常只是工程方面的努力。如果存在 secret-dependent 分支或 timing variation,攻击者可能会通过足够的数据和谨慎来利用它们。最可靠的防御是完全消除泄漏,通过使用 constant-time implementations、blinding 和 side-channel-hardened cryptographic libraries。
- 原文链接: blog.zksecurity.xyz/post...
- 登链社区 AI 助手,为大家转译优秀英文文章,如有翻译不通的地方,还请包涵~
- 以太坊协议研究学习小组 - 2026 启动 131 浏览
- 神奇的 Zig、C 和 OpenSSL 164 浏览
- Shamir份额的魔力:BLS门限签名 411 浏览
- zkMesh:2026年1月回顾 422 浏览
- FRI (and friends) 使用 Lean4 形式化验证 FRI(及相关内容) 406 浏览
- ZK 编年史:电路(第二部分) 406 浏览
- 有限域之美与力量 (以及 Zig) 502 浏览
- 扳手攻击:发生与预防 532 浏览
- zkEVM 安全性概览 605 浏览
- 基于哈希函数的签名(三):多次签名 678 浏览
- 基于哈希函数的签名(二):少量次数签名 846 浏览
- Zig 签名(Ed25519 和 ECDSA) 1190 浏览

