Compound 合约部署
- bixia1994
- 发布于 2021-08-29 15:29
- 阅读 8068
最近一直再研究Compound的代码,compound能够经历牛熊成长为借贷龙头,它的合约逻辑代码上面有非常多值得学习的地方。鉴于此前一直只是再看代码,缺少了一步实际跑代码的过程,感觉学习Compound时,始终有点缺憾。故今天就详细记录下Compound合约的部署步骤,以飨读者。
Compound 合约部署
最近一直再研究Compound的代码,compound能够经历牛熊成长为借贷龙头,它的合约逻辑代码上面有非常多值得学习的地方。鉴于此前一直只是再看代码,缺少了一步实际跑代码的过程,感觉学习Compound时,始终有点缺憾。故今天就详细记录下Compound合约的部署步骤,以飨读者。
可以点击链接查看原文:https://t.1yb.co/A8CX 也顺便关注我一下:微信号woodward1993, 我的公众号:bug合约写手,涨粉涨粉:)
Compound合约结构
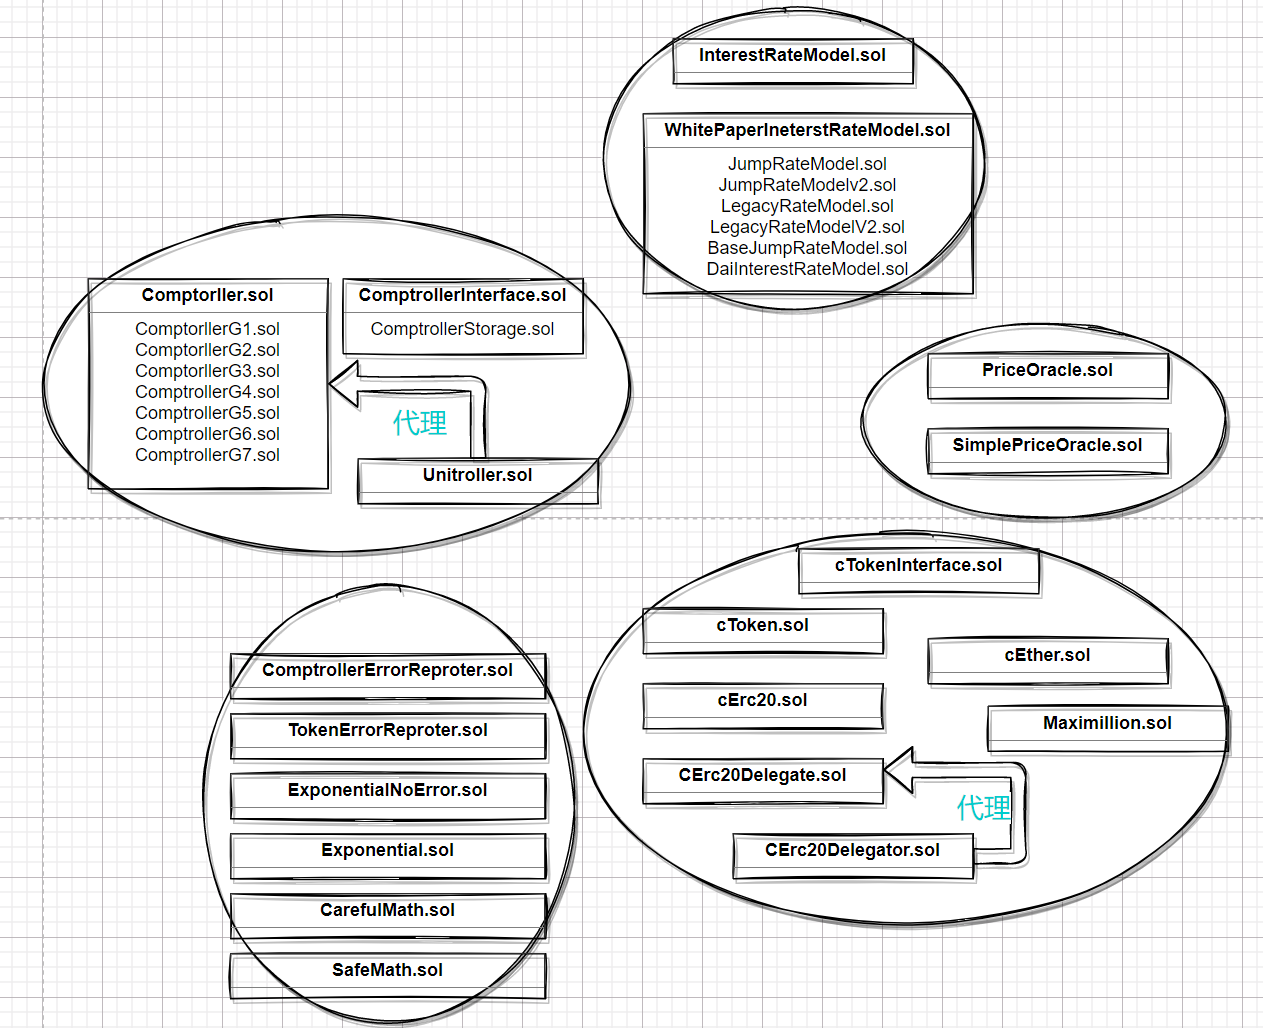
从上面的图片可以看到,Compound中含有的合约代码量还是很大的,文件数量30+。故再部署前,我们需要先梳理清楚各个合约之间的关系,并将其分组,梳理出各个模块,及初始化参数。
为简单起见,我们采取渐进式部署法 :laughing:, 即每一步都只把主要逻辑代码跑起来,不相关的合约就不部署。
小目标:最小可运行
分析如上图,最小可运行的合约至少应该包括:comptorller模块,ctoken模块,InterestRate模块,PriceOracle模块以及辅组合约模块。
comptroller模块
在comptorller模块部署中,我们选择ComptorllerG1, 因为G1是Comptorller的第一个版本,参数最少
| 模块 | 文件 | 初始化参数 | 初始化步骤 |
|---|---|---|---|
| comptroller模块 | Unitroller.sol | NA | _setPendingImplementation(comptrollerG1) |
| ComptrollerG1.sol | NA | _become() |
注意:再comptorller模块中,需要终端用户调用的函数为enterMarkets,故上述调用完成后还需要手动调用enterMarkets函数.
在初始化过程中,最重要的一点是想清楚comptroller._become应该是谁来调用?一种误解是使用unitroller,即代理合约来调用该become方法,因为所有的数据都保存在代理合约中。但实际上在compound设计中,unitroller是代理合约,comptroller是逻辑实现合约,通过delegatecall来实现远程合约调用。
最简单的一种方式是在Proxy代理合约中,增加一个管理函数,让管理员来设置逻辑实现合约的地址。compound中也使用了这一模式,在unicontroller合约中,它添加了 转移Proxy所有权的函数,其impl合约需要接受转移,以防止意外地升级到无效的合同。
unitroller = new Unitroller();
comptroller = new ComptrollerG1();
unitrollerProxy = ComptrollerG1(address(unitroller));

unitroller._setPendingImplementation(address(comptroller));

unitrollerProxy._setPriceOracle(priceOracle);
unitrollerProxy._setCloseFactor(500000000000000000);
unitrollerProxy._setMaxAssets(20);
unitrollerProxy._setLiquidationIncentive(1080000000000000000);

unitrollerProxy._supportMarket(CToken(address(cUni)));
Comptroller模块部署完成后,系统的存储变化:
Unitroller {
    address public admin => alice;
    address public pendingAdmin => address(0);
    address public comptrollerImplementation => address(ComptrollerG1);
    address public pendingComptrollerImplementation => address(0);
    PriceOracle public oracle => address(SimplePriceOracle);
    uint public closeFactorMantissa => 500000000000000000;
    uint public liquidationIncentiveMantissa => 1080000000000000000;
    uint public maxAssets => 20;
    // msg.sender => [cUni]
    mapping(address => CToken[]) public accountAssets;
    struct Market {
        bool isListed;
        uint collateralFactorMantissa;
        mapping(address => bool) accountMembership;
    }
    //cUni => (true, 600000000000000000, {msg.sender:true})
    mapping(address => Market) public markets;
}
priceOracle模块
此处只需要部署测试用的simplePriceOracle部分,compound中关于pricefeed的合约留在后续部署:
| 模块 | 文件 | 初始化参数 | 初始化步骤 |
|---|---|---|---|
| priceOracle模块 | SimplePriceOracle.sol | NA | NA |
SimplePriceOracle priceOracle = new SimplePriceOracle();
priceOracle.setUnderlyingPrice(cUni, 1e18);
interestRate模块,
此处只需要部署最简单的WhitePaperInterestRateModel部分,其他的利率模型留待下次部署
| 模块 | 文件 | 初始化参数 | 初始化步骤 |
|---|---|---|---|
| InterestRate模块 | WhitePaperInterestRateModel.sol | baseRate=50000000000000000 multiplier=120000000000000000 |
constructor(baseRate,multiplier) |
WhitePaperInterestRateModel whitePaper = new WhitePaperInterestRateModel(50000000000000000,120000000000000000);cToken模块
这里我们选择cUni来部署,涉及到的合约有:cUniDelegate,cUNI,Uni(测试用的ERC20token)
| 模块 | 文件 | 初始化参数 | 初始化步骤 |
|---|---|---|---|
| cToken模块 | token.sol | 部署一个测试代币:Uni | |
| cERC20Delegate.sol | NA | _becomeImplementation() |
|
| CErc20Delegator.sol(cUni) | 如下图所示 | constructor(),_setImplementation() |
cToken模块部署完成后,系统存储的变化:
cUni=>{
//cTokenStorage
bool internal _notEntered = true;
string public name = Compound Uniswap;
string public symbol = cUNI;
uint8 public decimals = 8;
address payable public admin = alice;
address payable public pendingAdmin = address(0);
ComptrollerInterface public comptroller = address(unitroller);
InterestRateModel public interestRateModel = address(whitepaper);
uint internal initialExchangeRateMantissa ;
uint public reserveFactorMantissa = 250000000000000000;
uint public accrualBlockNumber = 12927103;
uint public borrowIndex = 1067279966577335160;
uint public totalBorrows = 818650076167450321877884;
uint public totalReserves = 38954225225705070309036;
uint public totalSupply = 63681038419777549;
mapping (address => uint) internal accountTokens;
mapping (address => mapping (address => uint)) internal transferAllowances;
struct BorrowSnapshot {
    uint principal;
    uint interestIndex;
}
mapping(address => BorrowSnapshot) internal accountBorrows;
//cErc20storage
address public underlying = address(Uni);
//cDelegationStorage
address public implementation = address(cDeleagator);
}
对cUni的构造函数中传入数据进行分析如下:
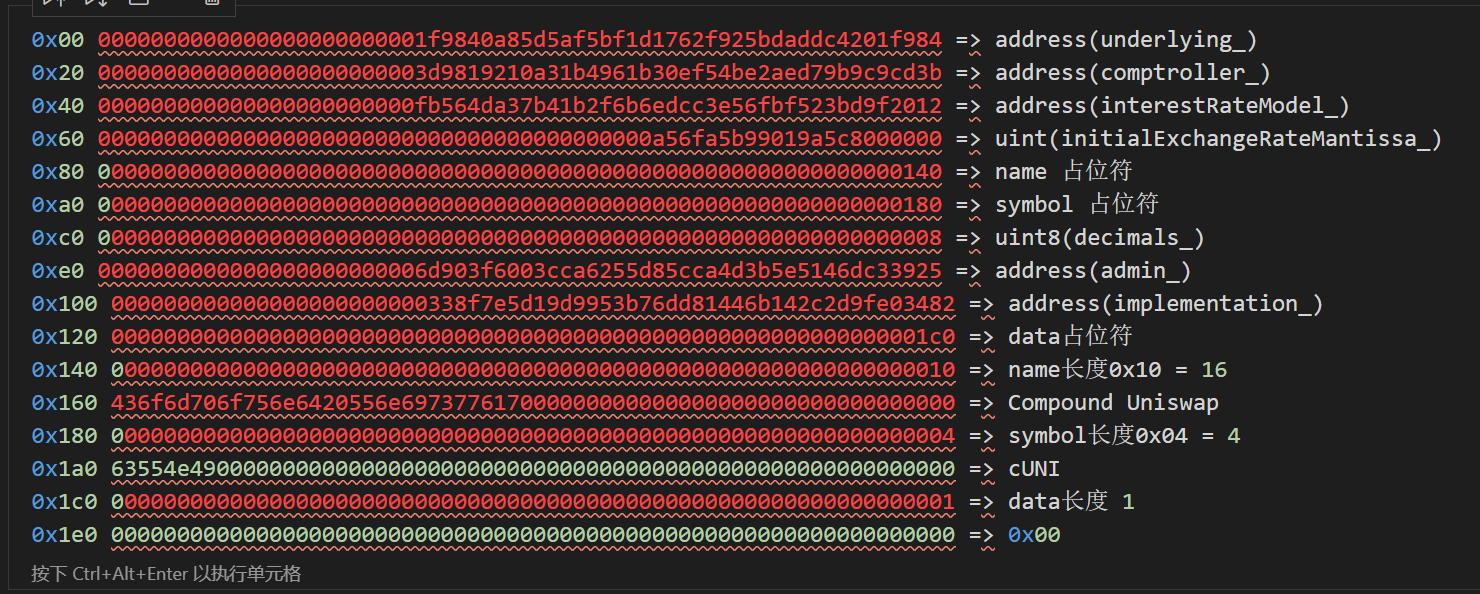
故我们的初始化代码为:
Token uni = new Token("Uniswap Test","Uni",18,uint(-1));
cERC20Delegate cUniDelegate = new cERC20Delegate();
bytes memory data = 0x00;
CErc20Delegator cUni = new CErc20Delegator(address(uni),
                                           address(unitroller),
                                           address(whitepaper),
                                           200000000000000000000000000,
                                           "Compound Uniswap",
                                           "cUNI",
                                           alice,
                                           address(cUniDelegate),
                                           data
                                          );
cUni._setImplementation(address(cUniDelegate), false, data);
cUni._setReserveFactor(250000000000000000);
整理setup
将上述4个模块的初始化代码整理如下:
pragma solidity ^0.5.16;
//cToken
import "./CErc20Delegator.sol";
import "./CErc20Delegate.sol";
import "./Token.sol";
//comptroller
import "./Unitroller.sol";
import "./ComptrollerG1.sol";
//interestModel
import "./WhitePaperInterestRateModel.sol";
//priceOracle
import "./SimplePriceOracle.sol";

contract Setup {
    Token public uni;
    CErc20Delegator public cUni;
    CErc20Delegate  public cUniDelegate;
    Unitroller      public unitroller;
    ComptrollerG1   public comptroller;
    ComptrollerG1   public unitrollerProxy;
    WhitePaperInterestRateModel public whitePaper;
    SimplePriceOracle   public priceOracle;

    constructor() public payable{
        //先初始化priceOracle
        priceOracle = new SimplePriceOracle();
        //再初始化whitepaper
        whitePaper = new WhitePaperInterestRateModel(50000000000000000,
                                                     120000000000000000);
        //再初始化comptroller
        unitroller = new Unitroller();
        comptroller = new ComptrollerG1();
        unitrollerProxy = ComptrollerG1(address(unitroller));

        unitroller._setPendingImplementation(address(comptroller));
        comptroller._become(unitroller, priceOracle, 500000000000000000, 20, true);

        unitrollerProxy._setPriceOracle(priceOracle);
        unitrollerProxy._setCloseFactor(500000000000000000);
        unitrollerProxy._setMaxAssets(20);
        unitrollerProxy._setLiquidationIncentive(1080000000000000000);
        //最后初始化cToken
        uni = new Standard_Token(uint(-1),"Uniswap Test",18,"Uni");
        cUniDelegate = new CErc20Delegate();
        bytes memory data = new bytes(0x00);
        cUni = new CErc20Delegator(
                                   address(uni),
                                   ComptrollerInterface(address(unitroller)),
                                   InterestRateModel(address(whitePaper)),
                                   200000000000000000000000000,
                                   "Compound Uniswap",
                                   "cUNI",
                                   8,
                                   address(uint160(address(this))),
                                   address(cUniDelegate),
                                   data
                                  );
        cUni._setImplementation(address(cUniDelegate), false, data);
        cUni._setReserveFactor(250000000000000000);

        //设置uni的价格
        priceOracle.setUnderlyingPrice(CToken(address(cUni)), 1e18);
        //支持的markets
        unitrollerProxy._supportMarket(CToken(address(cUni)));
        unitrollerProxy._setCollateralFactor(CToken(address(CUni)),
                                             600000000000000000);
        //将uni的代币全部转移给msg.sender,方便后续测试
        uni.transfer(msg.sender, uni.balanceOf(address(this)));
    }
}
测试模块
前面我们部署了comptroller合约,现在我们需要写一部分测试,看具体的合约逻辑执行。在最小可运行的compound合约中,我们部署了抵押token:uni,以及compound铸造出来的token:cUni. 并部署了cUni实际调用的逻辑cUniDelegate, 然后cUni的借贷模型中采用的是WhitepaperInterestRateModel,对应的审计合约是comptrollerG1.
下面我们分别就compound中,最核心的用户交互逻辑来编写5个测试,简单验证逻辑可行性。
测试1:存 mint
用户向compound中存款的逻辑是:用户向compound中存入Uni代币, compound根据当前的汇率算出铸造的cUni代币数量,将对应的cUni代币转账给用户。
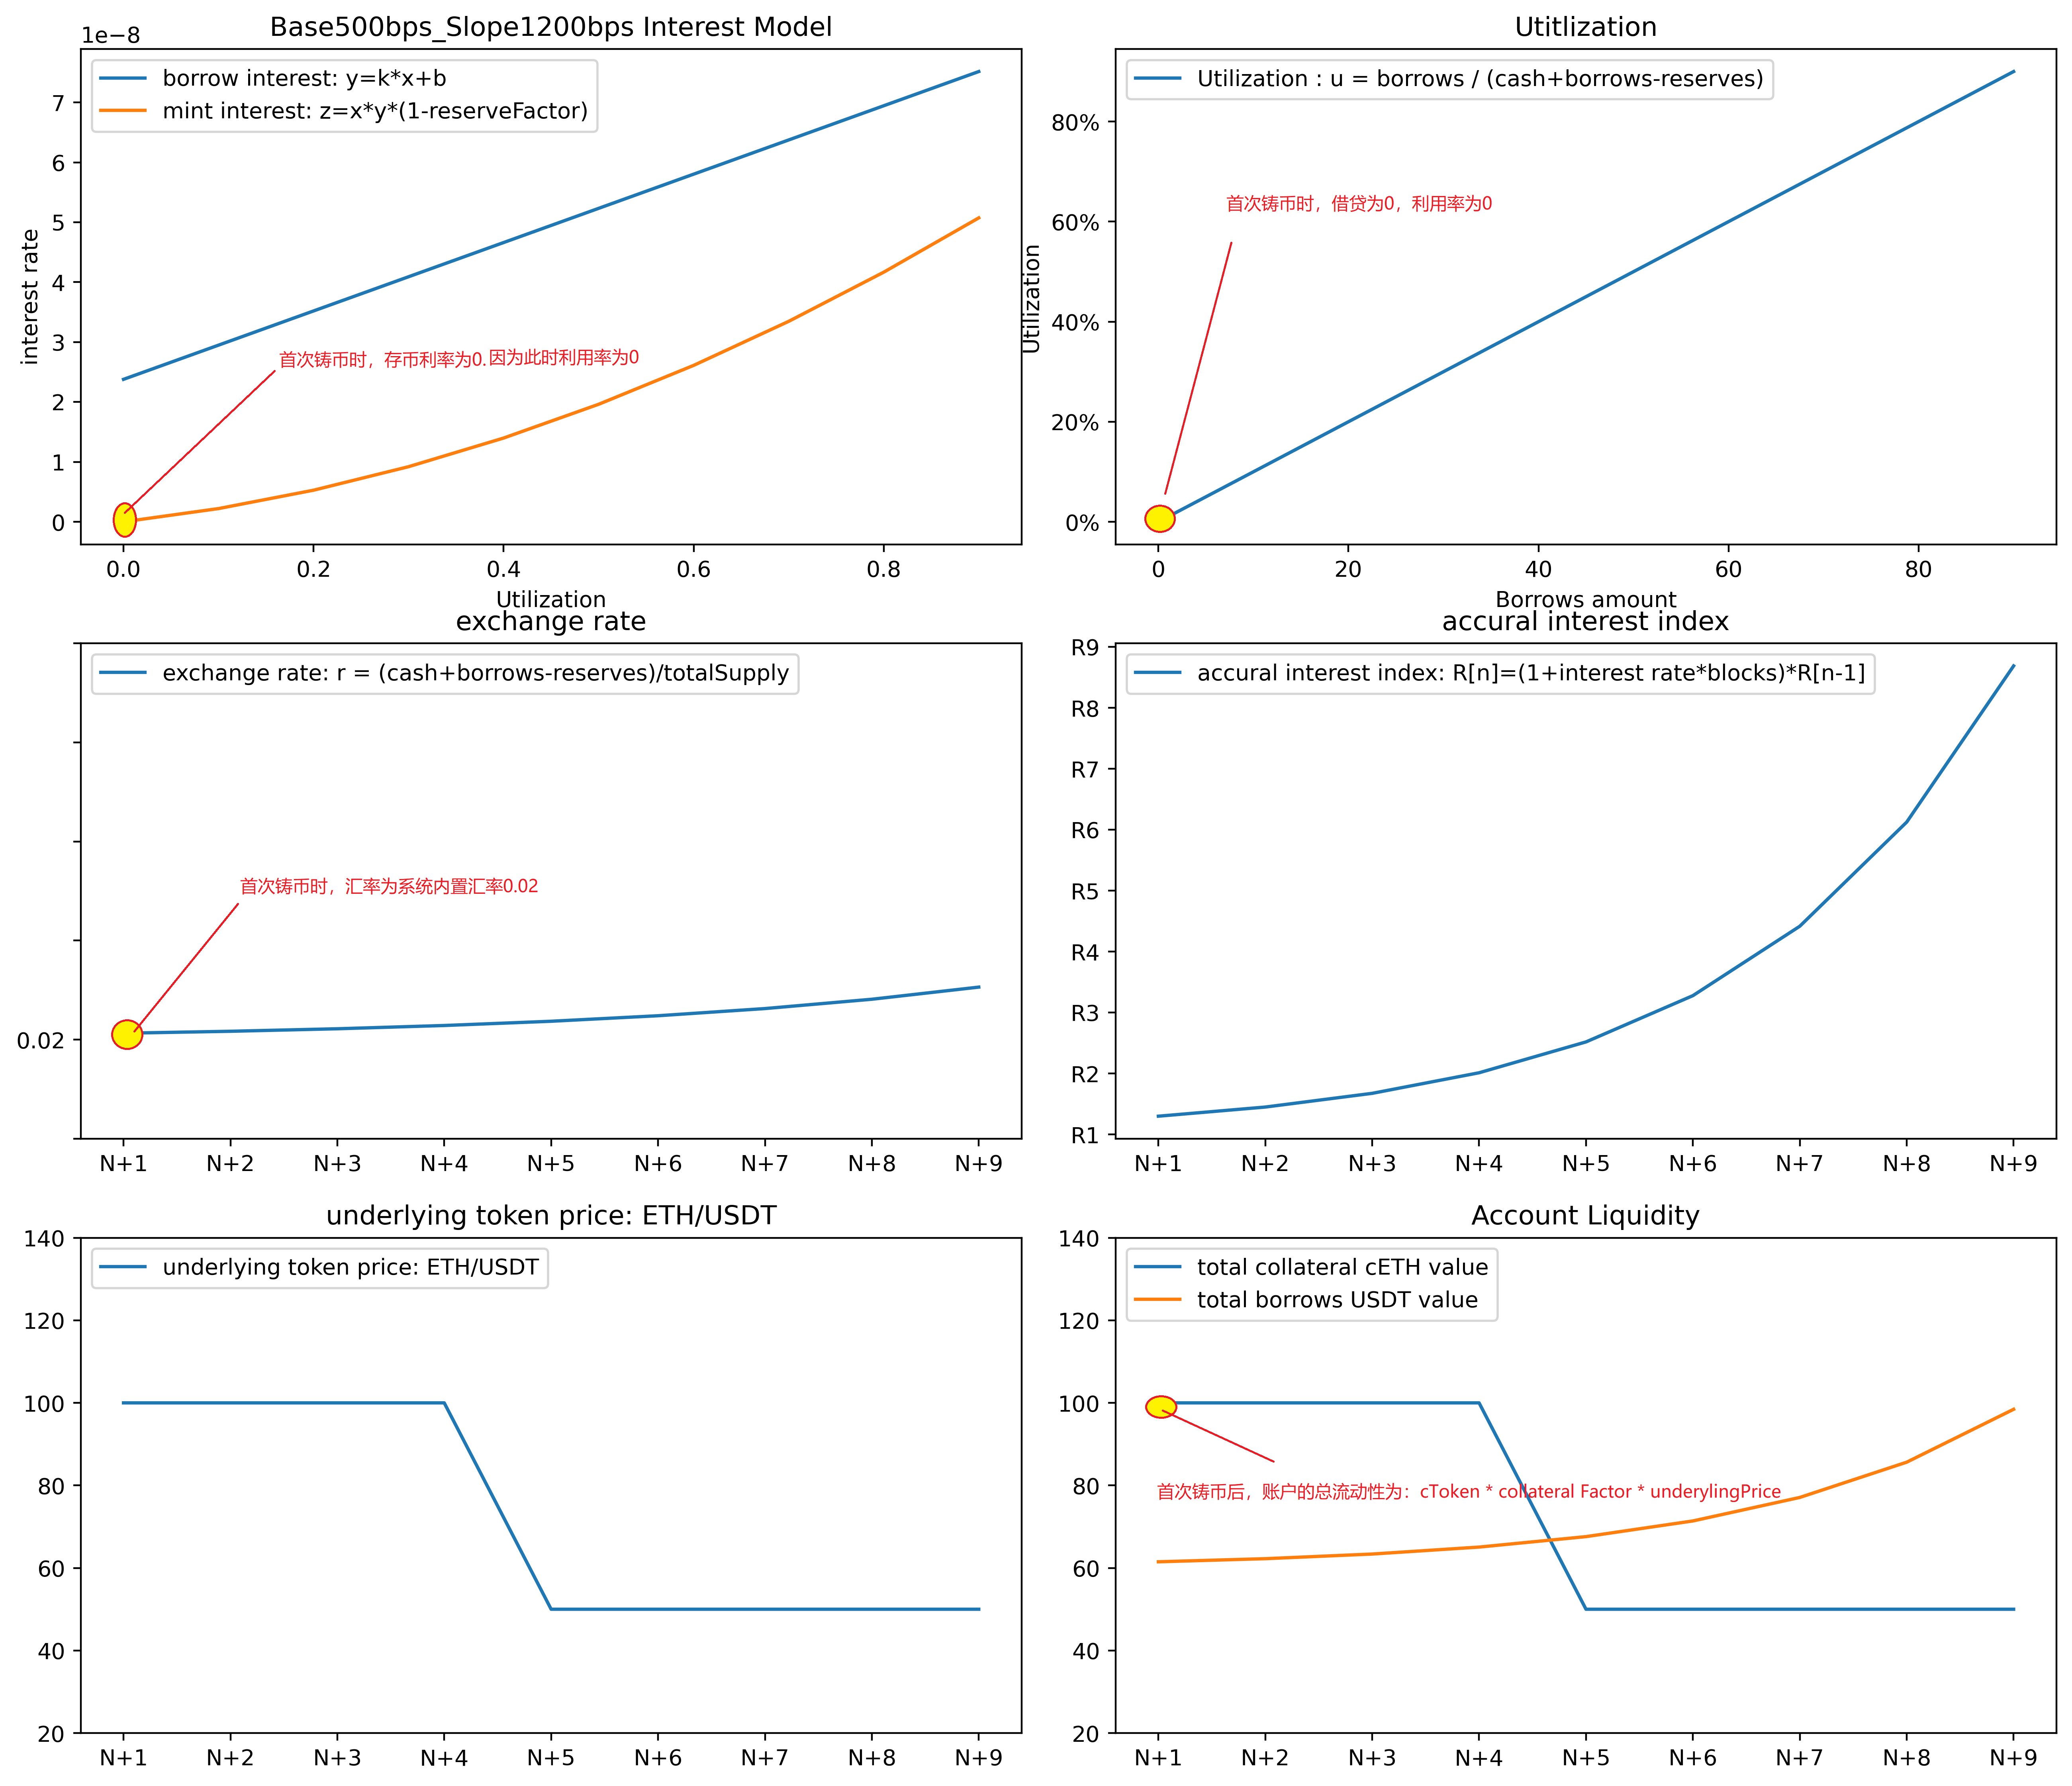
从上图可以分析得到:
对于第一笔mint交易,即一个空的market中首笔铸币交易,其汇率exchange rate为初始的0.02, 再没有任何贷款的情况下,利用率u = 0, 存款利率也为0, 此时该账户的总流动性为:cToken*collateral factor * price
则具体的测试流程如下:
//alice 有所有的Uni代币
uni.balanceOf(alice) = uint(-1)
//alice 调用unitroller的enterMarkets方法, 因为在mintAllowed函数中,存在一个检查:require(markets[cToken].isListed), 故即使在mint中也需要先调用enterMarkets
address[] memory addr = new address[](1);
addr[0] = cUni;
ComptrollerG1(address(unitroller)).enterMarkets(addr);
//此时alice调用enterMarkets后,全局变量accountAssets[alice] = cToken[cUni], markets[cUni]={true, 60%,{alice:true},false}
//alice 调用cUni的mint方法
uni.approve(address(cUni),uint(-1));
cUni.mint(7584007913129639935);
7584007913129639935/200000000
cUni.balanceOf(alice) = 37920039565;
cUni.totalSupply() = 37920039565
cUni.getCash() = 7584007913129639935
cUni.supplyRatePerBlock() = 0 //此时没有借款,利用率为0
ComptrollerG1(address(unitroller)).getAccountLiquidity(alice) = 4550404747877783960 = 7584007913129639935 * 0.6 //用户流动性:为UnderlyingToken * 0.6 * price
用户函数:enterMarkets
用户的地址中对应用户的所有资产列表,当计算一个用户的所有流动性时。在借贷一种资产前,一个或者多种资产必须被提供给compound以用作抵押。在借贷发生前,任何借贷出的资产必须通过这种方式添加进入compound中。该函数的返回值是一个列表,即该用户的所有资产列表。
function enterMarkets(address[] memory cTokens) public returns (uint[] memory) {
//对于每一种cToken
    uint len = cTokens.length;
    uint[] memory result = new uint[](len);
    for (uint i=0; i < len; i++) {
    //首先检查用户是否已经添加过该种cTOken,如果已经添加过,则返回true,否则继续
        CToken cToken = CToken(cTokens[i]);
        Markets storage market = markets[address(cToken)];
        if (!market.isListed) {
            result[i] = uint(Error.MARKET_NOT_LISTED);
            continue;
        }
    //其次检查用户是否达到了最大种类的资产,如果达到了最大种类资产,则返回false,否则继续
        if(accountAssets[msg.sender].length >= maxAssets) {
            result[i] = uint(Error.TOO_MANY_ASSETS);
            continue;
        }
    //检查该种cToken是否已经被列入,如果没有,则返回false,否则继续
        if (market.accountMembership[msg.sender] == true) {
            result[i] = uint(Error.NO_ERROR);
            continue;
        }
    //检查预言机的价格不等于0
    //将资产添加进入accountAssts中,并将用户的memberships[cToken][user]=true
        market.accountMembership[msg.sender] = true;
        accountAssets[msg.sender].push(cToken);
    //继续下一种资产,注意列表的大小会随着for循环而增加,故比较maxAssets时,必须用storage的数值来比较
        result[i] = uint(Error.NO_ERROR);
    }
    return result;
    //返回累计的结果
}
测试2:借 borrow
借币逻辑是:用户在compound中有多种cToken资产,记录在accountAssets中。 然后用户向compound借出一定量的uni资产,同时增加用户的负债额度。compound在接受用户的借款请求时,首先会检查cToken有没有上市,再检查用户是否enterMarket,然后根据现在的预言机报价检查用户的账户流动性。
整个borrow流程分为三步:
第一步:accuralInterest
如图4所示。在accuralInterest步骤中,如Accural Interest Index图4, 从A4点移动到B4点,即:
$$ \frac{Index_B}{Index_A}=(1+borrowRate[A]\cdot \Delta Blocks) $$
同时计算截至该block前的借贷额度所产生的利息,即
$$ totalBorrows =totalBorrowsPrev\cdot (1+borrowRate[A]\cdot \Delta blocks) $$
然后将产生的利息的一部分存入总的reserves中,即
$$ totalReserves = totalReservesPrev + totalBorrowsPrev\cdot borrowRate[A]\cdot \Delta blocks \cdot reserveFactor $$
此时系统中的totalBorrows并不包括即将借贷的部分,且market中的资金利用率也不变,借贷利率不变维持在A点
第二步:borrowAllowed
如图6所示。在borrowAllowed步骤中,Comptroller除开验证cToken的合法性外,以及用户是否enterMarket,还会计算虚拟的账户流动性。首先计算该账户中所有的cToken对应的价值。计算方法是cToken的数量按照B点对应的汇率换算成对应的Underlying Token,然后乘以market中设置的collateral factor,然后乘以该underlying token的实时价格, 即
$$ exchageRate = \frac{cash+totalBorrows-totalReserves}{totalSupply} $$
$$ cToken\cdot exchangeRate_B\cdot collateralFactor \cdot price $$
此处的exchangeRate计算中,cash和totalBorrows仅为B点前结息部分,不包含即将借出的borrowAmount部分。
对于借贷部分,它首先拿到已经结息的借贷总额accountBorrows[B],然后加上此次要借出的borrowAmount,然后乘以underlying token的实时价格, 即。
$$ (accountBorrows[A]\cdot \frac{Index_B}{Index_A}+borrowAmount) \cdot price $$
用资产的价值减去债务的价值得到流动性,如果流动性为正,则允许借出。如果流动性为负,则不允许借出。
第三步:borrowFresh
在borrowFresh这一步,主要是拿到截至此刻的accountBorrows[msg.sender]对应的已贷款(含利息)以及对用此刻的InterestRate[A],
$$ accountBorrows[msg.sender]_B=accountBorrows[msg.sender]_A\cdot \frac{Index_B}{Index_A}+borrowAmount $$
然后将新的贷款额和最新的InterestRate[B]更新到accountBalance中。并更新整个market的totalBorrows,即移动market的利用率从A点到B点,以及该利用率对应的借贷和存储利率。
$$ totalBorrows = totalBorrowsPrev + borrowAmount $$
注意:在这一步中,要理解汇率exchange Rate的变化。简单讲,汇率会缓慢增加,增加的原因是每一个$\Delta Blocks$所对应产生的利息(不是利率)的一部分(1-reserveFactor)存入了market中,即$totalBorrows\cdot borrowRatePrev \cdot \Delta Blocks \cdot (1-reserveFactor)$, 导致了underlyingToken的单调递增。如果单纯看汇率的公式:
$$ exchange Rate = \frac{cash+totalborrows-totalReserves}{totalSupply} $$
很难以看出其为何单调递增。原因就在于totalBorrows在每一次调用accuralInterest后,都会复利计算,即将产生的利息加回到债务作为新的债务中。而产生的一部分利息会存入资金池的reserve中,剩余的一部分利息则会存入资金池里,用于给cToken持有人.
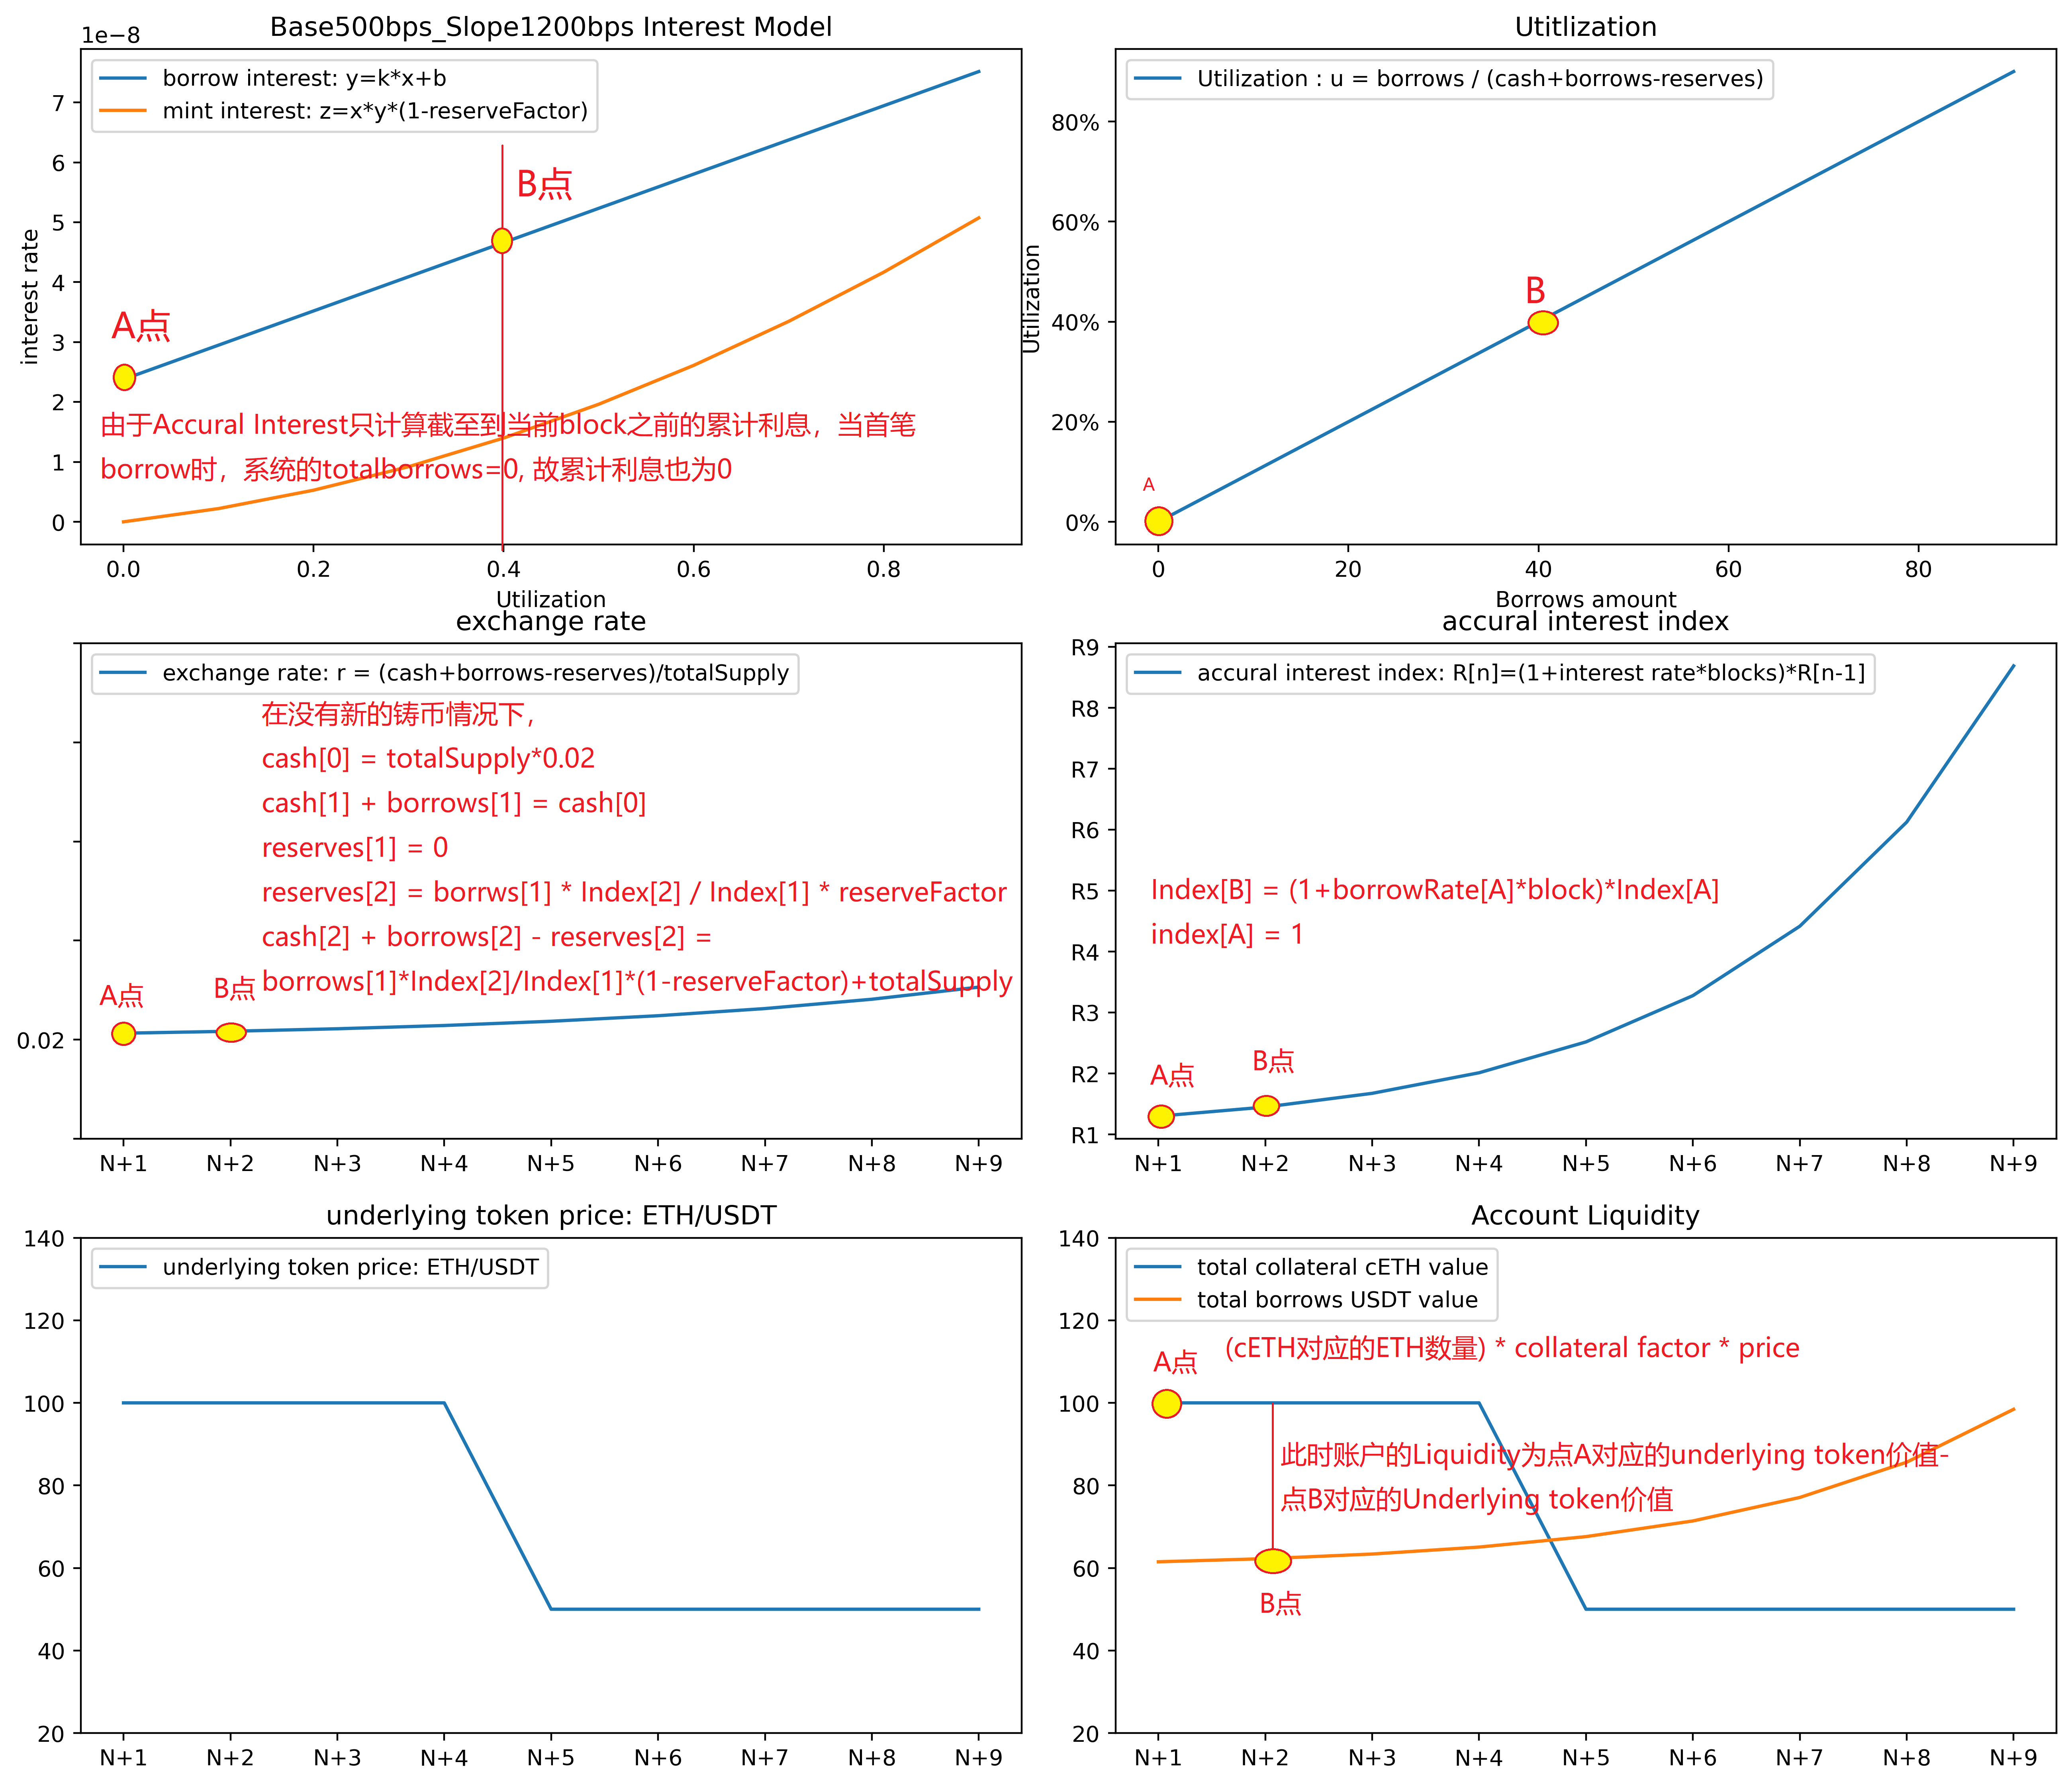
当借出一定数量的underlying tokens时,compound会首先计算下截止到当前block为止,此前的借贷额度所产生的利息,并将该利息的一部分存入reserve中,剩余的利息用于给cToken增值
function borrowAllowed(address cToken, address borrower, uint borrowAmount)
    external
    returns (uint)
{
    //检查cToken是否上架
    Market memory market = markets[cToken];
    require(market.isListed,"ComptrollerG1/borrowAllowed no listed");
    //检查用户是否enterMarkets,通过cToken与用户的membership来检查
    require(market.membership[borrower], "ComptrollerG1/borrowAllowed no membership");
    //检查underlying Token的实时价格
    require(priceOracle.getUnderlyingPrice(cToken) != 0, "Comptroller/borrowAllowed underlying price should not be 0");
    //计算用户总资产的流动性
    (Error err, uint liquidity, uint shortfall) = getHypotheticalAccountLiquidityInternal(borrower, CToken(cToken),0,borrowAmount);
    require(err == Error.NO_ERROR, "Comptroller/borrowAllowed getHyp falied");
    //返回
    require(shortfall == 0, "Comptroller/borrowAllowed insufficient liquidity");
    return liquidity;
}
测试流程:
//alice 在compound中存入了7584007913129639935的uni代币,获得了37920039565的cUni代币
//alice 向compound提出借款4584007913129639935的uni代币
cUni.borrow(2584007913129639935);
cUni.totalBorrows() = 2584007913129639935;
cUni.getCash() == 5000000000000000000 = 7584007913129639935 - 2584007913129639935
cUni.supplyRatePerBlock = 11046856810
cUni.exchangeRateStored() = 200000000003418771090092875
cUni.borrowRatePerBlock() = 43229717700
利用率:utilization = cUni.supplyRatePerBlock / cUni.borrowRatePerBlock * (1- 0.25) =
cUni.borrowIndex() = 1000000095129377644
cUni.accrualBlockNumber() =  4
测试3:还 repay
repay操作是borrow的逆操作,可以通过repayBorrow偿还自己的贷款,repayBorrowBehalf代为偿还他人贷款,其具体逻辑是用户批准cToken合约使用其underlying token,先调用accuralInterest计算目前利率指数和对全部借贷额计息,然后调用comptroller.repayBorrowAllowed函数检查是否可以偿还,最后调用repayBorrowFresh偿还。
accuralInterest
在偿还贷款前,用户会首先调用accuralIntrest函数,其作用是计算最新的利率指数,并对全部借贷额计息。如图所示,利率指数会从B点移动到C点。注意利率指数与accountBorrows无关,且其总是呈现指数增加的形式。因为在利率指数的定义中,其只与borrowRatePrev, 即图中的borrowRate[B]点相关,即上一时刻的借贷利率相关,与当前账户的借贷数目无关。
$$ \frac{Index_C}{Index_B}=1+borrowRate[B]\cdot \Delta Blocks $$
repayBorrowAllowed
在comptroller的repayBorrowAllowed函数中只检查了cToken的合法性
repayBorrowFresh
即先拿到已结息的accountBorrows[msg.sender]参数,包含上一时刻的贷款本金及利率指数,并利用当前时刻的Index对其结息后减去repayBorrowAmount,即:
$$ accountBorrows_C=accountBorrows_B\cdot \frac{Index_c}{Index_B}-repayBorrowAmount $$
然后从已结息的totalBorrows中扣除repayBorrowAmount。
最后从msg.sender中转账对应的repayBorrowAmount Token到cToken中,此时的资金利用率从B点回落到C点,对应的贷款利率也从B点回落到C点。
测试流程如下:
uni.approve(cToken, repayBorrowAmount);
cUni.repayBorrow(repayBorrowAmount);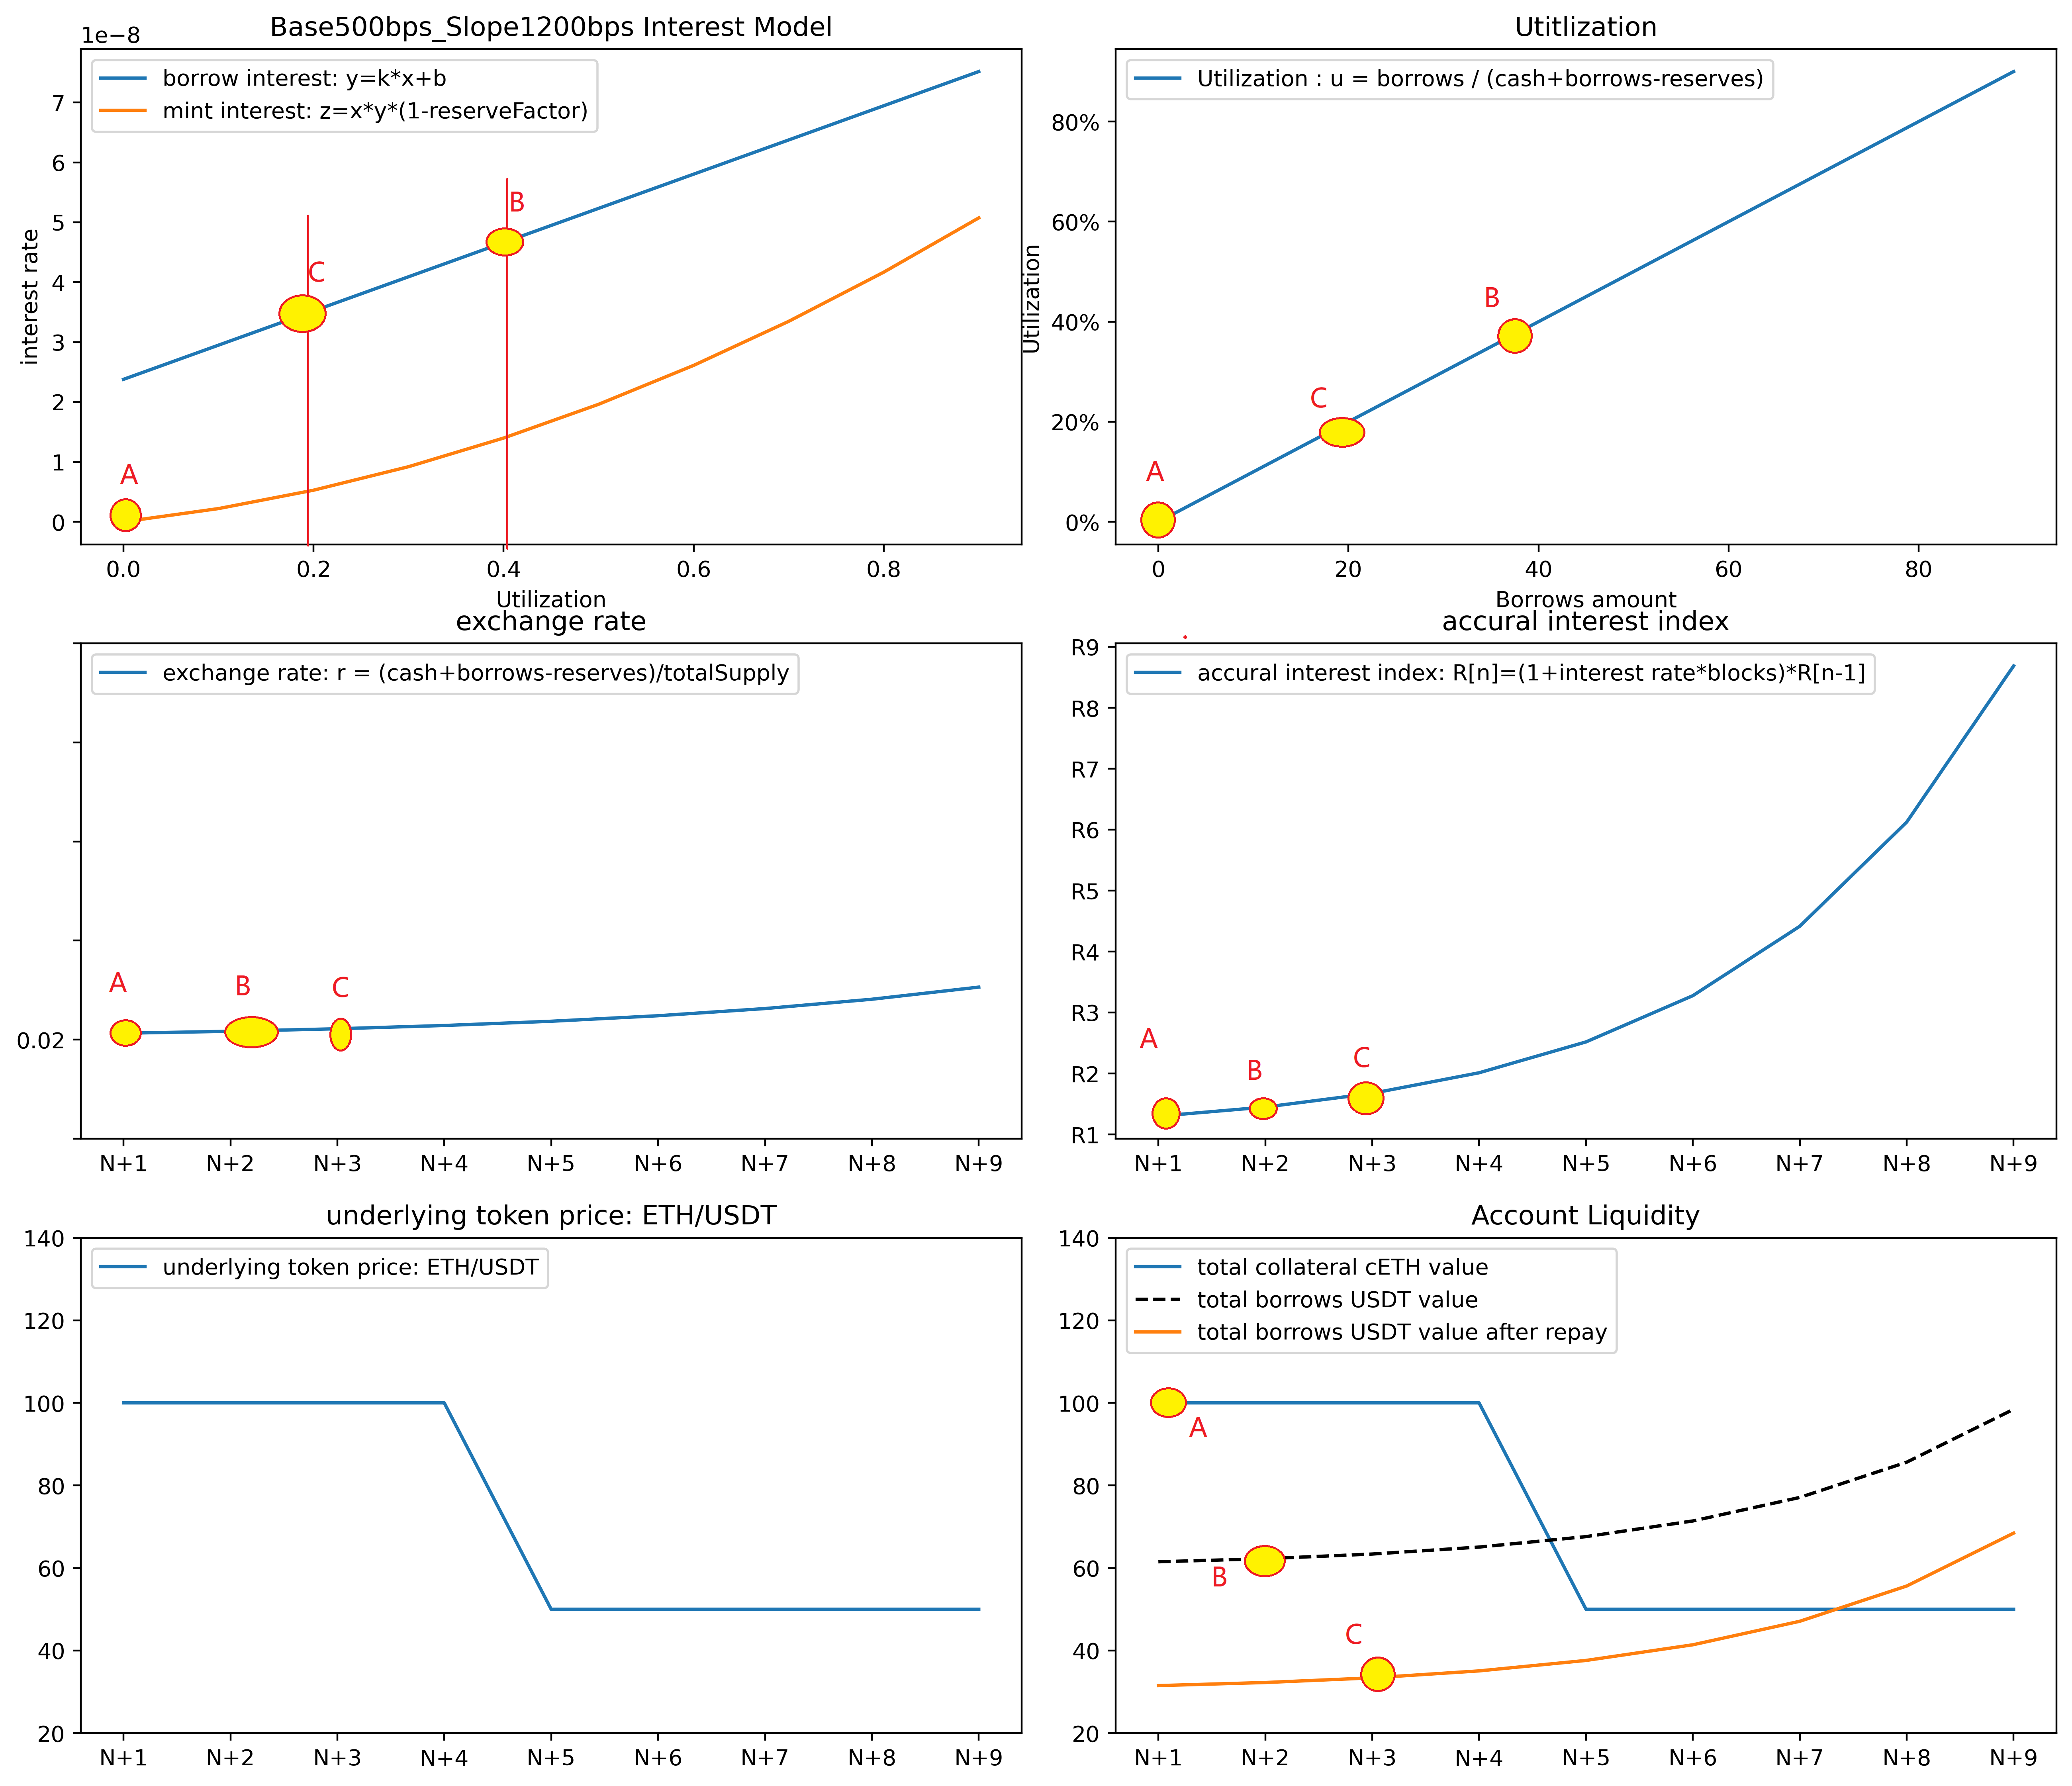
测试4:取 redeem
redeem是mint的逆运算,但在实际逻辑中,增加了一个检查账户虚拟流动性的一项。用户可以调用redeem来偿还给定数量的cToken,或者调用redeemUnderlying来偿还某数量的cToken得到给定数量的underlying Token. redeem操作的步骤是用户批准cUni合约使用用户的cUni代币,然后调用accuralInterest函数,来计算最新的利率指数Index,并对totalBorrows计息。再然后是调用comptroller.redeemAllowed函数,计算用户的虚拟流动性,看是否用户有足够的流动性来取走token。最后是redeemFresh函数根据要取走的数值,更新accountBorrow中的数值和totalBorrows。
redeemAllowed
在redeemAllowed,Comptroller除开验证cToken的合法性外,以及用户是否enterMarket,还会计算虚拟的账户流动性。与borrowAllowed的唯一区别是在计算underlying Token的价值时,borrowAllowed是
$$ (accountBorrows[A]\cdot \frac{Index_B}{Index_A}+borrowAmount) \cdot price $$
而redeemAllowed是
$$ (accountBorrows[A]\cdot \frac{Index_B}{Index_A}+redeemAmount) \cdot price $$
反映在图像6中,表现就是图六中的underlying token价值曲线上移,使得账户的流动性降低。当发生redeem之后,market的totalSupply降低,反映在资金利用率上就是资金利用率曲线上翘,相同的借贷金额会占据更大的资金利用率,从而导致借贷利率变化。
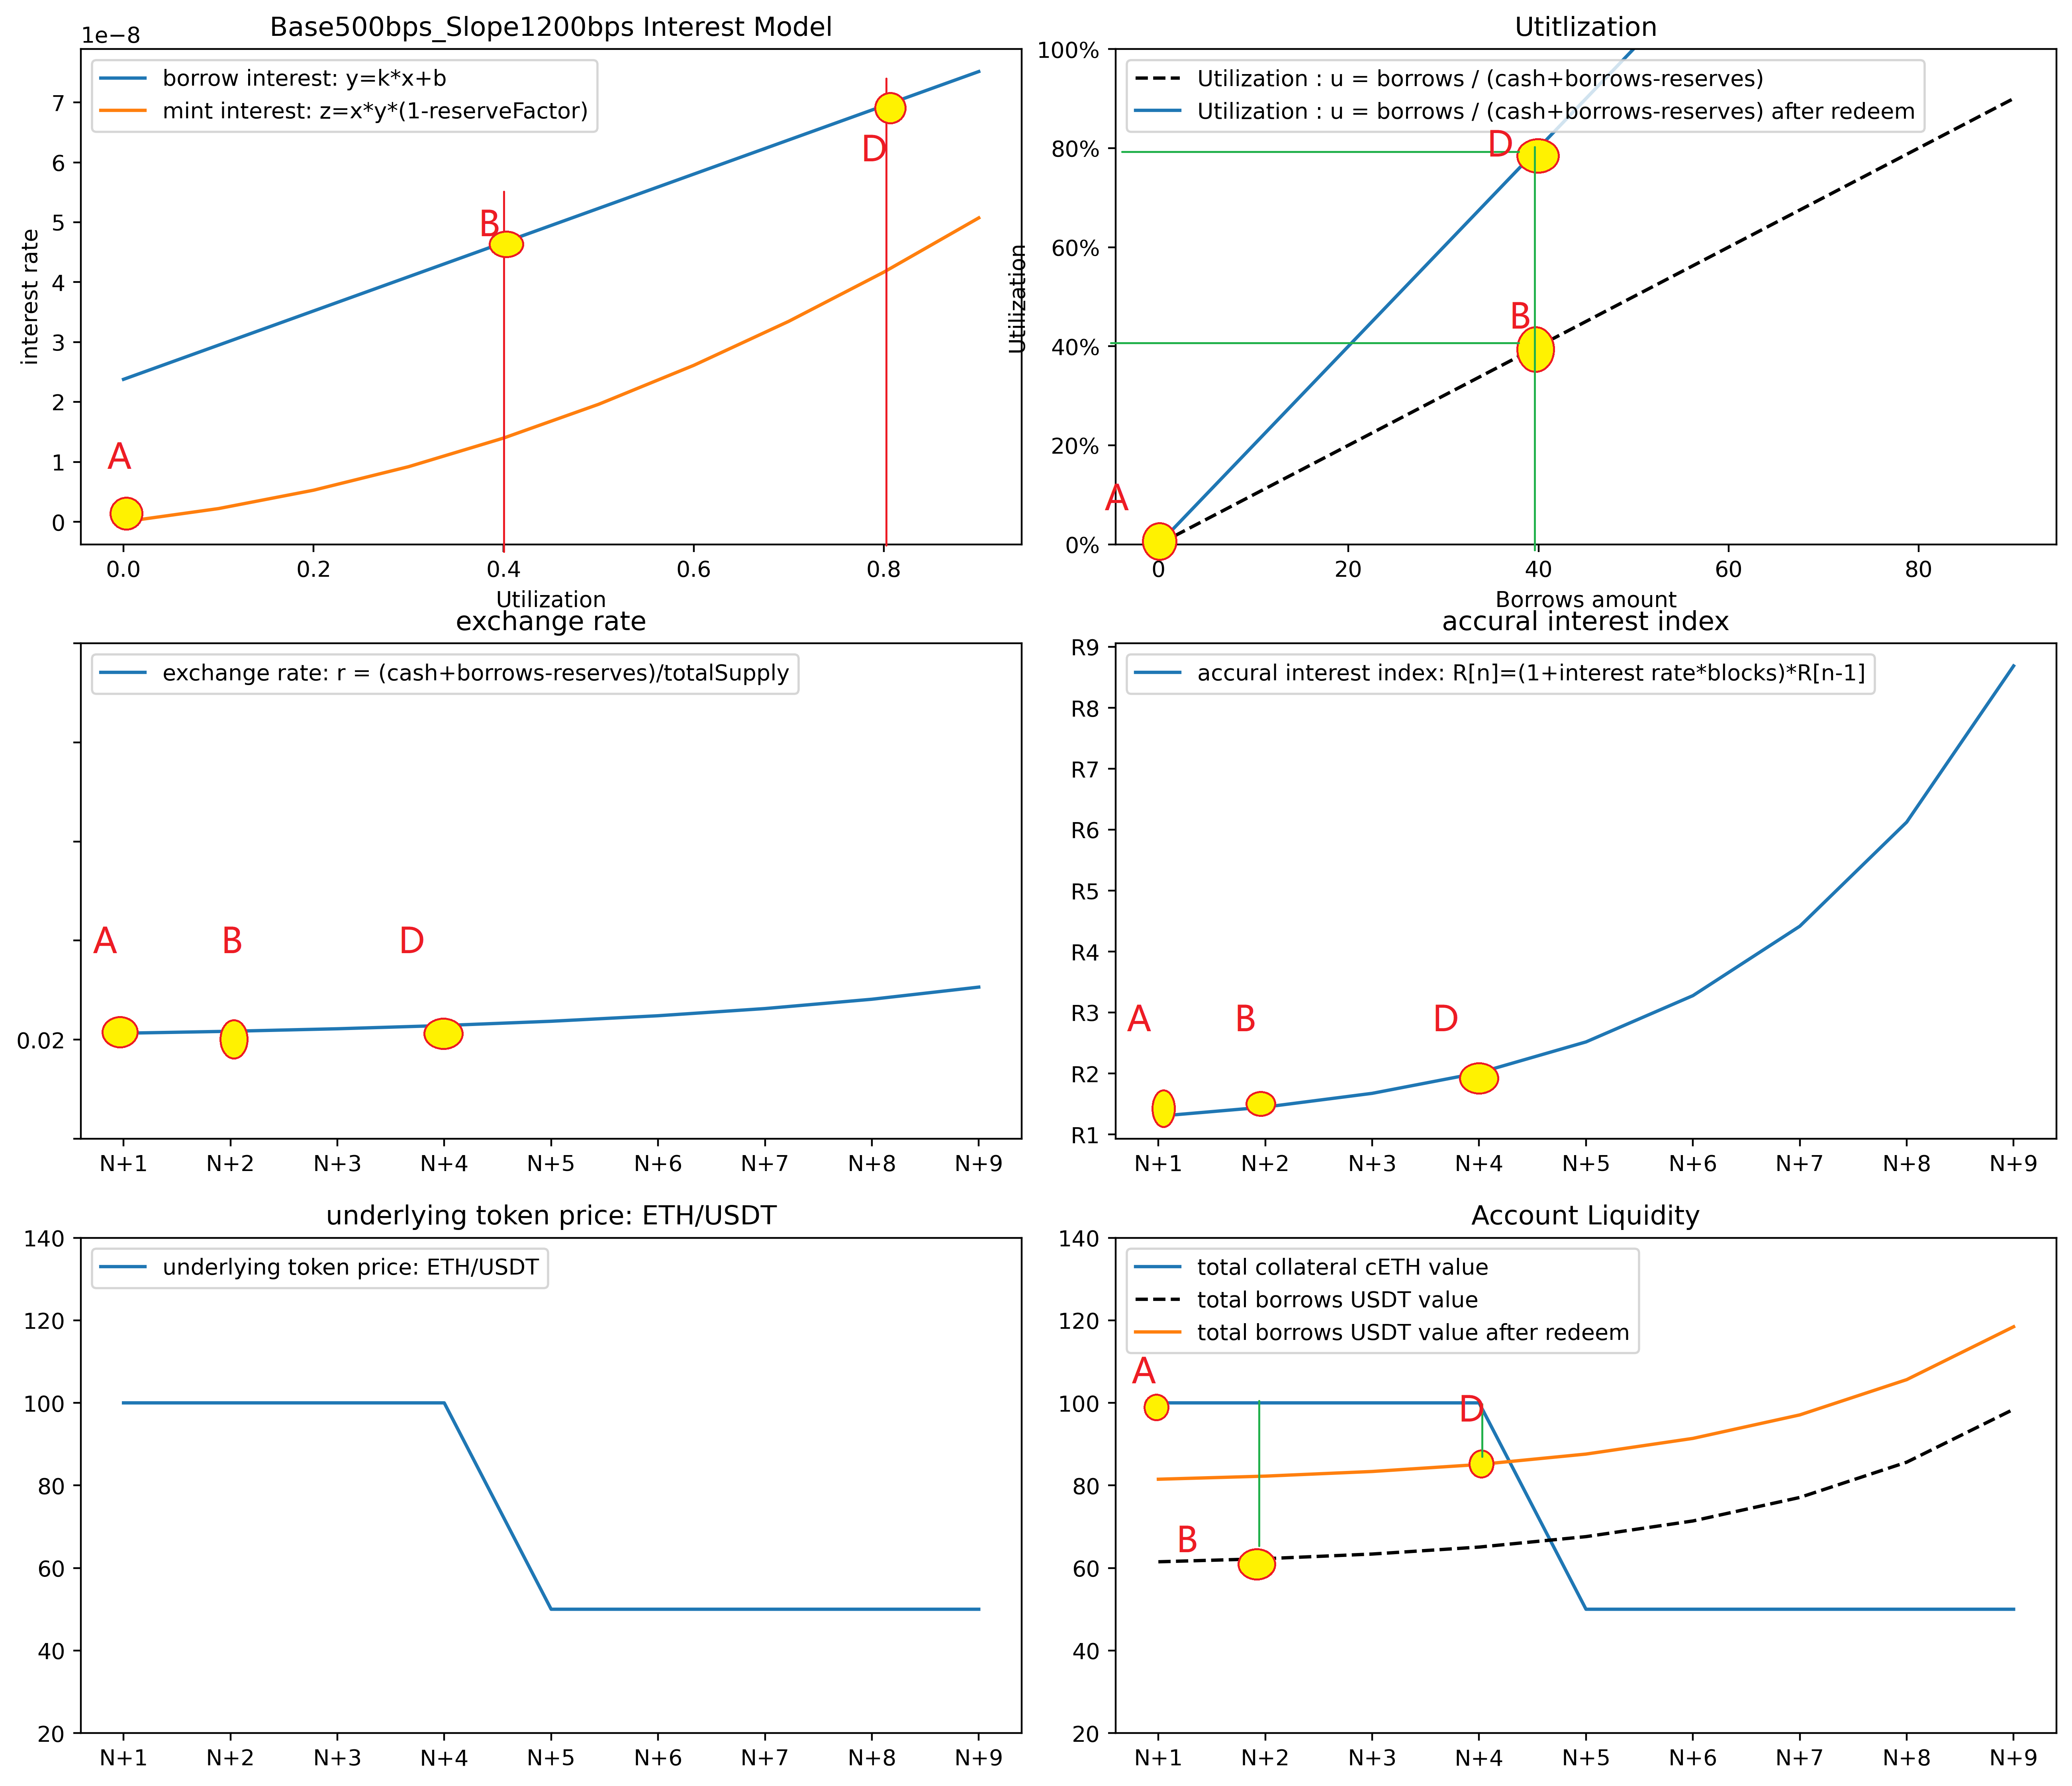
测试5:清算 liquidity
发生清算的一种典型情况是,用户enterMarkets了两个market,分别是cUni和cUSDT资金池。然后用户在cUni池中,存入Uni获得一定的cUni。用户凭借cUni在cUSDT资金池中借贷出USDT。然而,由于Uni的价格波动,导致Uni/USDT的价格突然下跌,此时用户放置在cUni池中的cUni的总价值小于了借出的USDT的价值,从而触发外部清算者进行清算。
//alice 有所有的Uni代币
uni.balanceOf(alice) = uint(-1)
//alice 调用unitroller的enterMarkets方法, 因为在mintAllowed函数中,存在一个检查:require(markets[cToken].isListed), 故即使在mint中也需要先调用enterMarkets
address[] memory addr = new address[](2);
addr[0] = cUni;
addr[1] = cUSDT;
ComptrollerG1(address(unitroller)).enterMarkets(addr);
//此时alice调用enterMarkets后,全局变量accountAssets[alice] = cToken[cUni], markets[cUni]={true, 60%,{alice:true},false}
//alice 调用cUni的mint方法
uni.approve(address(cUni),uint(-1));
cUni.mint(7584007913129639935);
cUSDT.borrow(1000000000);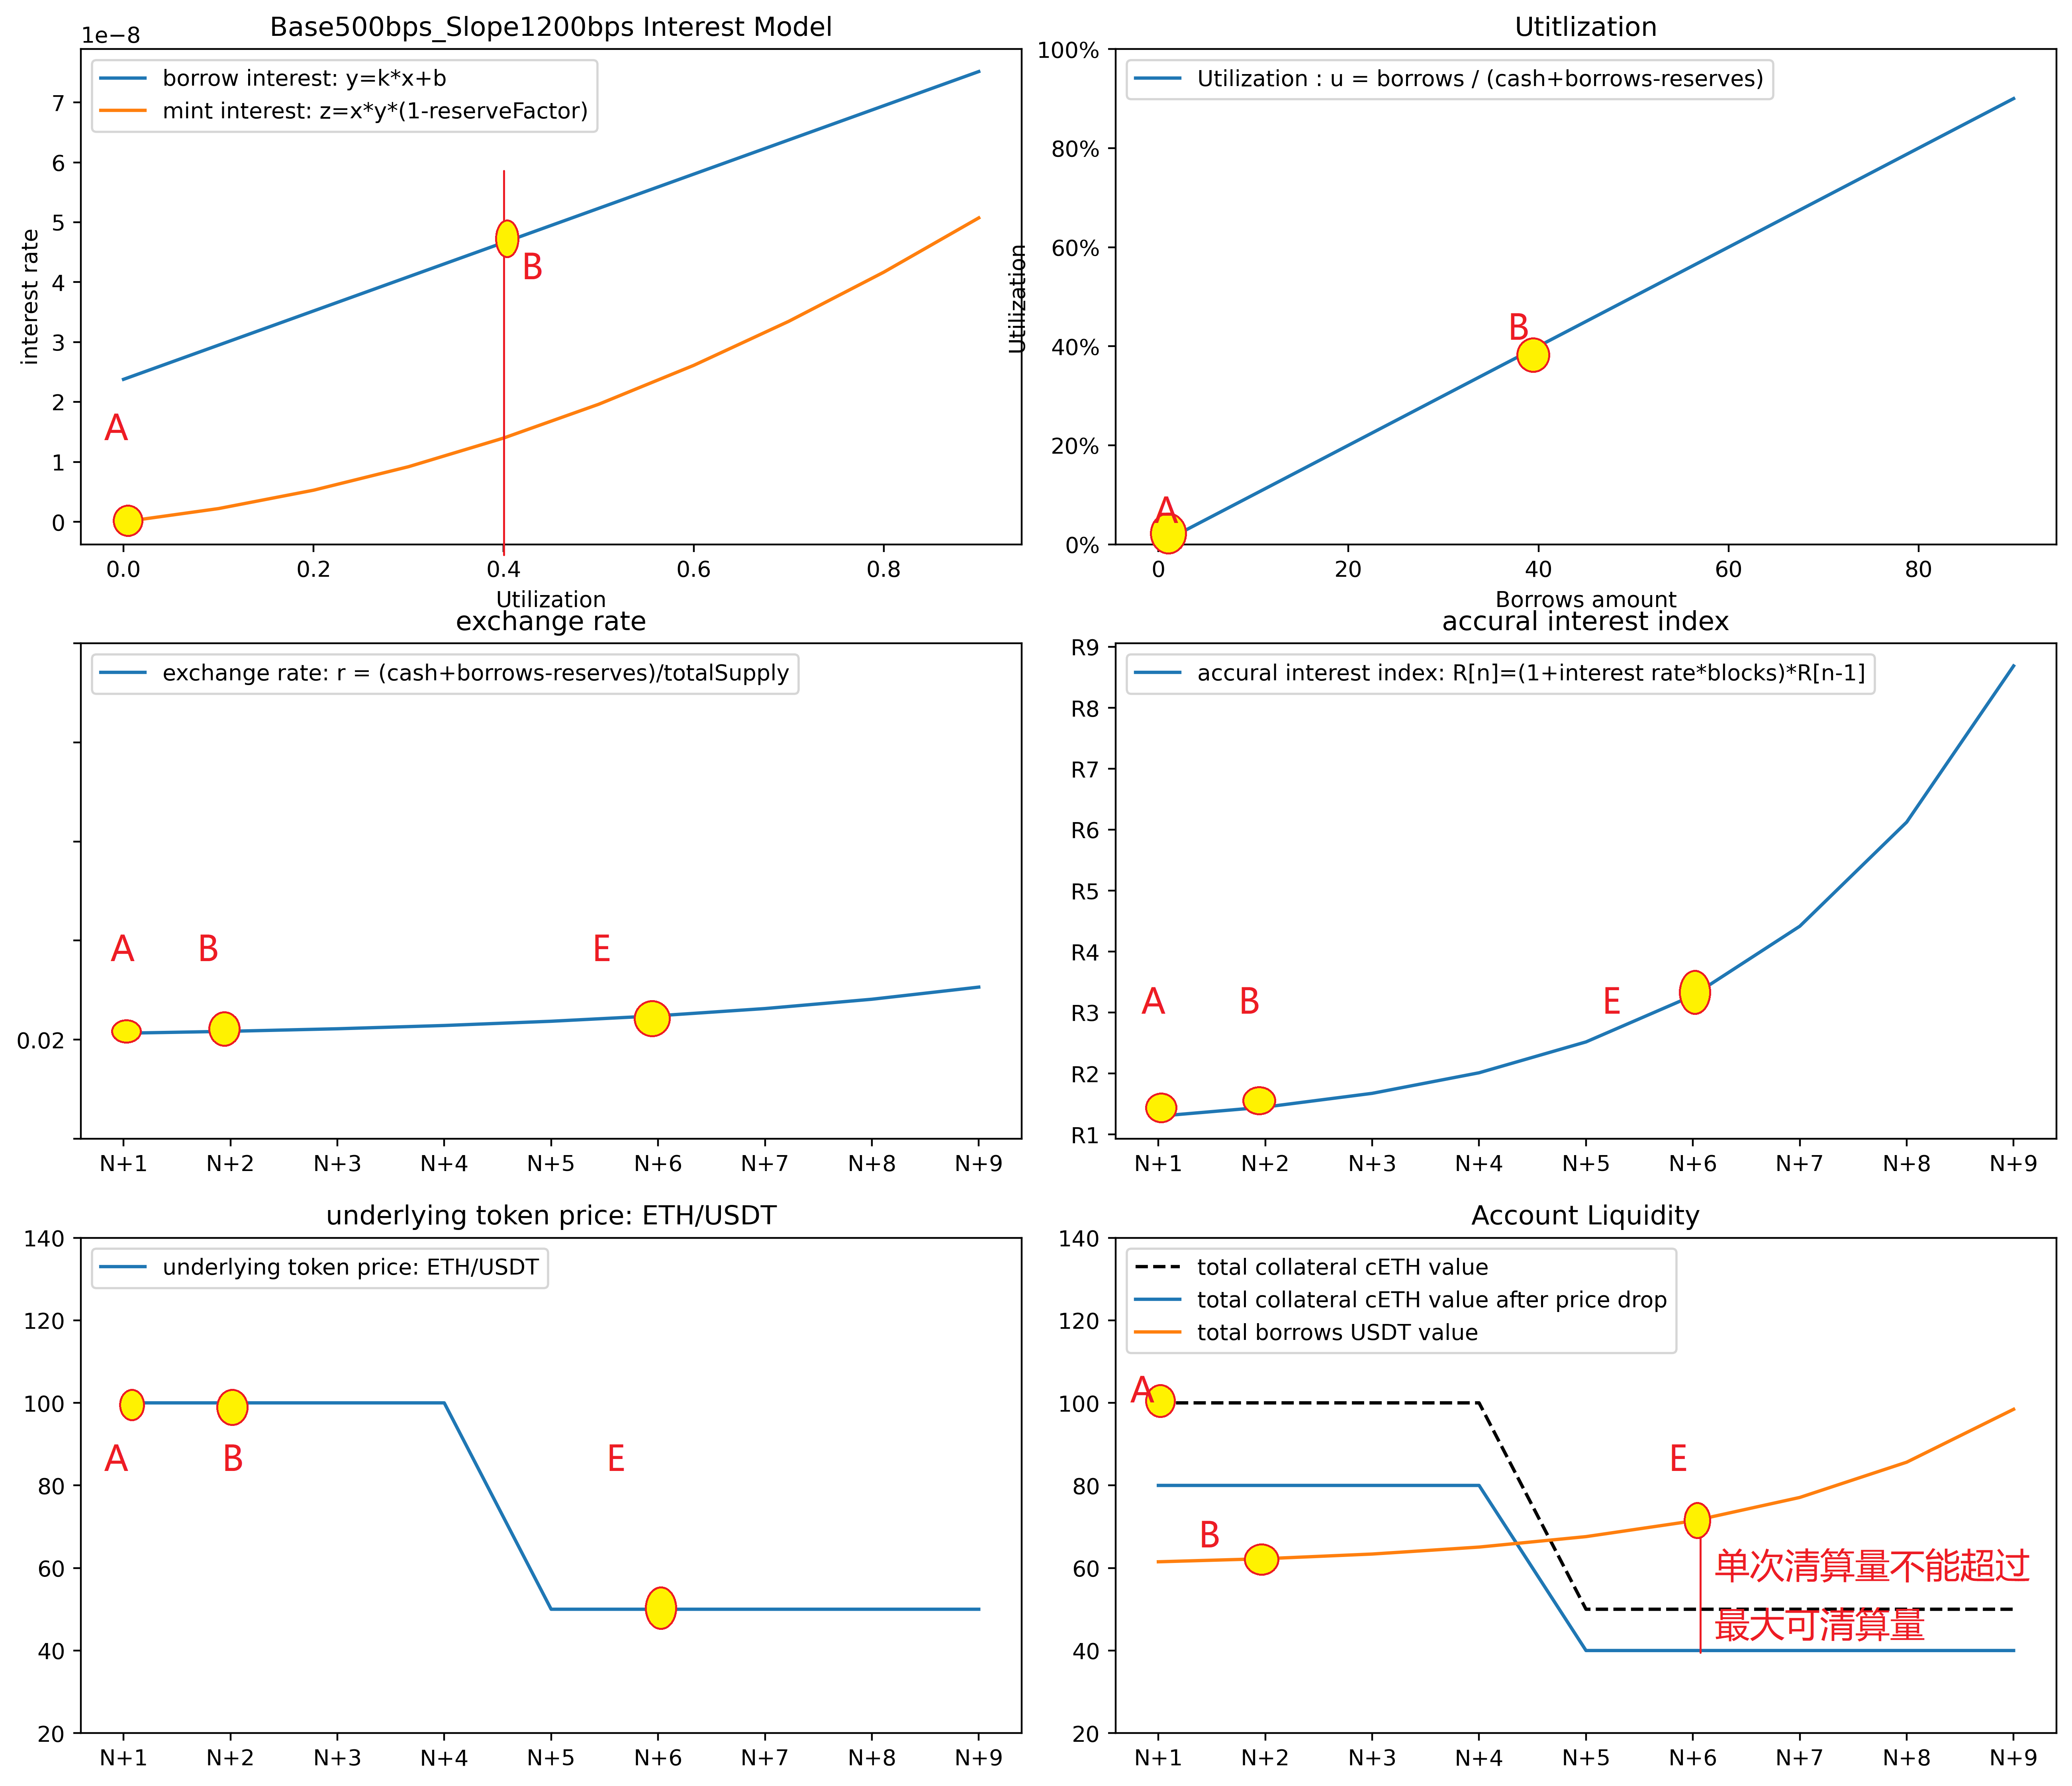
清算过程整体分为两部分:第一部分是repayBorrower部分,代为偿还underlying token,另一部分是seize部分,即将被清算者的cToken及奖励金一起奖励给清算者。由于清算涉及到两种cToken,故在清算的第一步是分别调用两种cToken的accural Interest函数,计算各自最新的利率指数Index,并计算含息债务总额。然后调用comptroller.liquidateBorrowAllowed函数,计算被清算账户的流动性,如果被清算账户的流动性为正,则不允许清算,如果被清算账户的流动性为负,并验算单笔交易的清算量不能超过被清算账户的最大可清算量,则允许清算。具体清算时,要求清算者不能是被清算者自己,然后计算转给被清算者的cToken数量, 如下公式所示:
$$ seizeTokens = \frac {repayAmount \times price{borrowed}\ /\ price{collateral}} {exchangeRate_{collateral}}\times liquidationIncentive $$
在执行转账cToken到清算者之前,需调用comptroller.seizeAllowed函数,作用是验证调用seize函数的msg.sender和address(this)的comptroller保持一致。然后将清算者的账户余额加上seizeTokens,被清算者的余额减去seizeTokens。在完成seize部分后,函数跳转到repayBorrow部分,代为偿还underlying token。

- 从 DeFi 到 NeoFi :下一个篇章 98 浏览
- 你的DeFi协议需要吸引机构注意力的5个架构转变 291 浏览
- 来自 Tomasz 的更新 213 浏览
- 将结构化收益引入 Neutrl NUSD 81 浏览
- “夺旗”竞赛继续! 275 浏览
- AI 正热,加密货币遇冷,那又如何? 498 浏览
- Polymarket交易手册 459 浏览
- 如何在稳定币上获得收益 292 浏览
- DeFi中的移动平均线:安全漏洞与攻击预防 215 浏览
- MegaETH主网已上线:应用、社区以及为什么这个L2感觉与众不同 285 浏览
- $PUMP 论点:一月份的赌场 346 浏览
- 加密货币的2026年 = 互联网的2002年:黎明前最黑暗的时刻 327 浏览

