OpenZeppelin Upgrades教程: 在Hardhat下如何进行合约升级
- 翻译小组
- 发布于 2021-10-12 21:20
- 阅读 12393
OpenZeppelin Hardhat Upgrades 使用教程
使用OpenZeppelin Upgrades插件部署的智能合约可以被升级,可以在保留其地址、状态和余额下,修改其合约代码,同时。这允许你迭代地将新功能添加到项目中,或修复你在生产中可能发现的任何错误。
在本教程中,我们将展示使用OpenZeppelin Hardhat Upgrades和Gnosis Safe多签钱包,进行合约创建、测试和部署,以及使用Gnosis Safe多签升级,教程包含以下内容:
- 创建一个可升级的合约
- 在本地测试该合约
- 将合约部署到公共网络上
- 将升级的控制权转移到Gnosis 多签账号中
- 创建新的实现版本
- 在本地测试升级
- 部署新的实现
- 升级合约
设置环境
我们将首先创建一个新的npm项目。
mkdir mycontract && cd mycontract
npm init -y我们将安装Hardhat。
运行Hardhat时,选择 创建一个空的hardhat.config.js的选项:
npm install --save-dev hardhat
npx hardhat
888    888                      888 888               888
888    888                      888 888               888
888    888                      888 888               888
8888888888  8888b.  888d888 .d88888 88888b.   8888b.  888888
888    888     "88b 888P"  d88" 888 888 "88b     "88b 888
888    888 .d888888 888    888  888 888  888 .d888888 888
888    888 888  888 888    Y88b 888 888  888 888  888 Y88b.
888    888 "Y888888 888     "Y88888 888  888 "Y888888  "Y888

Welcome to Hardhat v2.0.3

✔ What do you want to do? · Create an empty hardhat.config.js
Config file created
安装Hardhat Upgrades插件:
npm install --save-dev @openzeppelin/hardhat-upgrades我们使用ethers,所以还需要安装:
npm install --save-dev @nomiclabs/hardhat-ethers ethers然后需要配置Hardhat以使用@nomiclabs/hardhat-ethers和@openzeppelin/hardhat-upgrades,以及设置编译器版本为solc 0.7.3,在你的hardhat.config.js文件中添加插件并设置solc版本,如下所示:
hardhat.config.js
// hardhat.config.js
require("@nomiclabs/hardhat-ethers");
require('@openzeppelin/hardhat-upgrades');

/**
 * @type import('hardhat/config').HardhatUserConfig
 */
module.exports = {
  solidity: "0.7.3",
};
创建可升级的合约
我们将使用来自OpenZeppelin 学习教程的Box合约。在项目根目录下创建一个contracts目录,然后在contracts目录下用以下Solidity代码创建Box.sol。
注意,可升级的合约使用initialize函数而不是构造函数来初始化状态。为了保持简单,我们将使用公共的store函数来初始化我们的状态,该函数可以从任何账户多次调用,而不是使用受保护的单次调用的initialize函数。
Box.sol
// contracts/Box.sol
// SPDX-License-Identifier: MIT
pragma solidity ^0.7.0;

contract Box {
    uint256 private value;

    // Emitted when the stored value changes
    event ValueChanged(uint256 newValue);

    // Stores a new value in the contract
    function store(uint256 newValue) public {
        value = newValue;
        emit ValueChanged(newValue);
    }

    // Reads the last stored value
    function retrieve() public view returns (uint256) {
        return value;
    }
}
在本地测试合约
记得应该始终适当地测试我们编写的合约。 为了测试可升级的合约,我们应该为实现合约创建单元测试,同时创建更高级别的测试,以测试通过代理的交互。
我们在测试中使用chai expect,所以也需要安装以下:
npm install --save-dev chai我们将为实现合约创建单元测试。在项目根目录下创建一个test目录,然后在test目录下创建Box.js,并复制以下JavaScript:
测试脚本Box.js
// test/Box.js
// Load dependencies
const { expect } = require('chai');

let Box;
let box;

// Start test block
describe('Box', function () {
  beforeEach(async function () {
    Box = await ethers.getContractFactory("Box");
    box = await Box.deploy();
    await box.deployed();
  });

  // Test case
  it('retrieve returns a value previously stored', async function () {
    // Store a value
    await box.store(42);

    // Test if the returned value is the same one
    // Note that we need to use strings to compare the 256 bit integers
    expect((await box.retrieve()).toString()).to.equal('42');
  });
});
我们还可以创建通过代理进行交互的测试。 注意:我们不需要在这里重复我们的单元测试,这是为了测试代理交互和测试升级。
在你的test目录下使用以下JavaScript创建Box.proxy.js:
Box.proxy.js
// test/Box.proxy.js
// Load dependencies
const { expect } = require('chai');

let Box;
let box;

// Start test block
describe('Box (proxy)', function () {
  beforeEach(async function () {
    Box = await ethers.getContractFactory("Box");
    box = await upgrades.deployProxy(Box, [42], {initializer: 'store'});
  });

  // Test case
  it('retrieve returns a value previously initialized', async function () {
    // Test if the returned value is the same one
    // Note that we need to use strings to compare the 256 bit integers
    expect((await box.retrieve()).toString()).to.equal('42');
  });
});
然后我们可以运行测试:
$ npx hardhat test
Downloading compiler 0.7.3
Compiling 1 file with 0.7.3
Compilation finished successfully

  Box
    ✓ retrieve returns a value previously stored (63ms)

  Box (proxy)
    ✓ retrieve returns a value previously initialized

  2 passing (2s)
将合约部署到公共网络上
为了部署Box合约,需要使用一个脚本。OpenZeppelin Hardhat升级插件提供了一个deployProxy函数来部署的可升级合约。这将部署实现合约、一个ProxyAdmin作为我们项目代理管理员和代理,同时调用初始化。
在项目根目录创建一个scripts目录,然后在scripts目录中创建以下deploy.js脚本。
在本教程中,我们没有initialize函数,所以我们将使用store函数来初始化状态:
部署脚本 deploy.js
// scripts/deploy.js
async function main() {
    const Box = await ethers.getContractFactory("Box");
    console.log("Deploying Box...");
    const box = await upgrades.deployProxy(Box, [42], { initializer: 'store' });
    console.log("Box deployed to:", box.address);
  }

  main()
    .then(() => process.exit(0))
    .catch(error => {
      console.error(error);
      process.exit(1);
    });
我们通常会先将合约部署到本地测试,然后手动与之交互。为了节省时间,将跳过直接部署到公共测试网络。
在本教程中,将部署到Rinkeby网络。如果你在配置方面需要帮助,请参阅连接到公共测试网络 和Hardhat: 部署到真实网络 。注意:任何如助记符或Alchemy API密钥都不应提交到版本控制中。
我们将使用以下hardhat.config.js来部署到Rinkeby:
hardhat.config.js
// hardhat.config.js
const { alchemyApiKey, mnemonic } = require('./secrets.json');

require("@nomiclabs/hardhat-ethers");
require('@openzeppelin/hardhat-upgrades');

/**
 * @type import('hardhat/config').HardhatUserConfig
 */
module.exports = {
  solidity: "0.7.3",
  networks: {
    rinkeby: {
      url: `https://eth-rinkeby.alchemyapi.io/v2/${alchemyApiKey}`,
      accounts: {mnemonic: mnemonic}
    }
  }
};运行deploy.js 使用 Rinkeby网络参数进行部署。将部署实现合约(Box.sol)、ProxyAdmin和代理。
注意:我们需要跟踪代理地址,以后会需要它。
$ npx hardhat run --network rinkeby scripts/deploy.js
Deploying Box...
Box deployed to: 0xFF60fd044dDed0E40B813DC7CE11Bed2CCEa501F
我们可以使用Hardhat控制台与合约交互。
注意: Box.attach(PROXY ADDRESS)需要使用代理合约的地址。
$ npx hardhat console --network rinkeby
> const Box = await ethers.getContractFactory("Box")
undefined
> const box = await Box.attach("0xFF60fd044dDed0E40B813DC7CE11Bed2CCEa501F")
undefined
> (await box.retrieve()).toString()
'42'
将升级的控制权转移到Gnosis Safe多签
我们将使用Gnosis Safe多签来管理合约的升级。
首先,我们需要在Rinkeby网络上为自己创建一个Gnosis Safe。按照Create a Safe Multisig的指示。为了简单起见,在本教程中我们将使用1/1 多签,在生产环境中你应该考虑使用至少2/3。
一旦你在Rinkeby上创建了多签钱包,请复制地址,以便我们可以转移所有权。

代理的管理员(可以执行升级)是ProxyAdmin合约。只有ProxyAdmin的所有者可以升级我们的代理实现。警告:确保只将ProxyAdmin的所有权转移到我们控制的地址。
在scripts目录下创建包含以下JavaScript的文件transfer_ownership.js,将gnosisSafe的值改为你的Gnosis Safe多签地址。
transfer_ownership.js
// scripts/transfer_ownership.js
async function main() {
  const gnosisSafe = '0x1c14600daeca8852BA559CC8EdB1C383B8825906';

  console.log("Transferring ownership of ProxyAdmin...");
  // The owner of the ProxyAdmin can upgrade our contracts
  await upgrades.admin.transferProxyAdminOwnership(gnosisSafe);
  console.log("Transferred ownership of ProxyAdmin to:", gnosisSafe);
}

main()
  .then(() => process.exit(0))
  .catch(error => {
    console.error(error);
    process.exit(1);
  });
我们可以在Rinkeby网络上运行转移:
$ npx hardhat run --network rinkeby scripts/transfer_ownership.js
Transferring ownership of ProxyAdmin...
Transferred ownership of ProxyAdmin to: 0x1c14600daeca8852BA559CC8EdB1C383B8825906
实现新版本
一段时间后,我们决定要给合约增加功能。在本教程中,我们将添加一个increment函数。
注意:我们不能改变实现合约的存储布局,关于升级技术的限制更多细节,可以看这里。
在你的contracts目录下创建新的实现,BoxV2.sol,其Solidity代码如下:
BoxV2.sol
// contracts/BoxV2.sol
// SPDX-License-Identifier: MIT
pragma solidity ^0.7.0;

contract BoxV2 {
    uint256 private value;

    // Emitted when the stored value changes
    event ValueChanged(uint256 newValue);

    // Stores a new value in the contract
    function store(uint256 newValue) public {
        value = newValue;
        emit ValueChanged(newValue);
    }

    // Reads the last stored value
    function retrieve() public view returns (uint256) {
        return value;
    }

    // Increments the stored value by 1
    function increment() public {
        value = value + 1;
        emit ValueChanged(value);
    }
}
在本地测试升级
为了测试我们的升级,我们应该为新的实现合约创建单元测试,同时创建更高级别的测试,以测试通过代理进行的交互,检查状态是否在不同版本的升级中得到维护......
我们将为新的实现合约创建单元测试。我们可以添加到我们已经创建的单元测试中,以确保高覆盖率。
在你的test目录下使用以下JavaScript创建BoxV2.js
测试脚本BoxV2.js
// test/BoxV2.js
// Load dependencies
const { expect } = require('chai');

let BoxV2;
let boxV2;

// Start test block
describe('BoxV2', function () {
  beforeEach(async function () {
    BoxV2 = await ethers.getContractFactory("BoxV2");
    boxV2 = await BoxV2.deploy();
    await boxV2.deployed();
  });

  // Test case
  it('retrieve returns a value previously stored', async function () {
    // Store a value
    await boxV2.store(42);

    // Test if the returned value is the same one
    // Note that we need to use strings to compare the 256 bit integers
    expect((await boxV2.retrieve()).toString()).to.equal('42');
  });

  // Test case
  it('retrieve returns a value previously incremented', async function () {
    // Increment
    await boxV2.increment();

    // Test if the returned value is the same one
    // Note that we need to use strings to compare the 256 bit integers
    expect((await boxV2.retrieve()).toString()).to.equal('1');
  });
});
还可以创建升级后通过代理进行交互的测试。 注意:我们不需要在这里重复单元测试,仅测试代理交互和测试升级后的状态。
在你的test目录下创建BoxV2.proxy.js,其JavaScript内容如下。
BoxV2.proxy.js
// test/BoxV2.proxy.js
// Load dependencies
const { expect } = require('chai');

let Box;
let BoxV2;
let box;
let boxV2;

// Start test block
describe('BoxV2 (proxy)', function () {
  beforeEach(async function () {
    Box = await ethers.getContractFactory("Box");
    BoxV2 = await ethers.getContractFactory("BoxV2");

    box = await upgrades.deployProxy(Box, [42], {initializer: 'store'});
    boxV2 = await upgrades.upgradeProxy(box.address, BoxV2);
  });

  // Test case
  it('retrieve returns a value previously incremented', async function () {
    // Increment
    await boxV2.increment();

    // Test if the returned value is the same one
    // Note that we need to use strings to compare the 256 bit integers
    expect((await boxV2.retrieve()).toString()).to.equal('43');
  });
});
然后我们可以运行我们的测试。
$ npx hardhat test
Compiling 1 file with 0.7.3
Compilation finished successfully

  Box
    ✓ retrieve returns a value previously stored (59ms)

  Box (proxy)
    ✓ retrieve returns a value previously initialized

  BoxV2
    ✓ retrieve returns a value previously stored (40ms)
    ✓ retrieve returns a value previously incremented

  BoxV2 (proxy)
    ✓ retrieve returns a value previously incremented (40ms)

  5 passing (2s)
部署新的实现
一旦测试了我们的新实现,就可以准备升级了。这将验证并部署新实现合约。注意:我们只是在准备升级。我们将使用Gnosis Safe多签来执行实际的升级。
在scripts目录下创建prepare_upgrade.js,其中包含以下JavaScript:
注意:我们需要更新该脚本以指定我们的代理地址。
prepare_upgrade.js
// scripts/prepare_upgrade.js
async function main() {
  const proxyAddress = '0xFF60fd044dDed0E40B813DC7CE11Bed2CCEa501F';

  const BoxV2 = await ethers.getContractFactory("BoxV2");
  console.log("Preparing upgrade...");
  const boxV2Address = await upgrades.prepareUpgrade(proxyAddress, BoxV2);
  console.log("BoxV2 at:", boxV2Address);
}

main()
  .then(() => process.exit(0))
  .catch(error => {
    console.error(error);
    process.exit(1);
  });
我们可以在Rinkeby网络上运行迁移,部署新的实现:
$ npx hardhat run --network rinkeby scripts/prepare_upgrade.js
Preparing upgrade...
BoxV2 at: 0xE8f000B7ef04B7BfEa0a84e696f1b792aC526700
升级合约
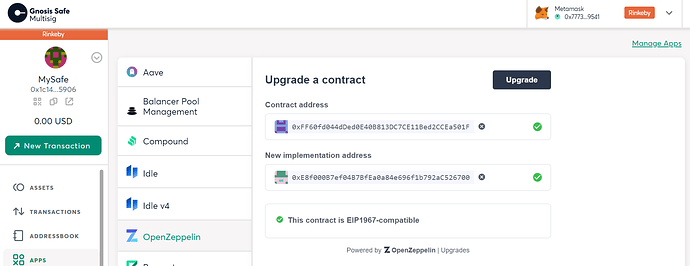
为了在Gnosis Safe中管理升级,使用OpenZeppelin应用(寻找OpenZeppelin的标志)。
首先,我们需要代理的地址和新实现的地址。我们可以从我们运行deploy.js和prepare_upgrade.js脚本时的输出中得到这些。
在Apps标签中,选择OpenZeppelin应用程序,在合约地址栏中粘贴代理的地址,并在新实现地址栏中粘贴新实现的地址。
该应用程序应该显示合约是EIP1967兼容的。

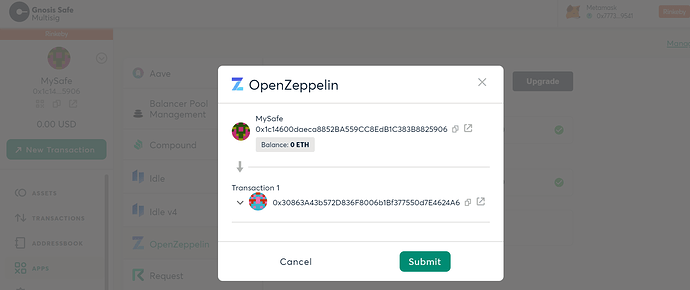
仔细检查这些地址,然后按下升级按钮。 我们将看到一个确认对话框,提交交易。

然后,需要在MetaMask(或你正在使用的钱包)中签署该交易。
现在可以与升级后的合约进行交互。需要使用代理的地址与BoxV2交互。注意:BoxV2.attach(PROXY ADDRESS)获取我们代理合约的地址。
然后,我们可以调用新的increment函数,可以观察到整个升级过程中状态保持了一致:
$ npx hardhat console --network rinkeby
> const BoxV2 = await ethers.getContractFactory("BoxV2")
undefined
> const boxV2 = await BoxV2.attach("0xFF60fd044dDed0E40B813DC7CE11Bed2CCEa501F")
undefined
> (await boxV2.retrieve()).toString()
'42'
> await boxV2.increment()
{ hash:
...
> (await boxV2.retrieve()).toString()
'43'
接下来
我们已经创建了一个可升级的合约,将升级的控制权转移到Gnosis 多签,并升级了合约。同样的过程也可以在主网上进行。注意:我们应该首先在公共测试网中测试升级。
我们也可以使用OpenZeppelin Defender管理升级,参考:https://docs.openzeppelin.com/defender/admin#upgrades
本翻译由 CellETF 赞助支持。
- GameFi 安全清单:55+ 项关键 P2E 漏洞检查 46 浏览
- 告别中心化身份!SSI 自主主权身份,重掌数字身份话语权 252 浏览
- 你的DeFi协议需要吸引机构注意力的5个架构转变 241 浏览
- 在EVM上代币化知识产权:可编程知识产权的Solidity模式 40 浏览
- GameFi 落地全解析:原理、场景、合约代码,补齐 Web3 内容版图 237 浏览
- 区块链如何悄然保护你的在线购物体验 276 浏览

