使用JavaScript实现一个简单的区块链
- Carry
- 发布于 2024-04-19 00:30
- 阅读 4267
本文使用JavaScript实现一个简单的区块链,主要在node.js环境中运行。使用crypto-js来为区块链中的块创建哈希加密,使用express.js来创建用于与区块链交互的API。
本文使用JavaScript实现一个简单的区块链,主要在node.js环境中运行。使用crypto-js来为区块链中的块创建哈希加密,使用express.js来创建用于与区块链交互的API。 本文源代码可查看:GitHub - CarryWang/mini-blockchain: use node.js implement a mini blockchain
以下是实现区块链的步骤:
- 创建一个新的Node.js项目并安装必要的库:crypto-js、express。
- 定义区块链中的区块结构。每个块应该包含唯一的索引、时间戳和想要存储在块中的数据。
- 创建一个区块链类,包含一些操作区块的方法,例如向链中添加新块。
- 使用 express.js 创建api,可以使用postman查询区块链,添加交易,以及执行挖矿操作。
- 使用 postman 测试区块链。
1. 创建一个新的Node.js项目并安装必要的库:crypto-js、express。
首先初始化一个node项目:
npm init在package.json文件中,添加type字段:
"type": "module"安装crypto-js和express:
npm install crypto-js
npm install express
npm install body-parser
在index.js中写入:
import express from "express";
import bodyParser from "body-parser";
const app = express(); const port = 3000;
app.listen(port, () => {
console.log(Example app listening on port ${port});
});
在terminal中输入:
```javascript
node index.js
你将看到:
Server running on port 3000.到这里,基本的node.js设置搞定。
2. 定义区块链中的区块结构。每个块应该包含唯一的索引、时间戳和想要存储在块中的数据。
新建blockchain.js文件,定义我们的区块结构:
import crypto from "crypto-js";

class Block {
    constructor(index, timestamp, transactions = [], previousHash = "") {
        this.index = index;
        this.timestamp = timestamp;
        this.transactions = transactions;
        this.previousHash = previousHash;
        this.hash = "";
        this.nonce = 0;
    }

    calcHash() {
        return crypto
            .SHA256(
                this.index +
                    this.timestamp +
                    JSON.stringify(this.transactions).toString() +
                    this.previousHash +
                    this.nonce,
            )
            .toString();
    }

    mineBlock(difficulty) {
        while (!this.hash.startsWith("0".repeat(difficulty))) {
            this.nonce++;
            this.hash = crypto
                .SHA256(
                    this.index +
                        this.timestamp +
                        JSON.stringify(this.transactions).toString() +
                        this.previousHash +
                        this.nonce,
                )
                .toString();
        }
    }
}
Block类包含6个属性,2个方法。
index:数字,区块的索引。timestamp:数字,时间戳。transactions:数组,储存每一笔交易信息。previousHash:哈希值,记录上一个区块的哈希值。hash:哈希值,记录当前区块的哈希值。nonce:数字,用于找到满足特定条件的哈希值的随机数,pow相关。calcHash:函数,计算哈希值,将index,timestamp,transactions,previousHash,nonce拼接在一起输出哈希值。-
mineBlock:函数,用于工作量证明的方法,接受一个代表复杂度的数字。本文对于工作量证明的计算条件为:寻找前4位为0的哈希值。3. 创建一个区块链类,包含一些操作区块的方法,例如向链中添加新块。
同样在
blockchain.js文件中,定义一个区块链类:export class Blockchain { constructor() { this.difficulty = 4; this.pendingTrasactions = []; this.chain = [this.createGenesisBlock()]; } createGenesisBlock() { const genesisPreviousHash = "0".repeat(64); const genesisBlock = new Block(0, Date.now(), [], genesisPreviousHash); genesisBlock.mineBlock(this.difficulty); genesisBlock.transactions.push({ sender: "", recipient: genesisBlock.hash, amount: 50, }); return genesisBlock; } createBlock() { const minerReward = { sender: "", recipient: "miner_adress", amount: 50, }; this.pendingTrasactions.push(minerReward); const block = new Block( this.getLatestBlock().index + 1, Date.now(), this.pendingTrasactions, this.getLatestBlock().hash, ); block.mineBlock(this.difficulty); this.chain.push(block); this.pendingTrasactions = []; } getLatestBlock() { return this.chain[this.chain.length - 1]; } createTransaction(transaction) { this.pendingTrasactions.push(transaction); return this.chain[this.chain.length - 1].index + 1; } }
`Blockchain`类包含3个属性,4个方法。

- `difficulty`:数字,代表复杂度的数字。
- `pendingTrasactions`:数组,资源池,用于存储每一笔交易。当新的区块产生时,会将资源池中的交易信息存入新区块中。
- `chain`:数组,储存每一个区块。
- `createGenesisBlock`:函数,创建第一个区块(创世块)。
- `createBlock`:函数,创建新区块。
- `getLatestBlock`:函数,返回最后一个区块。
- `createTransaction`:函数,创建一笔交易,返回将被写入区块的索引值。
## 4. 使用 express.js 创建api,可以使用postman查询区块链,添加交易,以及执行挖矿操作。
接下来需要实现三个api,分别是:
```javascript
GET /chain                //查看区块链
GET /mine                 //执行挖矿,成功后增加一个区块
POST /transactions/new //添加一笔交易回到index.js中,导入blockchain.js,并添加route:
import express from "express";
import bodyParser from "body-parser";

import { Blockchain } from "./blockchain.js";

const app = express();
const port = 3000;

app.listen(port, () => {
    console.log(`Example app listening on port ${port}`);
});

app.use(express.json());
app.use(bodyParser.urlencoded({ extended: false }));
app.use(bodyParser.json());

const blockchain = new Blockchain();

app.get("/mine", (req, res) => {
    blockchain.createBlock();
    res.status(200).send(blockchain.chain[blockchain.chain.length - 1]);
});

app.post("/transactions/new", (req, res) => {
    // const transaction = {
    //     sender: "sender_adress",
    //     recipient: "recipient_adress",
    //     amount: 50,
    // };
    const transaction = req.body;
    const blockNumber = blockchain.createTransaction(transaction);
    res.status(200).send(`will be added to block ${blockNumber}`);
});

app.get("/chain", (req, res) => {
    res.status(200).send(blockchain.chain);
});
5. 使用 postman 测试区块链。
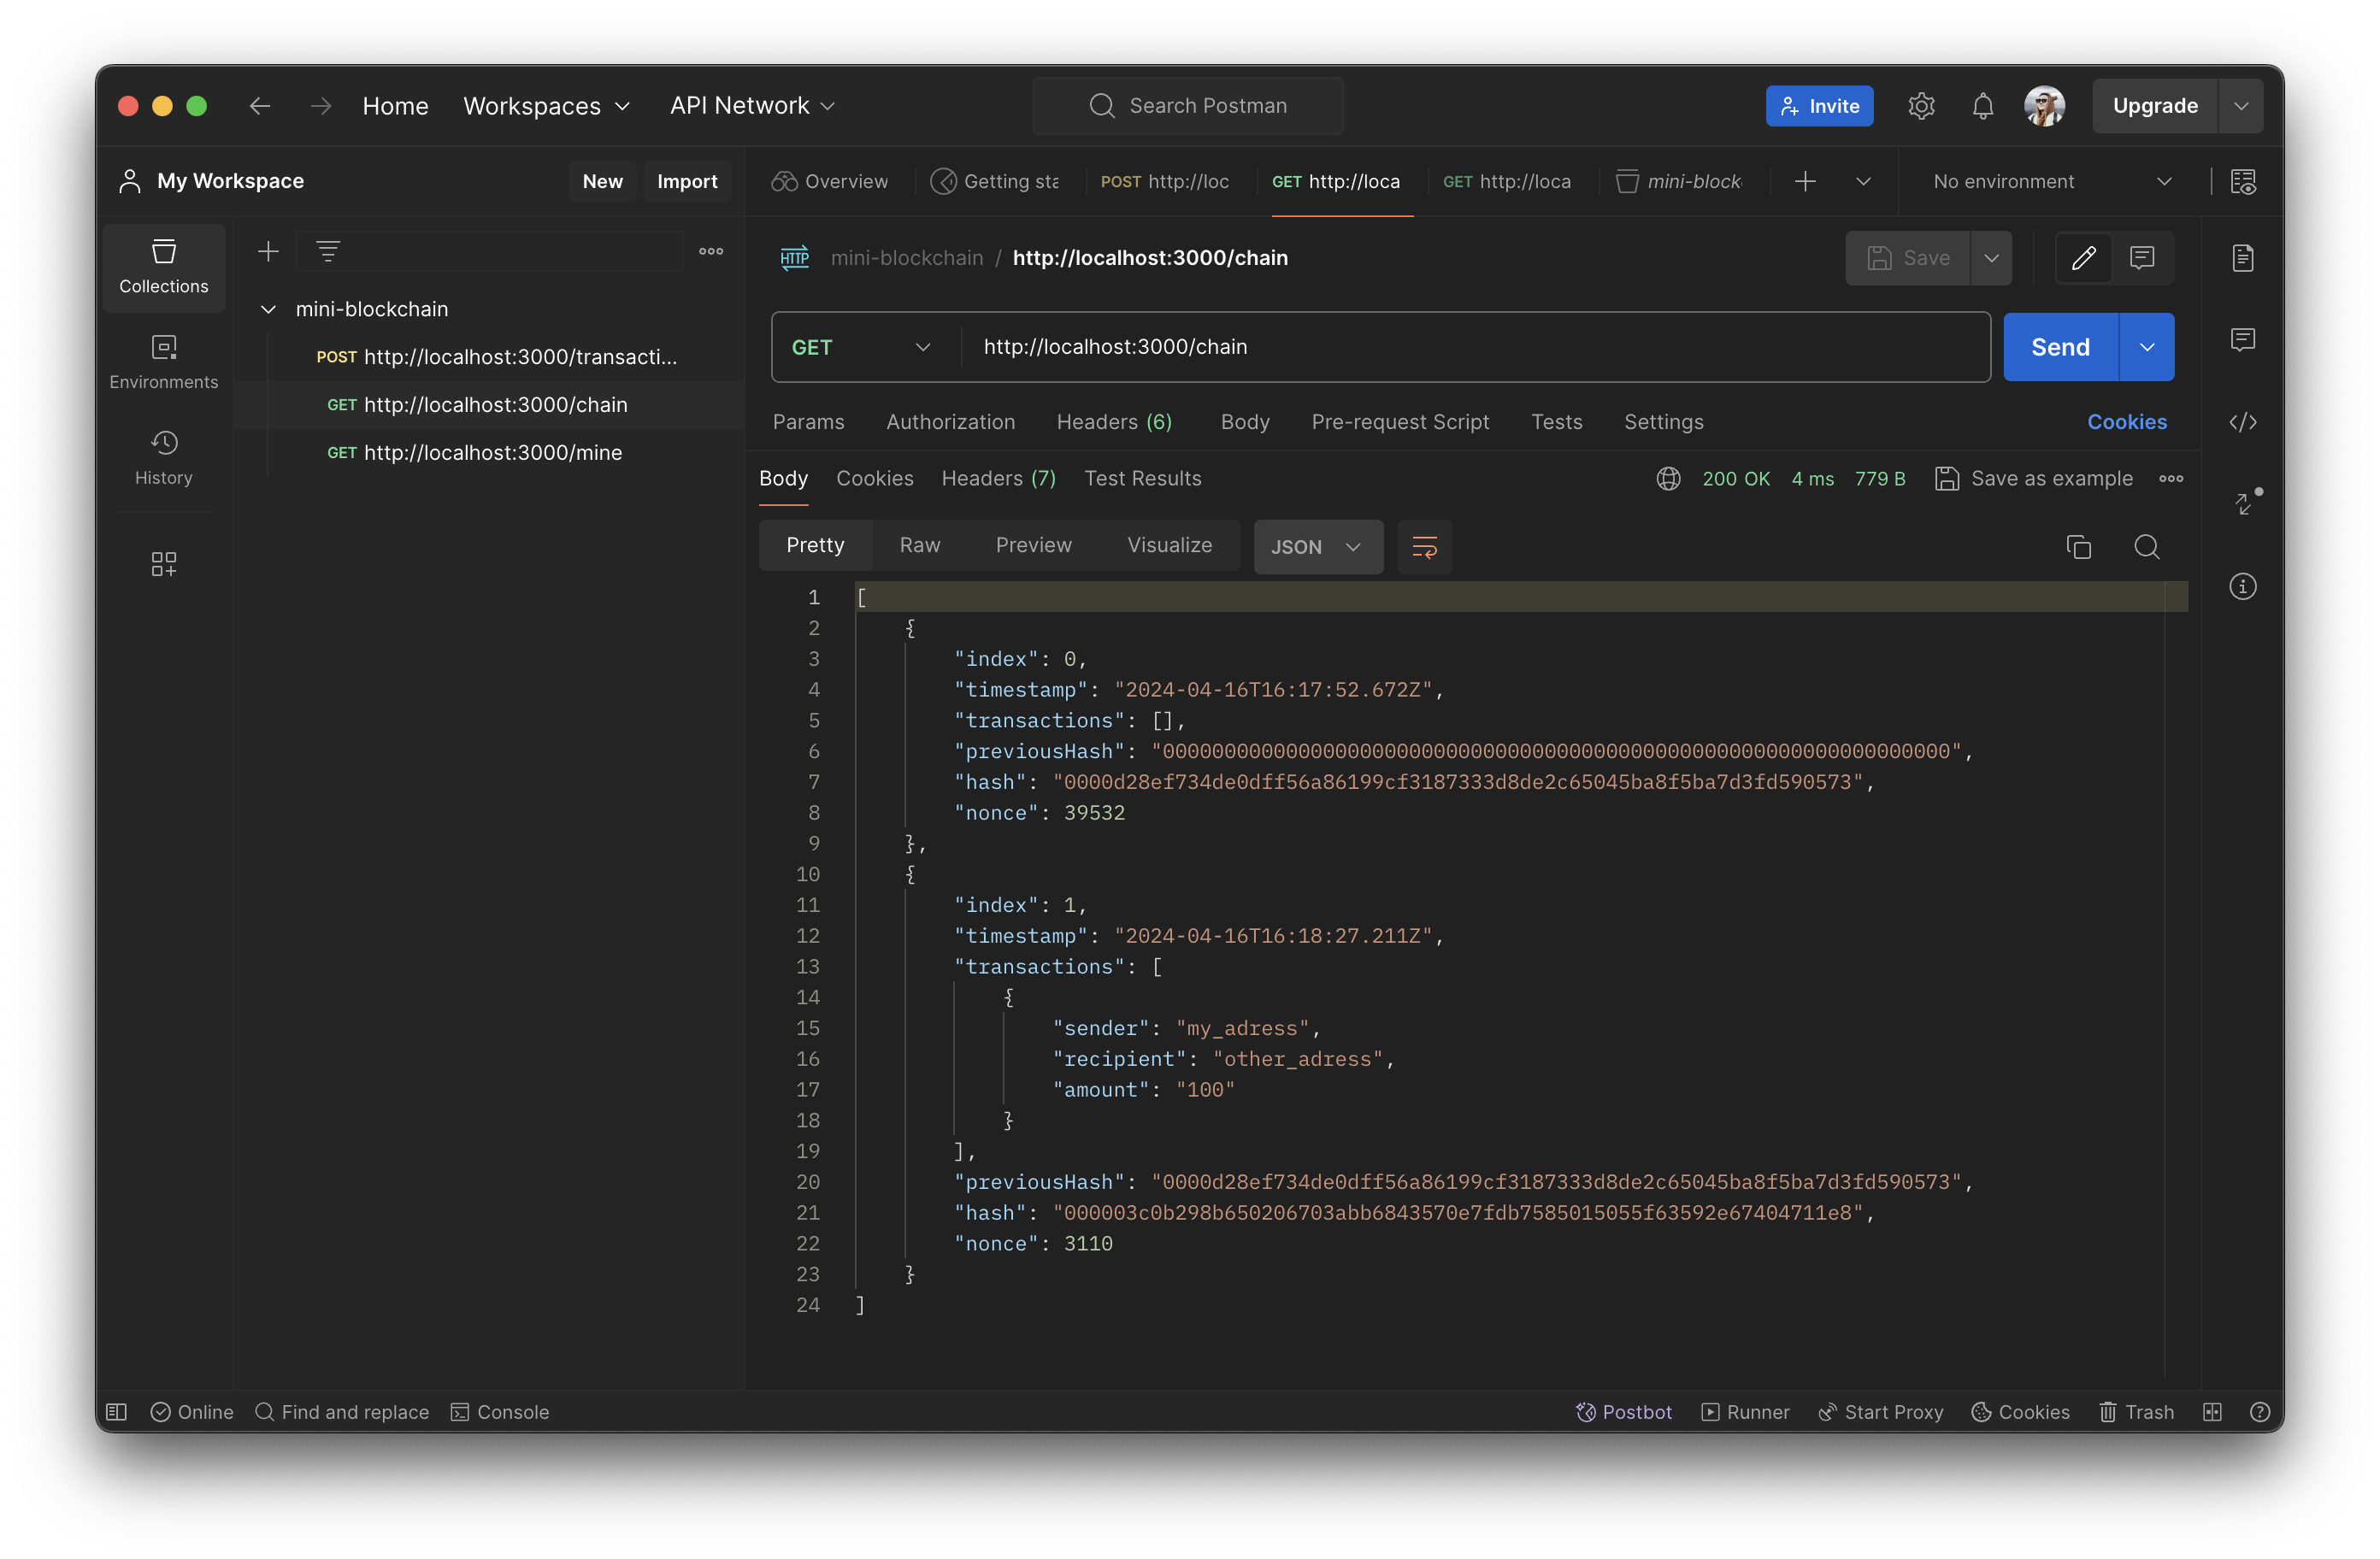
测试 GET http://localhost:3000/chain:
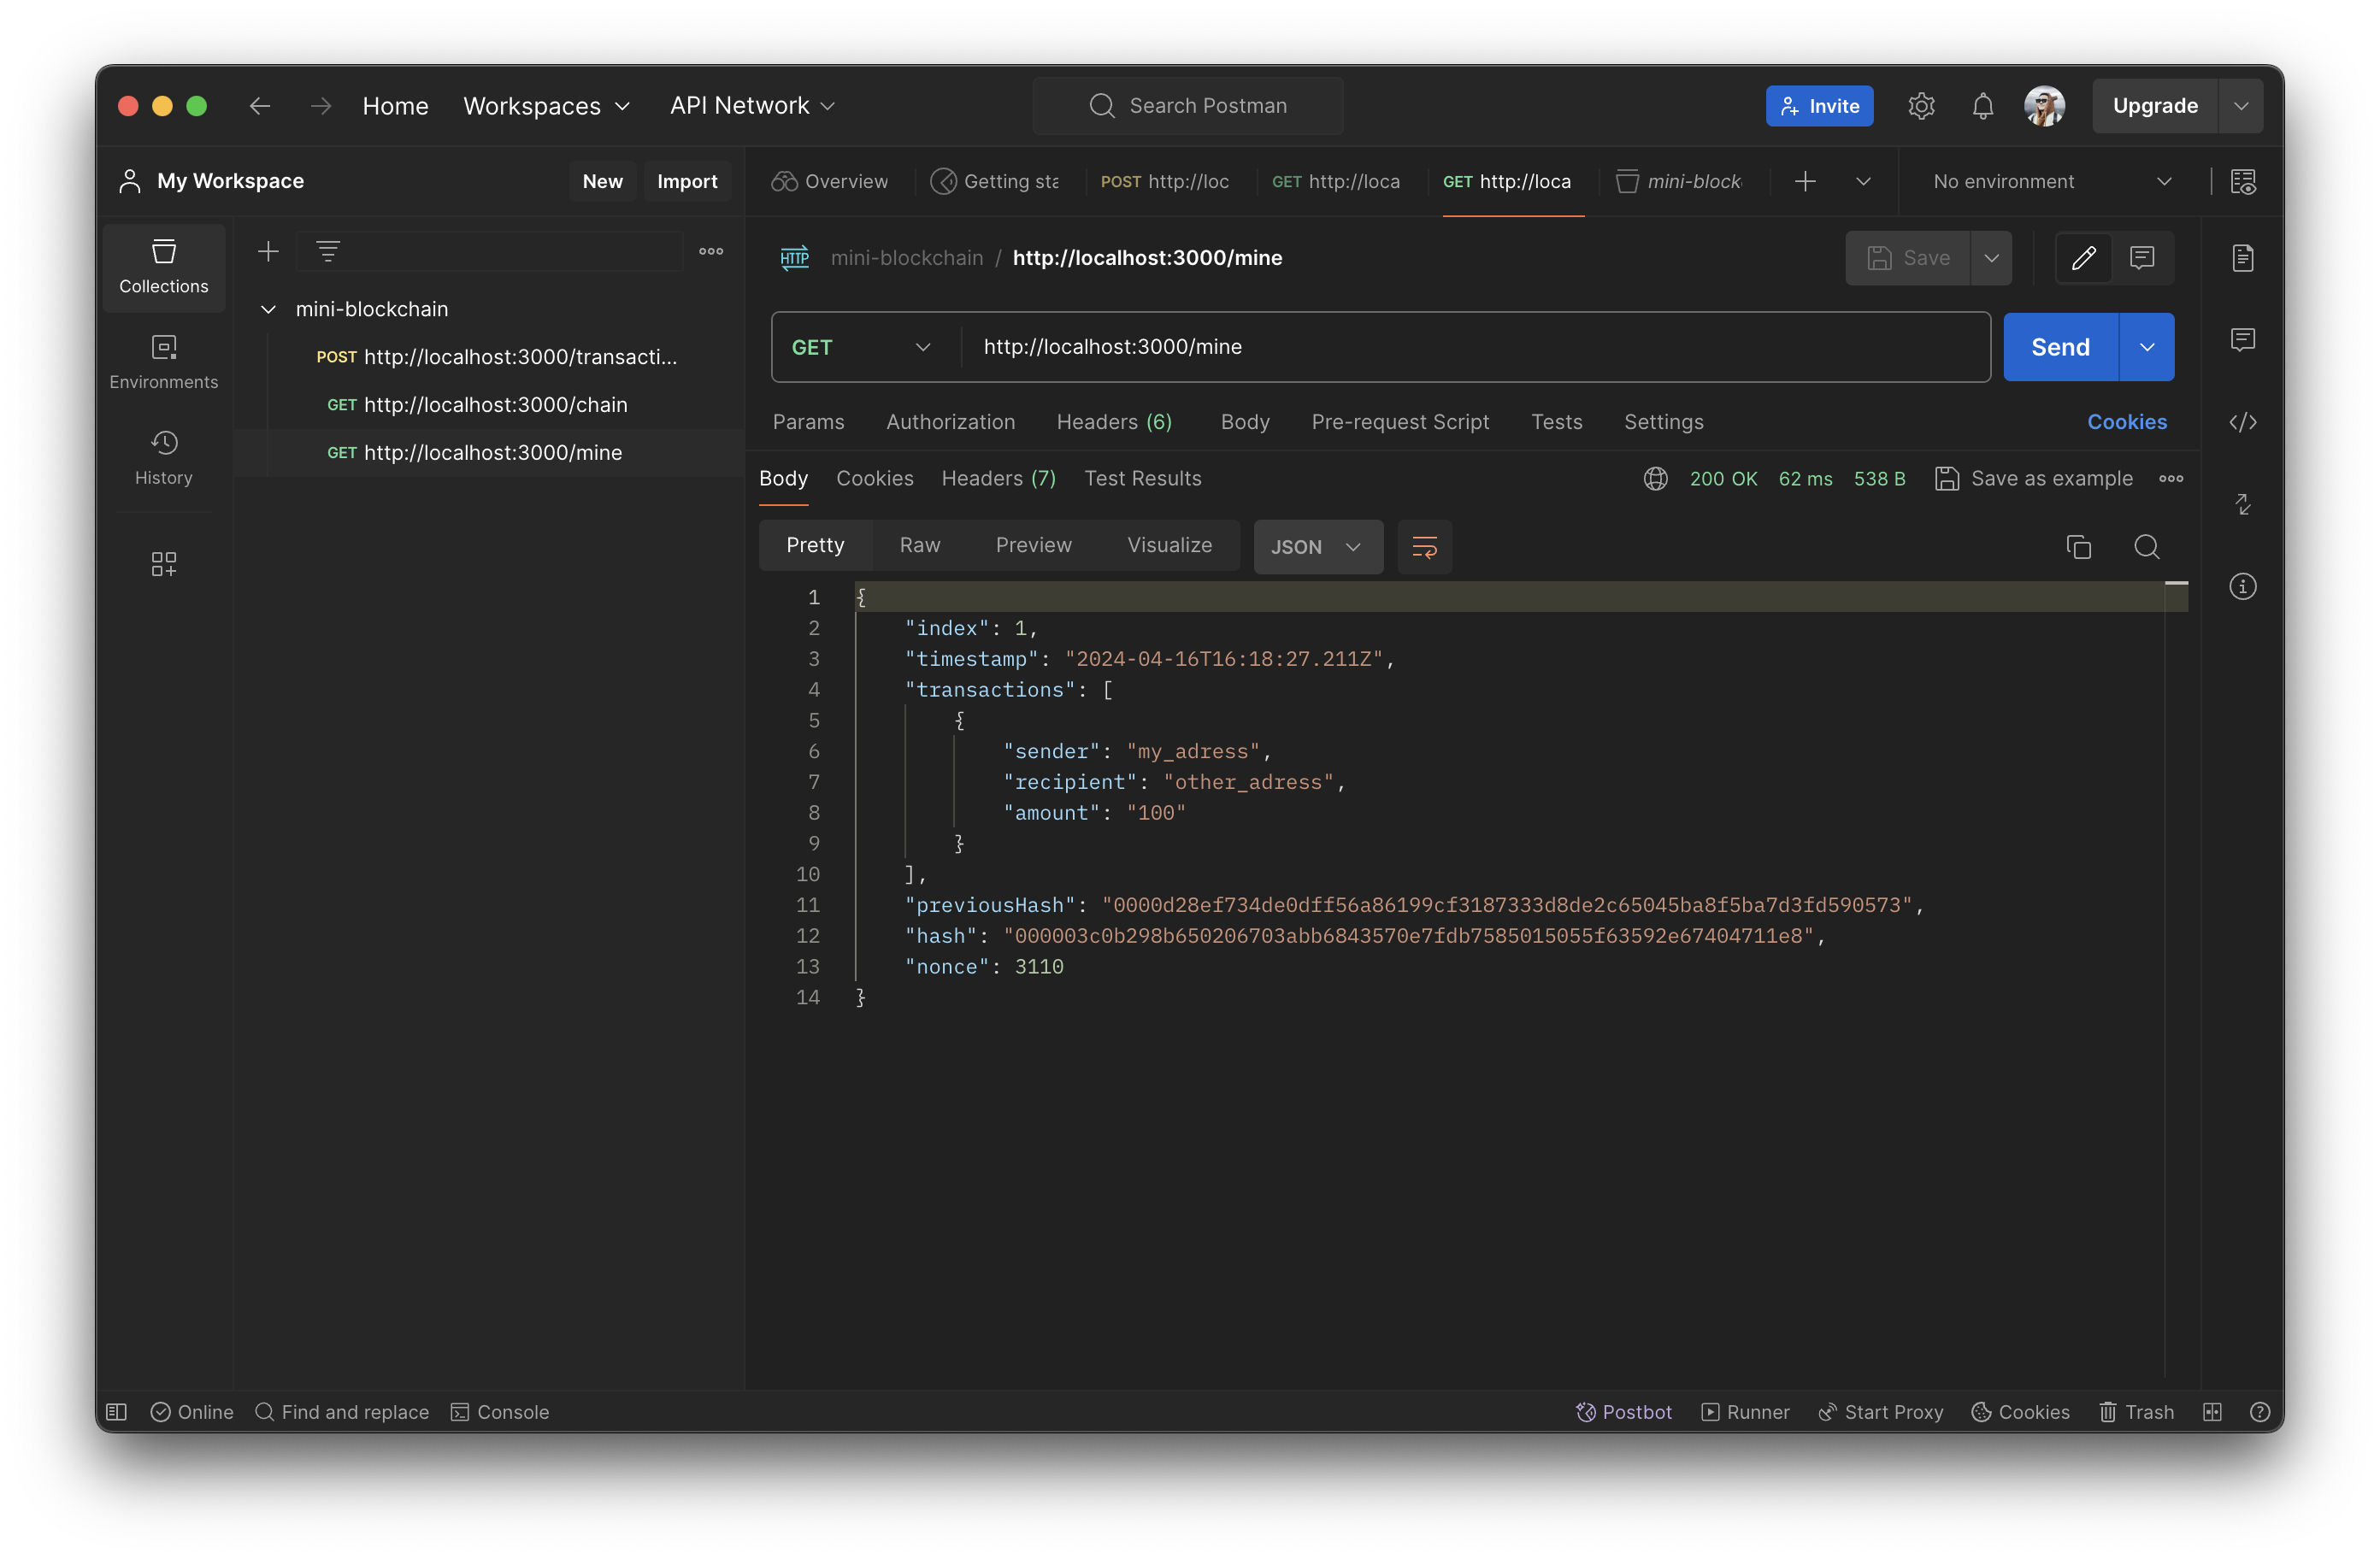
 测试 GET http://localhost:3000/mine:
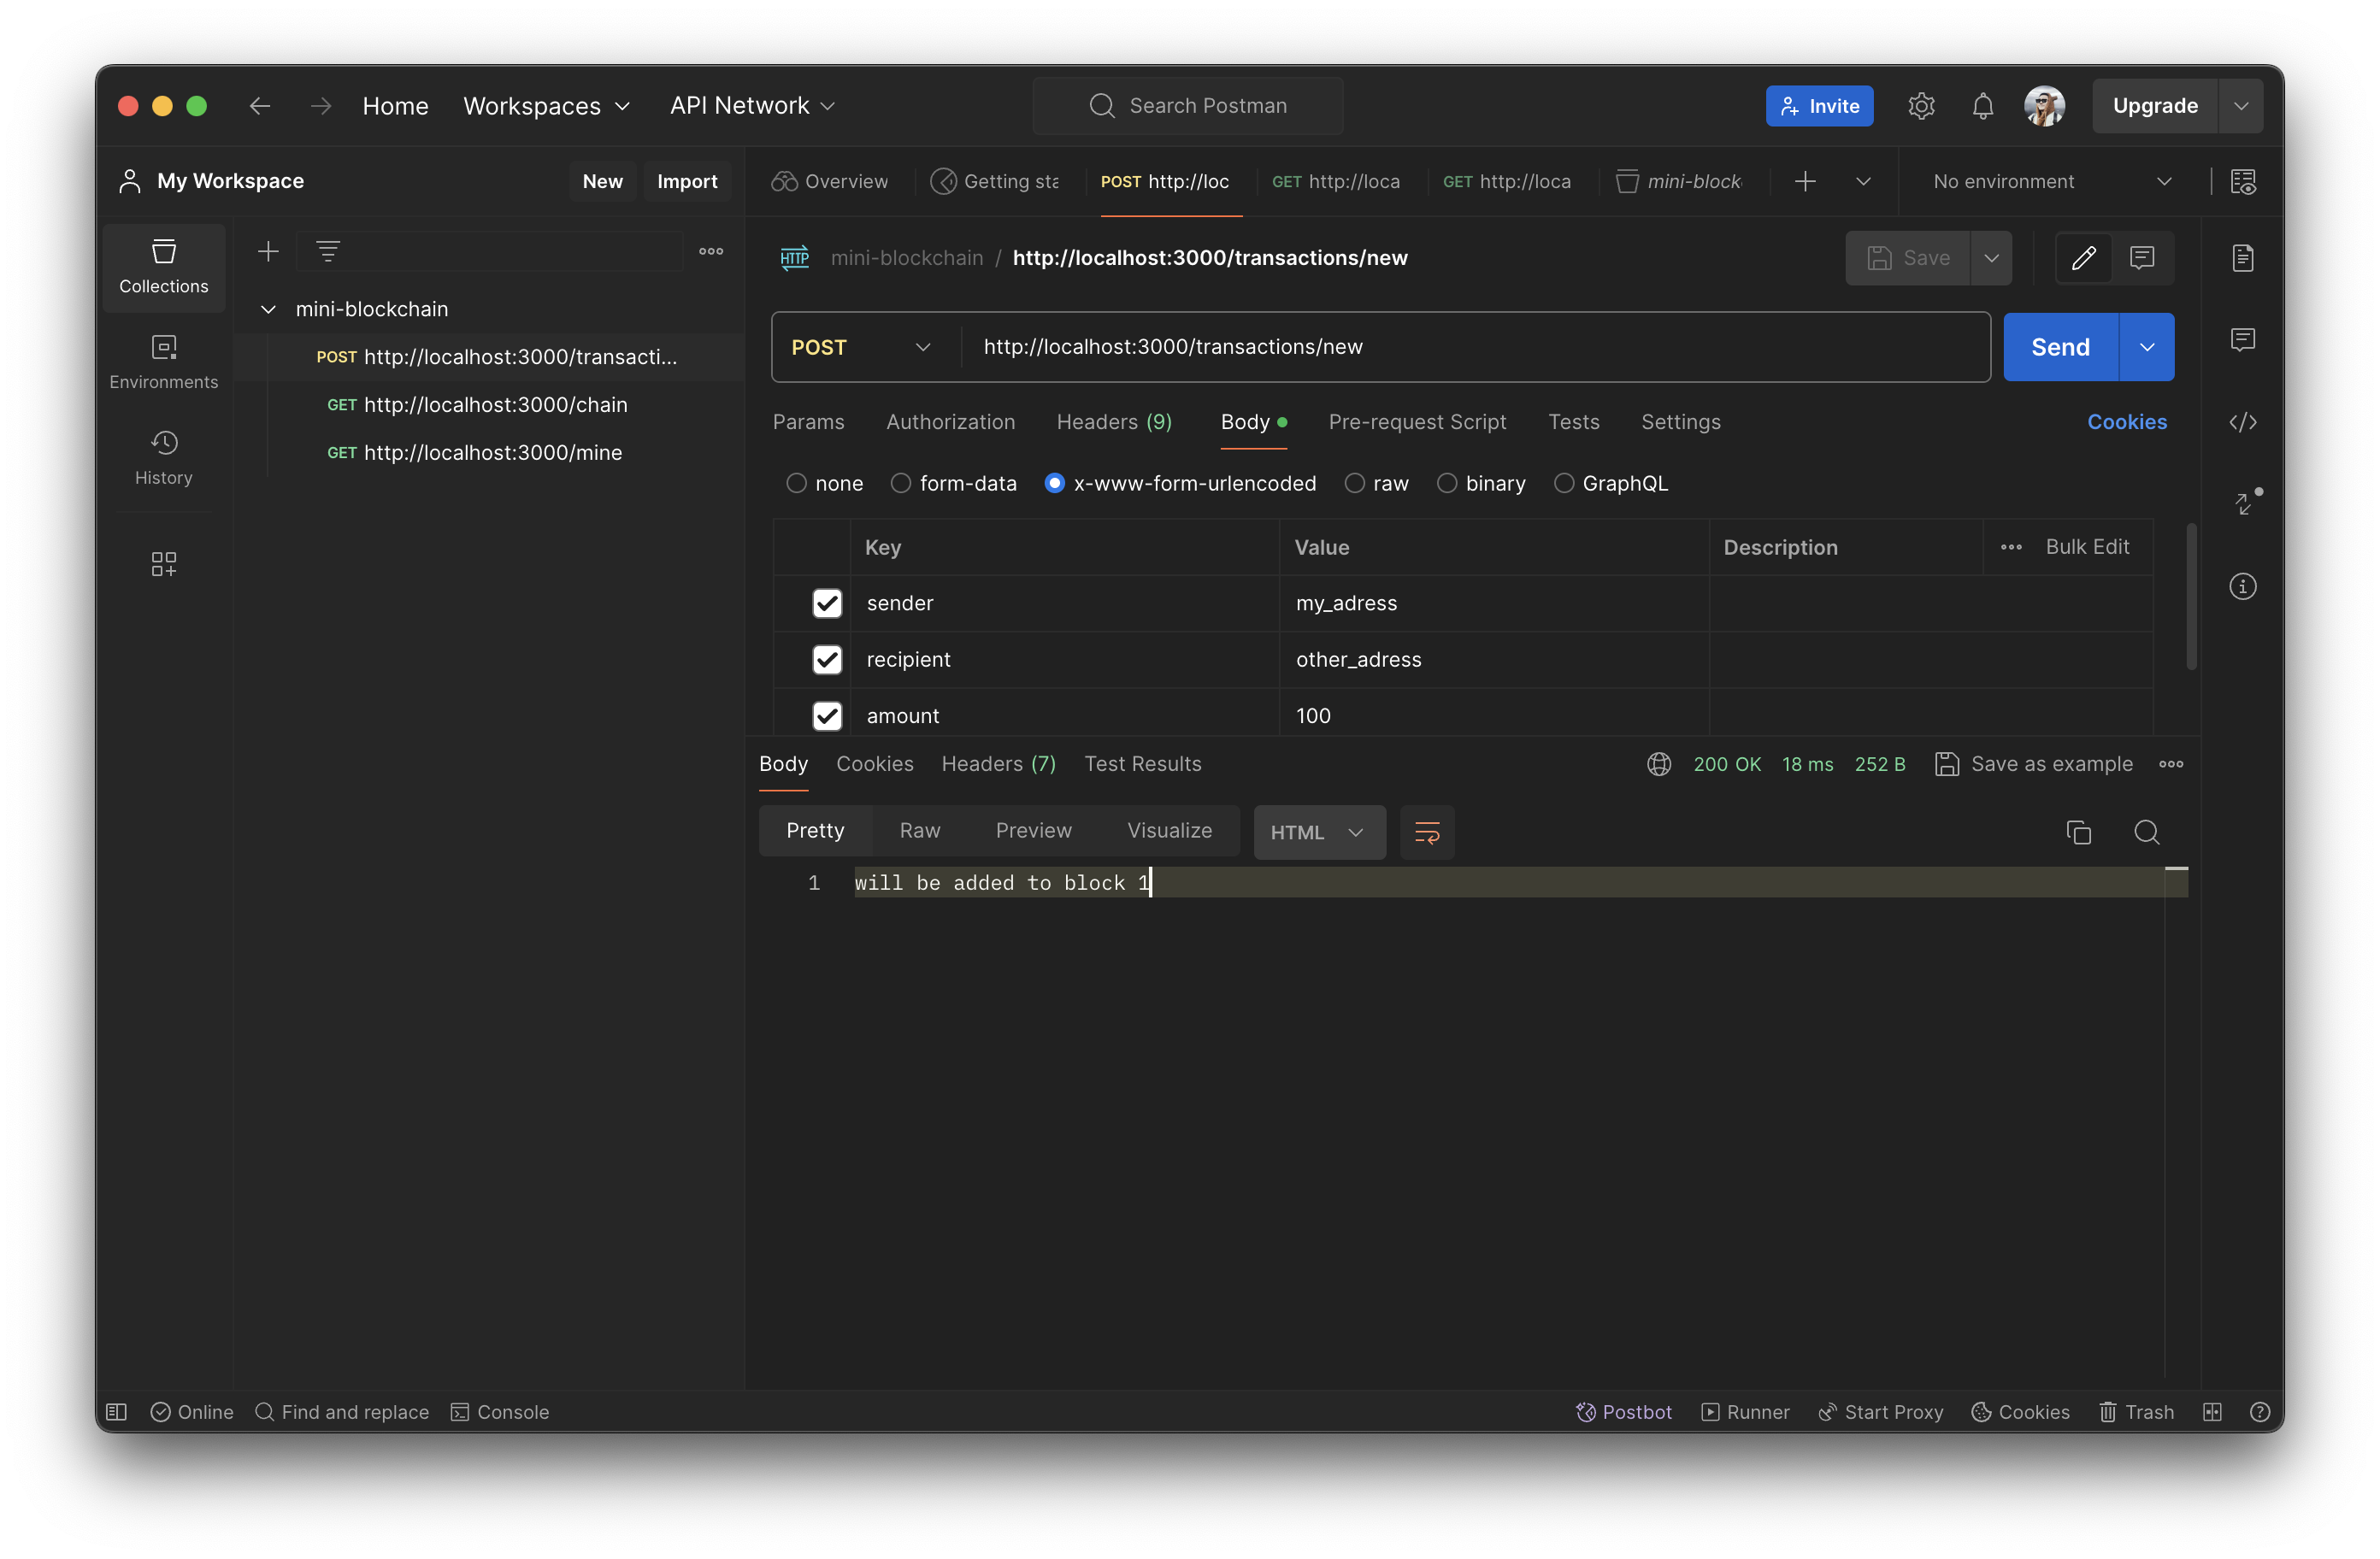
 测试 POST http://localhost:3000/transactions/new:

- 新帖子 – ImmuneBytes 40 浏览
- 后量子时代,我们如何保护隐私 117 浏览
- 为机器人募资:发展agent资本市场 191 浏览
- 区块链如何悄然保护你的在线购物体验 304 浏览
- AI 正热,加密货币遇冷,那又如何? 491 浏览
- Layer Zero 发布 Zero 链:去中心化的多核世界计算机 305 浏览
- 如何在不到一分钟内发现Web3骗局 320 浏览
- 加密货币的长期博弈 362 浏览
- 加密货币的2026年 = 互联网的2002年:黎明前最黑暗的时刻 324 浏览
- 让挖矿带来更多完全验证的比特币用户 314 浏览
- 2025年第四季度加密货币和区块链风险投资 438 浏览
- 代币化的真实世界资产:初学者须知 872 浏览

