从0基础开始写Sui MOVE 应用&游戏 实战系列
2024年06月05日更新
15 人订阅
专栏简介
Sui环形掌上战争 0基础开发入门到精通(1)
Sui环形掌上战争 0基础开发入门到精通(2)
Let's Move Sui环形掌上战争 0基础开发入门到精通(3)
Let's Move Sui环形掌上战争 0基础开发入门到精通(4)
Let's Move Sui环形掌上战争 0基础开发入门到精通(5)
Let's Move 0基础web2向web3迁移指南 (1)
Let's Move 0基础web2向web3迁移指南 (2)
Let's Move Sui环形掌上战争 0基础开发入门到精通(6)
Let's Move 0基础web2向web3迁移指南 (3)
Let's Move 从0开始开发Sui工具类应用 (1)
Let's Move Sui环形掌上战争 0基础开发入门到精通(7)
Let's Move 0基础web2向web3迁移指南 (4)
Let's Move 从前端到web3入门教程 (1) NaviSdk悬赏奖励
Let's Move 从前端到web3入门教程 (2) Navi竞赛奖励第4期
Let's Move 从前端到web3入门教程 (3) Navi竞赛奖励第5期
Let's Move 0基础web2向web3迁移指南 (5) sui zkSend红包 SDK
Let's Move 从前端到web3入门教程 (4) Navi竞赛奖励第6期
Let's Move 从前端到web3入门教程 (5) Navi竞赛补充
Let's Move 从前端到web3入门教程 (6) Navi竞赛奖励第7期
Let's Move 0基础web2向web3迁移指南 (6) 手模手教您安装 官方 Move analyzer 插件 超详细
Let's Move 0基础web2向web3迁移指南 (7) RustRover 和 Sui Move 插件一起完美写代码
Let's Move 从前端到web3入门教程 (7) Navi竞赛奖励第8期
Let's Move 从前端到web3入门教程 (6) Navi竞赛奖励第7期
- Summer.XJ
- 发布于 2024-05-23 00:58
- 阅读 2907
Let'sMove从前端到web3入门教程(6)Navi竞赛奖励第7期引子NAVI竞赛又又又来了!这次任务是borrow,然后调用2个外部movecall来stake换取响应的vsui和afsui。let'smove!开始首先调用naviborrowlet
Let's Move 从前端到web3入门教程 (6) Navi竞赛奖励第7期
引子
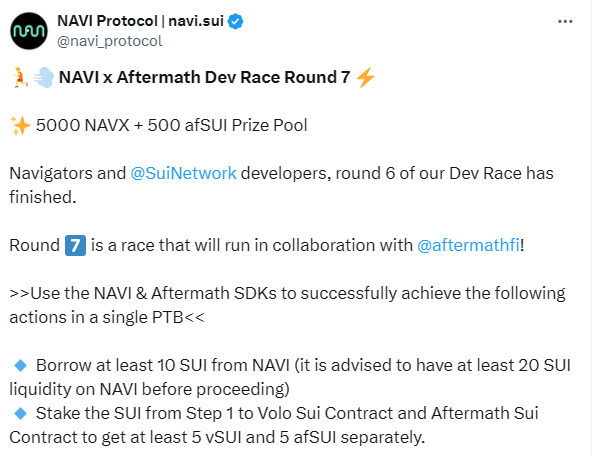
NAVI竞赛又又又来了!

这次任务是borrow,然后调用2个外部movecall来stake换取响应的vsui和afsui。
let's move !
开始
首先 调用 navi borrow
    let borrowed = await txb.moveCall({
        target : `${config.ProtocolPackage}::incentive_v2::borrow`,
        arguments: [
            txb.object('0x06'), // clock object id
            txb.object(config.PriceOracle), // The object id of the price oracle
            txb.object(config.StorageId), // Object id of storage
            txb.object(pool_to_borrow.poolId), // pool id of the asset
            txb.pure(pool_to_borrow.assetId), // The id of the asset in the protocol
            txb.pure(borrowamount), // The amount you want to borrow
            txb.object(config.IncentiveV2), // The incentive object v2
        ],
        typeArguments:[pool_to_borrow.type] // type arguments, for this just the coin type
    });
这里的borrow出来的是balance,需要做一次转换
    const extra_coin = txb.moveCall({
        target: '0x2::coin::from_balance',
        arguments: [borrowed],
        typeArguments: [pool_to_borrow.type],
    });
接下来 stake sui 获 volo sui
这次官方提供了2份文档,一份是volo sui的,一份是Aftermath 的。 volo sui的文档就是提供了一个github地址,可以看到源码。 主要是观察这个函数 native_pool::stake
public entry fun stake(
    self: &mut NativePool,
    metadata: &mut Metadata<CERT>,
    wrapper: &mut SuiSystemState,
    coin: Coin<SUI>,
    ctx: &mut TxContext)
通过suiscan,查询volo包,我们找到了发布到主网的package
然后通过比对,查询到了各项需要的object, 然后就可以开始写ptb了
    //Stake the SUI from Step 1 to Volo Sui Contract
    const to_add = txb.splitCoins(extra_coin, [txb.pure(borrowamount/2)]);

    await txb.moveCall({
        target : `0x549e8b69270defbfafd4f94e17ec44cdbdd99820b33bda2278dea3b9a32d3f55::native_pool::stake`,
        arguments: [
            txb.object('0x7fa2faa111b8c65bea48a23049bfd81ca8f971a262d981dcd9a17c3825cb5baf'),
            txb.object('0x680cd26af32b2bde8d3361e804c53ec1d1cfe24c7f039eb7f549e8dfde389a60'),
            txb.object("0x05"),
            to_add,
        ],
        typeArguments:[
            //"0x549e8b69270defbfafd4f94e17ec44cdbdd99820b33bda2278dea3b9a32d3f55::cert::Metadata<0x549e8b69270defbfafd4f94e17ec44cdbdd99820b33bda2278dea3b9a32d3f55::cert::CERT>"
        ]// type arguments
    });
调用 ptb 发现 typeArguments 并不需要填写,填写了反而报错。不知是何原因。
继续 stake sui 获 afsui
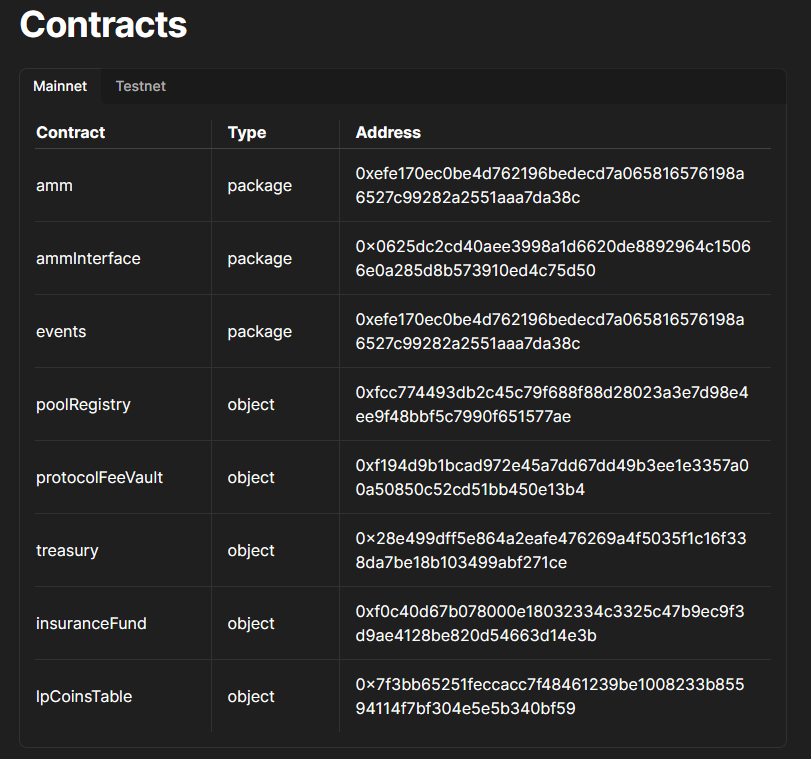
这里官方文档就提供很多了,从他文档里可以看一些列表

感兴趣的同学们可以自己研究一下。
根据文档我们填写相应的参数
    //Stake the SUI from Step 1 to Aftermath Sui Contract
    let stakeaf  = await txb.moveCall({
        target : `0x7f6ce7ade63857c4fd16ef7783fed2dfc4d7fb7e40615abdb653030b76aef0c6::staked_sui_vault::request_stake`,
        arguments: [
            txb.object('0x2f8f6d5da7f13ea37daa397724280483ed062769813b6f31e9788e59cc88994d'),
            txb.object('0xeb685899830dd5837b47007809c76d91a098d52aabbf61e8ac467c59e5cc4610'),
            txb.object("0x05"),
            txb.object("0x4ce9a19b594599536c53edb25d22532f82f18038dc8ef618afd00fbbfb9845ef"),
            extra_coin,
            txb.pure("0xd30018ec3f5ff1a3c75656abf927a87d7f0529e6dc89c7ddd1bd27ecb05e3db2"),

        ],
        typeArguments:[
        ]// type arguments
    });
注意 typeArguments 我也不填,ptb调用的时候会自动补齐这些类型参数。
最后记得把 获得的afsui传回自己账户
txb.transferObjects([stakeaf], sender);调试的时候用 dry run,确认无误后直接调用
await SignAndSubmitTXB(txb, account.client, account.keypair);最后提交文档 注意 截图的时候 不要泄露助记词 !

(未完待续)
Let's Move 中文社区
telegram: https\://t.me/move_cn
QQ群: 79489587
点赞 1
收藏 0
分享
本文参与登链社区写作激励计划 ,好文好收益,欢迎正在阅读的你也加入。
0 条评论
请先 登录 后评论
